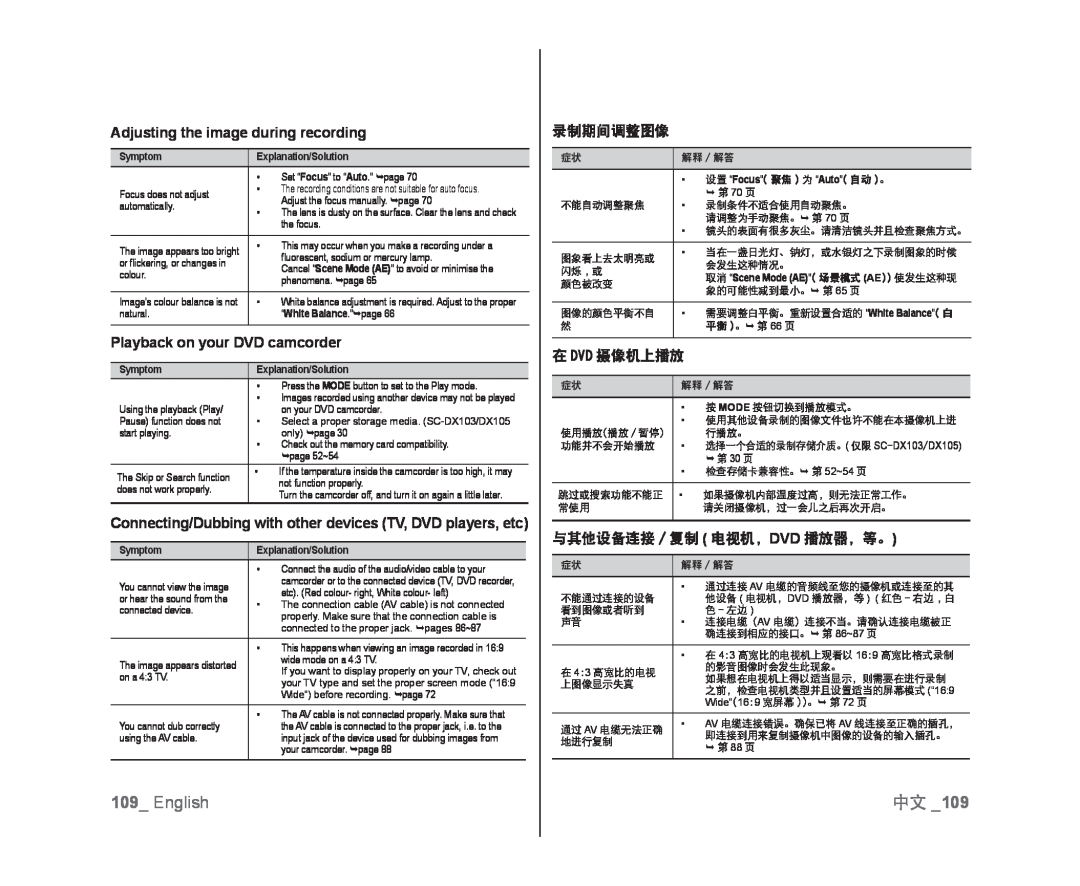
Adjusting the image during recording
Symptom | Explanation/Solution | ||
| • | Set “Focus” to “Auto.” page 70 | |
Focus does not adjust | • | The recording conditions are not suitable for auto focus. | |
| Adjust the focus manually. page 70 | ||
automatically. |
| ||
• | The lens is dusty on the surface. Clear the lens and check | ||
| |||
|
| the focus. | |
|
|
| |
The image appears too bright | • | This may occur when you make a recording under a | |
| fluorescent, sodium or mercury lamp. | ||
or flickering, or changes in |
| ||
| Cancel “Scene Mode (AE)” to avoid or minimise the | ||
colour. |
| ||
| phenomena. page 65 | ||
|
| ||
|
|
| |
Image’s colour balance is not | • | White balance adjustment is required. Adjust to the proper | |
natural. |
| “White Balance.”page 66 | |
|
|
| |
Playback on your DVD camcorder
SymptomExplanation/Solution
| • | Press the MODE button to set to the Play mode. |
Using the playback (Play/ | • | Images recorded using another device may not be played |
| on your DVD camcorder. | |
Pause) function does not | • | Select a proper storage media. |
start playing. |
| only) page 30 |
| • | Check out the memory card compatibility. |
|
| page 52~54 |
The Skip or Search function | • | If the temperature inside the camcorder is too high, it may |
| not function properly. | |
does not work properly. |
| |
| Turn the camcorder off, and turn it on again a little later. | |
|
|
Connecting/Dubbing with other devices (TV, DVD players, etc)
Symptom | Explanation/Solution | ||
| • | Connect the audio of the audio/video cable to your | |
You cannot view the image |
| camcorder or to the connected device (TV, DVD recorder, | |
| etc). (Red colour- right, White colour- left) | ||
or hear the sound from the |
| ||
• | The connection cable (AV cable) is not connected | ||
connected device. | |||
| properly. Make sure that the connection cable is | ||
|
| ||
|
| connected to the proper jack. pages 86~87 | |
|
|
| |
| • | This happens when viewing an image recorded in 16:9 | |
The image appears distorted |
| wide mode on a 4:3 TV. | |
| If you want to display properly on your TV, check out | ||
on a 4:3 TV. |
| ||
| your TV type and set the proper screen mode (“16:9 | ||
|
| ||
|
| Wide”) before recording. page 72 | |
|
|
| |
You cannot dub correctly | • | The AV cable is not connected properly. Make sure that | |
| the AV cable is connected to the proper jack, i.e. to the | ||
using the AV cable. |
| input jack of the device used for dubbing images from | |
|
| your camcorder. page 88 | |
录制期间调整图像
症状 | 解释 / 解答 | |
|
| |
| • 设置 “Focus”( 聚焦 ) 为 “Auto”( 自动 )。 | |
| • | 第 70 页 |
不能自动调整聚焦 | 录制条件不适合使用自动聚焦。 | |
| • | 请调整为手动聚焦。 第 70 页 |
| 镜头的表面有很多灰尘。请清洁镜头并且检查聚焦方式。 | |
|
|
|
图象看上去太明亮或 | • | 当在一盏日光灯、钠灯,或水银灯之下录制图象的时候 |
| 会发生这种情况。 | |
闪烁 , 或 |
| |
| 取消 “Scene Mode (AE)”( 场景模式 (AE)) 使发生这种现 | |
颜色被改变 |
| |
| 象的可能性减到最小。 第 65 页 | |
|
| |
|
|
|
图像的颜色平衡不自 | • | 需要调整白平衡。重新设置合适的 “White Balance”( 白 |
然 |
| 平衡 )。 第 66 页 |
|
|
|
在 DVD 摄像机上播放 |
| |
|
| |
症状 | 解释 / 解答 | |
|
|
|
| • | 按 MODE 按钮切换到播放模式。 |
| • | 使用其他设备录制的图像文件也许不能在本摄像机上进 |
使用播放(播放 / 暂停) |
| 行播放。 |
功能并不会开始播放 | • | 选择一个合适的录制存储介质。( 仅限 |
|
| 第 30 页 |
| • 检查存储卡兼容性。 第 52~54 页 | |
|
|
|
跳过或搜索功能不能正 | • | 如果摄像机内部温度过高,则无法正常工作。 |
常使用 |
| 请关闭摄像机,过一会儿之后再次开启。 |
|
|
|
与其他设备连接 / 复制 ( 电视机,DVD 播放器,等。)
症状解释 / 解答
| • | 通过连接 AV 电缆的音频线至您的摄像机或连接至的其 |
不能通过连接的设备 |
| 他设备 ( 电视机,DVD 播放器,等 ) ( 红色 - 右边 , 白 |
看到图像或者听到 |
| 色 - 左边 ) |
声音 | • | 连接电缆(AV 电缆)连接不当。请确认连接电缆被正 |
|
| 确连接到相应的接口。 第 86~87 页 |
|
| |
| • 在 4:3 高宽比的电视机上观看以 16:9 高宽比格式录制 | |
在 4:3 高宽比的电视 |
| 的影音图像时会发生此现象。 |
| 如果想在电视机上得以适当显示,则需要在进行录制 | |
上图像显示失真 |
| |
| 之前,检查电视机类型并且设置适当的屏幕模式 (“16:9 | |
|
| |
|
| Wide”(16:9 宽屏幕 ))。 第 72 页 |
|
|
|
通过 AV 电缆无法正确 | • | AV 电缆连接错误。确保已将 AV 线连接至正确的插孔, |
| 即连接到用来复制摄像机中图像的设备的输入插孔。 | |
地进行复制 |
| |
| 第 88 页 | |
|
| |
109_ English | 中文 _109 |
