 HMX-QF30/HMX-QF33
HMX-QF300/HMX-QF310/HMX-QF320
www.samsung.com/register
 Important safety instructions
 Important safety instructions
 Important safety instructions
 Important safety instructions
USER INSTALLER CAUTION:
NOTE:
CALIFORNIA USA ONLY
NOTE:
FCC Warning
(1)This device may not cause harmful interference, and
 Before reading this user manual
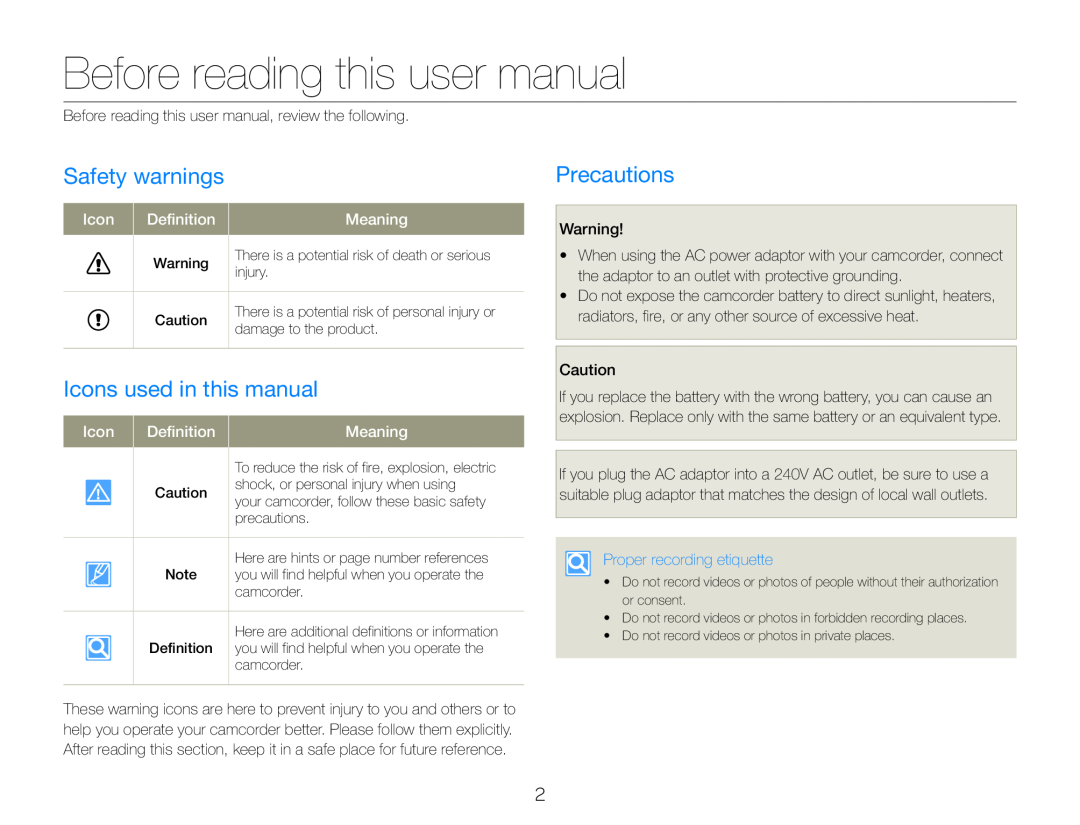
Safety warnings
Icons used in this manual
Precautions
 Before reading this user manual
Important information on use
About this user manual
Before using this camcorder
 Notes regarding trademarks
 Safety information
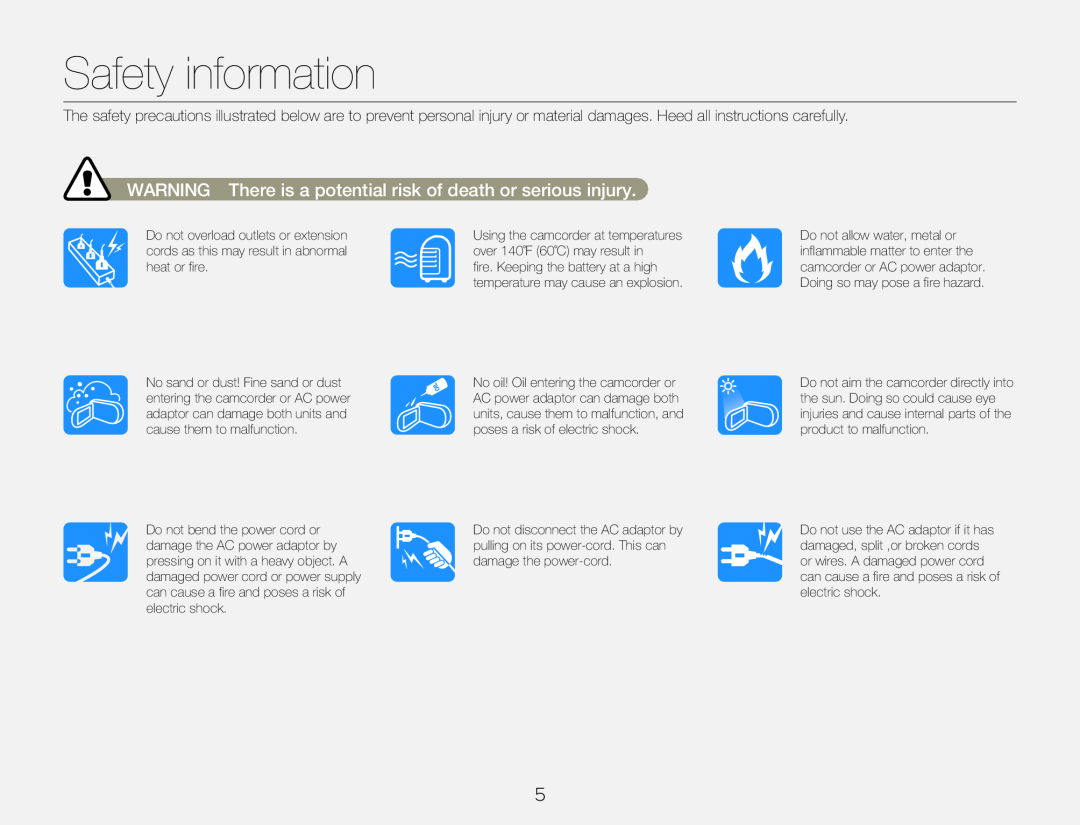
WARNING There is a potential risk of death or serious injury
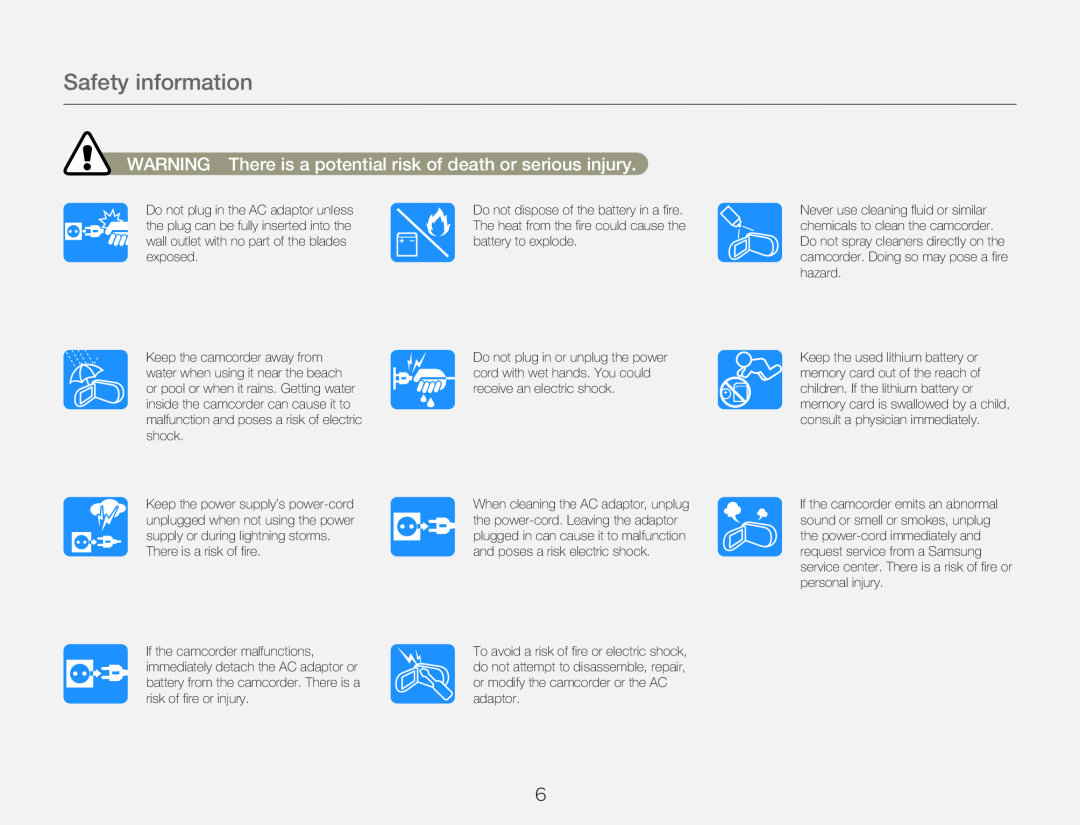 Safety information
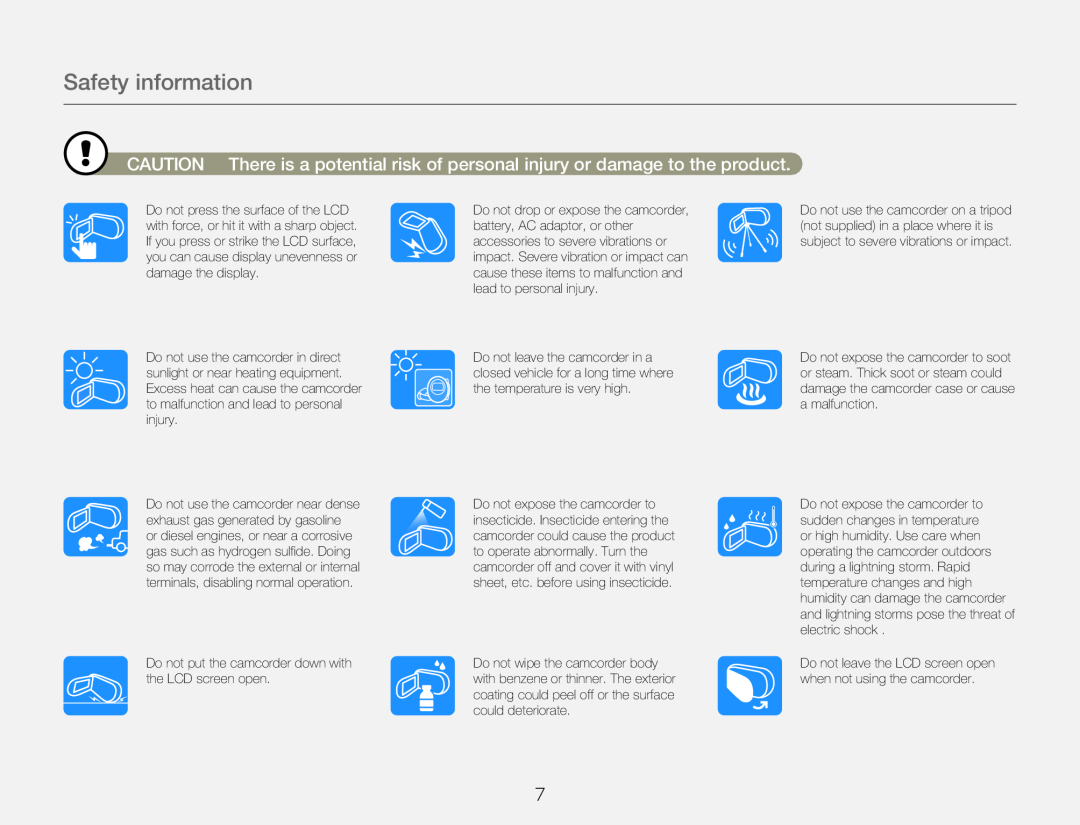 CAUTION There is a potential risk of personal injury or damage to the product
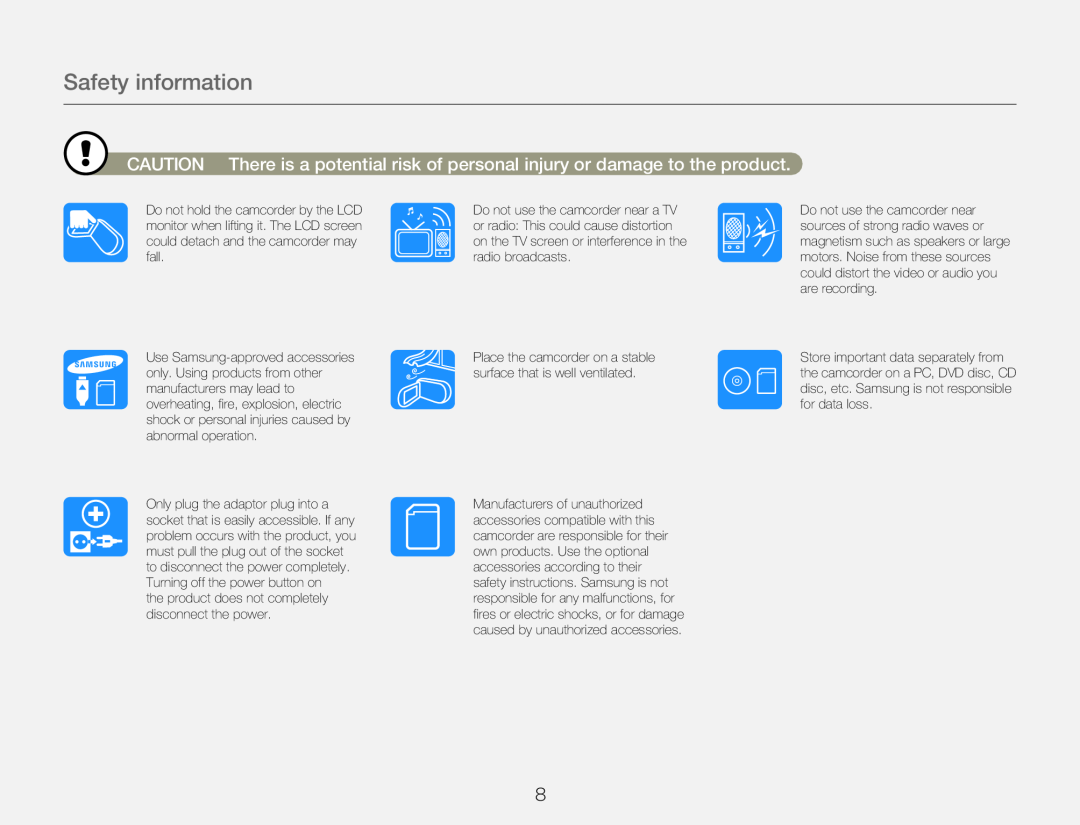 Safety information
CAUTION There is a potential risk of personal injury or damage to the product
 Contents
Getting Started
Unpacking
Camcorder layout
Inserting/Ejecting the battery and memory card
Charging the battery
Turning your camcorder on/off
Using the touch screen
Performing the initial setup
Selecting the language
Learning icons
Using the Home screen
Using the grip belt
Basic functions
Recording videos
Recording photos
Zooming
Extended functions
Using the Manual modes
Using the Art Film modes
Using the Art Time Lapse mode
Playback/Editing
Viewing videos or photos in playback mode
Editing videos or photos
 Contents
Wireless network
Sending videos or photos to a smart phone
Using video or photo sharing web sites
Using Auto Backup to send videos or photos
About the Wakeup on LAN (WOL) feature
Using with other devices
Connecting to a TV
Settings
Appendixes
 Getting Started
Learn about your camcorder’s layout, icons, and home screen
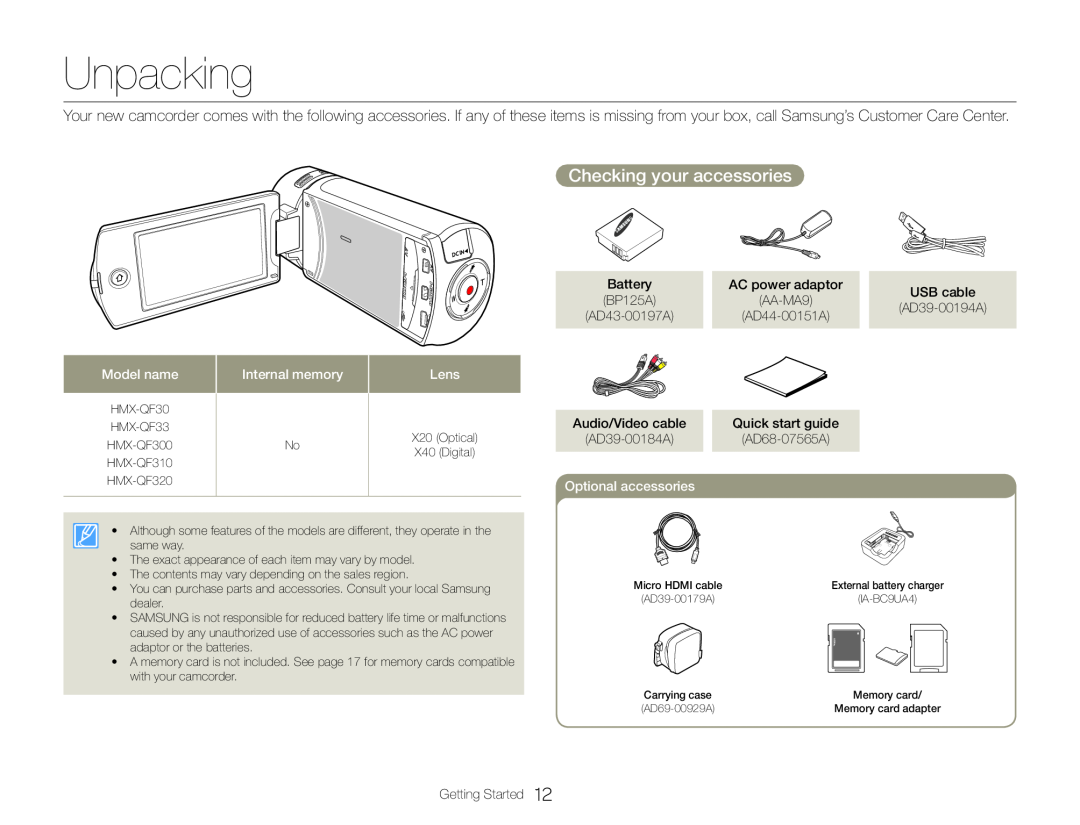 Unpacking
Checking your accessories
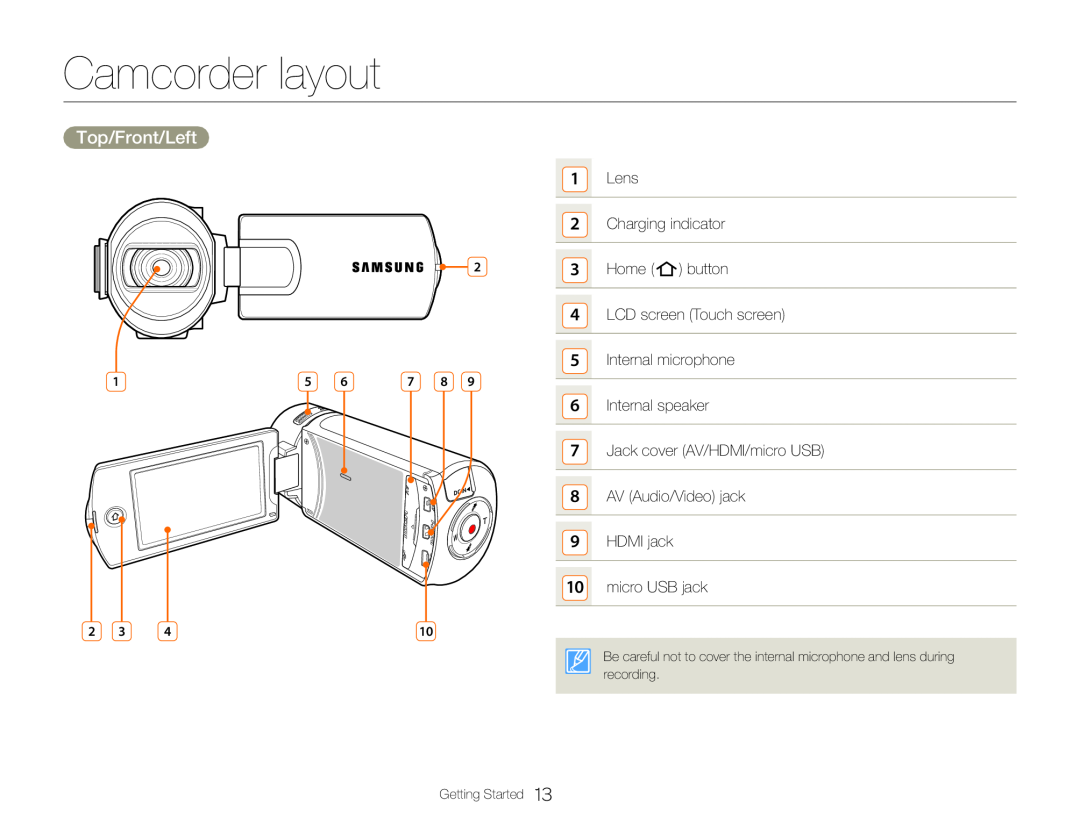 Camcorder layout
Top/Front/Left
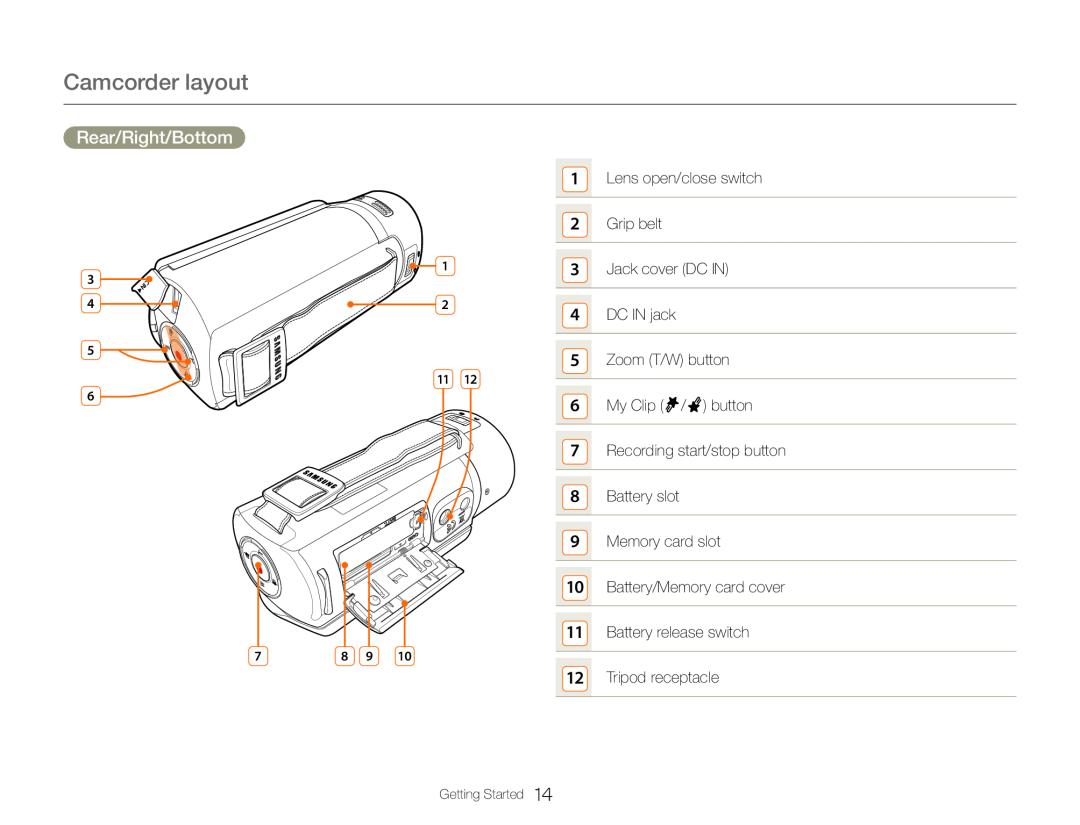 Camcorder layout
Rear/Right/Bottom
 Inserting/Ejecting the battery and memory card
Inserting/ejecting the battery
To insert the battery
1 Slide, and then open the battery slot cover as shown in the figure
2 Insert the battery into the battery slot until it locks
3 Close the battery slot cover
To eject the battery
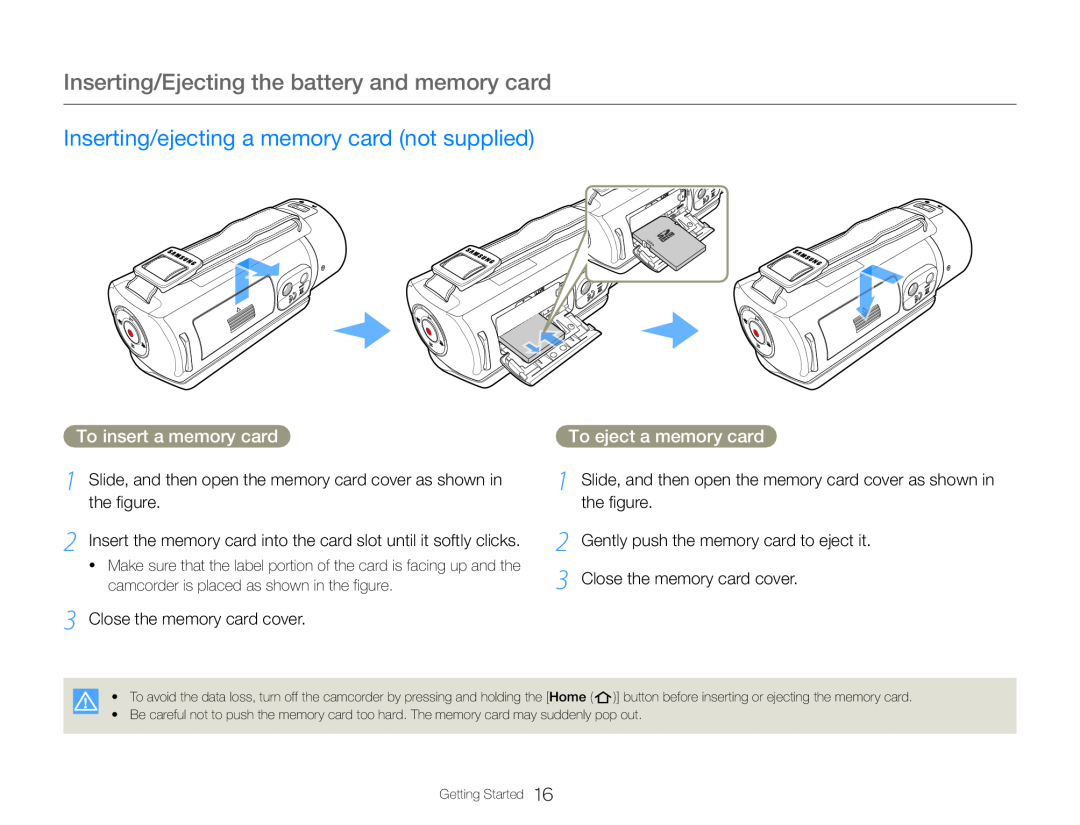 Inserting/ejecting a memory card (not supplied)
To insert a memory card
1 Slide, and then open the memory card cover as shown in the figure
2 Insert the memory card into the card slot until it softly clicks
3 Close the memory card cover
To eject a memory card
2 Gently push the memory card to eject it
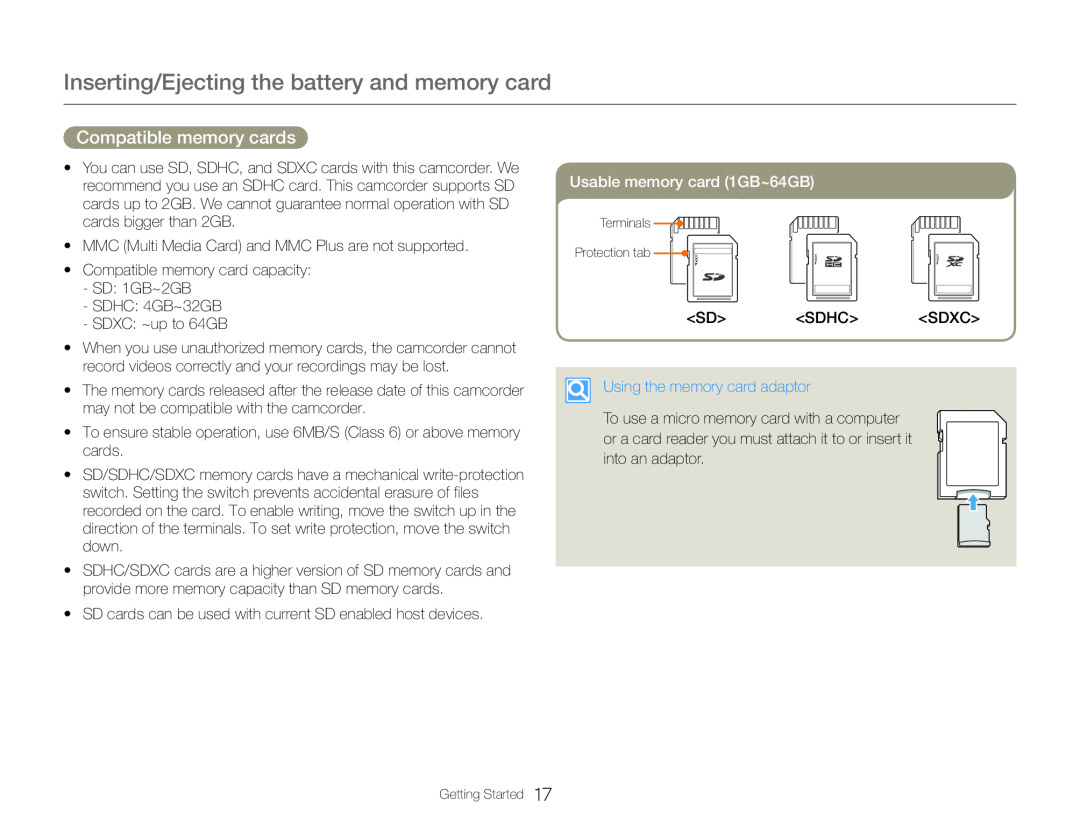 Compatible memory cards
 Handling a memory card
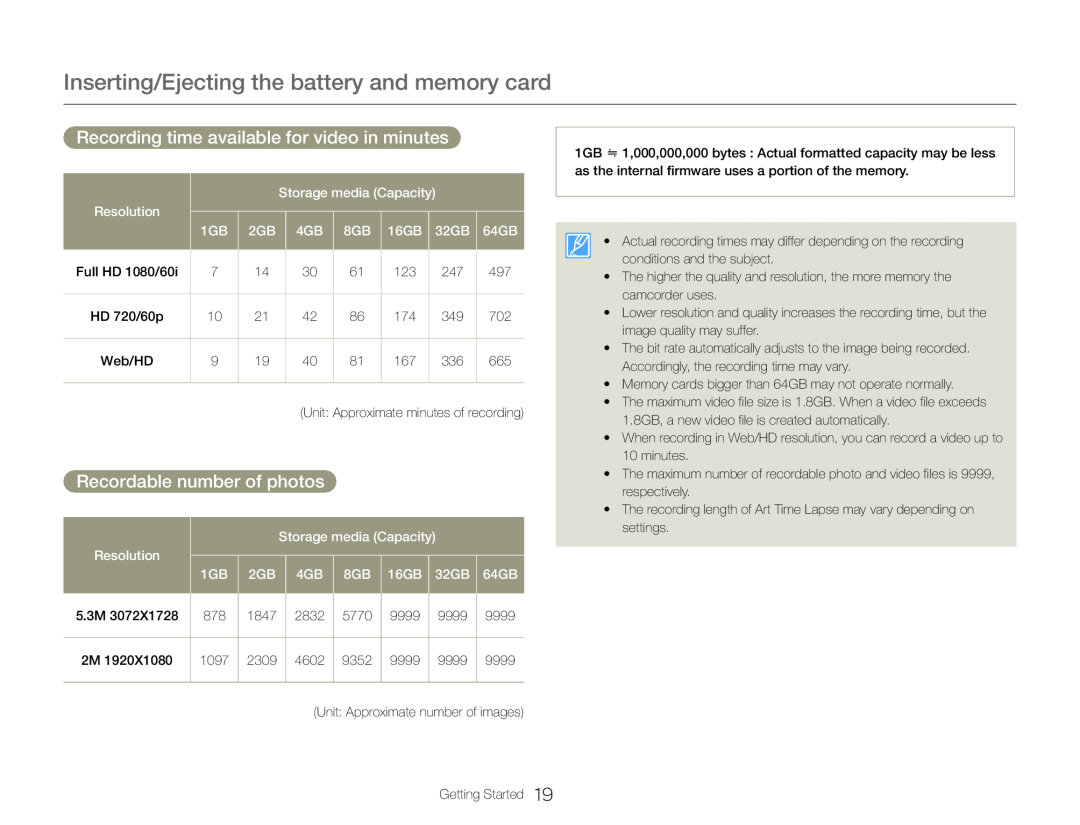 Recording time available for video in minutes
Recordable number of photos
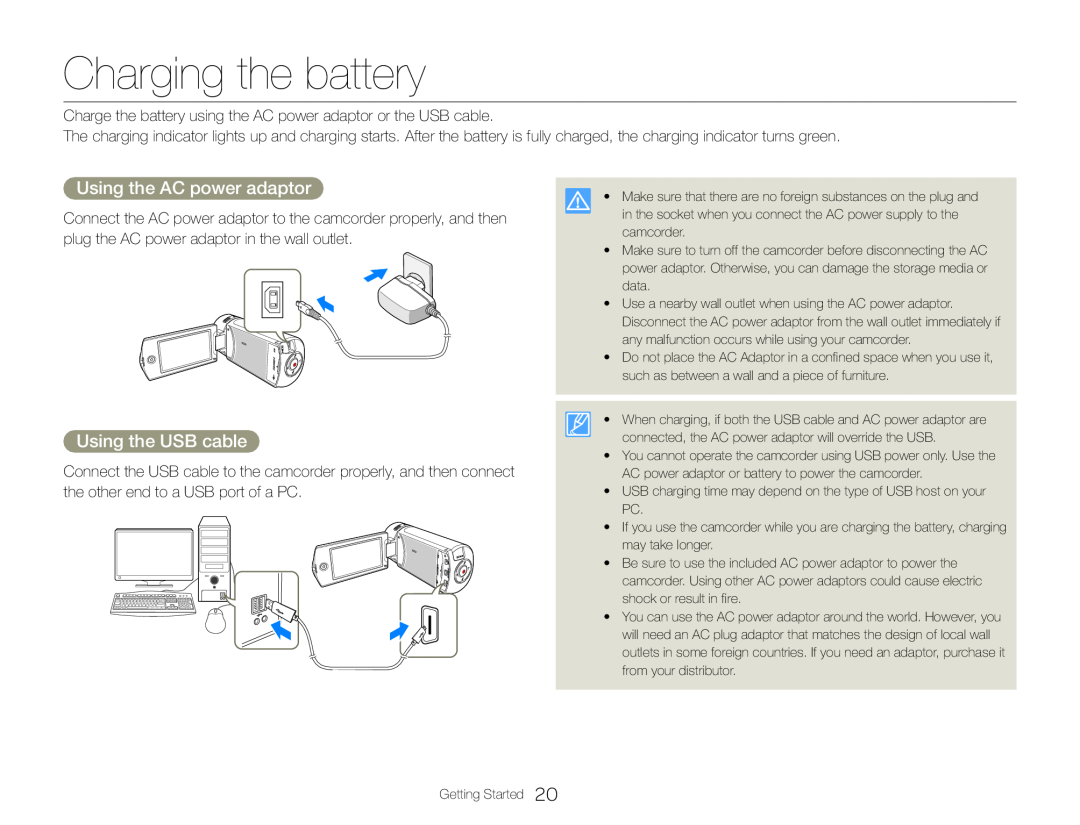 Charging the battery
Using the AC power adaptor
Using the USB cable
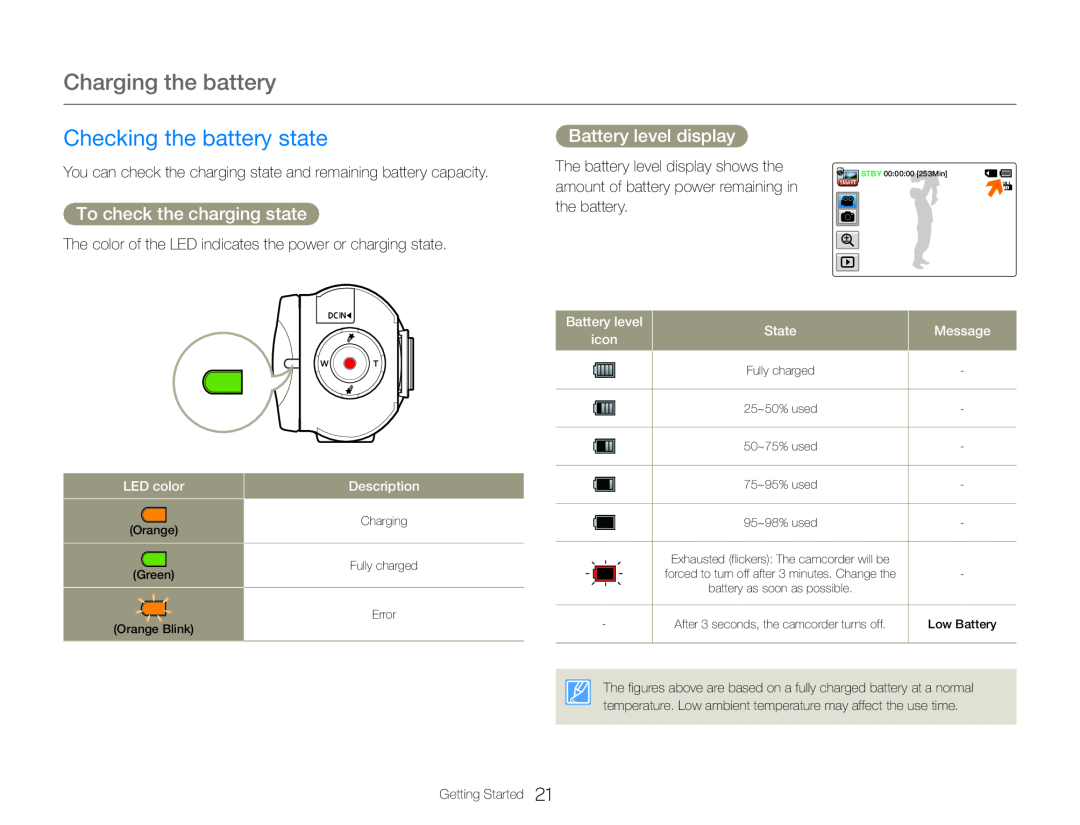 Checking the battery state
To check the charging state
Battery level display
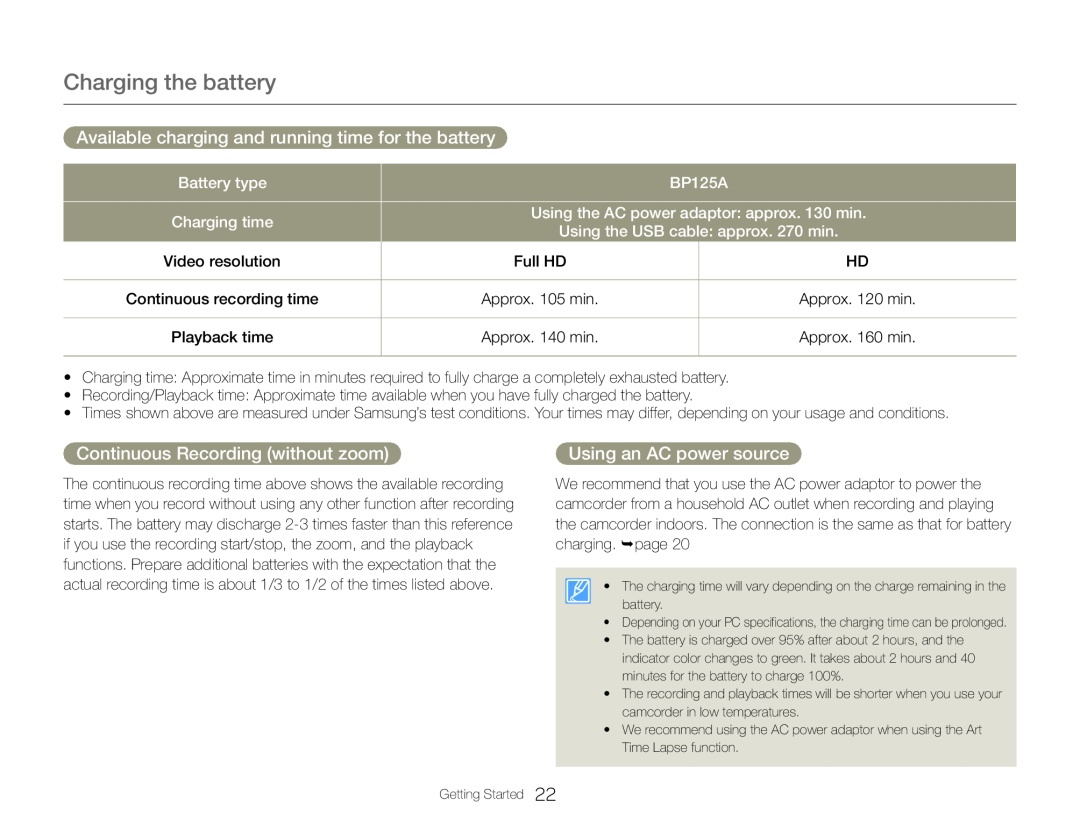 Available charging and running time for the battery
Continuous Recording (without zoom)
Using an AC power source
 About the battery
![1 Turn on the camcorder by opening the LCD screen 2 To turn off the camcorder, press and hold the [Home ( )] button](/images/prints/7709/28.1080.webp) Turning your camcorder on/off
Turning your camcorder on/off1 Turn on the camcorder by opening the LCD screen
2 To turn off the camcorder, press and hold the [Home ( )] button
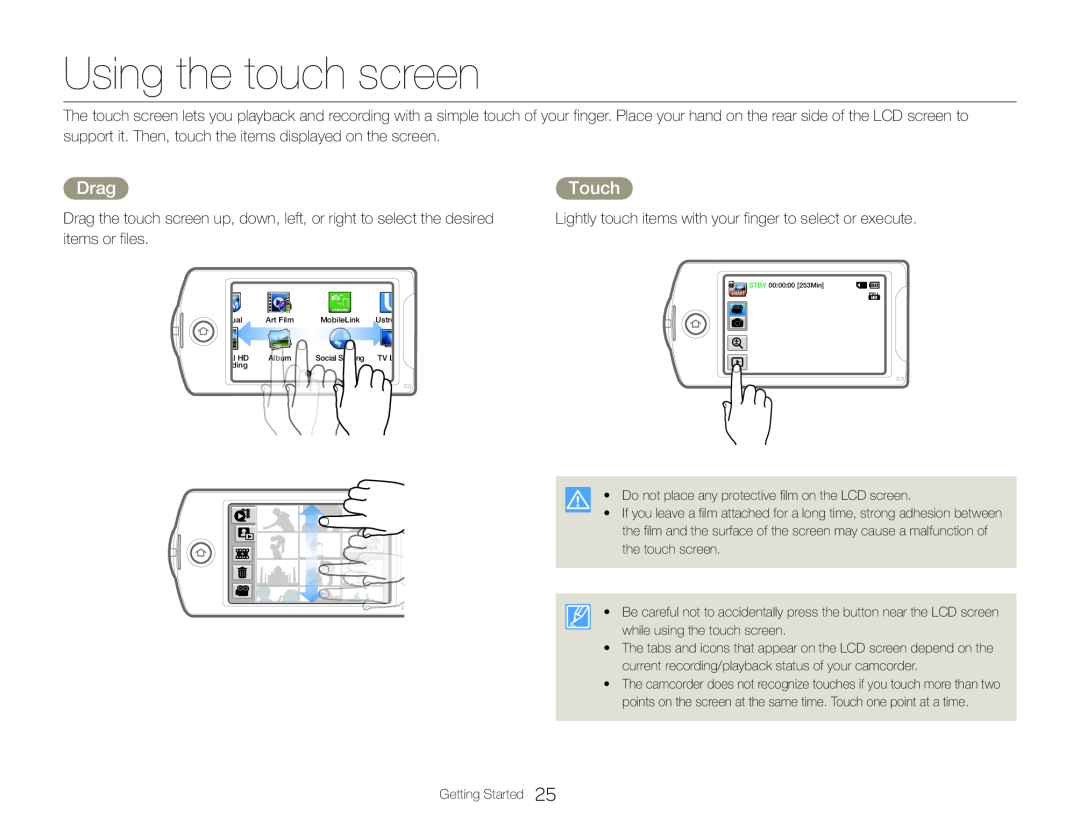 Using the touch screen
Drag
Touch
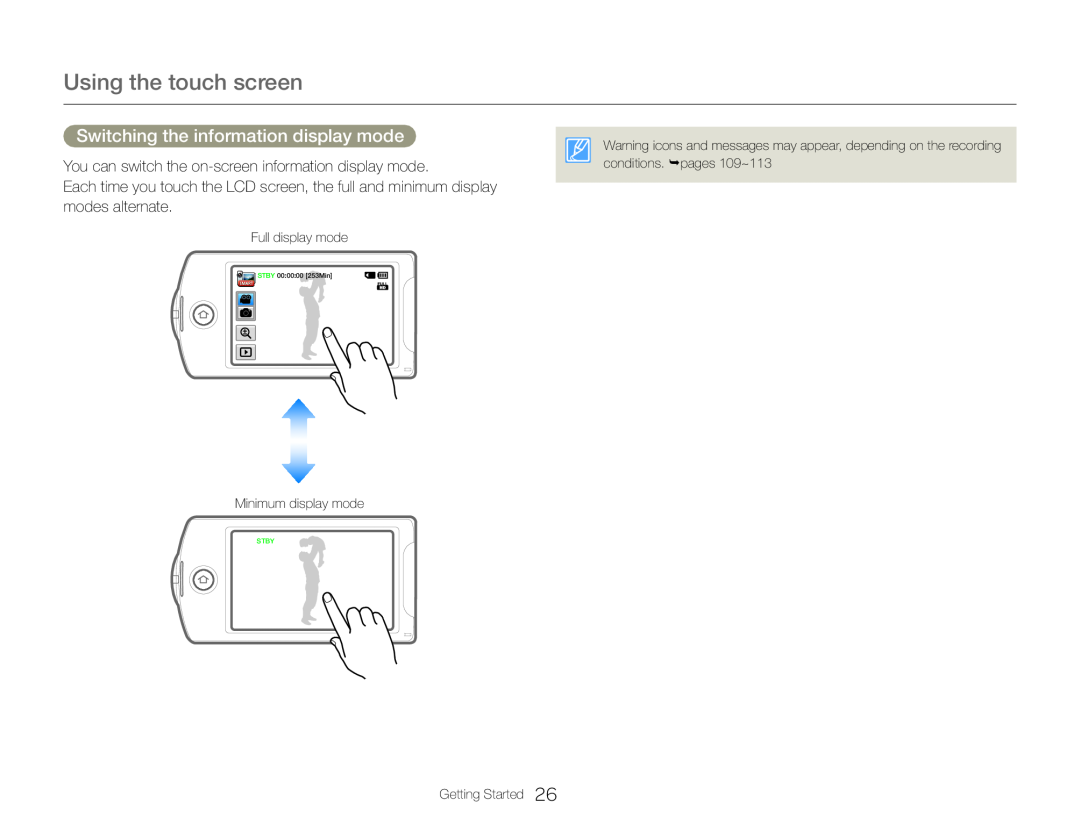 Switching the information display mode
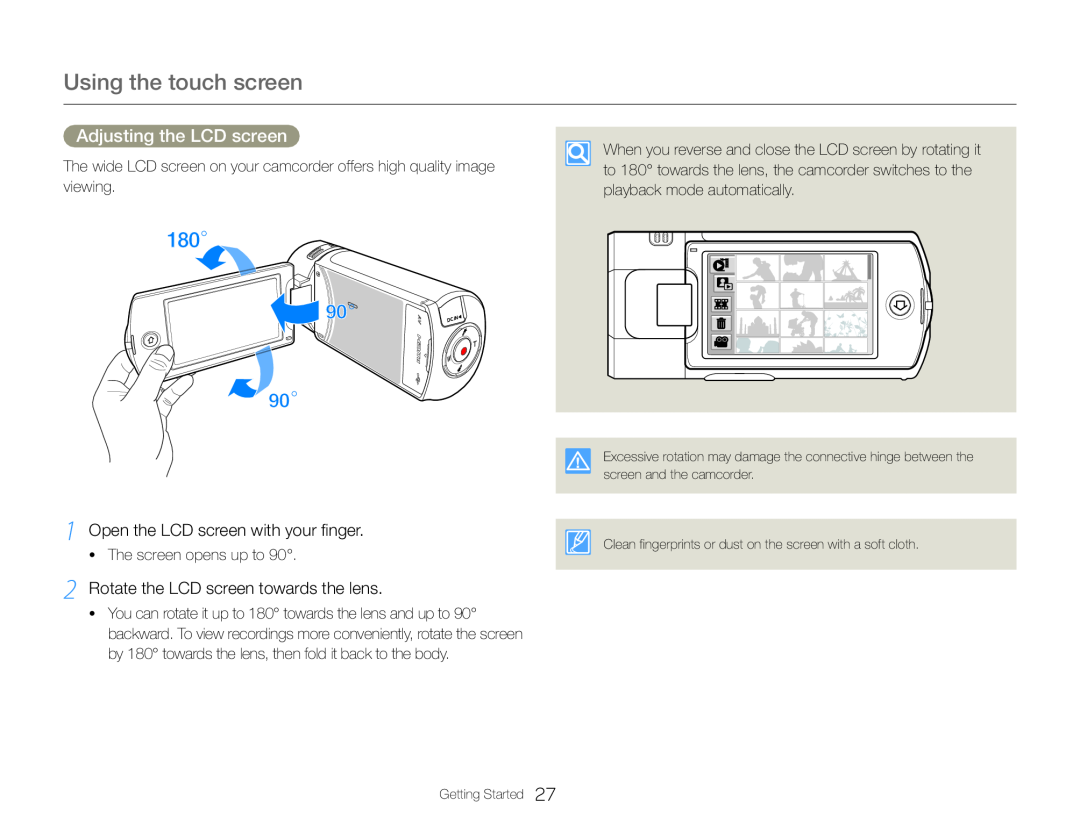 Adjusting the LCD screen
1 Open the LCD screen with your finger
2 Rotate the LCD screen towards the lens
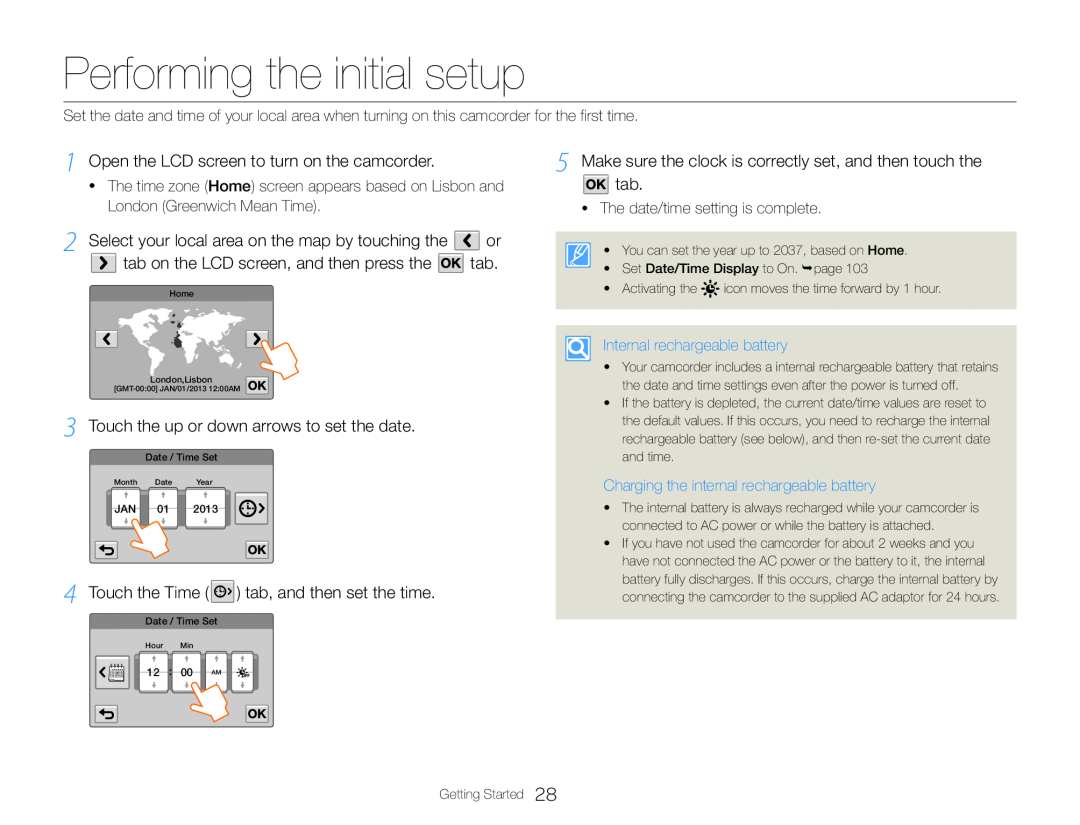 Performing the initial setup
1 Open the LCD screen to turn on the camcorder
3 Touch the up or down arrows to set the date
4 Touch the Time ( ) tab, and then set the time
5 Make sure the clock is correctly set, and then touch the tab
![1 Press the [Home ( )] button, and then drag the Home screen left 3 Touch the desired language](/images/prints/7709/33.1080.webp) Selecting the language
Selecting the language1 Press the [Home ( )] button, and then drag the Home screen left
3 Touch the desired language
4 Touch the Return ( ) tab to complete the setting
2 Touch Settings General Language
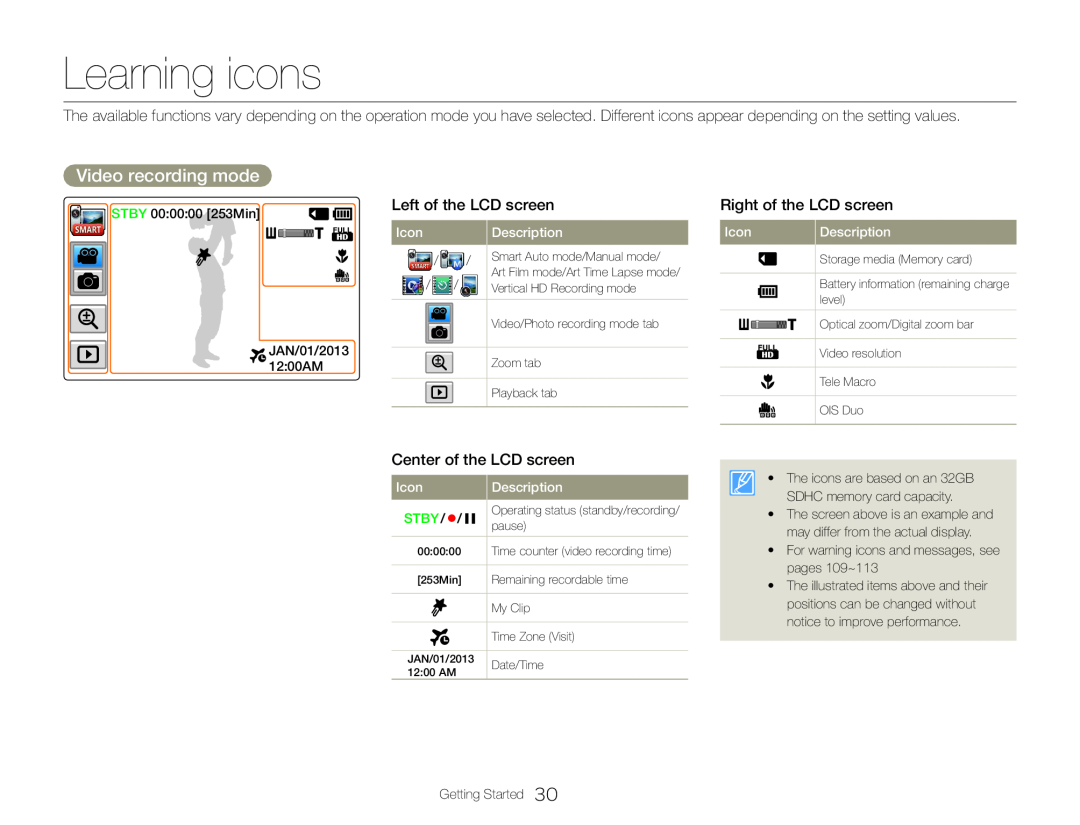 Learning icons
Video recording mode
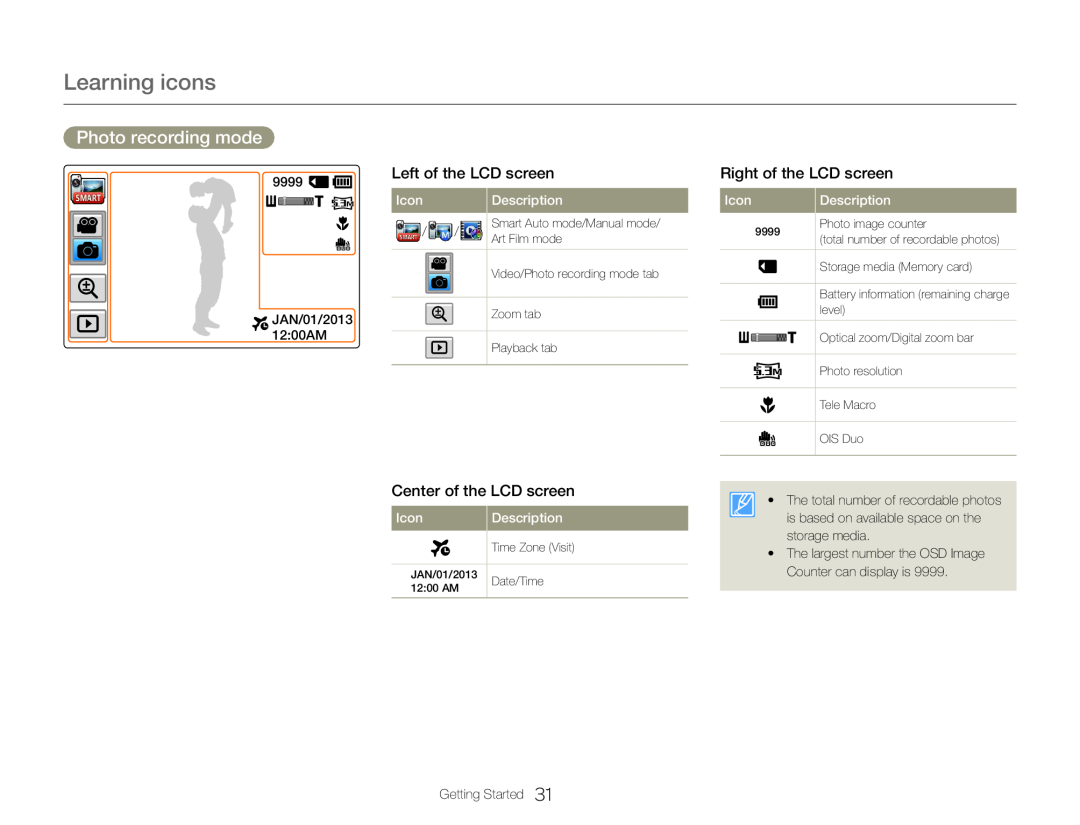 Photo recording mode
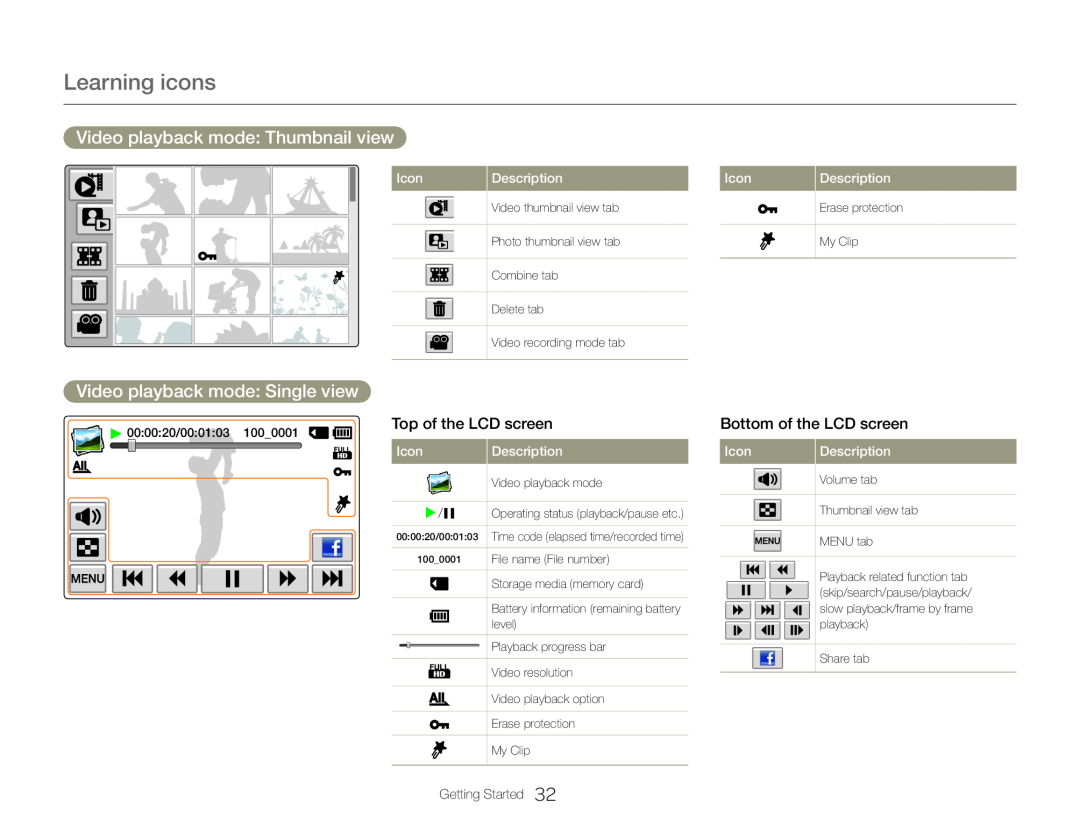 Video playback mode: Thumbnail view
Video playback mode: Single view
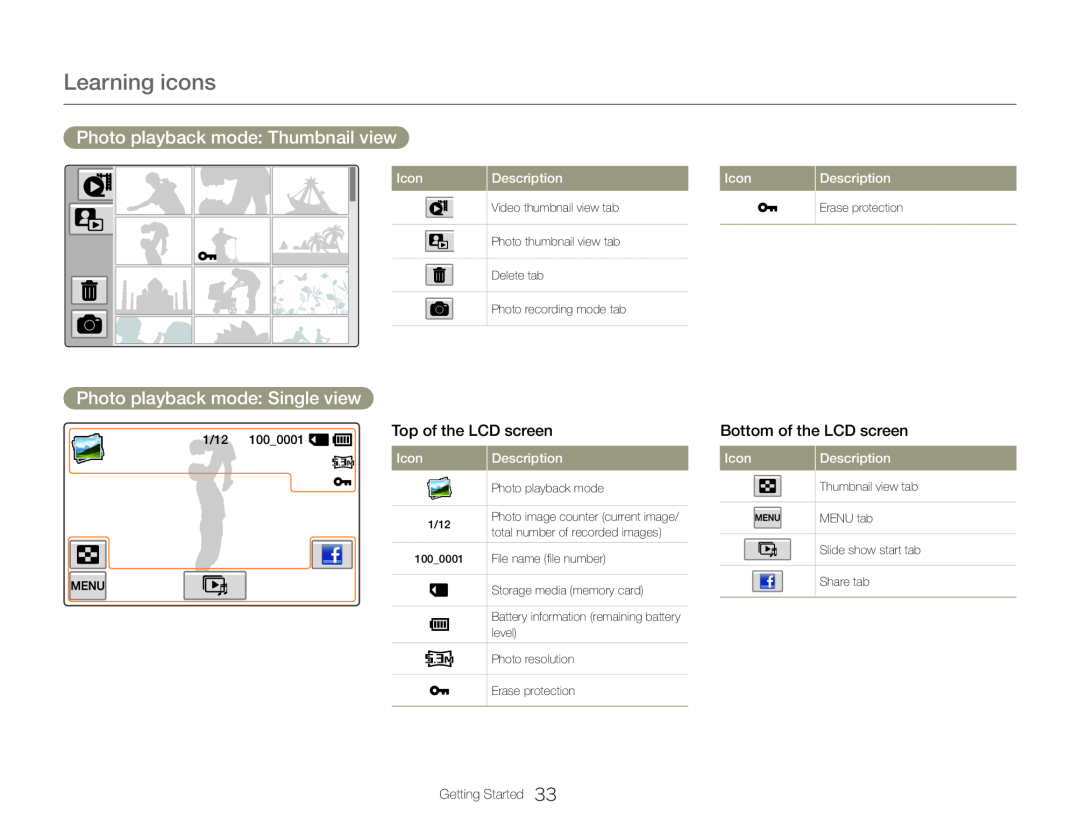 Photo playback mode: Thumbnail view
Photo playback mode: Single view
 Using the Home screen
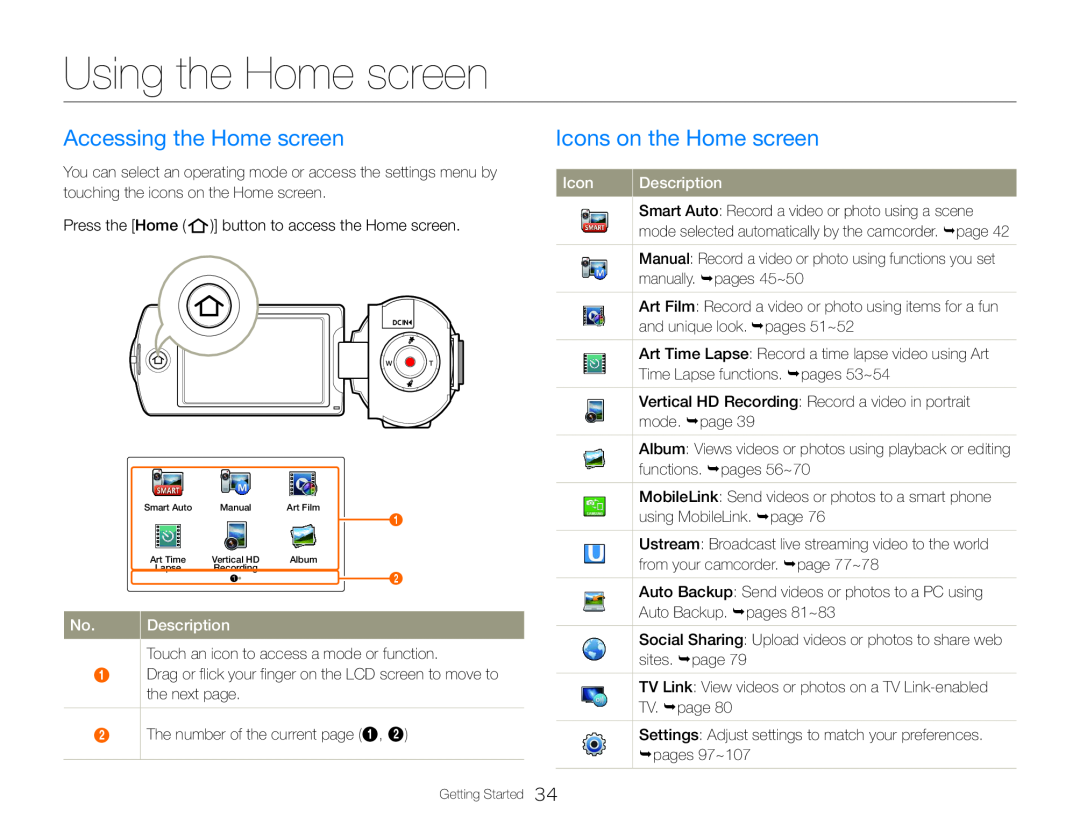
Accessing the Home screen
Icons on the Home screen
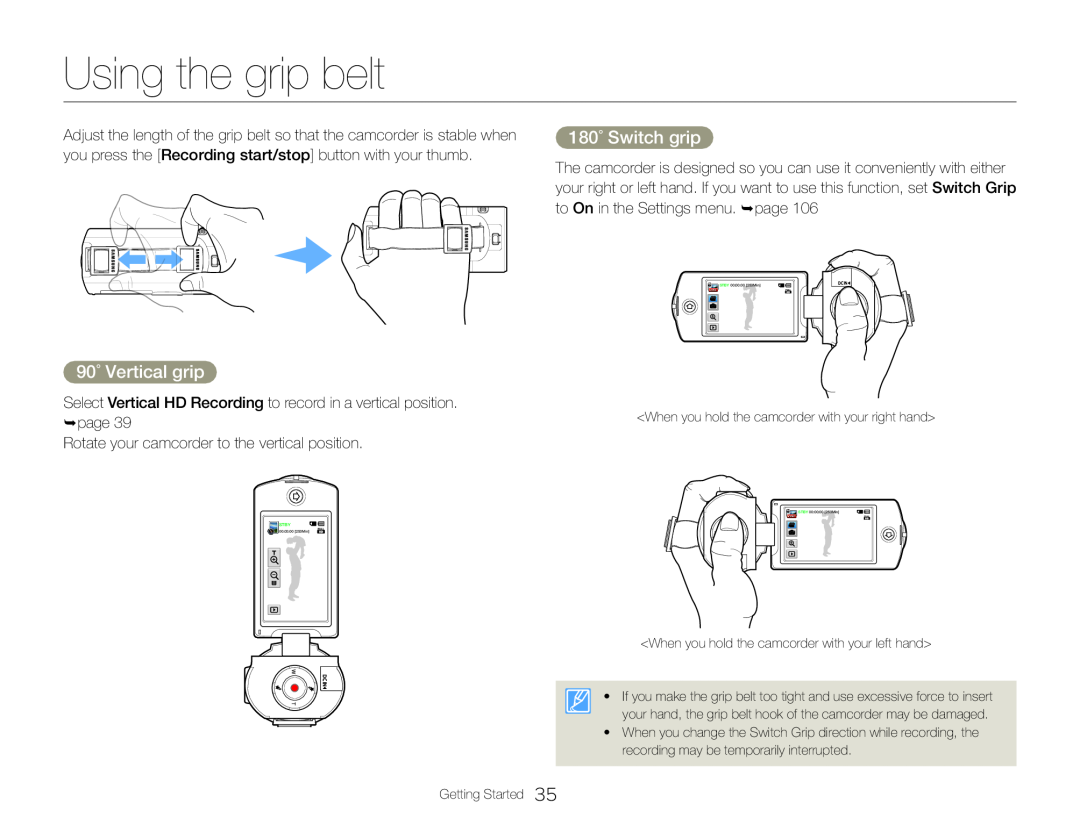 Using the grip belt
180˚ Switch grip
90˚ Vertical grip
 Basic functions
Learn about basic functions for video and photo shooting
Recording with ease for beginners (SMART AUTO)
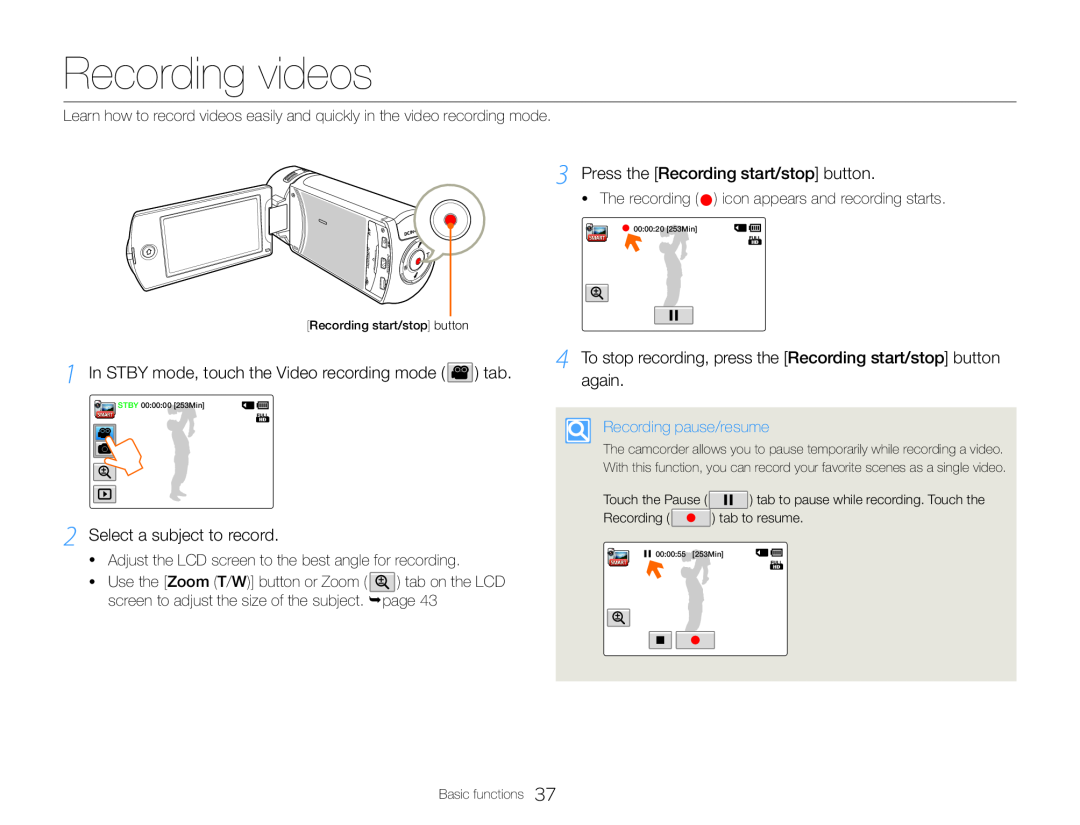 Recording videos
1 In STBY mode, touch the Video recording mode ( ) tab
2 Select a subject to record
Press the [Recording start/stop] button
To stop recording, press the [Recording start/stop] button again
 Recording videos
•Note that damaged data cannot be recovered
• Videos are compressed in the H.264 (MPEG-4.AVC)format
•For the on-screeninformation display, see page
•For approximate recording time, see page
•For various functions available during recording, see pages 45~54
•The [Home ( )] button cannot be used during video recording
Basic functions
![1 Press the [Home ( )] button touch Vertical HD Recording 3 Select a subject to record](/images/prints/7709/43.1080.webp) Recording videos in portrait mode
Recording videos in portrait mode1 Press the [Home ( )] button touch Vertical HD Recording
3 Select a subject to record
4 Press the [Recording start/stop] button
2 Rotate the camcorder to 90º for vertical recording
5 To stop recording, press the [Recording start/stop] button again
![again 3 Press the [Recording start/stop] button](/images/prints/7709/44.1080.webp) Tagging great moments while recording (My Clip function)
Tagging great moments while recording (My Clip function)again
3 Press the [Recording start/stop] button
4 Press the [My Clip ( )] button every great moment while recording
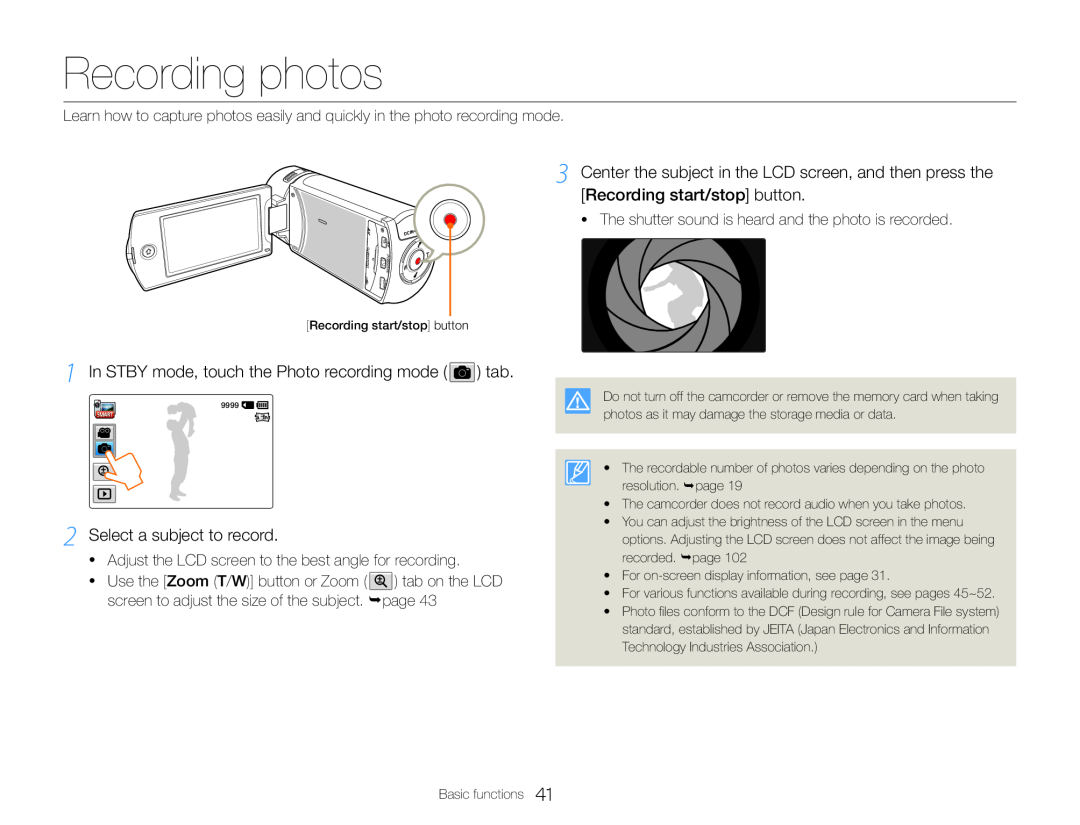 Recording photos
1 In STBY mode, touch the Photo recording mode ( ) tab
![1 Press the [Home ( )] button touch Smart Auto 2 Align your subject in the frame](/images/prints/7709/46.1080.webp) Recording with ease for beginners (SMART AUTO)
Recording with ease for beginners (SMART AUTO)1 Press the [Home ( )] button touch Smart Auto
2 Align your subject in the frame
3 To record the video or photo, press the [Recording start/ stop] button
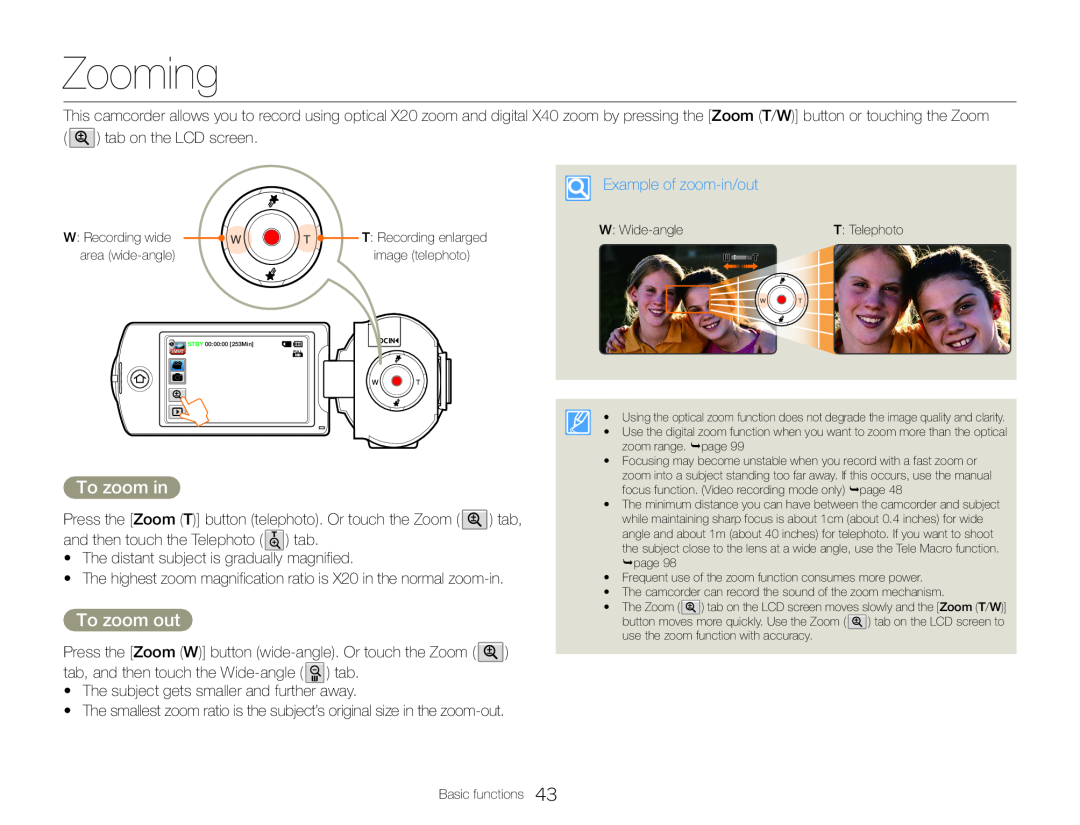 Zooming
To zoom in
To zoom out
 Extended functions
Learn how to record a video and photo by selecting a mode
![1 In Manual mode, touch White Balance ( ) tab Custom WB ( ) tab 1 Press the [Home ( )] button touch Manual White Balance ( ) tab](/images/prints/7709/49.1080.webp) Using the Manual modes
Using the Manual modesWhite Balance
To set the white balance manually
1 In Manual mode, touch White Balance ( ) tab Custom WB ( ) tab
1 Press the [Home ( )] button touch Manual White Balance ( ) tab
2 Touch the desired submenu item
2 Fill the screen with a white object, and then touch the tab
![1 Press the [Home ( )] button touch Manual EV ( ) tab 2 Touch the / tab to adjust the setting values](/images/prints/7709/50.1080.webp) EV (Exposure Value)
EV (Exposure Value)1 Press the [Home ( )] button touch Manual EV ( ) tab
2 Touch the / tab to adjust the setting values
![1 Press the [Home ( )] button touch Manual Back Light ( ) tab Back Light](/images/prints/7709/51.1080.webp) Back Light
Back Light1 Press the [Home ( )] button touch Manual Back Light ( ) tab
![1 In STBY mode, touch the Video recording mode ( ) tab 2 Press the [Home ( )] button touch Manual ](/images/prints/7709/52.1080.webp) Focus
Focus1 In STBY mode, touch the Video recording mode ( ) tab
2 Press the [Home ( )] button touch Manual
Focus
) tab
3 Touch the desired submenu item
![2 Press the [Home )] button touch Manual ](/images/prints/7709/53.1080.webp) Super C.Nite
Super C.Nite2 Press the [Home
)] button touch Manual
Super C. Nite
![2 Press the [Home ( )] button touch Manual Self Timer ( ) tab 2 Press the [Home ( )] button touch Manual Cont. Shot ( ) tab](/images/prints/7709/54.1080.webp) Self Timer
Self TimerCont. Shot
2 Press the [Home ( )] button touch Manual Self Timer ( ) tab
2 Press the [Home ( )] button touch Manual Cont. Shot ( ) tab
![2 Press the [Home ( )] button touch Art Film Fader ( ) tab Fader](/images/prints/7709/55.1080.webp) Using the Art Film modes
Using the Art Film modesFader
2 Press the [Home ( )] button touch Art Film Fader ( ) tab
![1 Press the [Home ( )] button touch Art Film Using the Art Film modes](/images/prints/7709/56.1080.webp) Using the Art Film modes
Using the Art Film modesDigital Effect
1 Press the [Home ( )] button touch Art Film
![1 Press the [Home ( )] button touch Art Time Lapse. 2 Touch the desired menu 5 Touch the desired submenu item](/images/prints/7709/57.1080.webp) Using the Art Time Lapse mode
Using the Art Time Lapse mode1 Press the [Home ( )] button touch Art Time Lapse. 2 Touch the desired menu
5 Touch the desired submenu item
 Using the Art Time Lapse mode
 Playback/Editing
Learn how to play back and edit videos and photos
 Viewing videos or photos in playback mode
Starting the playback mode
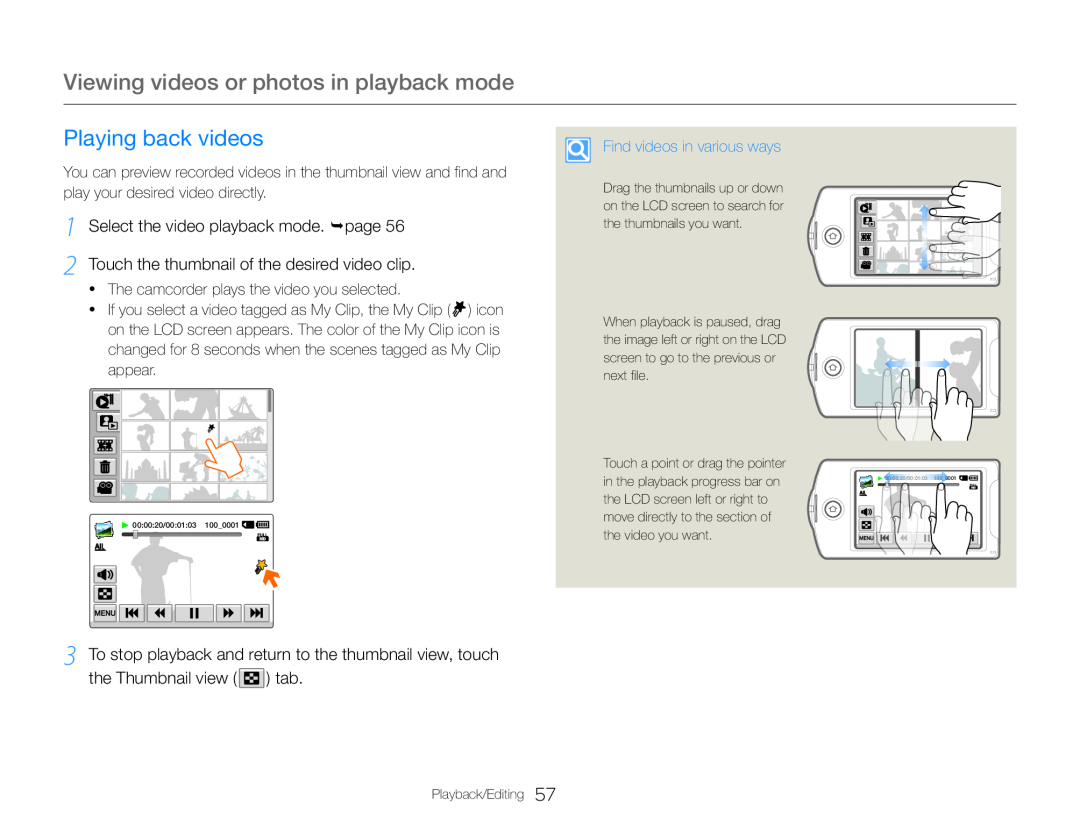 Playing back videos
1 Select the video playback mode. page
2 Touch the thumbnail of the desired video clip
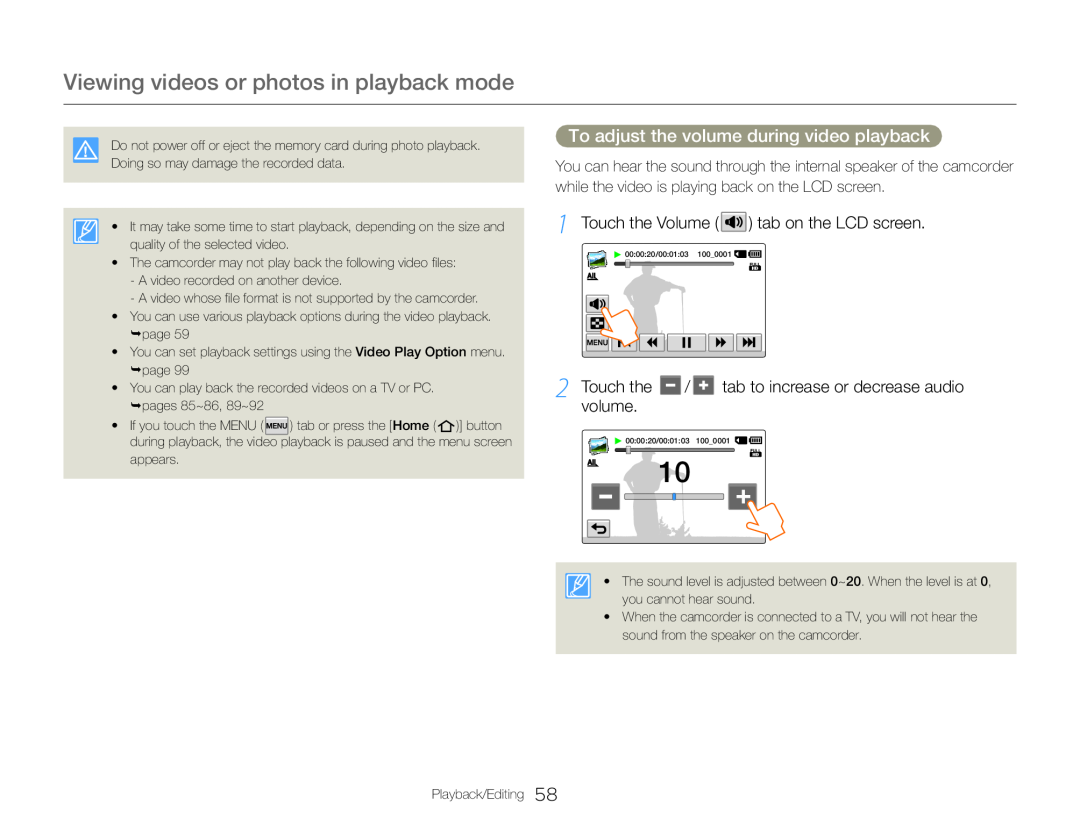 To adjust the volume during video playback
1 Touch the Volume ( ) tab on the LCD screen
2 Touch the / tab to increase or decrease audio volume
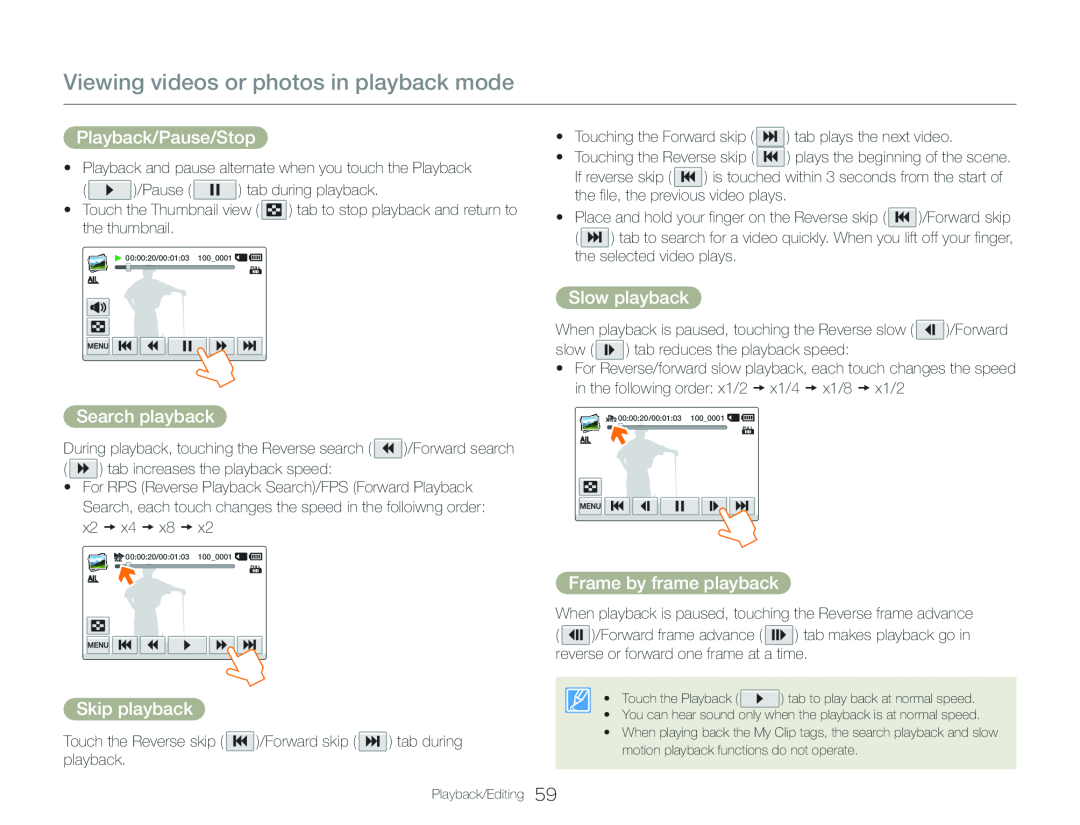 Playback/Pause/Stop
Search playback
Skip playback
Slow playback
Frame by frame playback
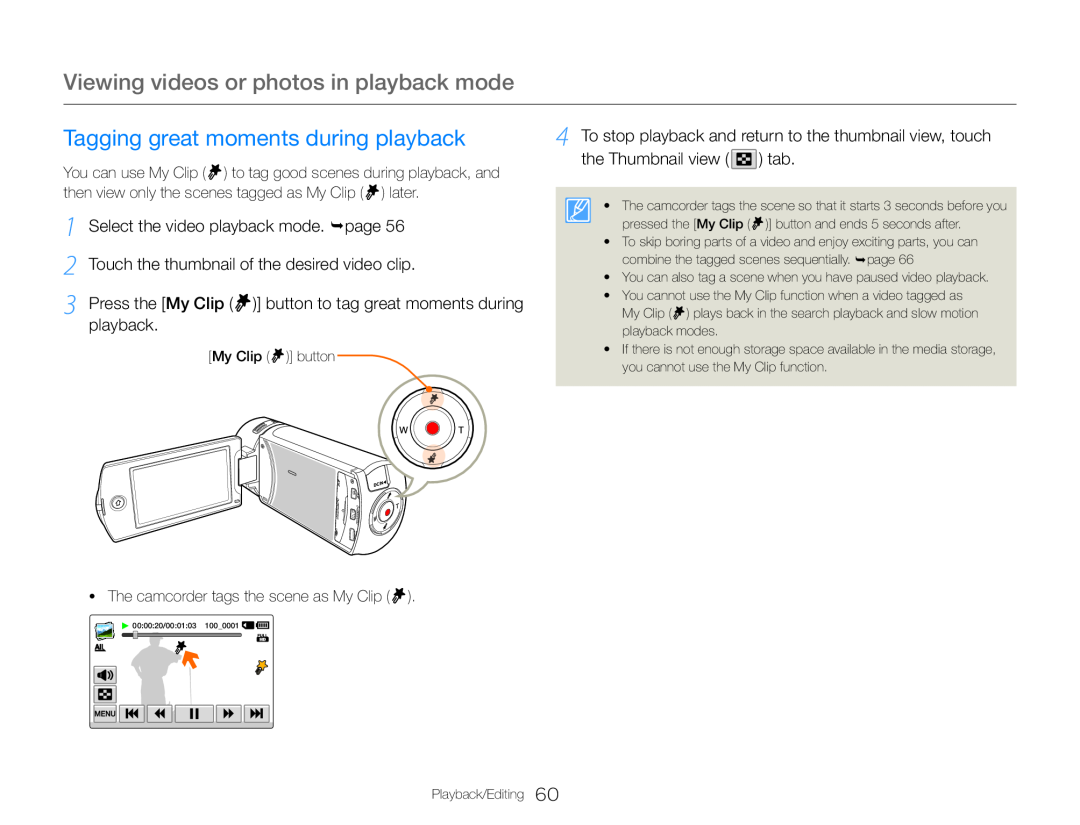 Tagging great moments during playback
4 To stop playback and return to the thumbnail view, touch
the Thumbnail view
Select the video playback mode. page
Touch the thumbnail of the desired video clip
Press the [My Clip ( )] button to tag great moments during
playback
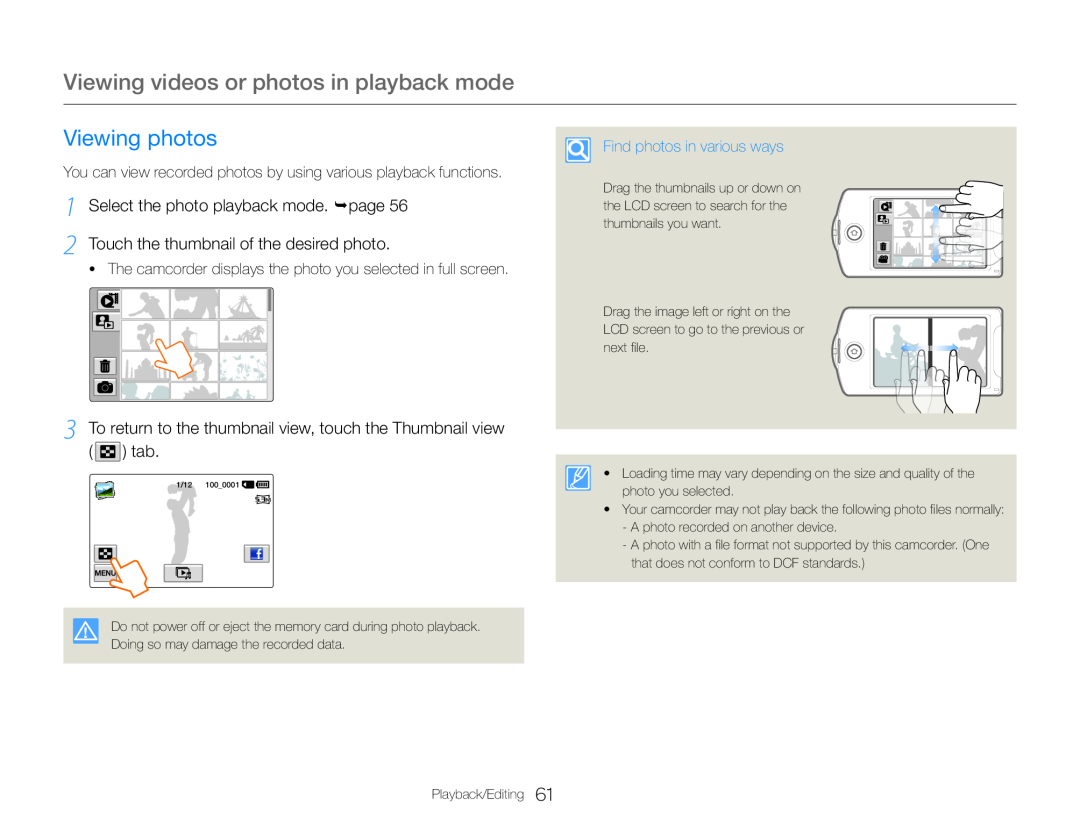 Viewing photos
1 Select the photo playback mode. page
2 Touch the thumbnail of the desired photo
3 To return to the thumbnail view, touch the Thumbnail view ( ) tab
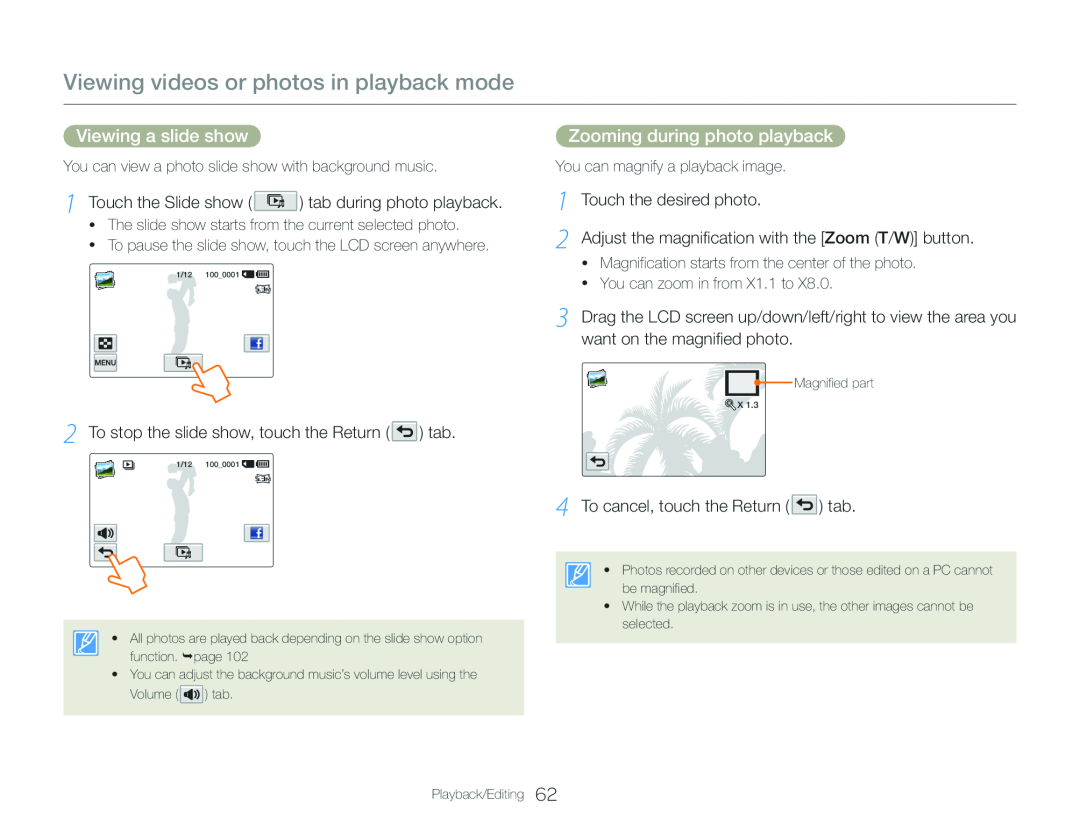 Viewing a slide show
1 Touch the Slide show ( ) tab during photo playback
2 To stop the slide show, touch the Return ( ) tab
Zooming during photo playback
1 Touch the desired photo
2 Adjust the magnification with the [Zoom (T/W)] button
4 To cancel, touch the Return ( ) tab
 Editing videos or photos
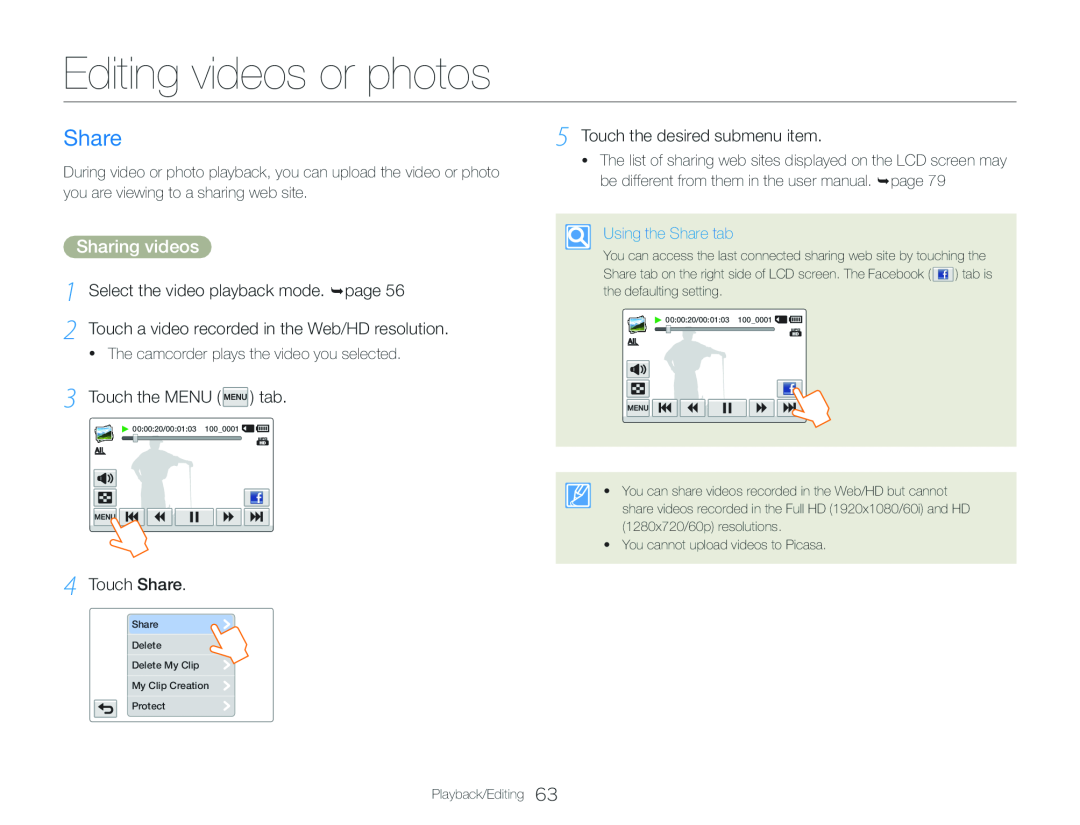
Share
Sharing videos
2 Touch a video recorded in the Web/HD resolution
3 Touch the MENU ( ) tab
4 Touch Share
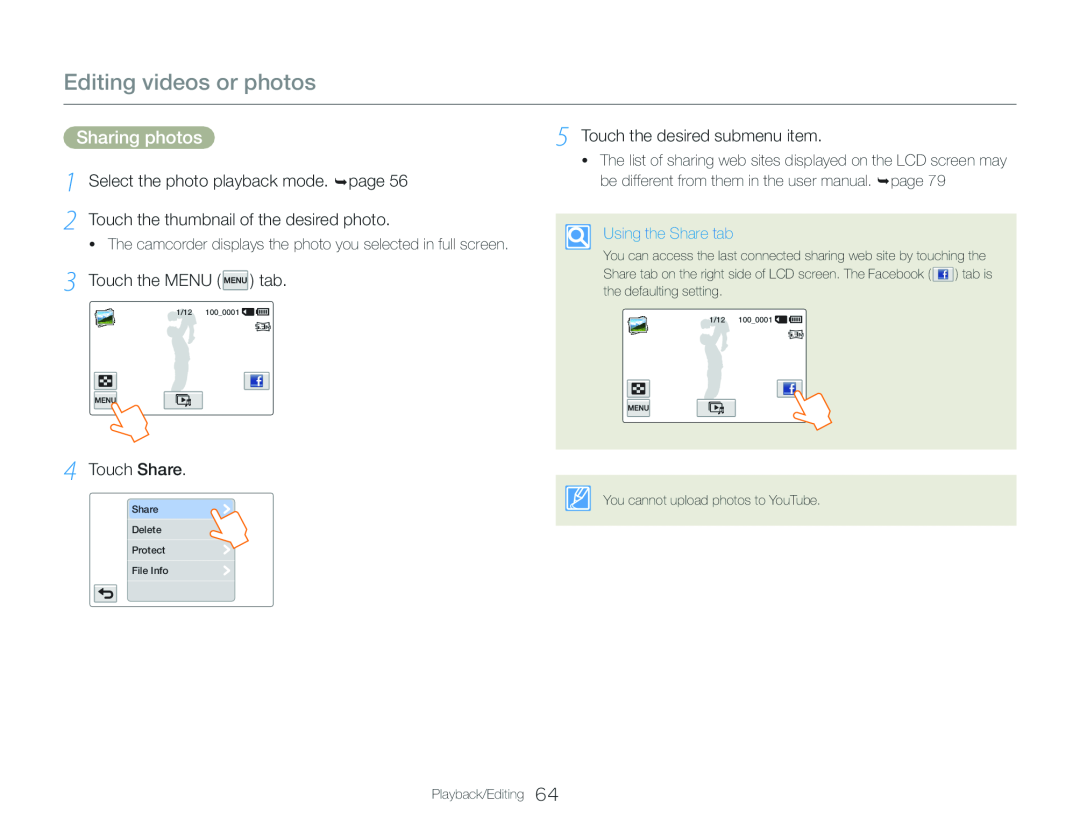 Sharing photos
Select the photo playback mode. page
Touch the thumbnail of the desired photo
 Delete
4 Touch the tab
5 Touch Yes
3 Touch thumbnails
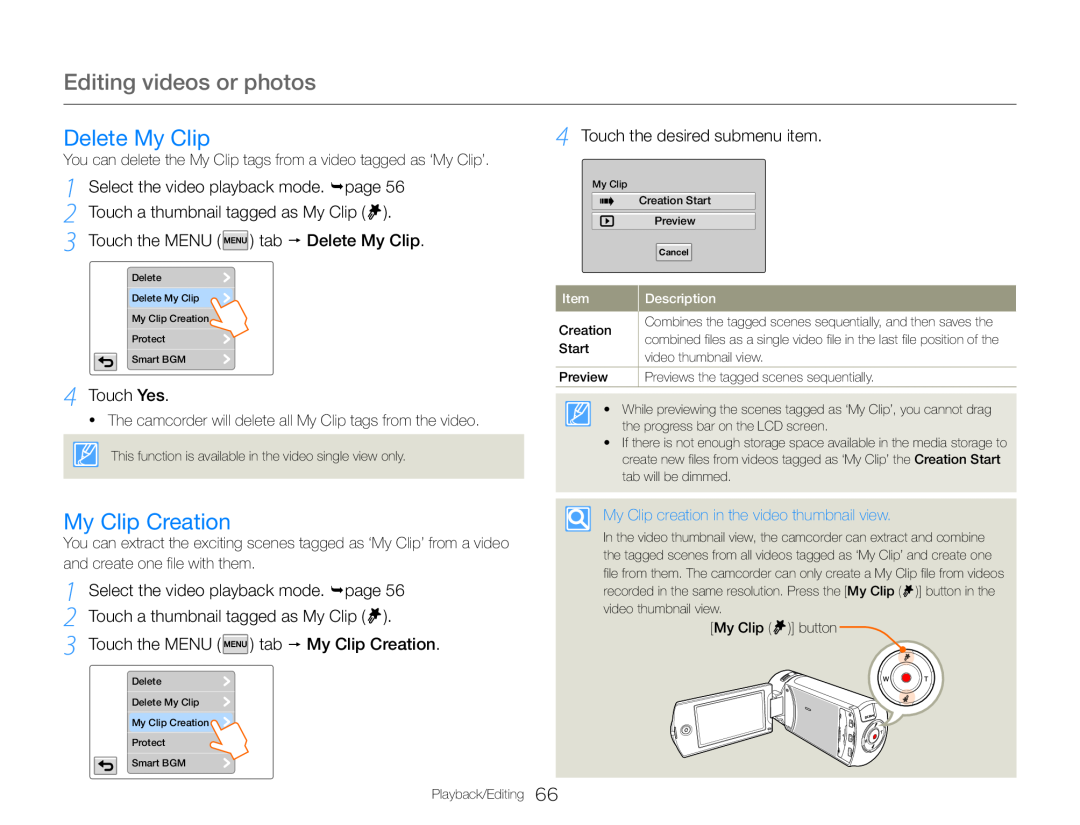 My Clip Creation
Touch Yes
Touch the MENU
Delete My Clip
4 Touch the desired submenu item
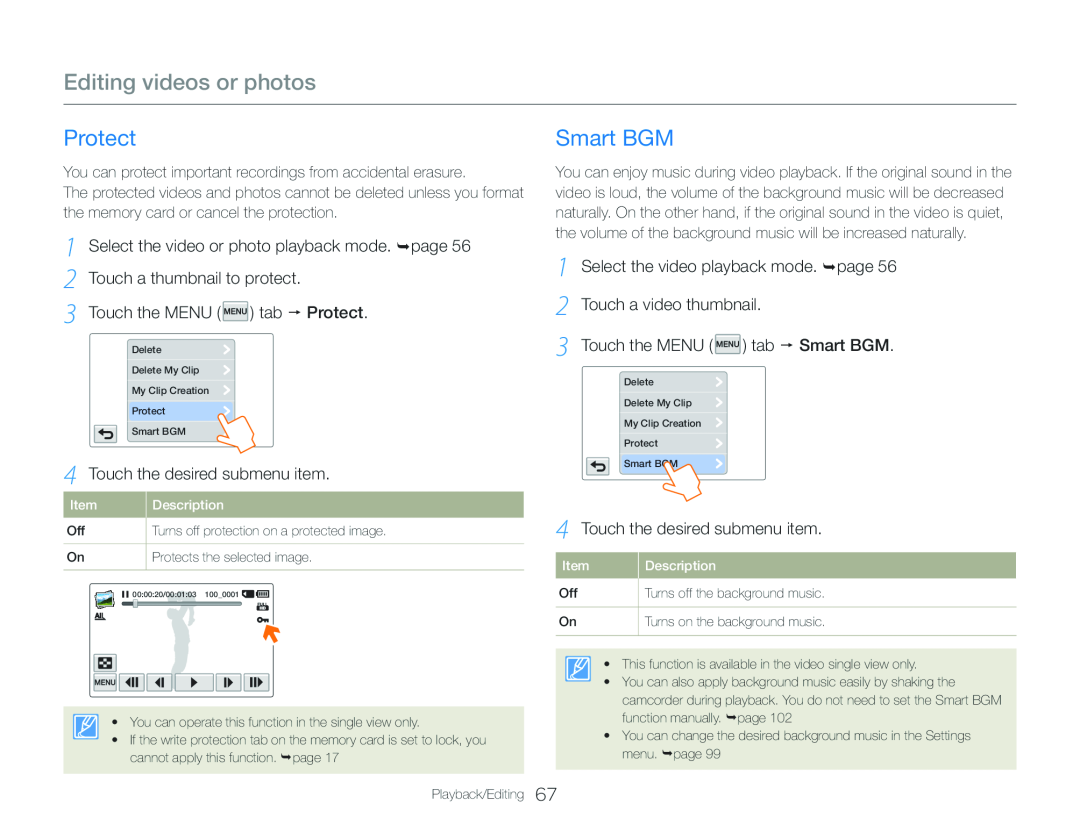 Protect
3 Touch the MENU ( ) tab Protect
Smart BGM
2 Touch a video thumbnail
3 Touch the MENU ( ) tab Smart BGM
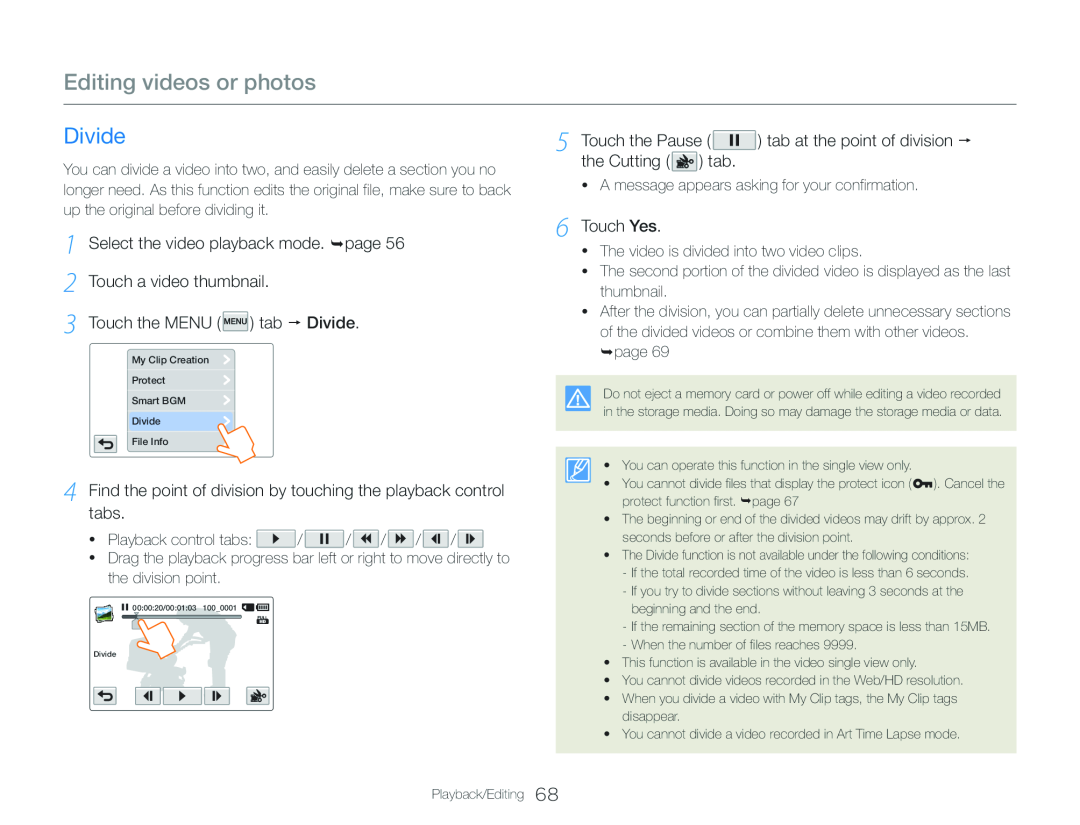 Divide
3 Touch the MENU ( ) tab Divide
4 Find the point of division by touching the playback control tabs
5 Touch the Pause ( ) tab at the point of division the Cutting ( ) tab
6 Touch Yes
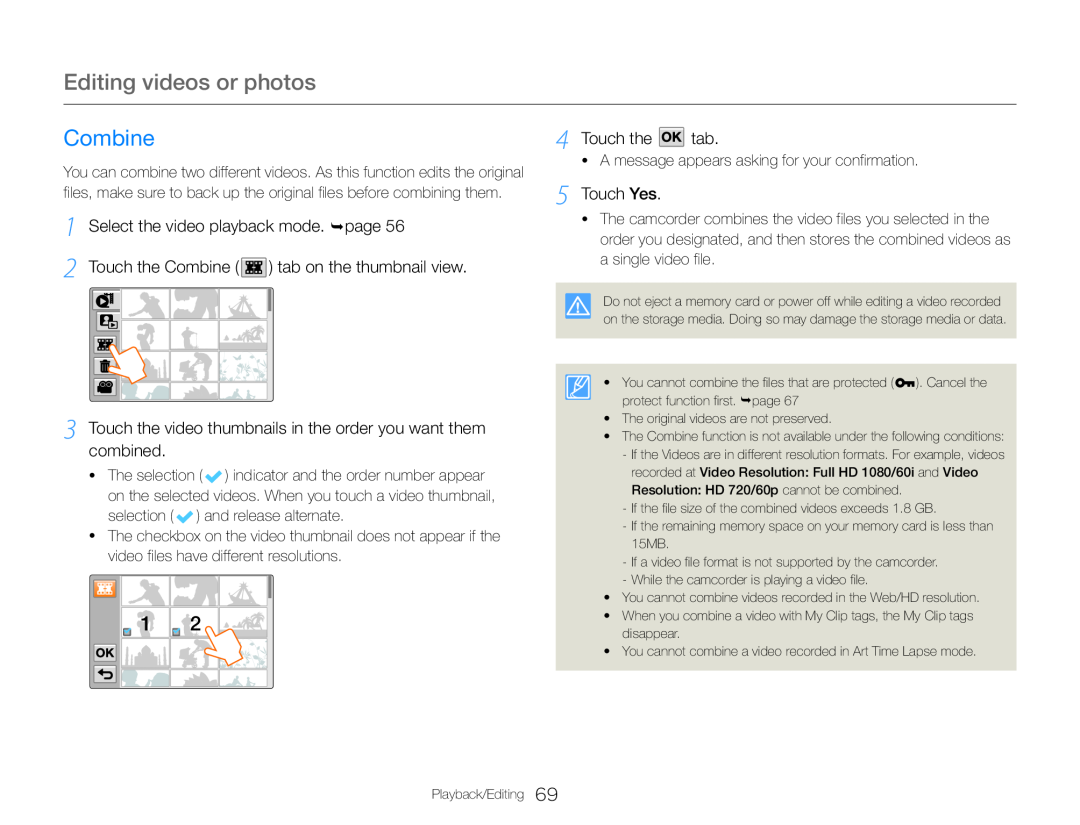 Combine
3 Touch the video thumbnails in the order you want them combined
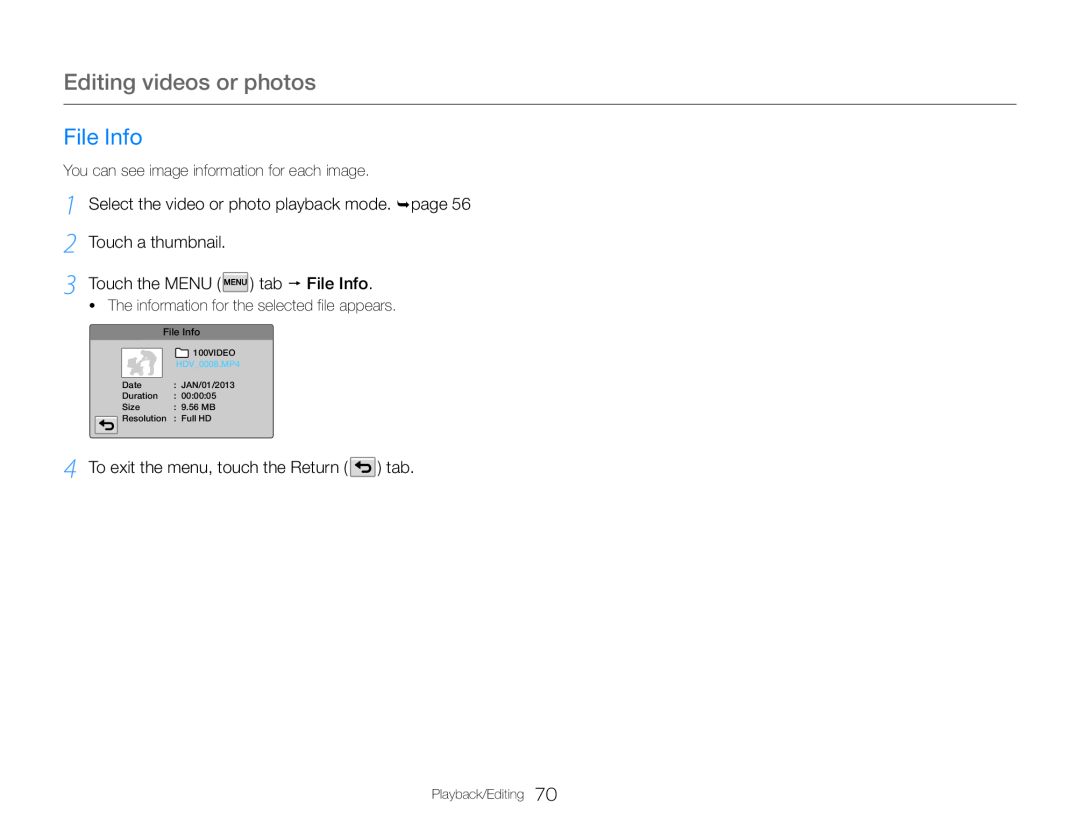 File Info
Touch a thumbnail
Touch the MENU ( ) tab File Info
To exit the menu, touch the Return ( ) tab
 Wireless network
Learn to connect to wireless local area networks (WLANs) and use functions
Viewing videos or photos on a TV Link-enabledTV
![1 Press the [Home ( )] button touch Social Sharing 2 Touch the MENU ( ) tab Wi-FiSetting](/images/prints/7709/76.1080.webp) Connecting to a WLAN
Connecting to a WLAN1 Press the [Home ( )] button touch Social Sharing
2 Touch the MENU ( ) tab Wi-FiSetting
To select a WPS supported AP, touch the tab next to the AP, and then go to Step
When done, press OK, and then go to Step
7 The camcorder connects to the network you have chosen
 Connecting to a WLAN and configuring network settings
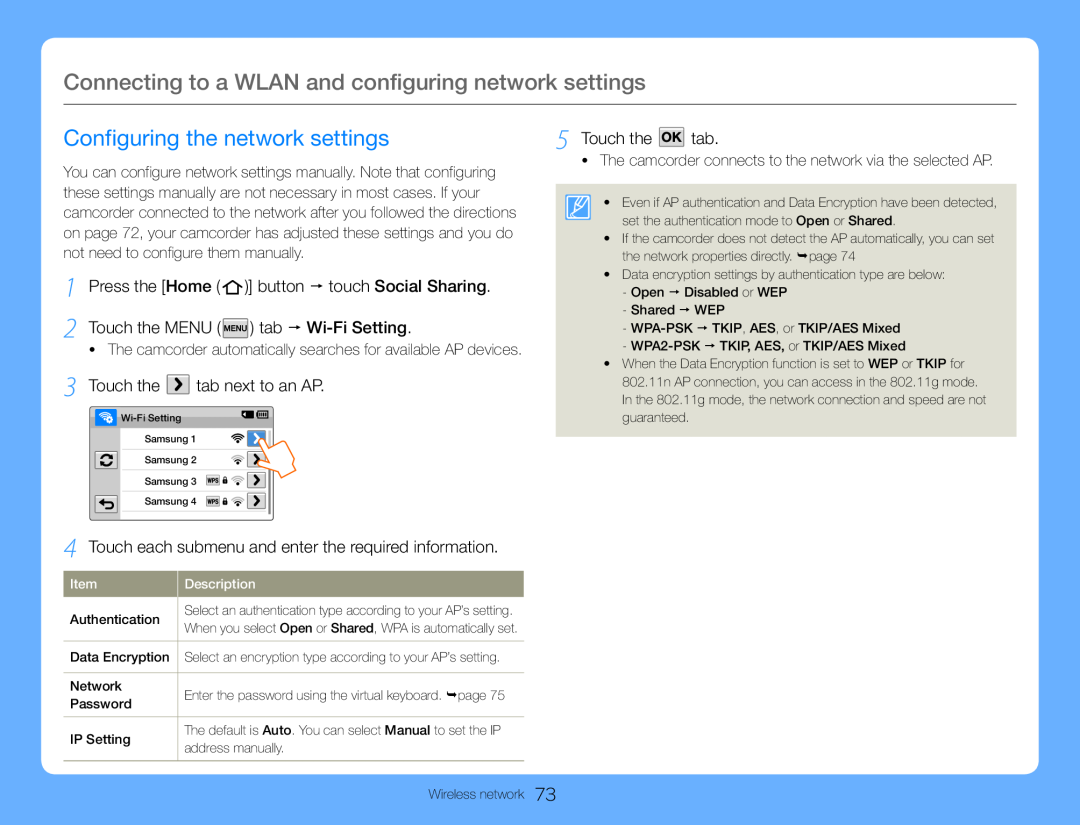
Configuring the network settings
5 Touch the tab
1 Press the [Home
)] button touch Social Sharing
2 Touch the MENU
) tab Wi-FiSetting
3 Touch the tab next to an AP
4 Touch each submenu and enter the required information
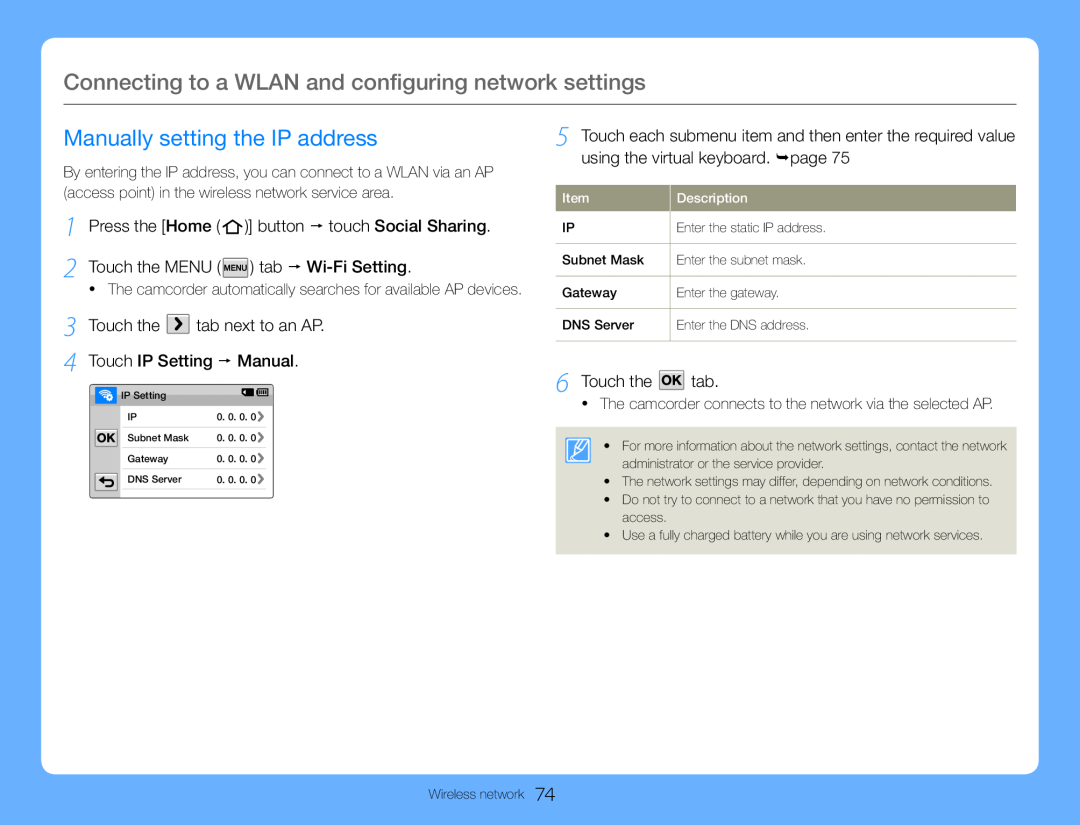 Manually setting the IP address
3 Touch the tab next to an AP. 4 Touch IP Setting Manual
6 Touch the tab
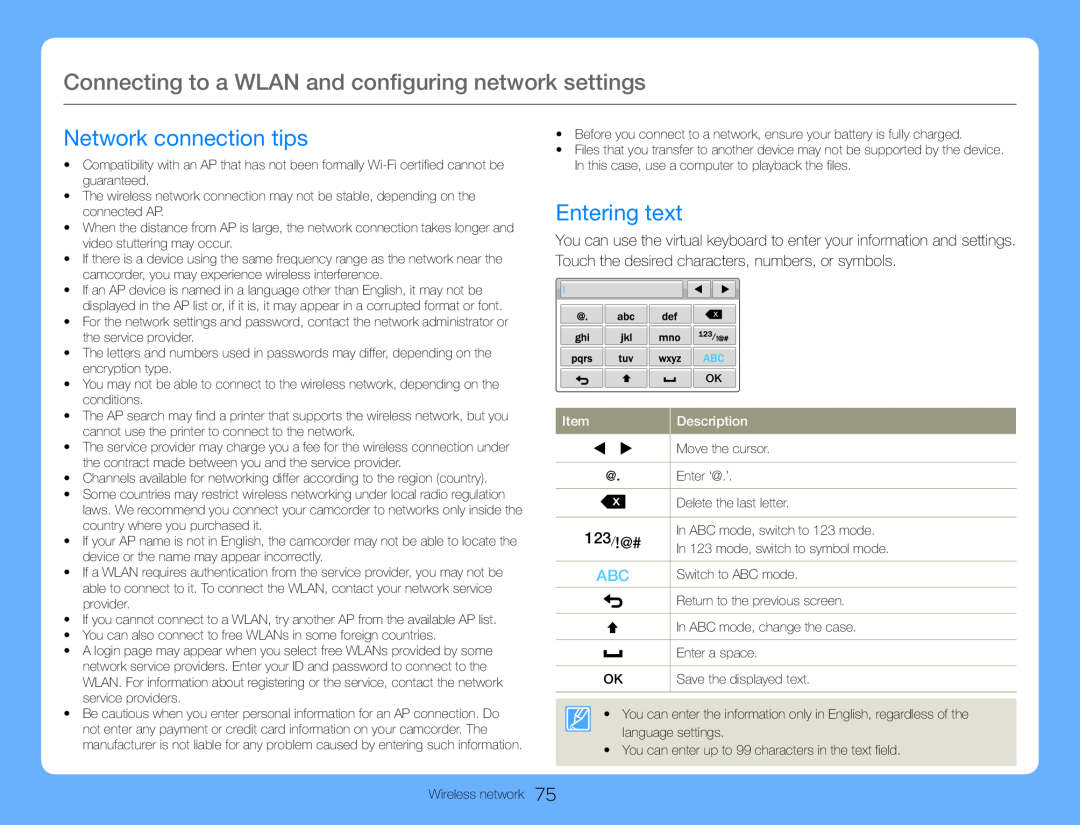 Network connection tips
Entering text
![Press the [Home ( )] button touch MobileLink 3 On the smart phone, turn on the Samsung MobileLink](/images/prints/7709/80.1080.webp) Sending videos or photos to a smart phone
Sending videos or photos to a smart phonePress the [Home ( )] button touch MobileLink
3 On the smart phone, turn on the Samsung MobileLink
application
tab or the Selected Images tab to
select files to share with the smart phone
On the camcorder, touch Yes
On the smart phone, select files to receive from the camcorder
On the smart phone, touch Copy
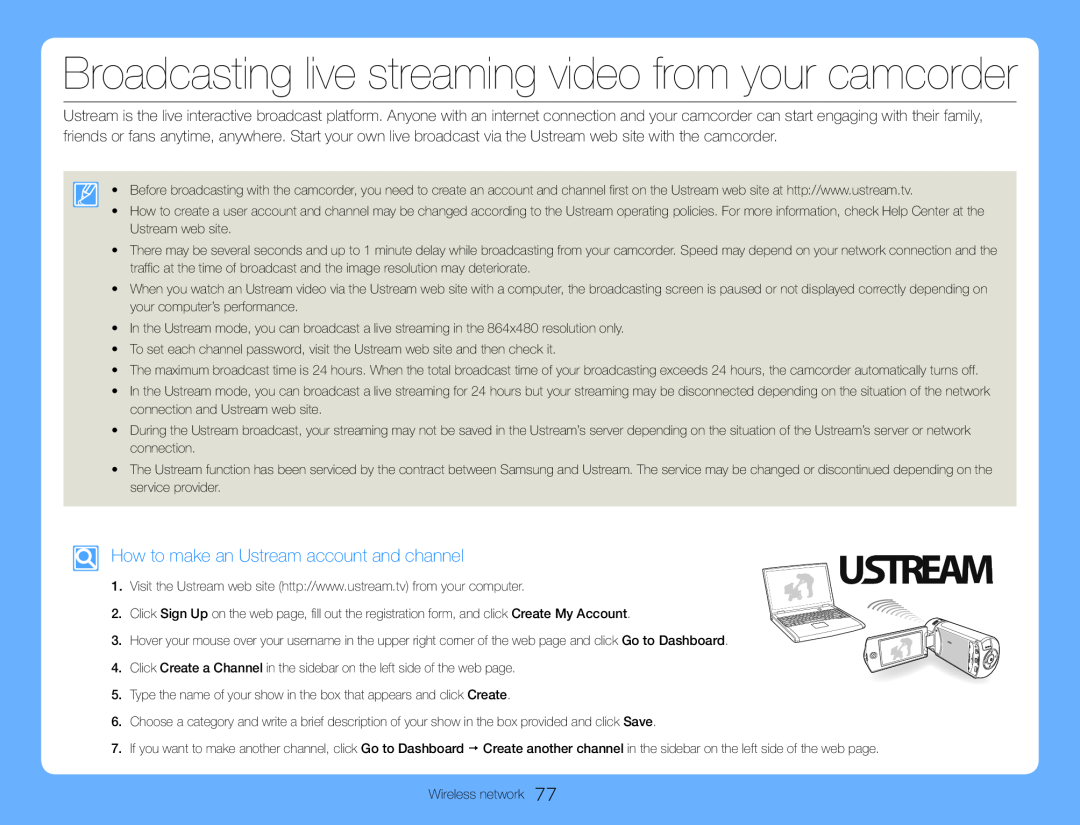 How to make an Ustream account and channel
![1 Press the [Home ( )] button touch Ustream 2 Enter your ID and password, and then touch the Login ( Login ) tab](/images/prints/7709/82.1080.webp) Broadcasting live streaming video from your camcorder
Broadcasting live streaming video from your camcorder1 Press the [Home ( )] button touch Ustream
2 Enter your ID and password, and then touch the Login ( Login ) tab
3 Touch the tab
5 To stop live broadcasting, press the [Recording start/stop] button again
![Press the [Home ( )] button touch Social Sharing](/images/prints/7709/83.1080.webp) Accessing a web site
Accessing a web sitePress the [Home ( )] button
touch Social Sharing
Select a web site
Using video or photo sharing web sites
3 Enter your ID and password, and then touch the Login ( Login ) tab
Uploading videos or photos
1 Access a sharing web site with your camcorder. 2 Touch files the tab
3 Touch the Upload ( Upload ) tab
![1 Press the [Home ( )] button touch TV Link the Confirm tab 2 Connect your TV to a WLAN via an AP device](/images/prints/7709/84.1080.webp) Viewing videos or photos on a TV Link-enabledTV
Viewing videos or photos on a TV Link-enabledTV1 Press the [Home ( )] button touch TV Link the Confirm tab
2 Connect your TV to a WLAN via an AP device
3 On the TV, search for the camcorder and browse the shared videos or photos
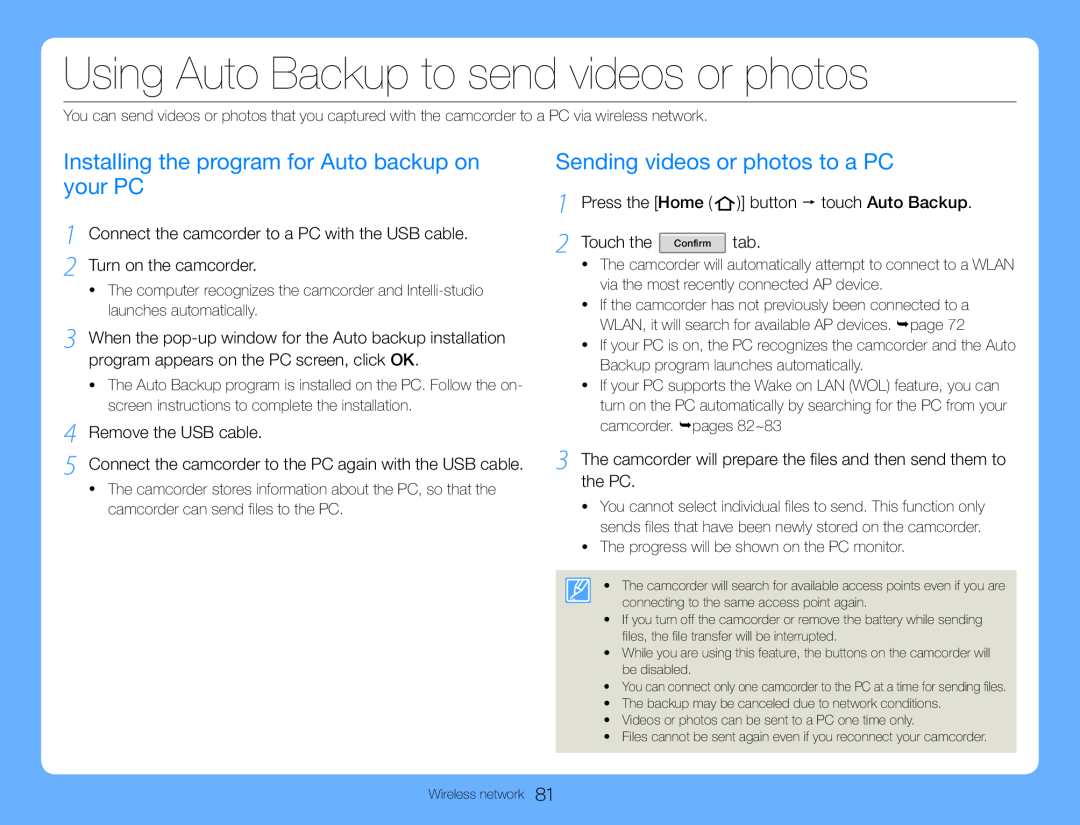 Using Auto Backup to send videos or photos
Installing the program for Auto backup on your PC
1 Connect the camcorder to a PC with the USB cable. 2 Turn on the camcorder
4 Remove the USB cable
5 Connect the camcorder to the PC again with the USB cable
Sending videos or photos to a PC
Press the [Home
Touch the Confirm
tab
3 The camcorder will prepare the files and then send them to the PC
 About the Wakeup on LAN (WOL) feature
Setting the PC to wake up from sleep mode
3 Right click Local Area, and then click Properties
5 Click OK
6 Restart the PC
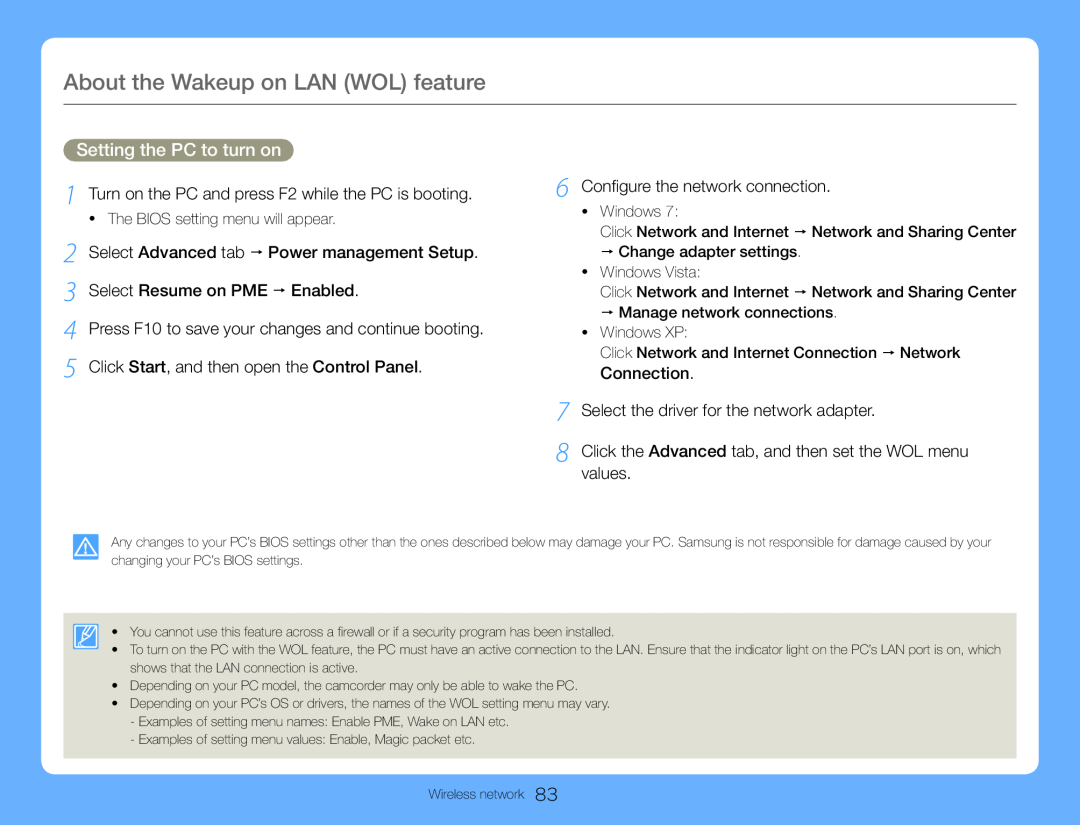 About the Wakeup on LAN (WOL) feature
Setting the PC to turn on
1 Turn on the PC and press F2 while the PC is booting
2 Select Advanced tab Power management Setup
3 Select Resume on PME Enabled
6 Configure the network connection
Connection
7 Select the driver for the network adapter
8 Click the Advanced tab, and then set the WOL menu values
 Using with other devices
Dubbing videos to VCR or DVD/HDD recorders
Transferring files to your Windows computer
 Connecting to a TV
Connecting to a high definition TV with HDMI
Using a micro HDMI cable
1 Turn on the camcorder
2 Select HDMI TV Out. page
3 Connect the camcorder to the TV with a micro HDMI cable
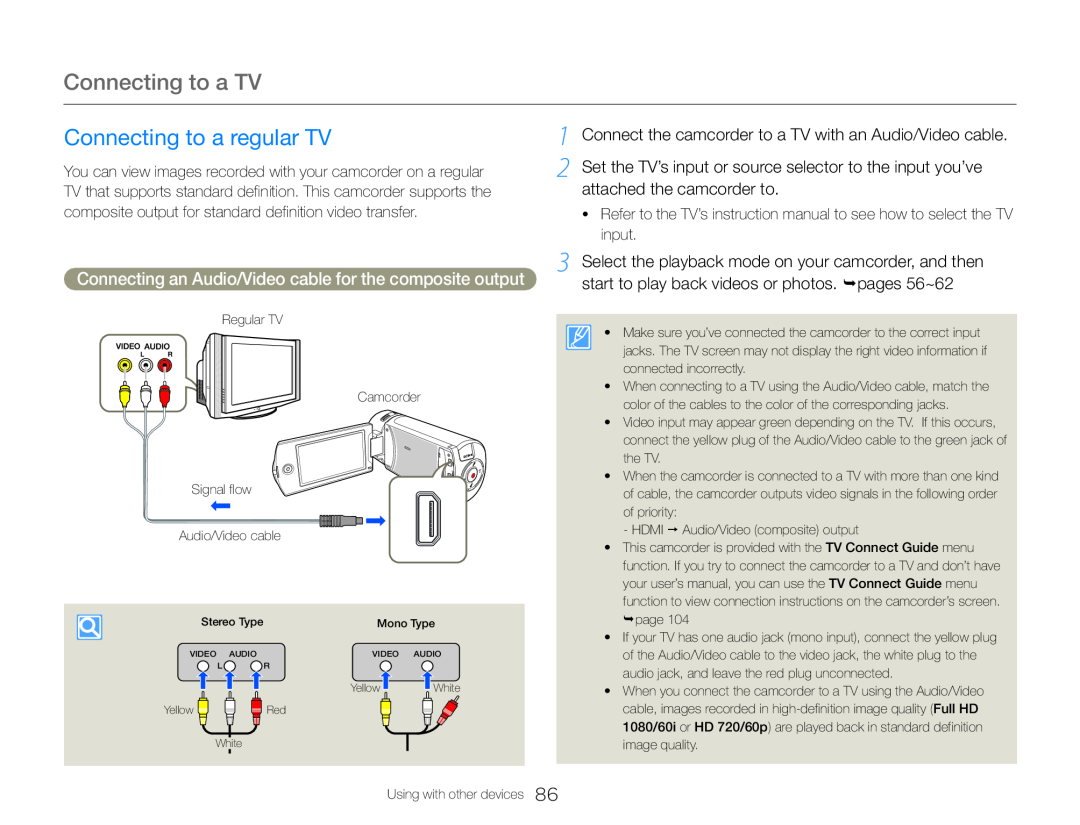 Connecting to a regular TV
1 Connect the camcorder to a TV with an Audio/Video cable
Connecting an Audio/Video cable for the composite output
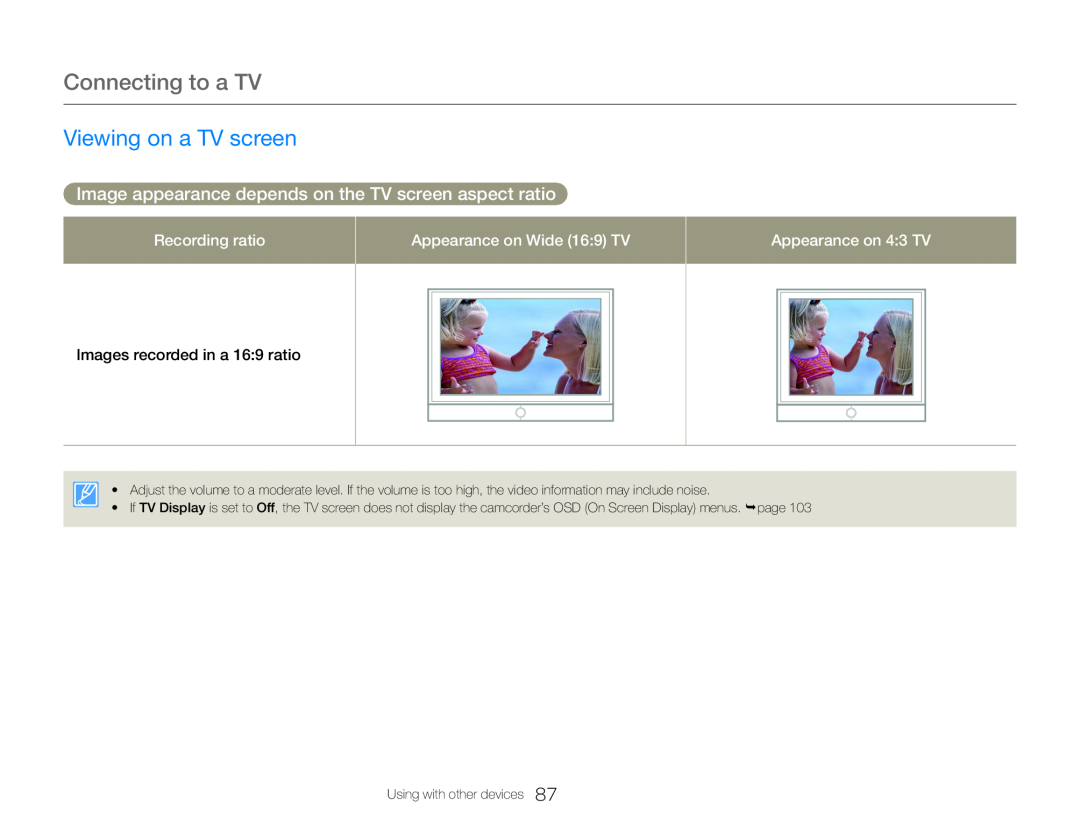 Viewing on a TV screen
Image appearance depends on the TV screen aspect ratio
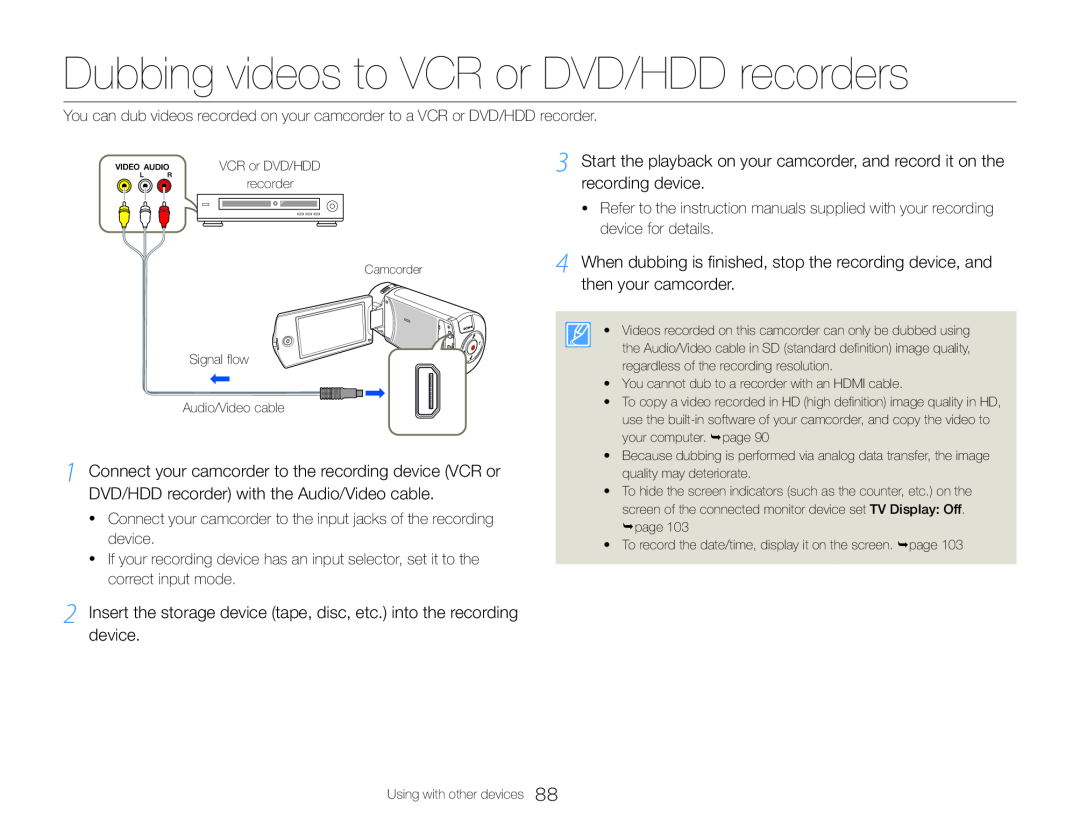 Dubbing videos to VCR or DVD/HDD recorders
3 Start the playback on your camcorder, and record it on the recording device
4 When dubbing is finished, stop the recording device, and then your camcorder
2 Insert the storage device (tape, disc, etc.) into the recording device
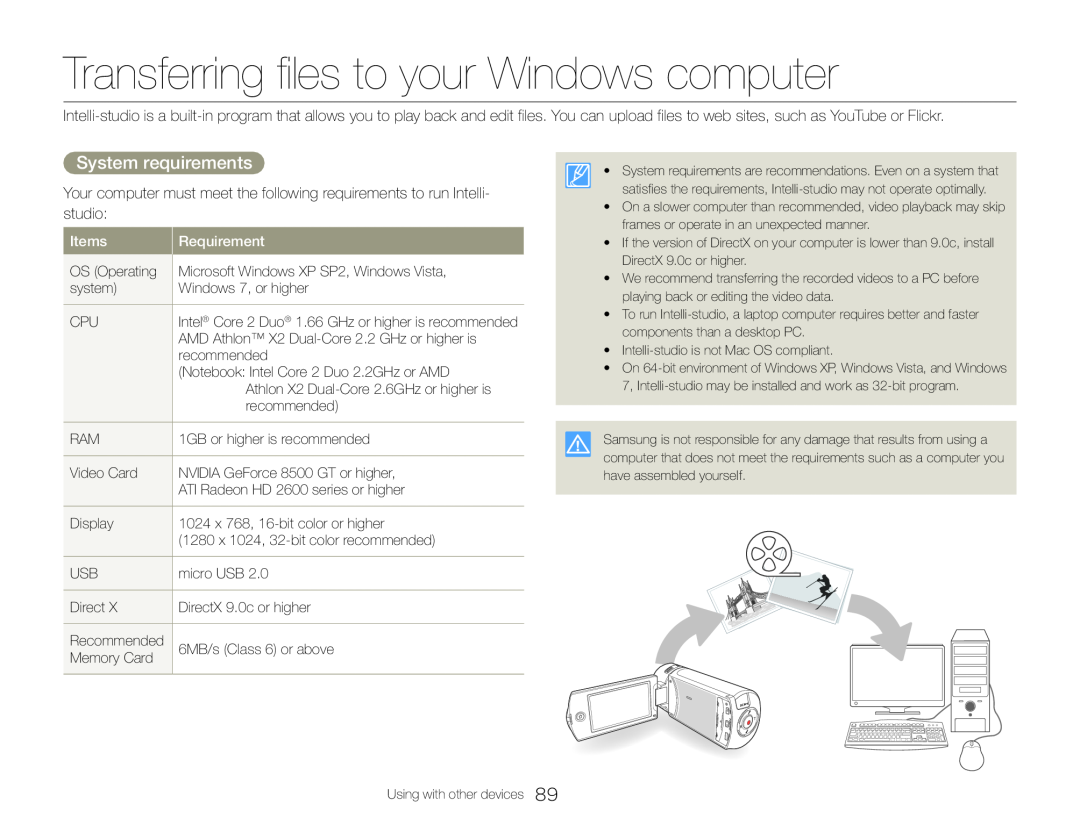 Transferring files to your Windows computer
System requirements
 Transferring files to your Windows computer
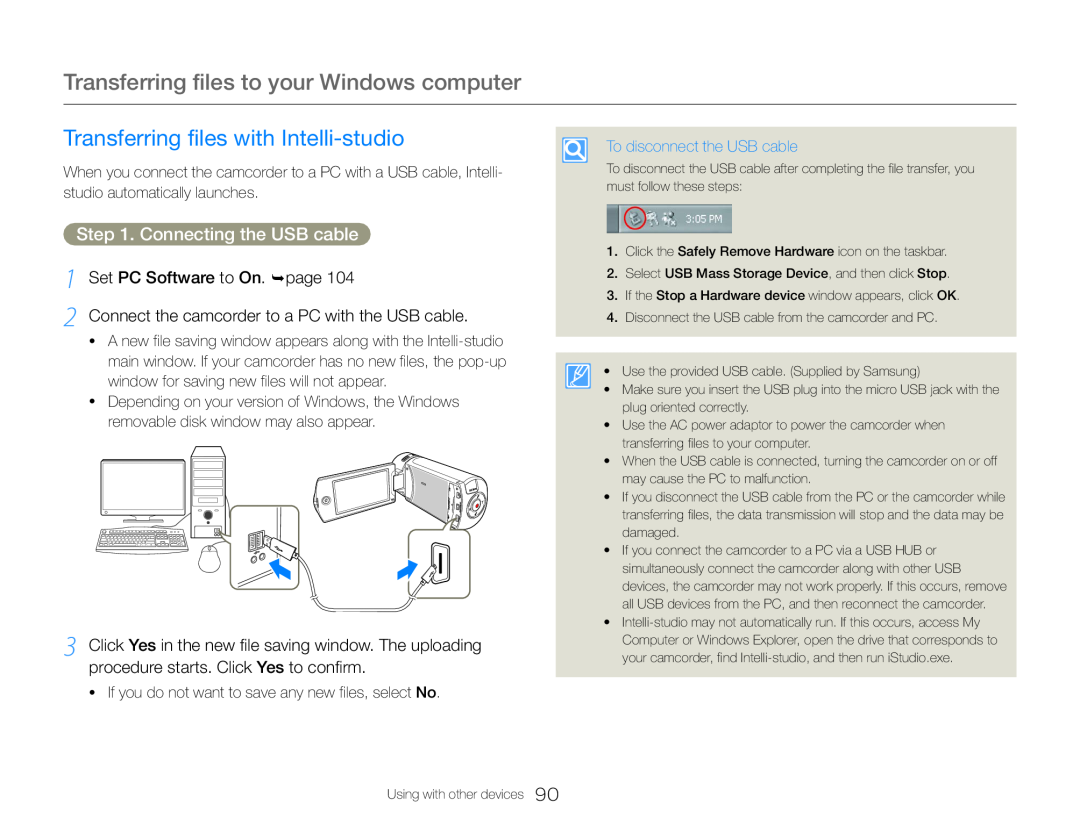
Transferring files with Intelli-studio
Step 1. Connecting the USB cable 1 Set PC Software to On. page
Step 1. Connecting the USB cable
2 Connect the camcorder to a PC with the USB cable
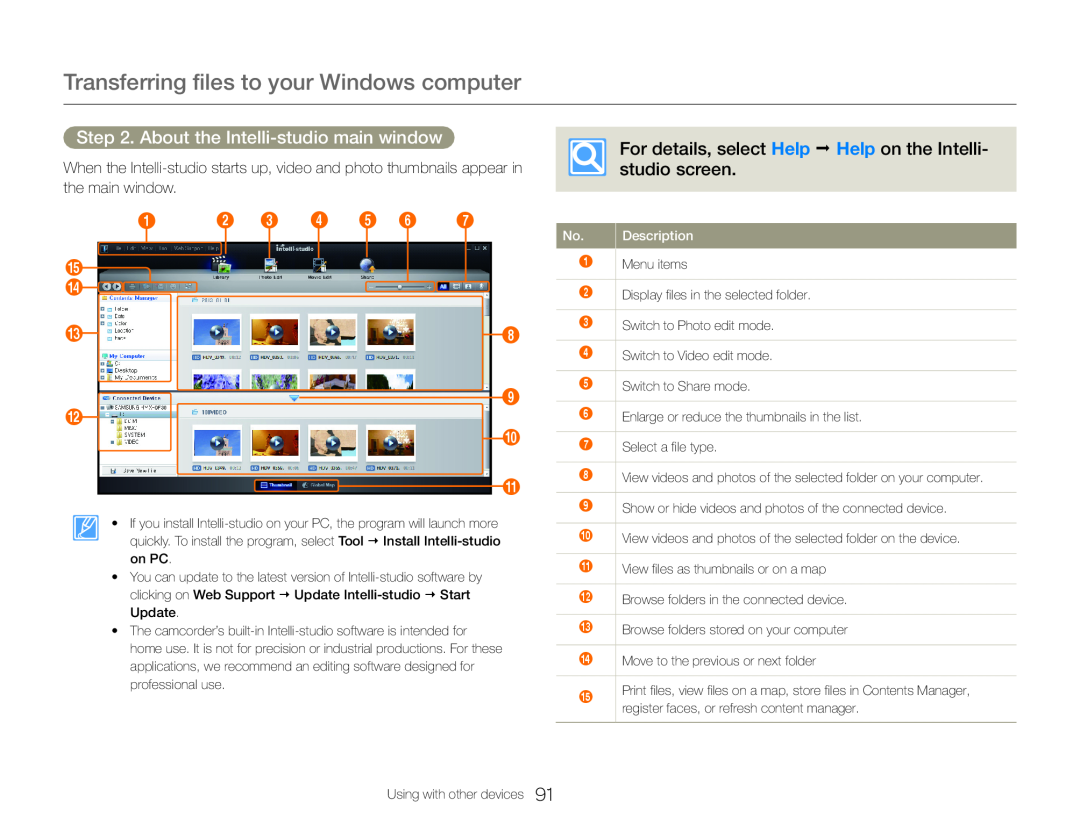 Step 2. About the Intelli-studiomain window
For details, select Help Help on the Intelli- studio screen
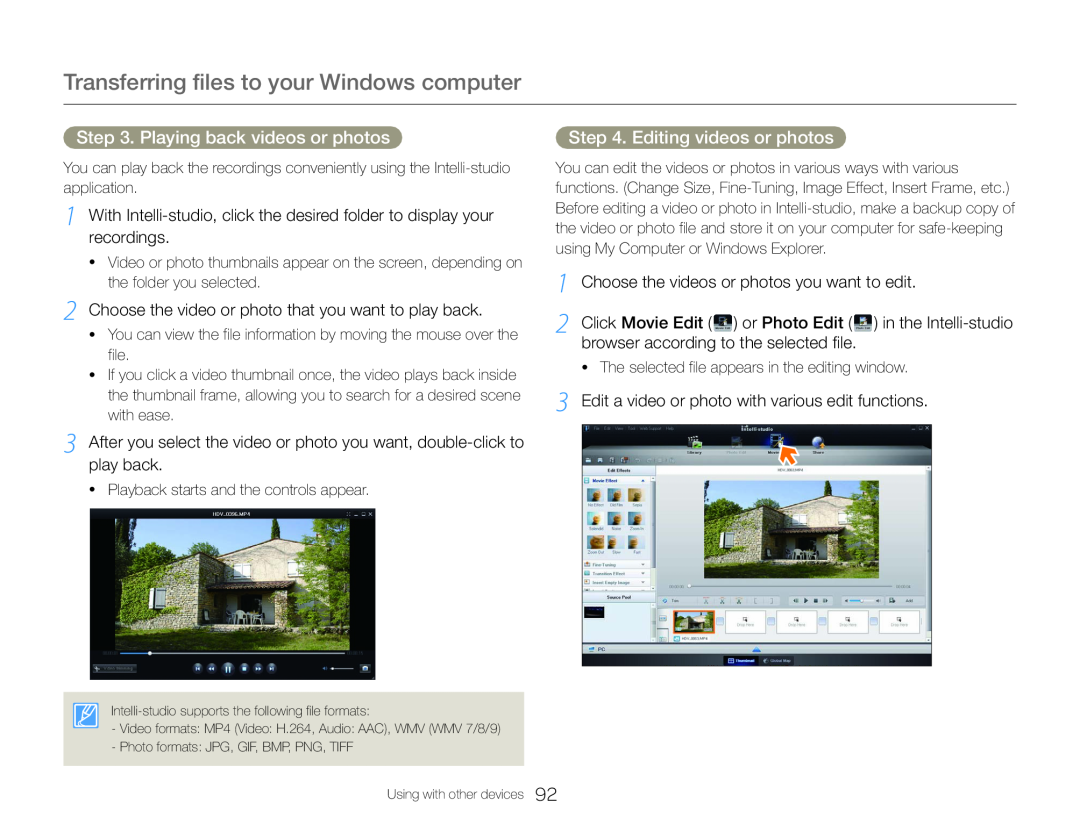 Step 3. Playing back videos or photos
Step 4. Editing videos or photos
1 With Intelli-studio,click the desired folder to display your recordings
2 Choose the video or photo that you want to play back
3 After you select the video or photo you want, double-clickto play back
Choose the videos or photos you want to edit
Click Movie Edit ( ) or Photo Edit
Edit a video or photo with various edit functions
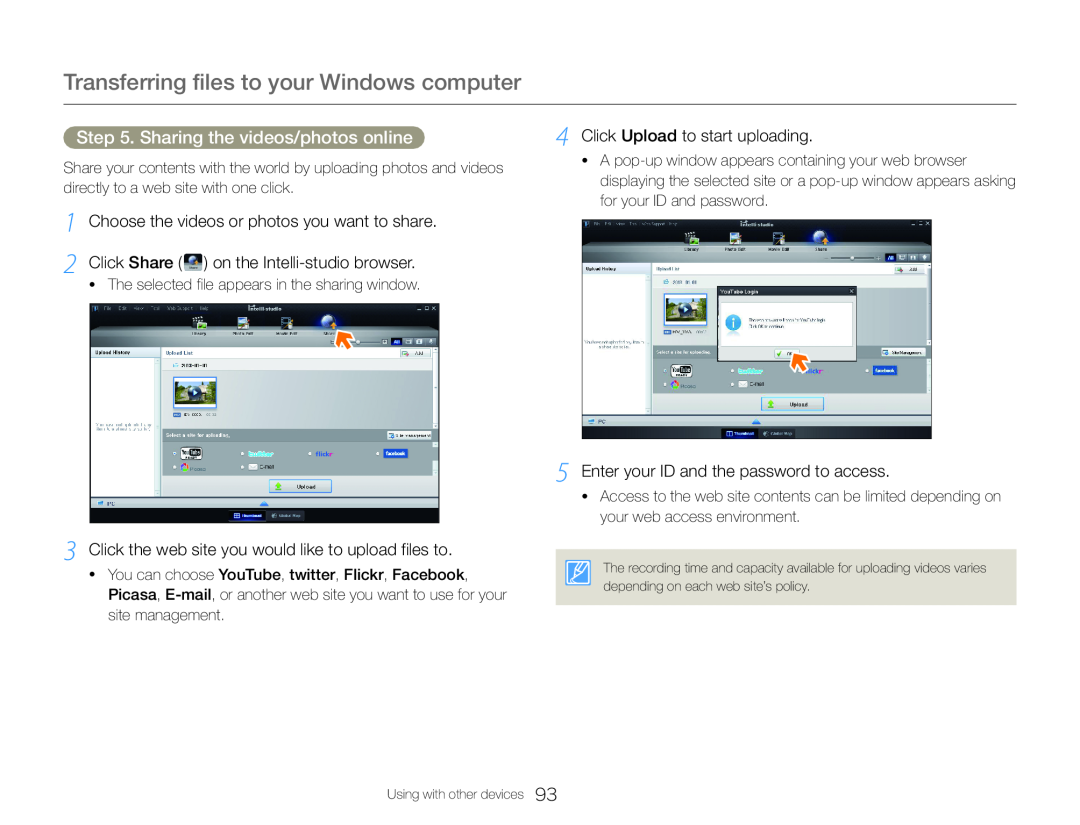 Step 5. Sharing the videos/photos online
3 Click the web site you would like to upload files to
4 Click Upload to start uploading
5 Enter your ID and the password to access
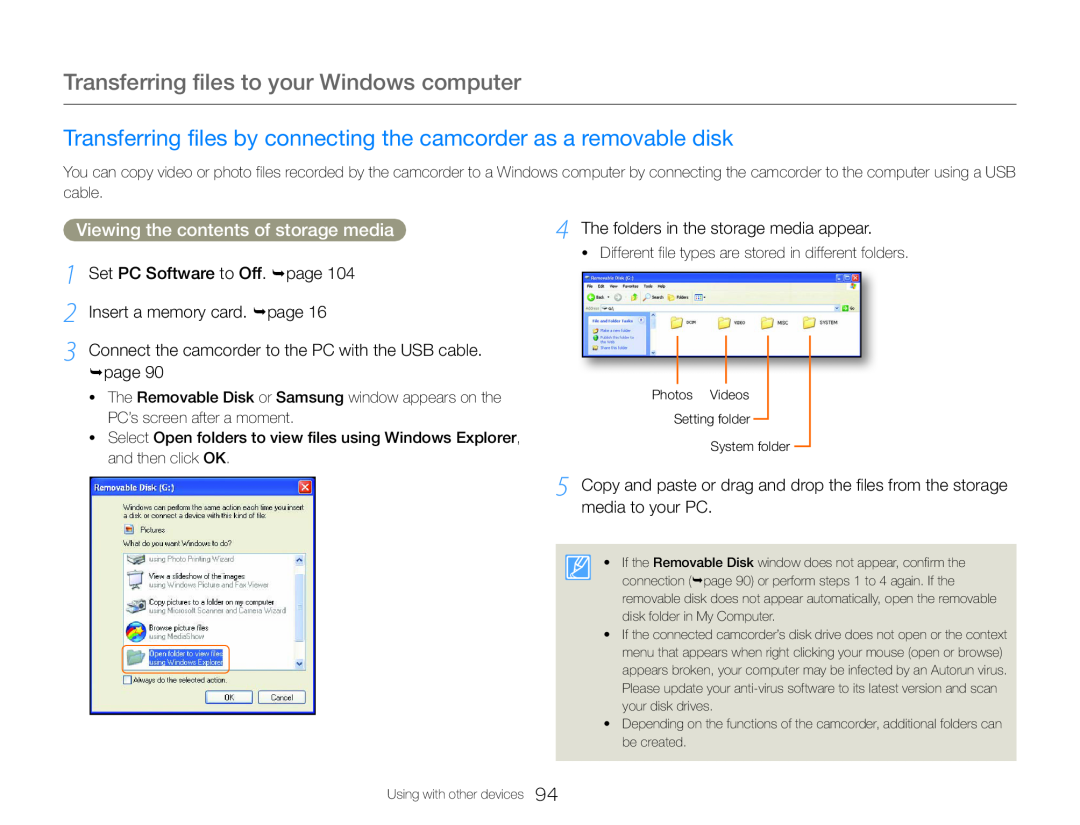 Transferring files by connecting the camcorder as a removable disk
Viewing the contents of storage media
1 Set PC Software to Off. page 104 2 Insert a memory card. page
3 Connect the camcorder to the PC with the USB cable. page
4 The folders in the storage media appear
5 Copy and paste or drag and drop the files from the storage media to your PC
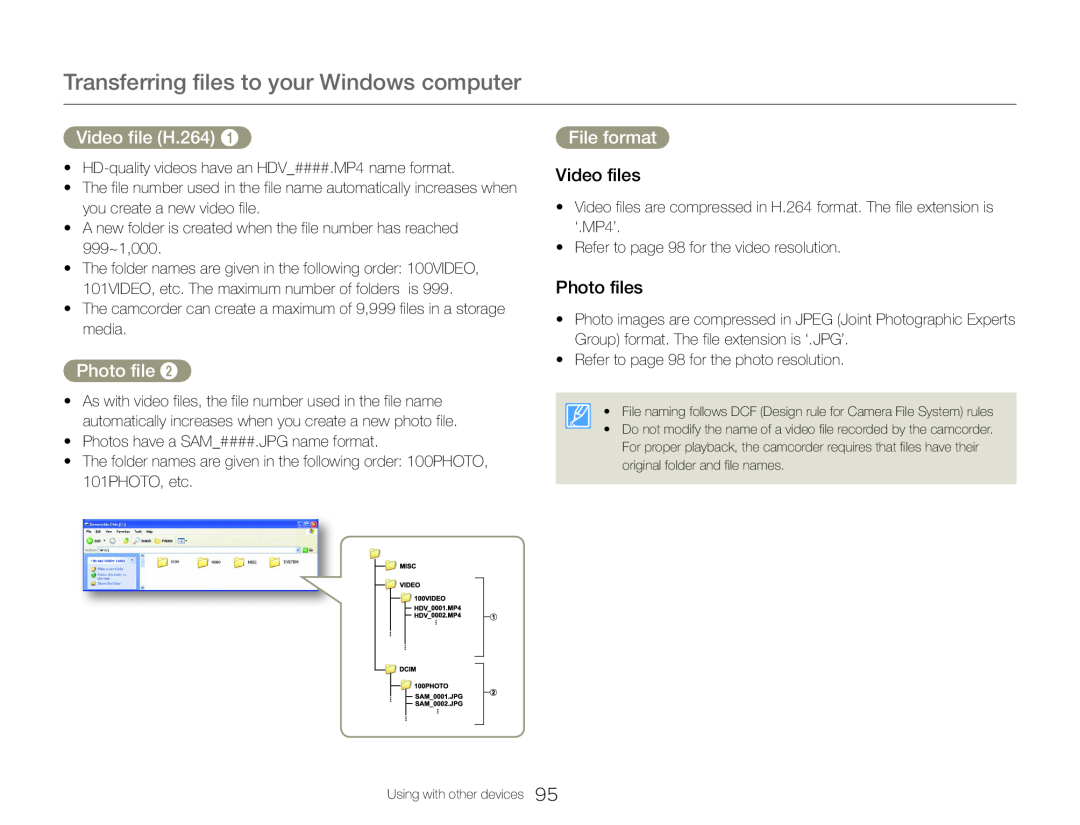 Video file (H.264)
Photo file
File format
Video files
Photo files
 Settings
Refer to items to configure your camcorder’s settings
Settings menu
![1 Press the [Home ( )] button touch Settings. 2 Touch a menu 3 Touch a submenu](/images/prints/7709/101.1080.webp) Settings menu
Settings menuAccessing the settings menu
1 Press the [Home ( )] button touch Settings. 2 Touch a menu
3 Touch a submenu
5 To exit the menu setting, touch the Return ( ) tab
 Settings menu
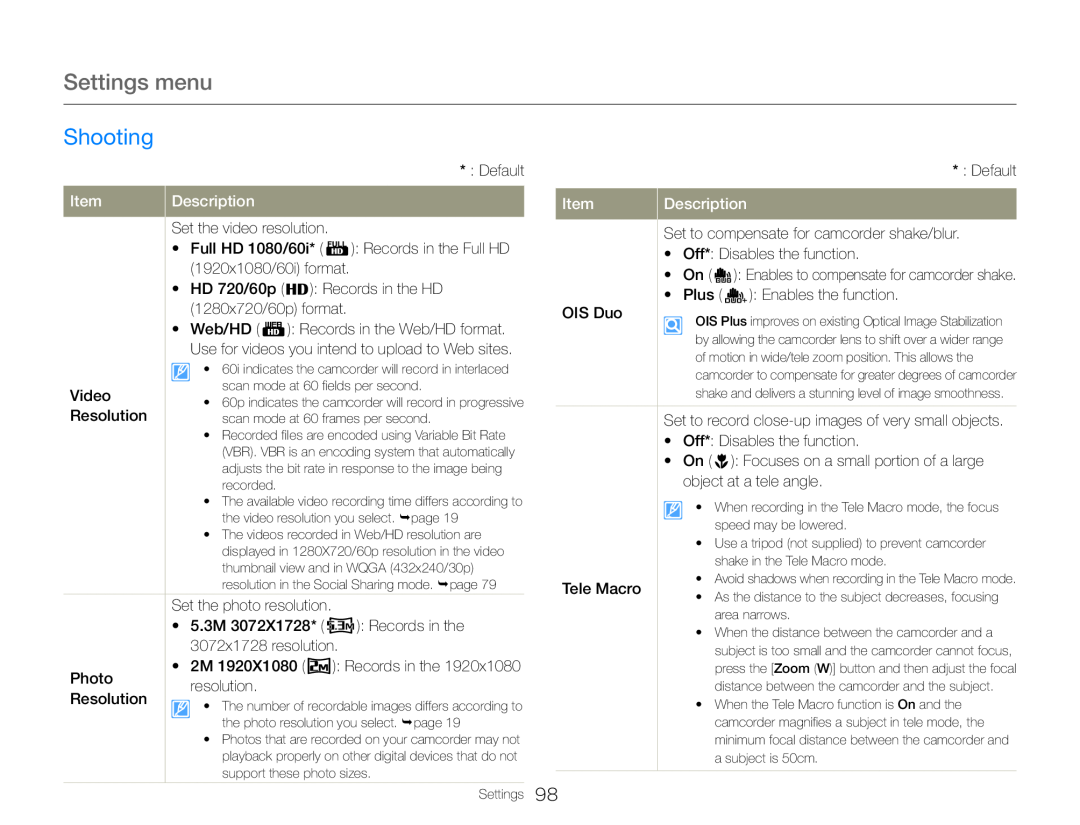
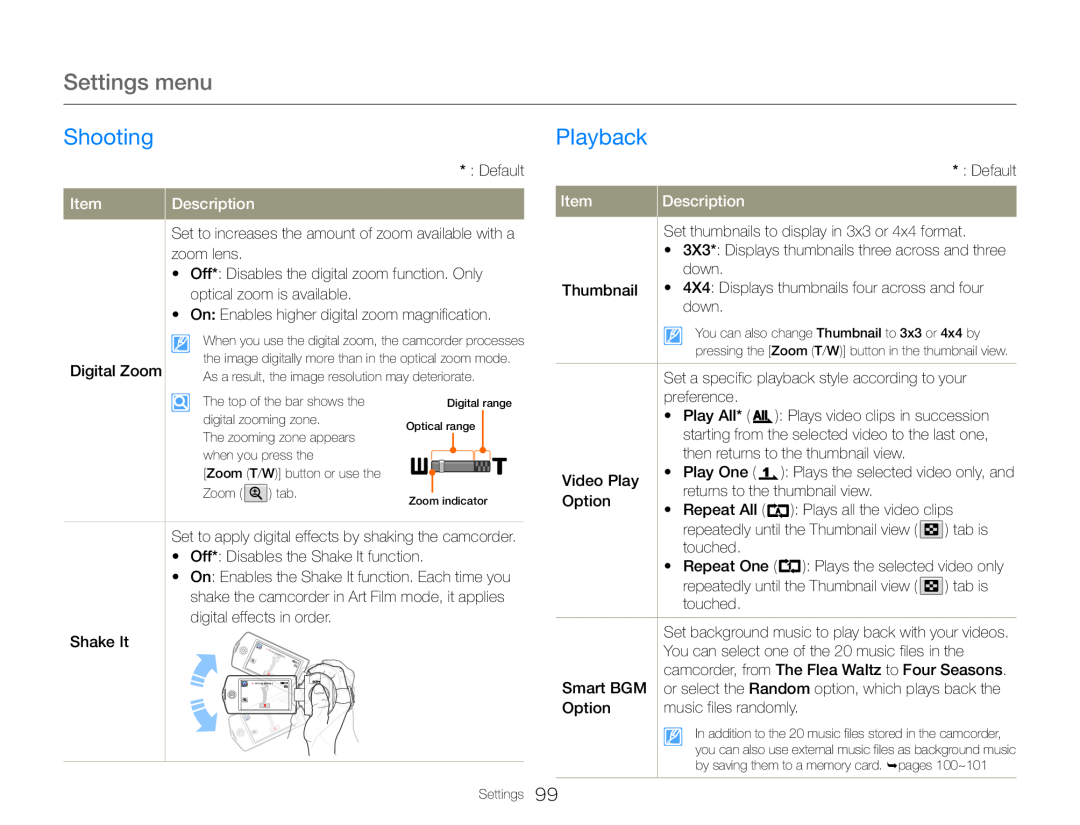 Playback
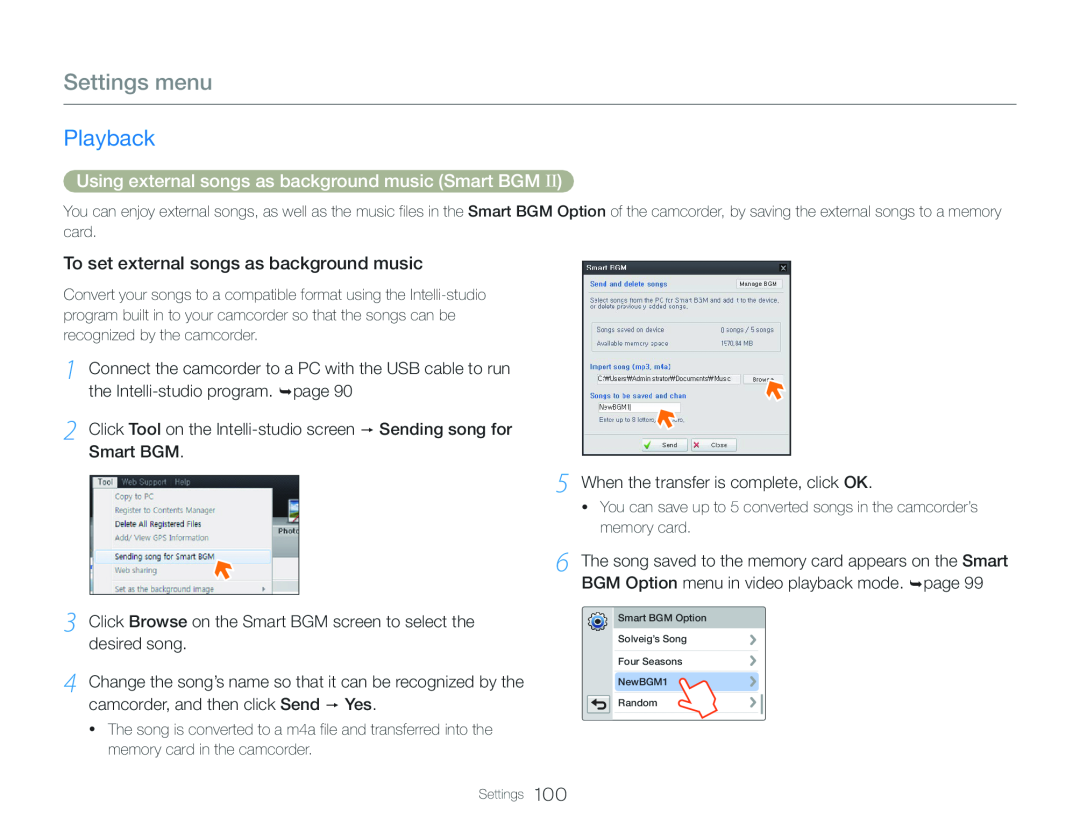 Using external songs as background music (Smart BGM II)
To set external songs as background music
2 Click Tool on the Intelli-studioscreen Sending song for Smart BGM
3 Click Browse on the Smart BGM screen to select the desired song
When the transfer is complete, click OK
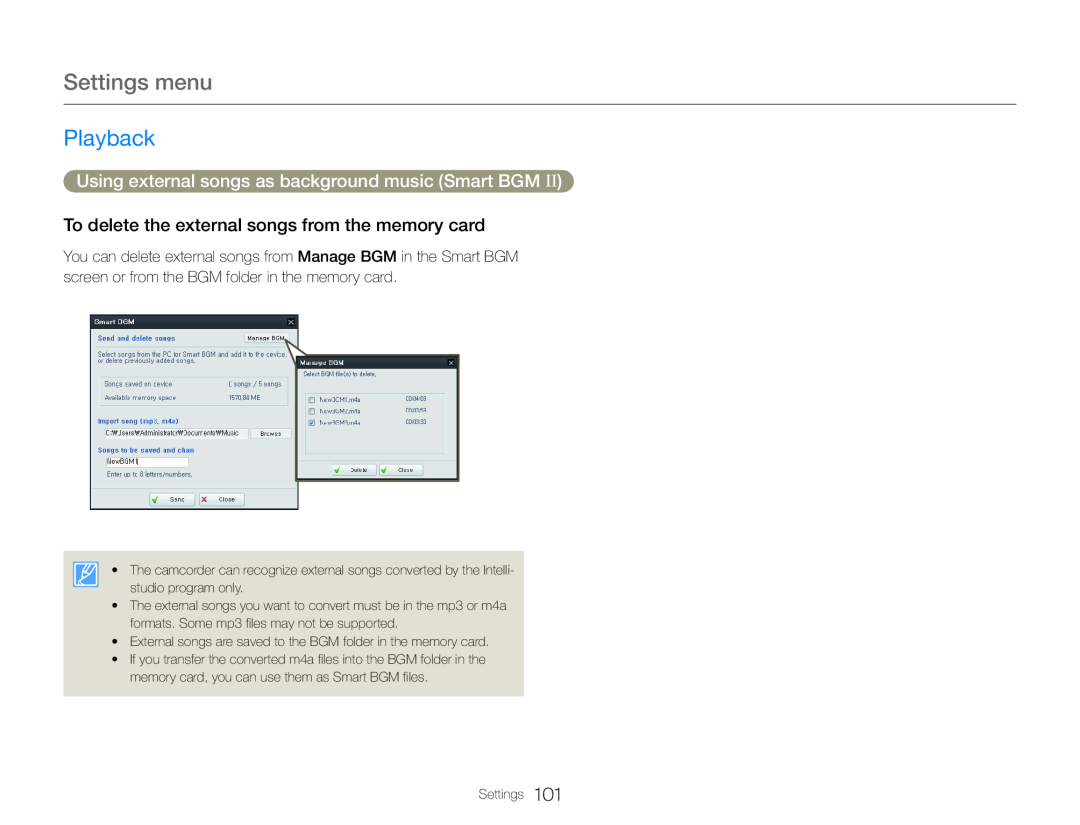 To delete the external songs from the memory card
 Settings menu
Playback
Display
* : Default
Item
Description
Set the playback options for a slide show, and then touch the tab
Slide Show
starts, the 20 melodies will play back in shuffle
mode
Option
Interval: Continuously plays back photos at the
interval you select. You can choose 1 sec or
3 sec
• Effect: Continuously plays back photos using the
fade in/out effect to transition between photos
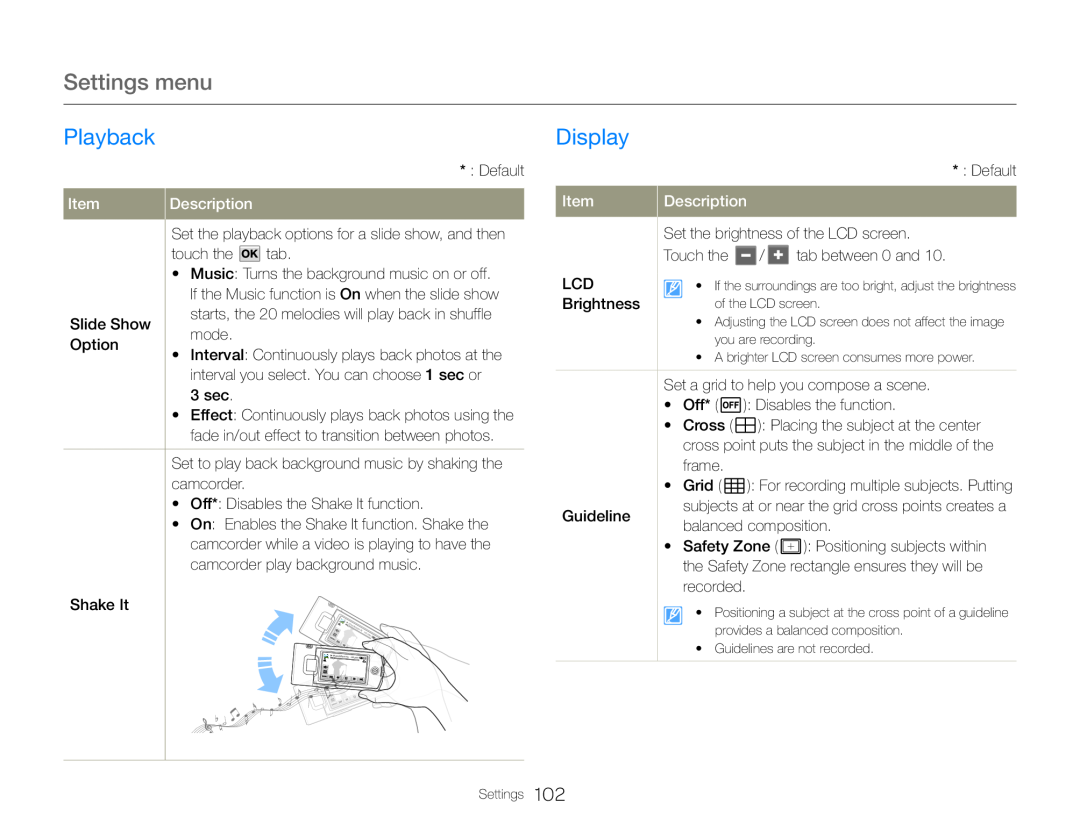
Set to play back background music by shaking the
camcorder
• Off*: Disables the Shake It function
• On: Enables the Shake It function. Shake the
camcorder while a video is playing to have the
camcorder play background music
Shake It
* : Default
Item
Description
Set the brightness of the LCD screen
Touch the / tab between 0 and
LCD
Brightness
Set a grid to help you compose a scene
Off
): Disables the function
Cross
): Placing the subject at the center
cross point puts the subject in the middle of the
frame
Grid
Guideline
balanced composition
Safety Zone ( ): Positioning subjects within
the Safety Zone rectangle ensures they will be
recorded
 Settings menu
Display
* : Default
Item
Description
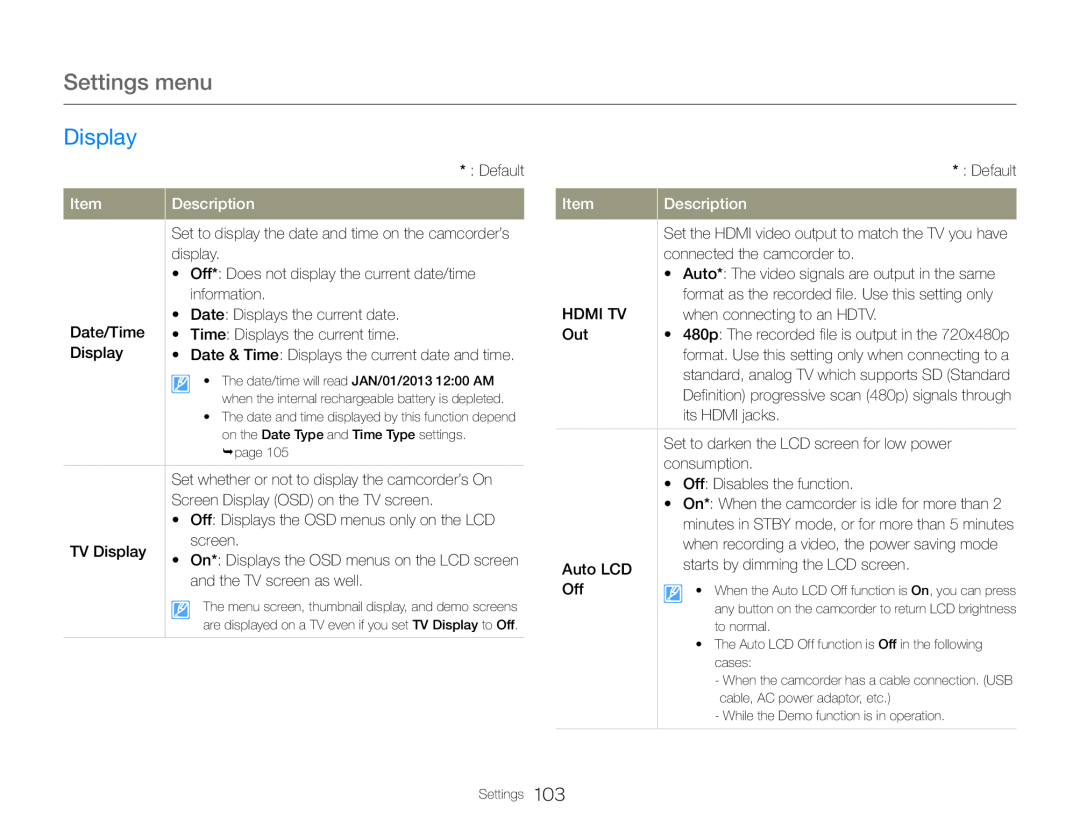
Set to display the date and time on the camcorder’s display
•Off*: Does not display the current date/time information
•Date: Displays the current date. Date/Time • Time: Displays the current time
Display • Date & Time: Displays the current date and time
page
Set whether or not to display the camcorder’s On
Screen Display (OSD) on the TV screen
• Off: Displays the OSD menus only on the LCD
TV Display
screen
On*: Displays the OSD menus on the LCD screen
and the TV screen as well
* : Default
Item
Description
connected the camcorder to
• Auto*: The video signals are output in the same
format as the recorded file. Use this setting only
HDMI TV
when connecting to an HDTV
Out
• 480p: The recorded file is output in the 720x480p
format. Use this setting only when connecting to a
standard, analog TV which supports SD (Standard
its HDMI jacks
Set to darken the LCD screen for low power consumption
•Off: Disables the function
Auto LCD
starts by dimming the LCD screen
Off
to normal
•The Auto LCD Off function is Off in the following cases:
-While the Demo function is in operation
Settings
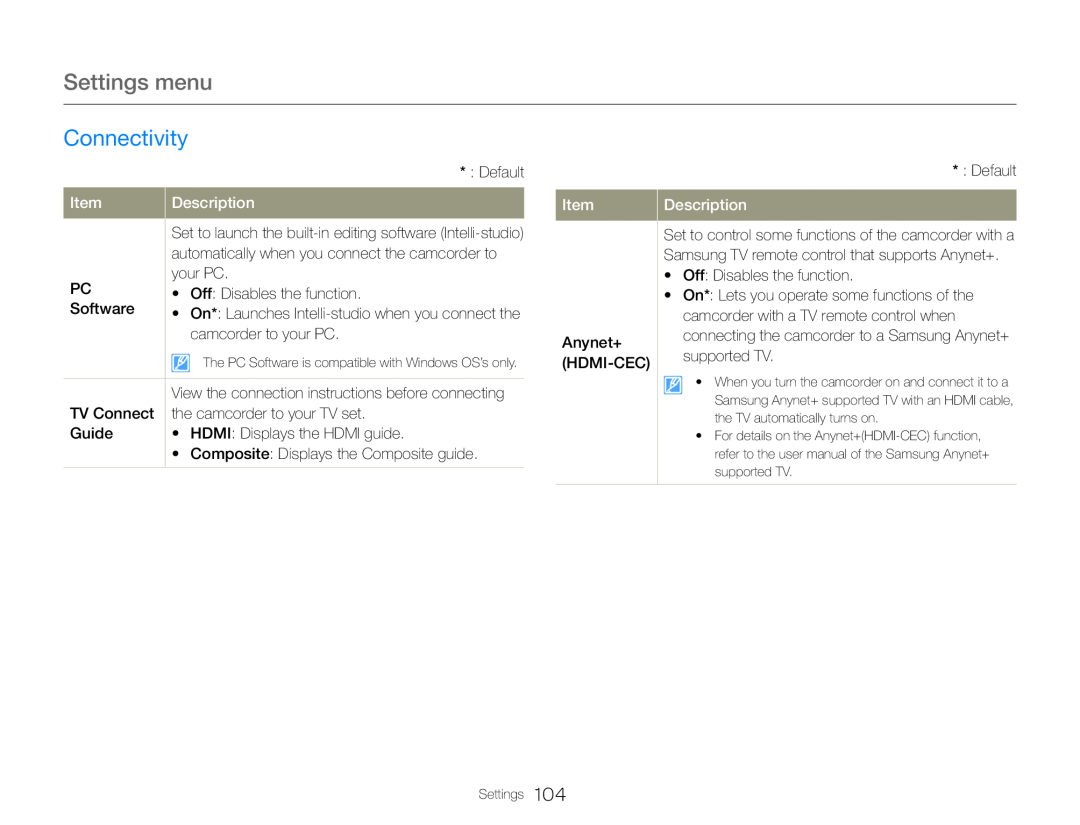 Connectivity
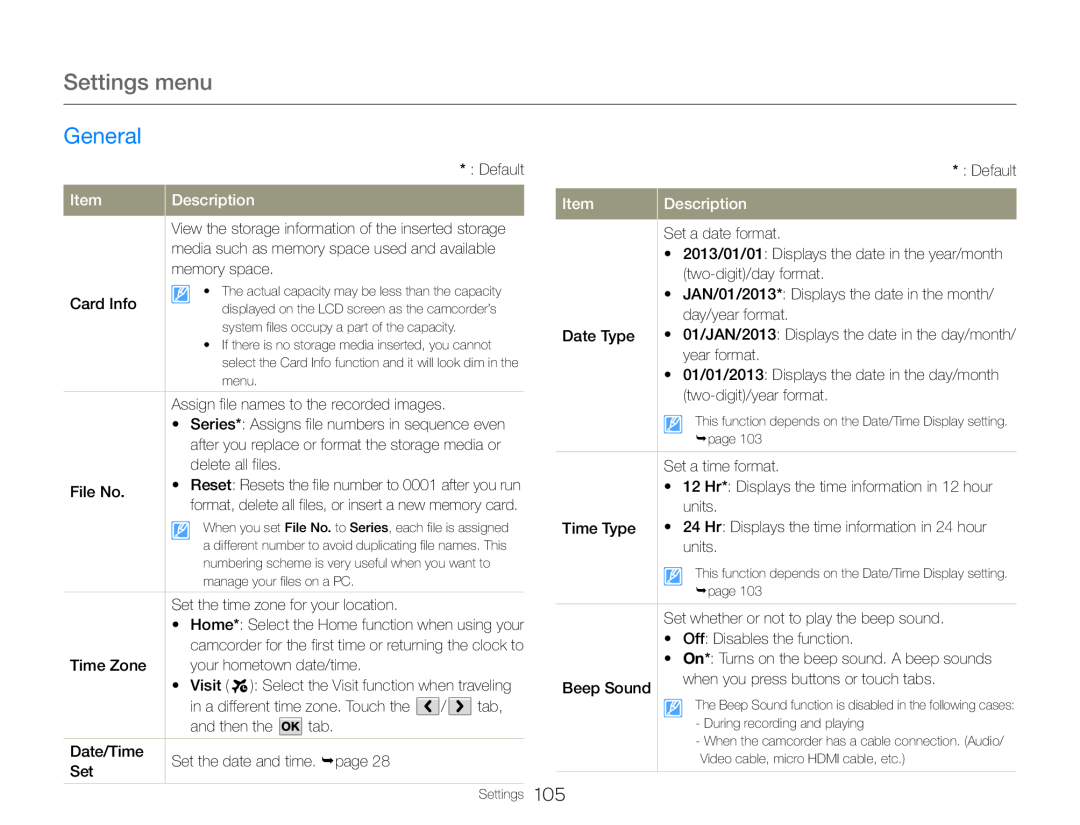 General
 Settings menu
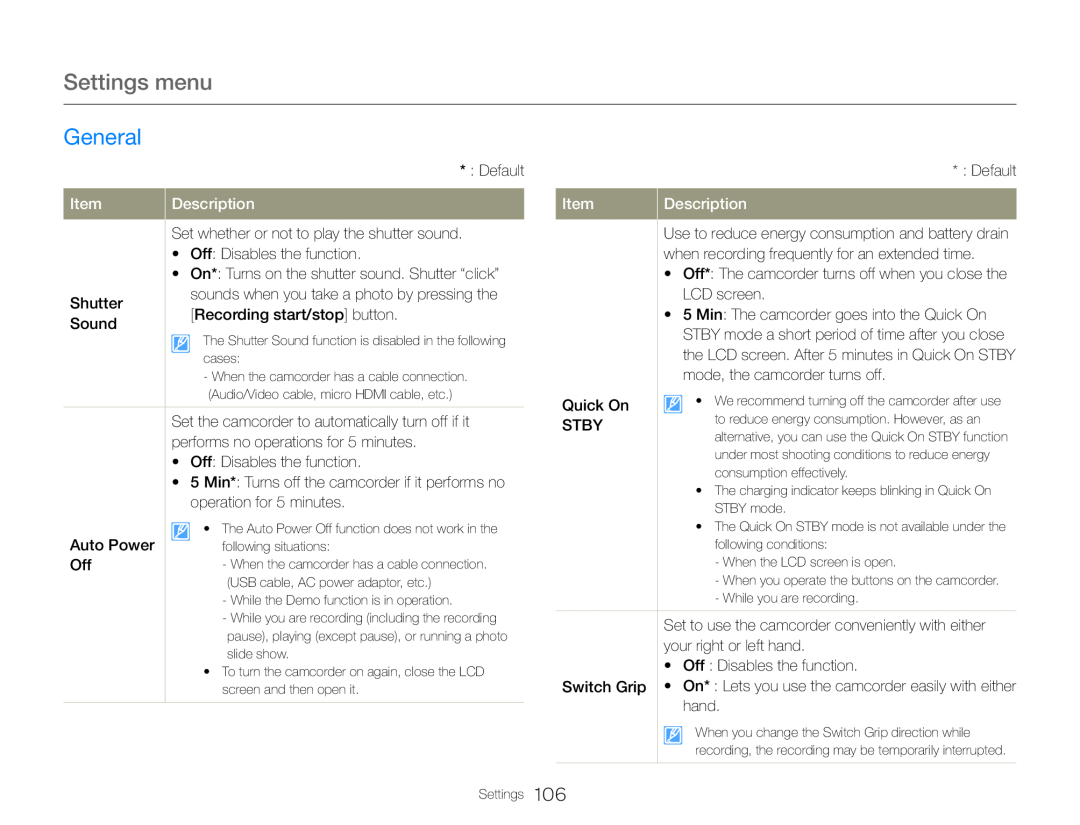
General
* : Default
Item
Description
Set whether or not to play the shutter sound
• Off: Disables the function
• On*: Turns on the shutter sound. Shutter “click”
Shutter
sounds when you take a photo by pressing the
[Recording start/stop] button
Sound
cases:
(Audio/Video cable, micro HDMI cable, etc.)
•Off: Disables the function
•5 Min*: Turns off the camcorder if it performs no operation for 5 minutes
Auto Power
following situations:
Off
(USB cable, AC power adaptor, etc.)
-While the Demo function is in operation
•To turn the camcorder on again, close the LCD screen and then open it
* : Default
Item
Description
•Off*: The camcorder turns off when you close the LCD screen
Quick On
STBY
consumption effectively
•The charging indicator keeps blinking in Quick On STBY mode
•The Quick On STBY mode is not available under the following conditions:
-When the LCD screen is open
-When you operate the buttons on the camcorder
-While you are recording
Set to use the camcorder conveniently with either your right or left hand
•Off : Disables the function
Switch Grip • On* : Lets you use the camcorder easily with either hand
Settings
 Settings menu
General
* : Default
Item
Description
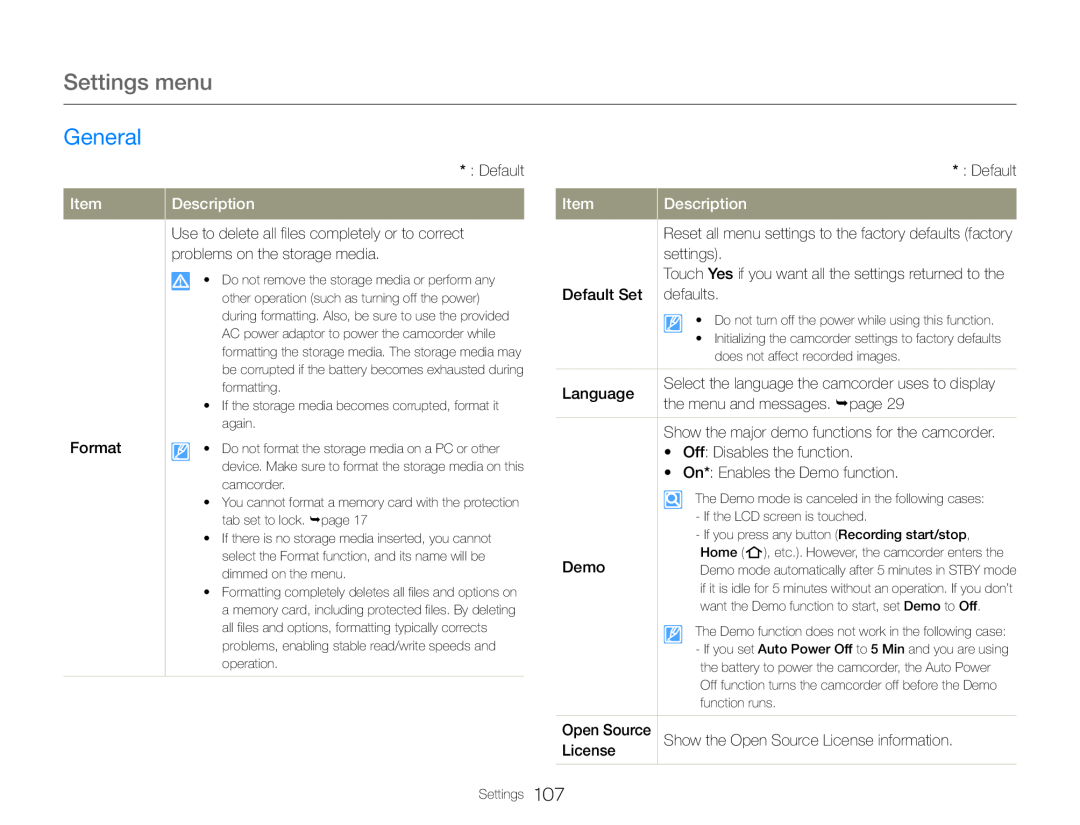
problems on the storage media
•If the storage media becomes corrupted, format it again
Format
camcorder
•You cannot format a memory card with the protection tab set to lock. page
* : Default
Item
Description
settings)
Touch Yes if you want all the settings returned to the
Default Set
defaults
Language
the menu and messages. page
Show the major demo functions for the camcorder
•Off: Disables the function
•On*: Enables the Demo function
The Demo mode is canceled in the following cases:
-If the LCD screen is touched
-If you press any button (Recording start/stop
Demo
Open Source
License
Settings
 Appendixes
Get information about error messages, maintenance, and
specifications
Troubleshooting
Maintenance
Using your camcorder abroad
Glossary
Specifications
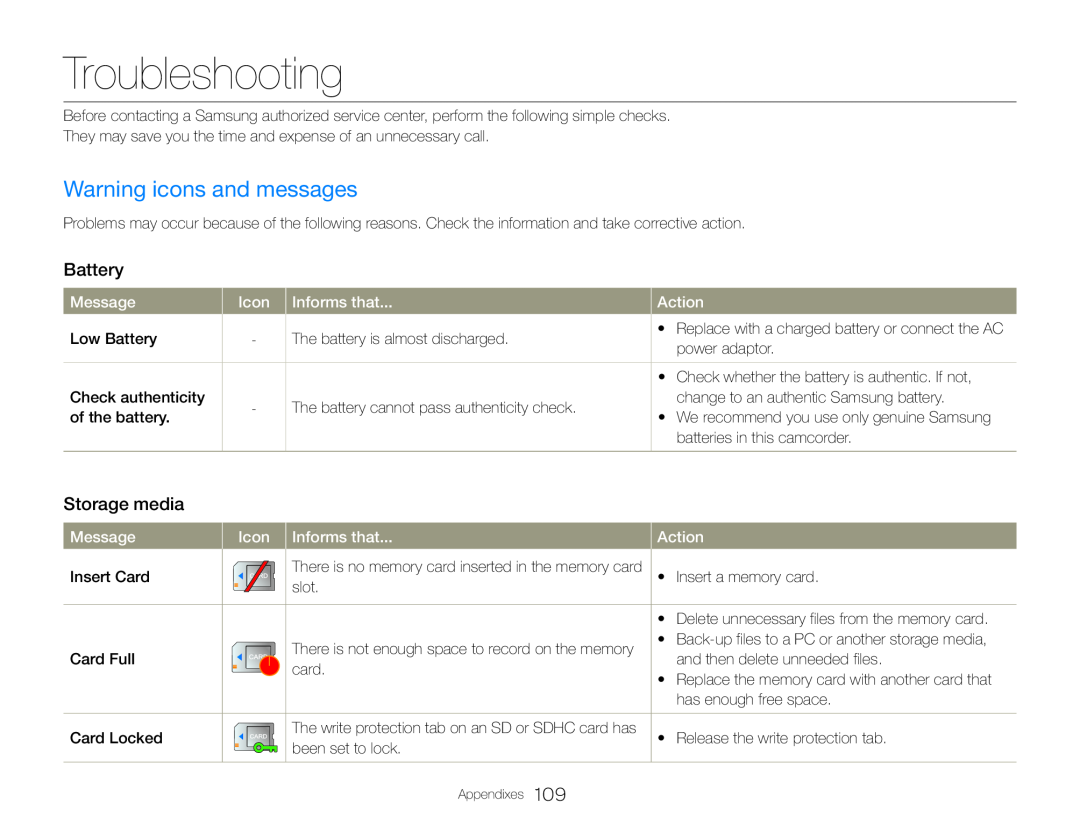 Troubleshooting
Warning icons and messages
Battery
Storage media
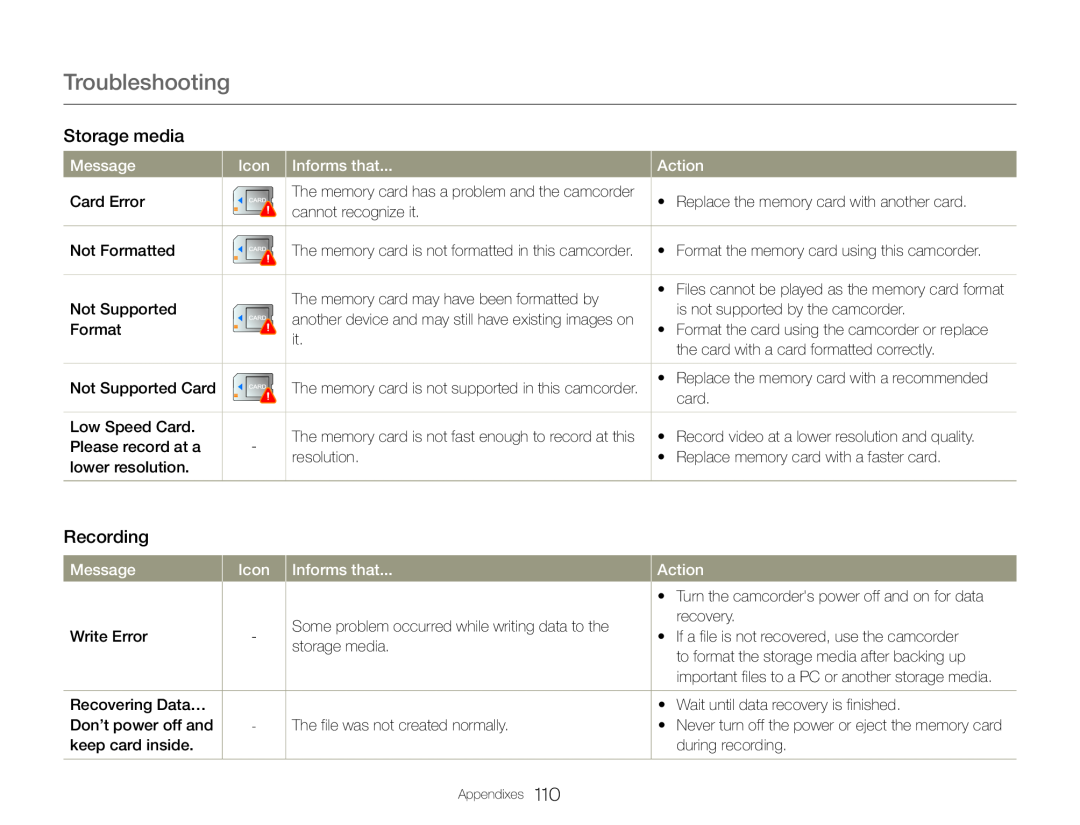 Troubleshooting
 Troubleshooting
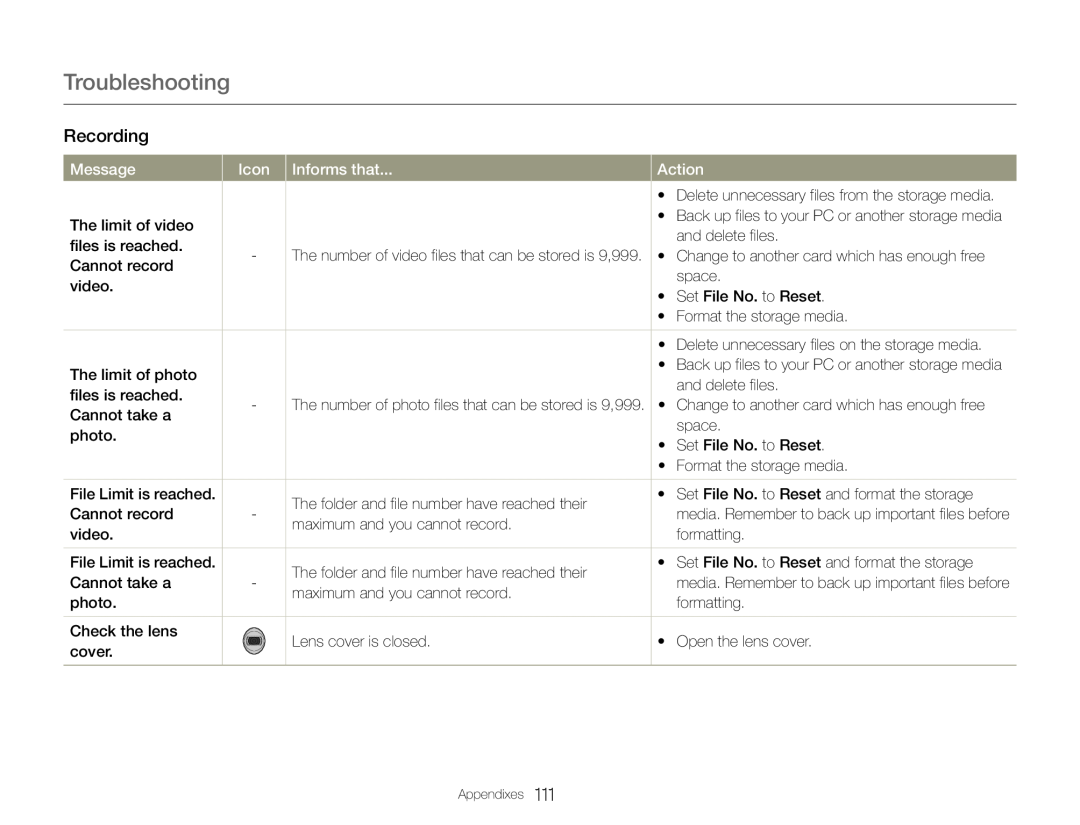
Recording
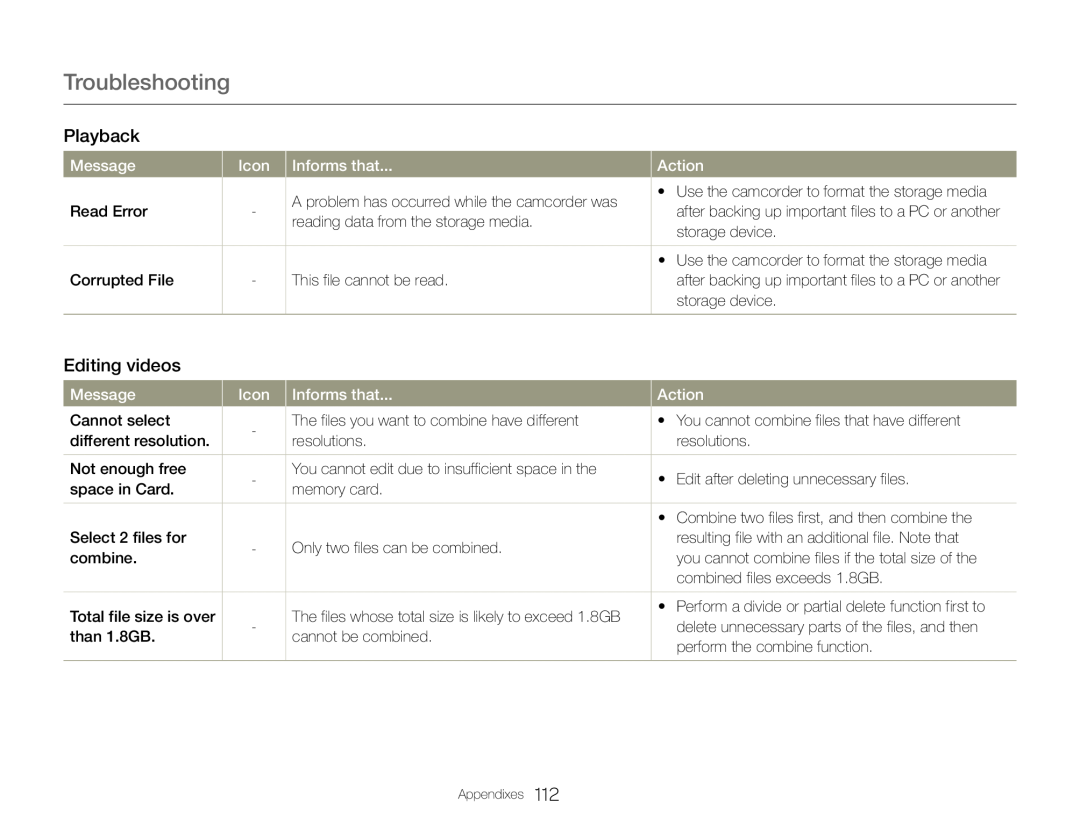 Playback
Editing videos
 Wireless Network
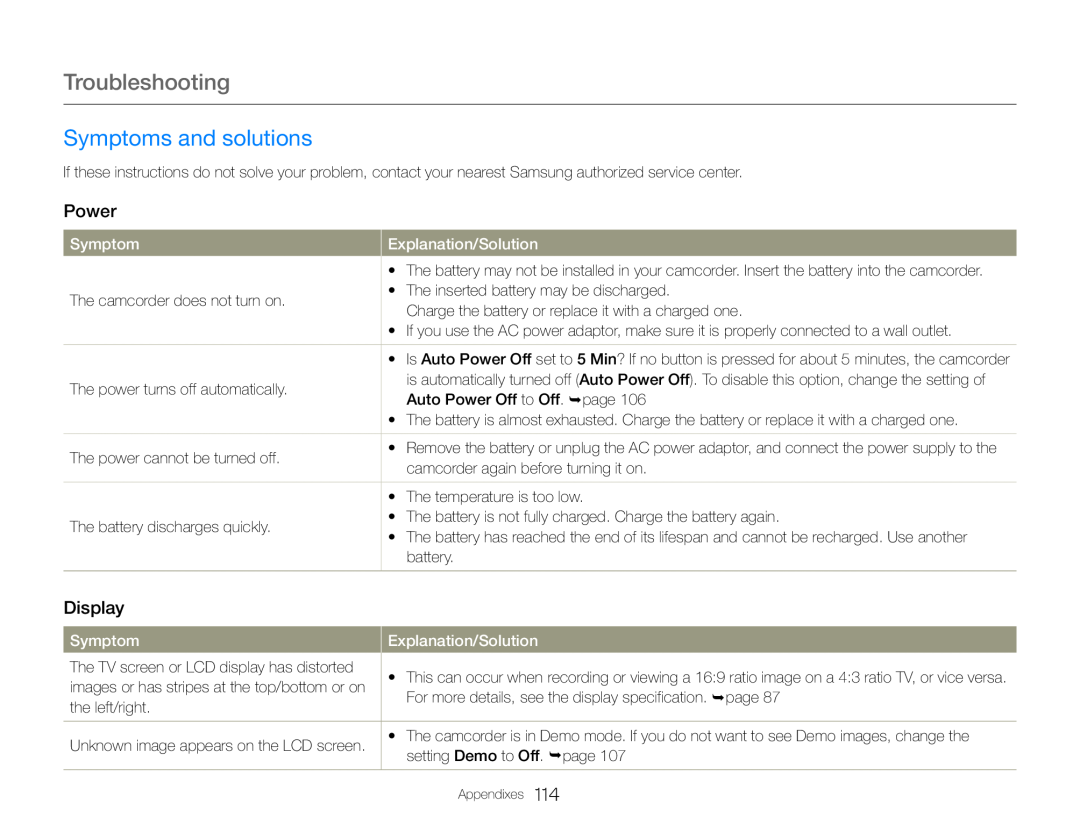 Symptoms and solutions
Power
Display
 Troubleshooting
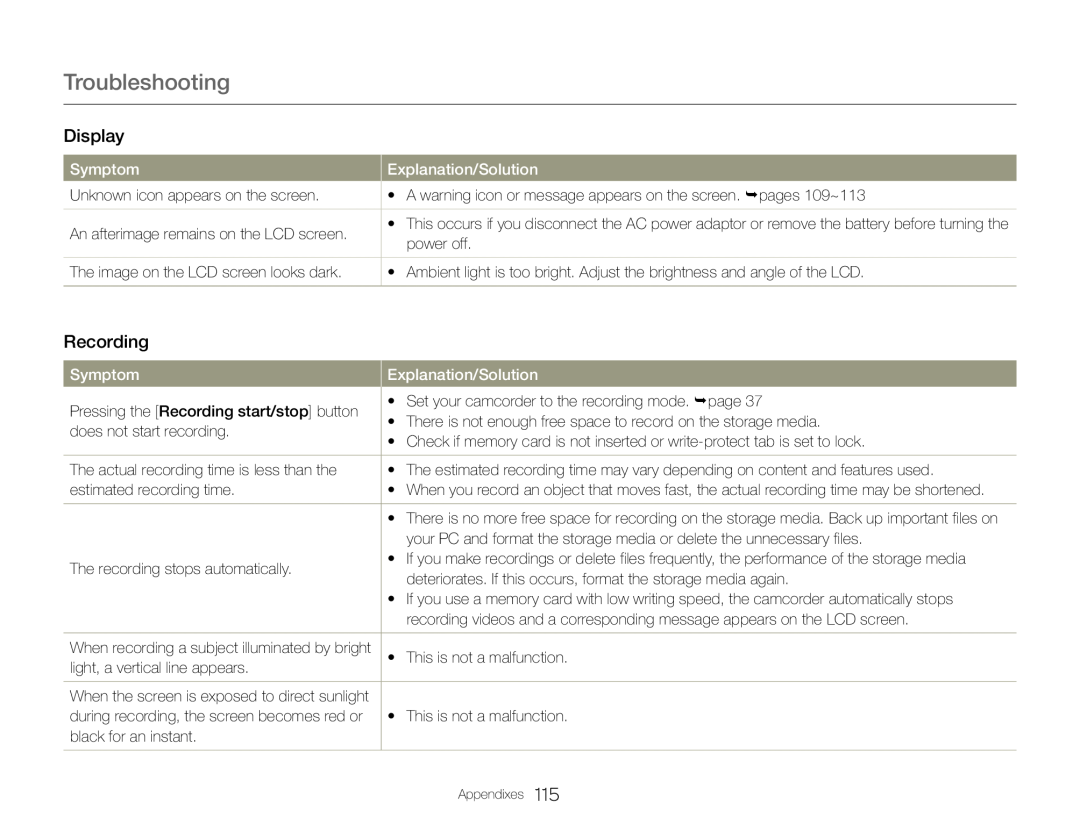
Display
Symptom
Explanation/Solution
Unknown icon appears on the screen
• A warning icon or message appears on the screen. pages 109~113
An afterimage remains on the LCD screen
power off
The image on the LCD screen looks dark
• Ambient light is too bright. Adjust the brightness and angle of the LCD
Recording
Symptom
Explanation/Solution
Pressing the [Recording start/stop] button
• Set your camcorder to the recording mode. page
• There is not enough free space to record on the storage media
does not start recording
• Check if memory card is not inserted or write-protecttab is set to lock
The actual recording time is less than the
• The estimated recording time may vary depending on content and features used
estimated recording time
your PC and format the storage media or delete the unnecessary files
The recording stops automatically
deteriorates. If this occurs, format the storage media again
recording videos and a corresponding message appears on the LCD screen
When recording a subject illuminated by bright
• This is not a malfunction
light, a vertical line appears
When the screen is exposed to direct sunlight
during recording, the screen becomes red or
• This is not a malfunction
black for an instant
 Troubleshooting
Recording
Symptom
Explanation/Solution
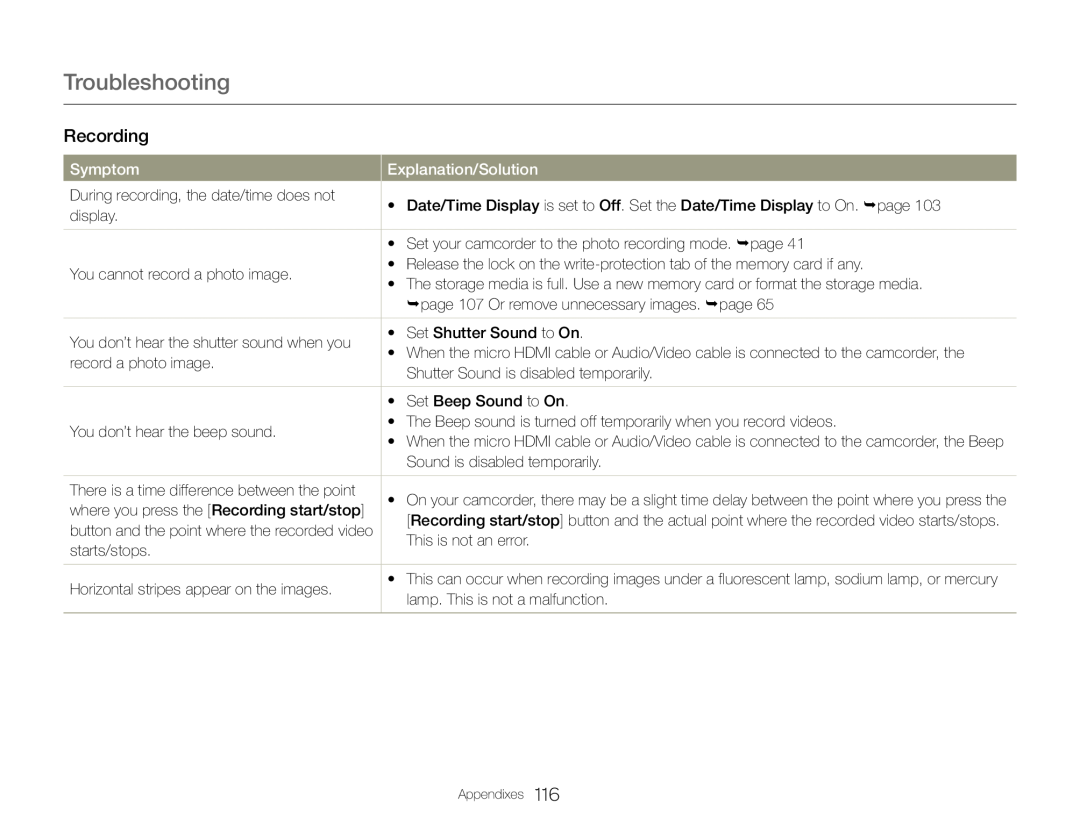
During recording, the date/time does not
• Date/Time Display is set to Off. Set the Date/Time Display to On. page
display
• Set your camcorder to the photo recording mode. page
You cannot record a photo image
• Release the lock on the write-protectiontab of the memory card if any
• The storage media is full. Use a new memory card or format the storage media
page 107 Or remove unnecessary images. page
You don’t hear the shutter sound when you
• Set Shutter Sound to On
record a photo image
Shutter Sound is disabled temporarily
• Set Beep Sound to On
You don’t hear the beep sound
• The Beep sound is turned off temporarily when you record videos
Sound is disabled temporarily
There is a time difference between the point
where you press the [Recording start/stop]
This is not an error
starts/stops
Horizontal stripes appear on the images
lamp. This is not a malfunction
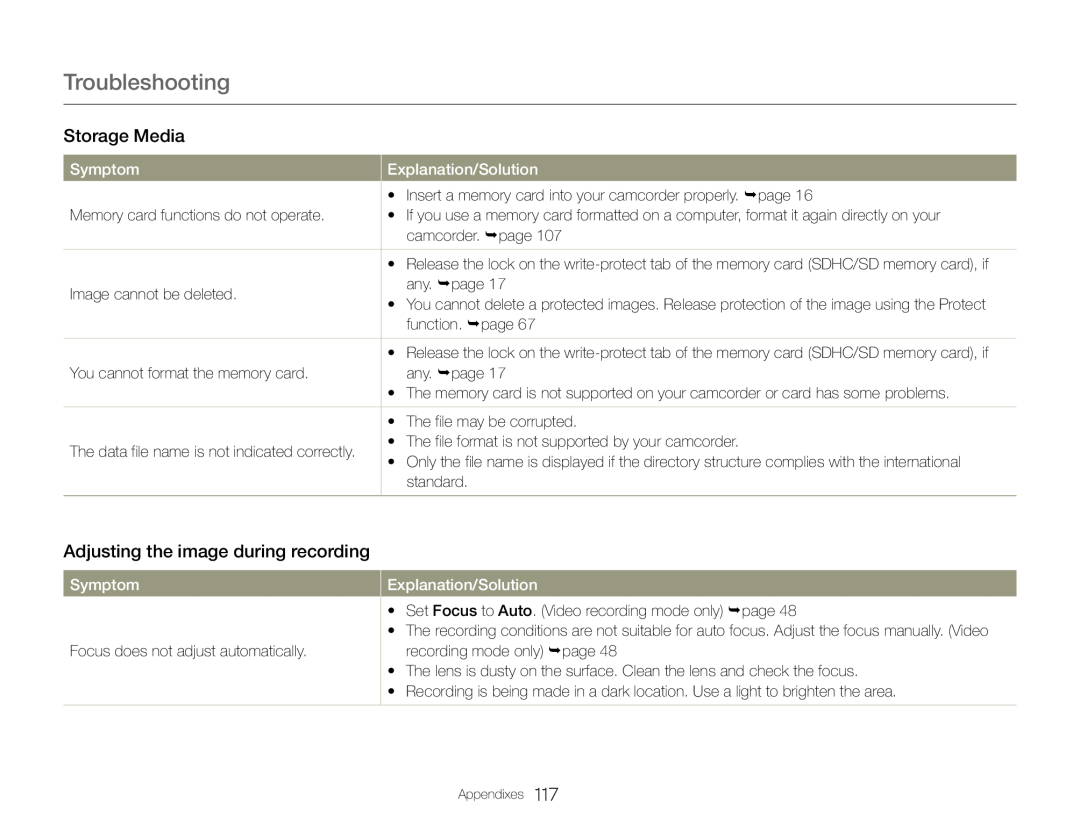 Storage Media
Adjusting the image during recording
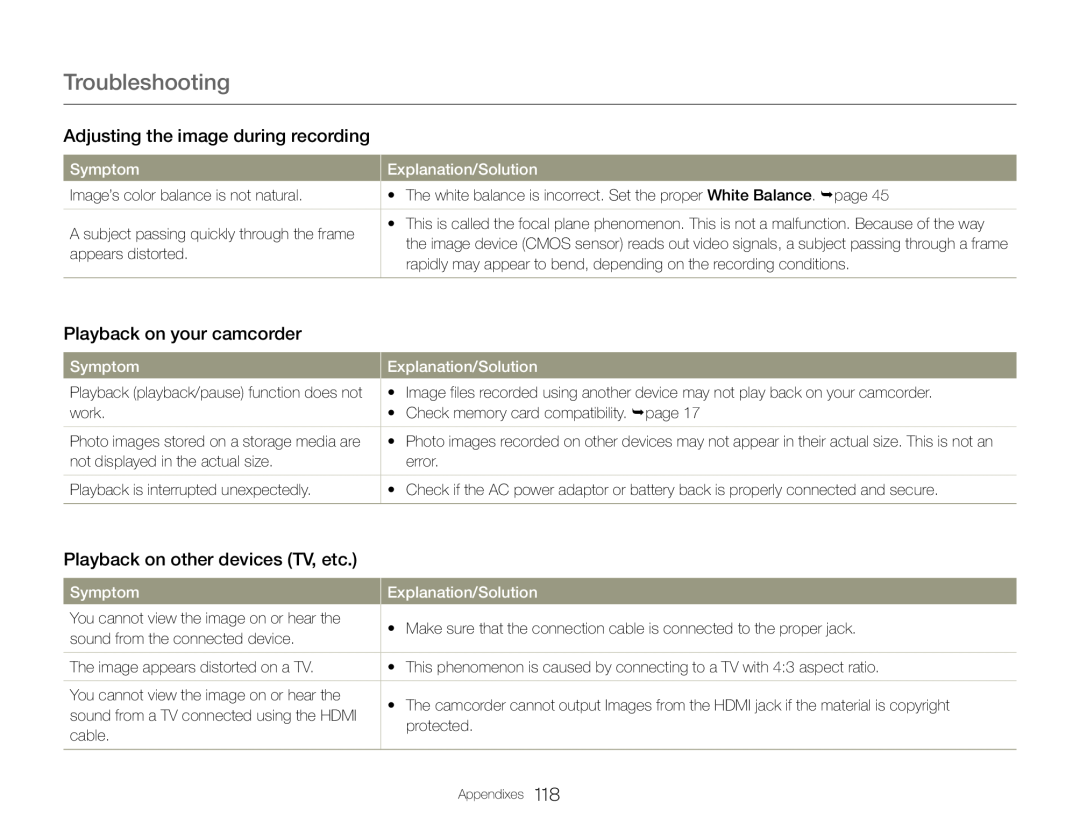 Playback on your camcorder
Playback on other devices (TV, etc.)
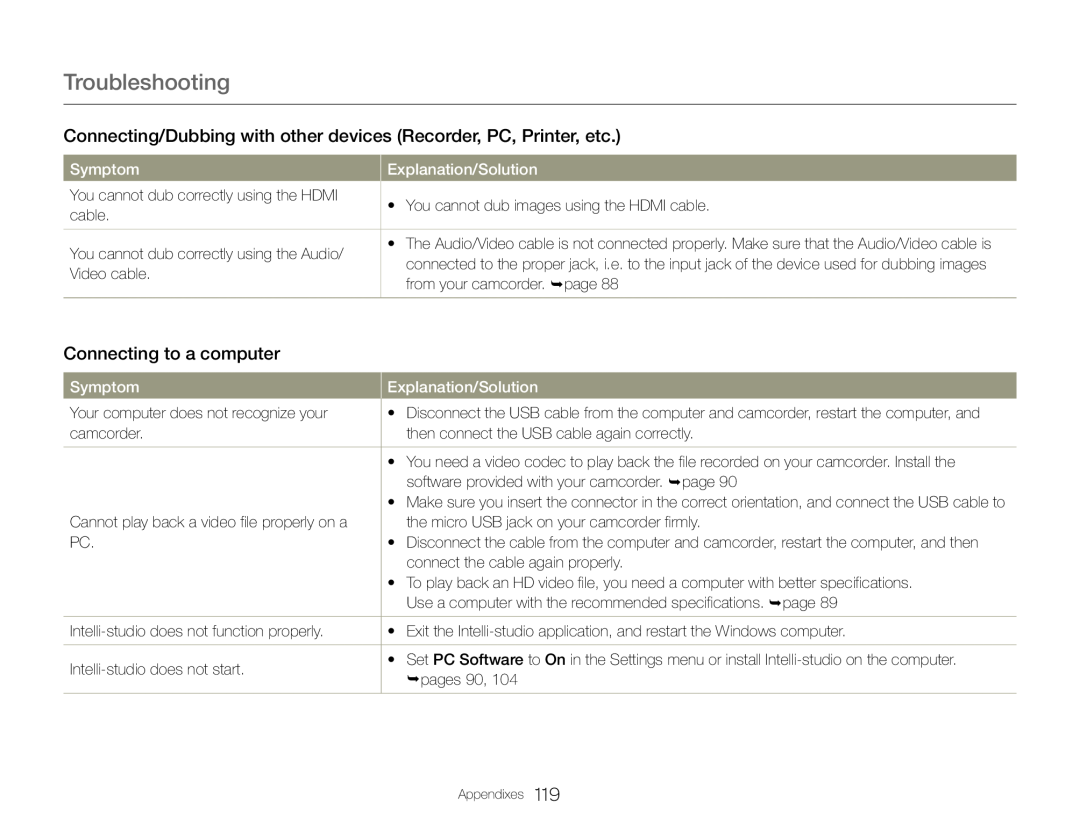 Connecting/Dubbing with other devices (Recorder, PC, Printer, etc.)
Connecting to a computer
 Overall operations
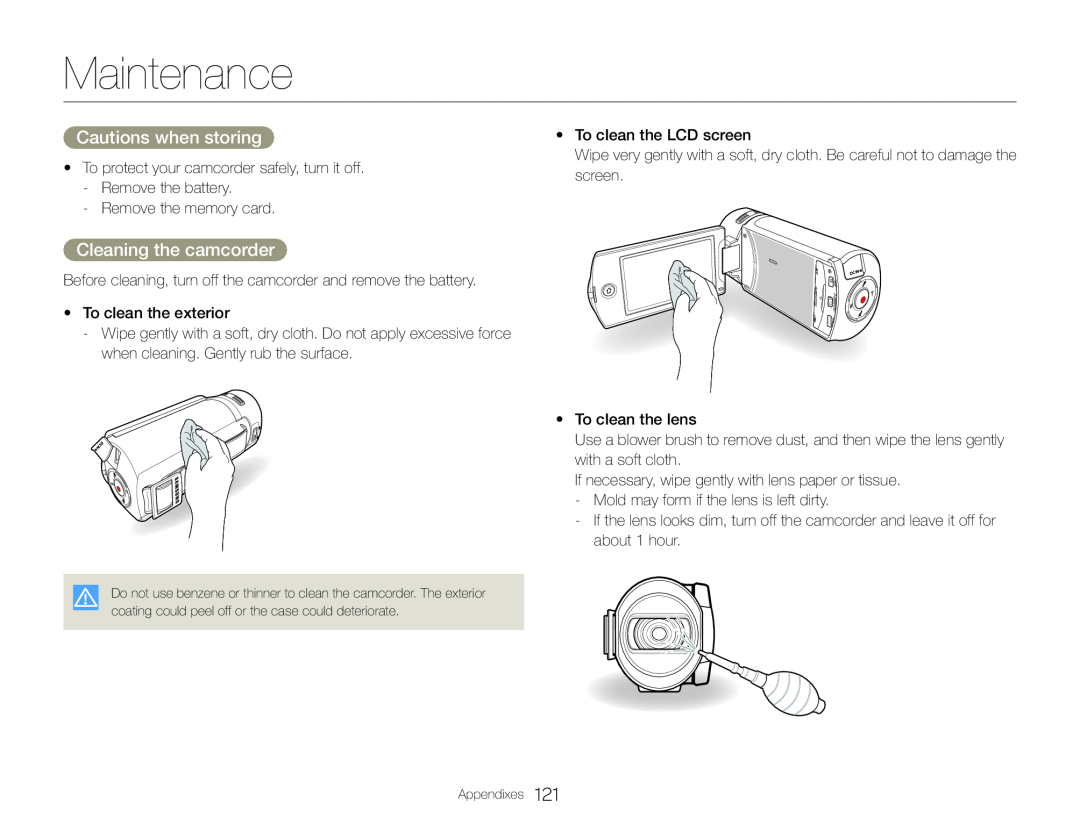 Maintenance
Cautions when storing
Cleaning the camcorder
 Maintenance
LCD screen
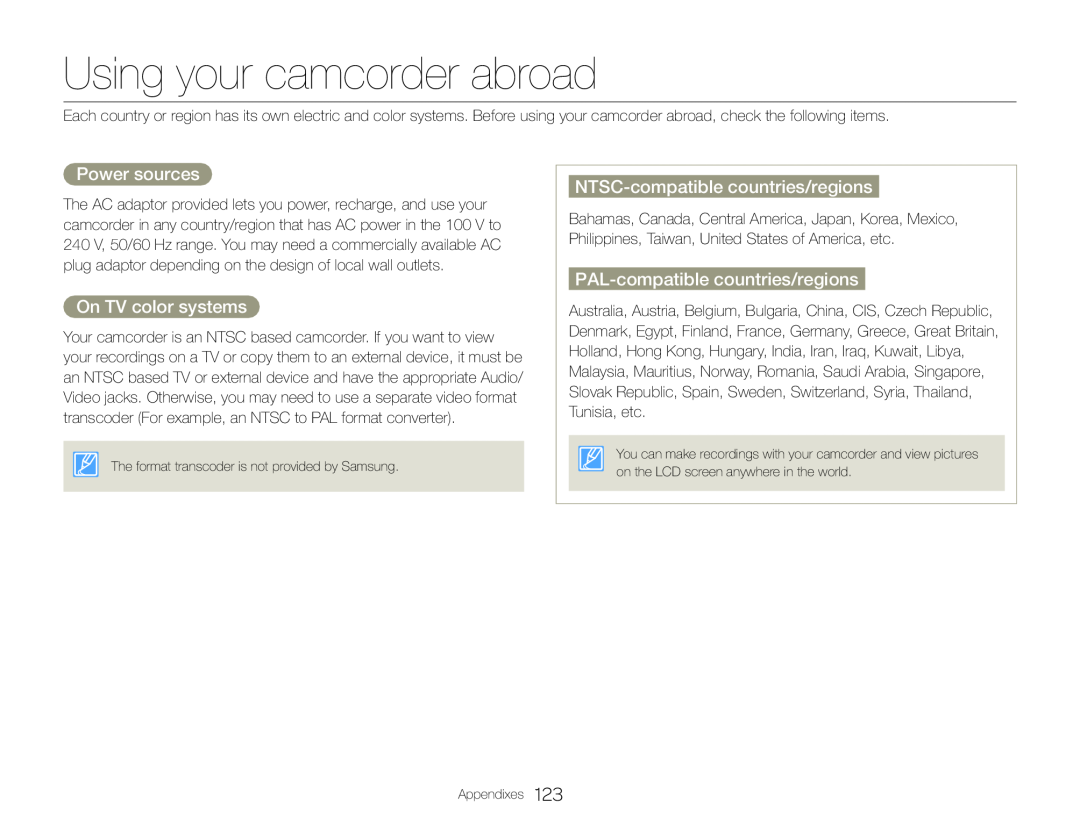 Using your camcorder abroad
Power sources
On TV color systems
NTSC-compatiblecountries/regions
PAL-compatiblecountries/regions
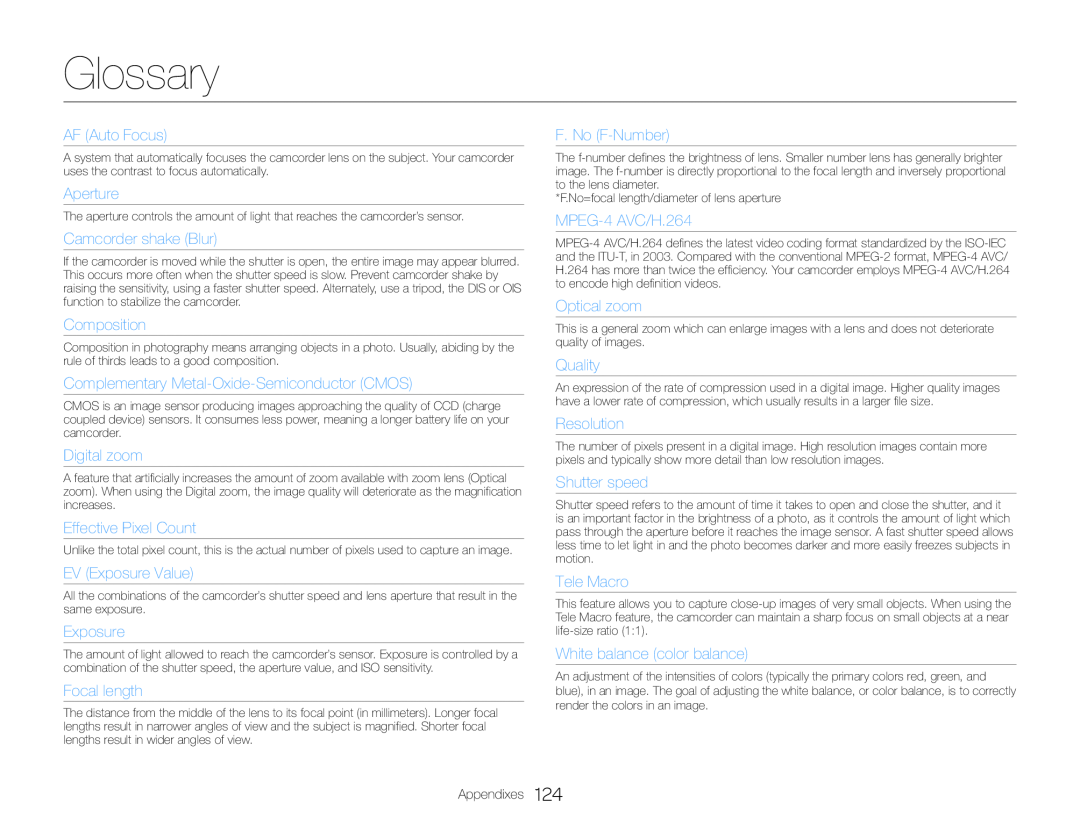 Glossary
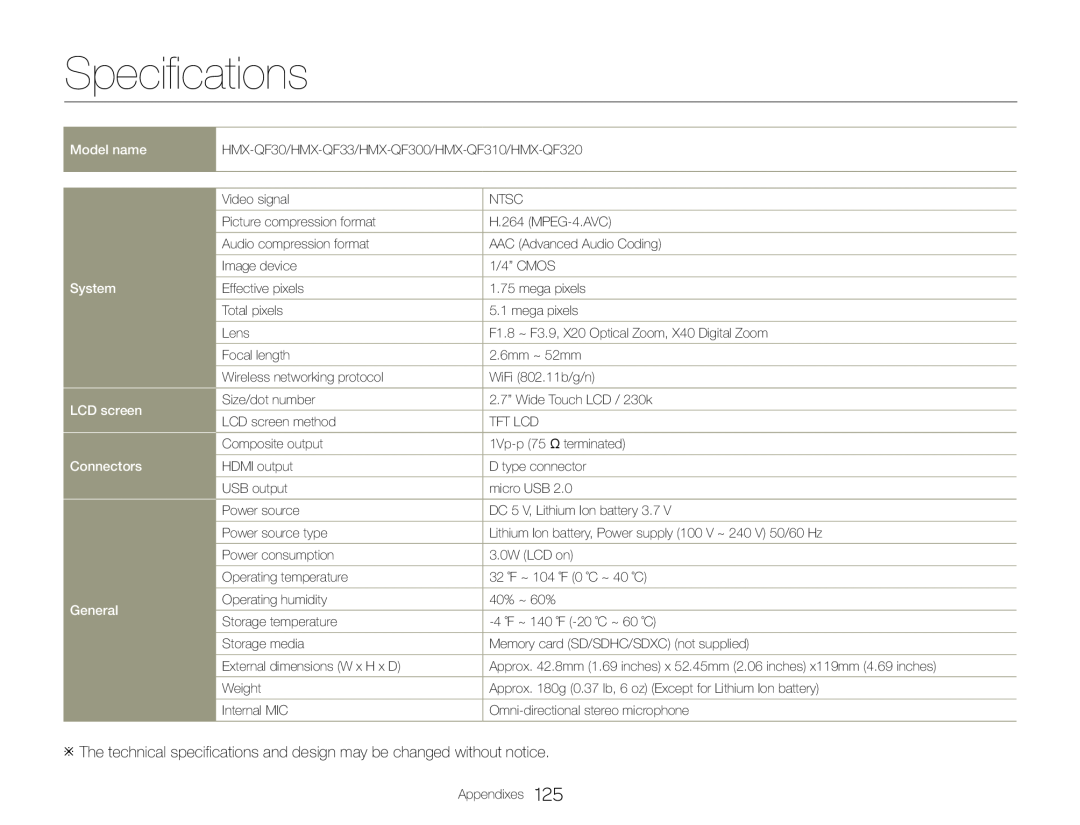 Specifications
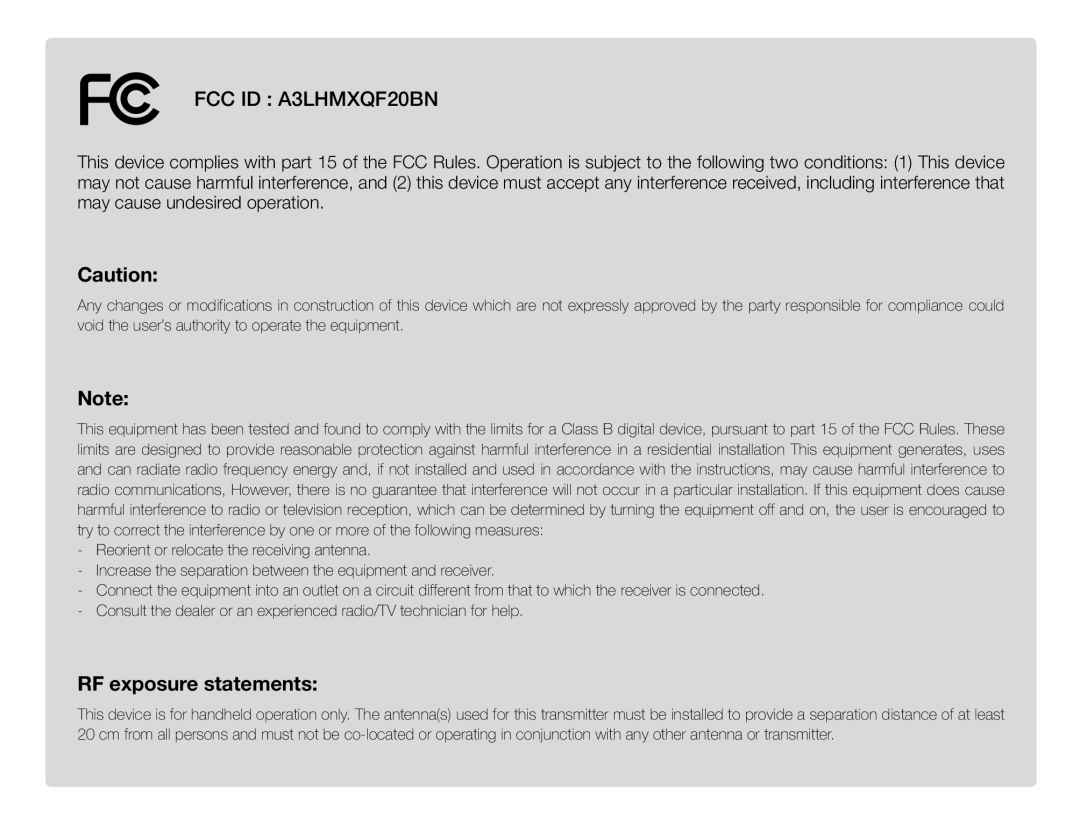 FCC ID : A3LHMXQF20BN
Caution:
Note:
RF exposure statements:
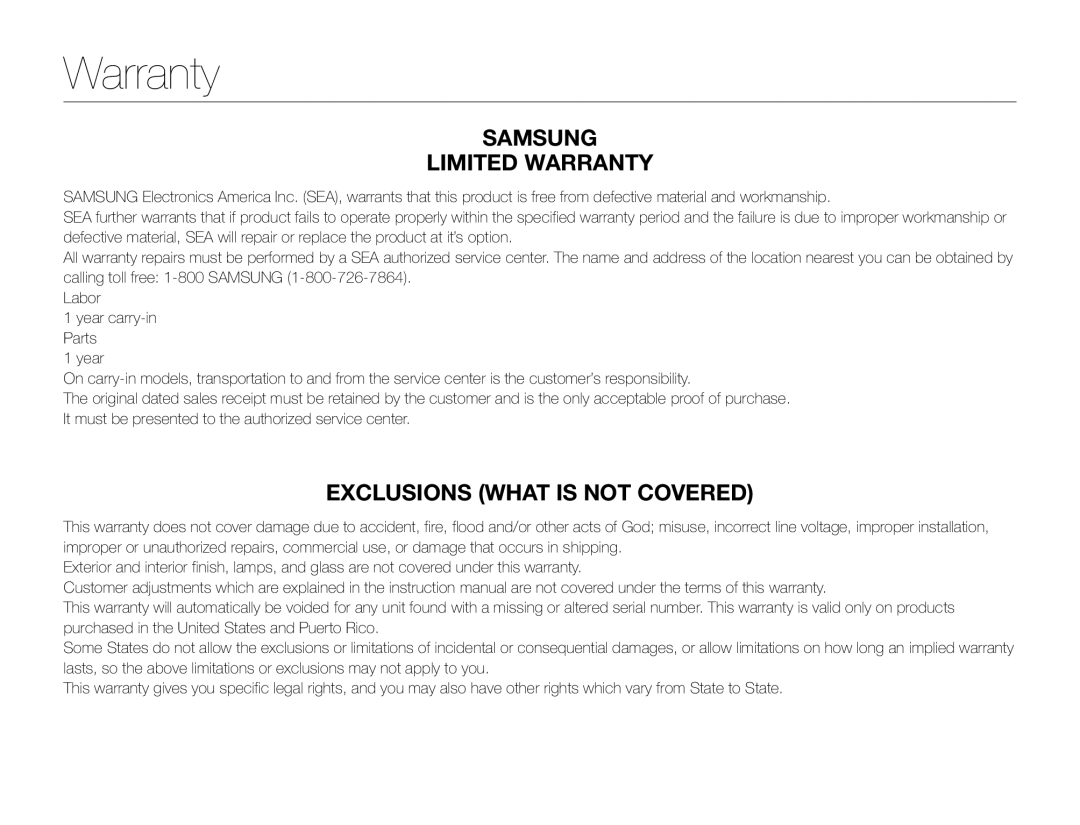 Warranty
 Correct disposal of batteries in this product
(Applicable in countries with separate collection systems)
Correct Disposal of This Product
(Waste Electrical & Electronic Equipment)
(Applicable in countries with separate collection systems)
Type Approved
No.: ESD-1206039C
 QUESTIONS OR COMMENTS