ENGLISH
DVD Camcorder: Basic Recording
Making your First Recording
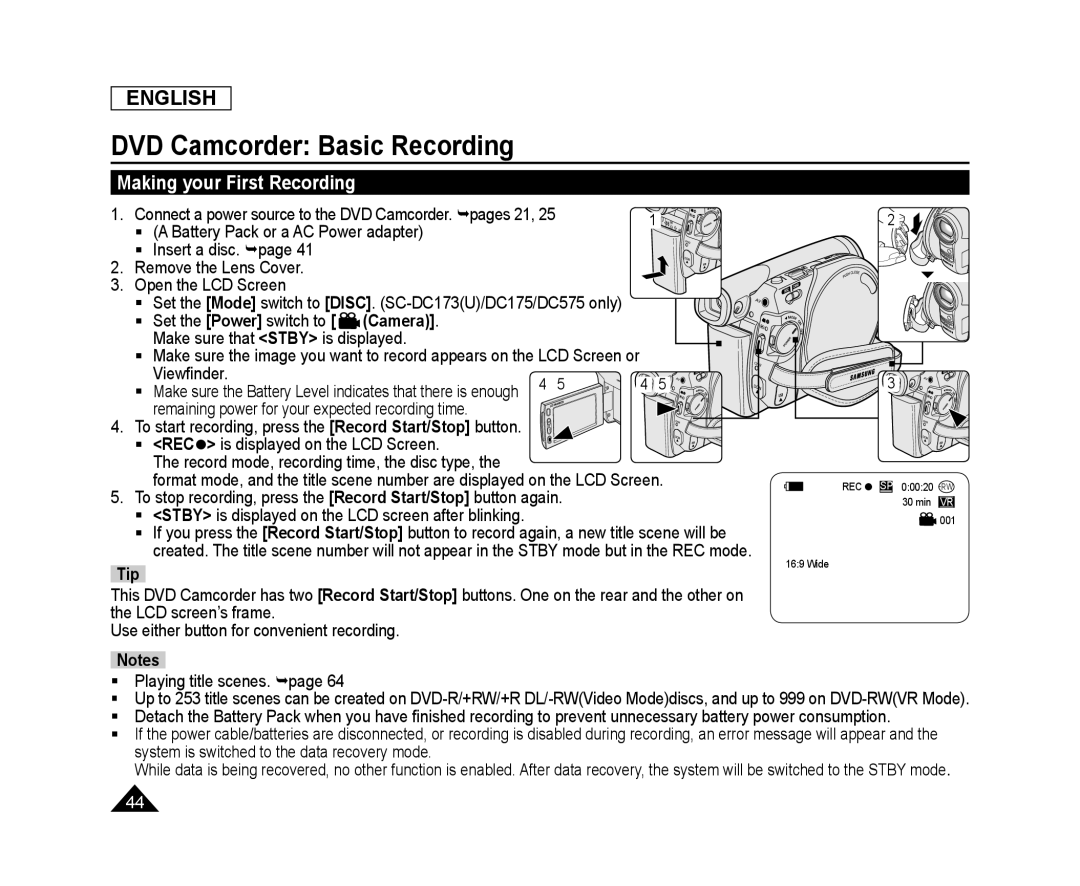
1. | Connect a power source to the DVD Camcorder. pages 21, 25 |
|
| 1 | |||
| (A Battery Pack or a AC Power adapter) |
|
|
|
| ||
2. | Insert a disc. page 41 |
|
|
|
|
| |
Remove the Lens Cover. |
|
|
|
|
| ||
3. | Open the LCD Screen |
|
|
|
|
| |
| Set the [Mode] switch to [DISC]. |
|
| ||||
| | Set the [Power] switch to [ | (Camera)]. |
|
|
|
|
|
| Make sure that <STBY> is displayed. |
|
|
|
| |
| | Make sure the image you want to record appears on the LCD Screen or |
|
| |||
|
| Viewfinder. |
| 4 | 5 | 4 | 5 |
| Make sure the Battery Level indicates that there is enough | ||||||
|
|
|
|
| |||
4. |
| remaining power for your expected recording time. |
|
|
|
| |
To start recording, press the [Record Start/Stop] button. |
|
|
|
| |||
| <REC> is displayed on the LCD Screen. |
|
|
|
| ||
|
| The record mode, recording time, the disc type, the |
|
|
|
| |
|
| format mode, and the title scene number are displayed on the LCD Screen. | |||||
5.To stop recording, press the [Record Start/Stop] button again.
<STBY> is displayed on the LCD screen after blinking.
If you press the [Record Start/Stop] button to record again, a new title scene will be created. The title scene number will not appear in the STBY mode but in the REC mode.
TipThis DVD Camcorder has two [Record Start/Stop] buttons. One on the rear and the other on the LCD screen’s frame.
Use either button for convenient recording.
2
![]()
![]()
![]()
![]() 3
3![]()
![]()
![]()
![]()
![]()
![]()
REC SP 0:00:20
![]() 001
001
16:9 Wide
Playing title scenes. page 64
Up to 253 title scenes can be created on
Detach the Battery Pack when you have finished recording to prevent unnecessary battery power consumption.
If the power cable/batteries are disconnected, or recording is disabled during recording, an error message will appear and the system is switched to the data recovery mode.
While data is being recovered, no other function is enabled. After data recovery, the system will be switched to the STBY mode.
44
