ENGLISH
FRANÇAIS
Digital Still Camera Mode | Mode Digital Still Camera | ||||||||||||||||||||
|
|
|
|
|
|
|
|
|
|
|
|
|
|
| |||||||
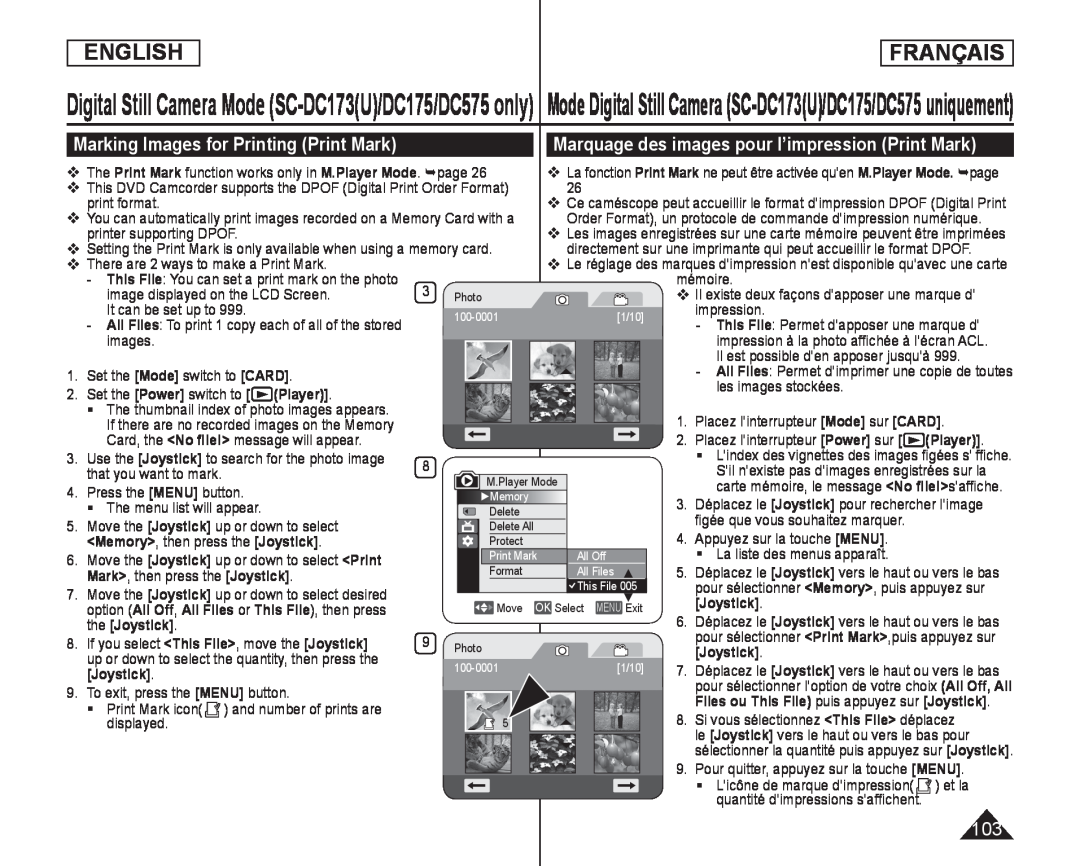
Marking Images for Printing (Print Mark) |
|
|
|
|
|
|
| Marquage des images pour l’impression (Print Mark) | |||||||||||||
The Print Mark function works only in M.Player Mode. page 26 | La fonction Print Mark ne peut être activée qu’en M.Player Mode. page | ||||||||||||||||||||
This DVD Camcorder supports the DPOF (Digital Print Order Format) | 26 |
|
|
|
|
|
|
|
|
|
| ||||||||||
print format. |
|
|
|
|
|
|
|
| Ce caméscope peut accueillir le format d’impression DPOF (Digital Print | ||||||||||||
You can automatically print images recorded on a Memory Card with a | Order Format), un protocole de commande d’impression numérique. | ||||||||||||||||||||
printer supporting DPOF. |
|
|
|
|
|
|
|
| Les images enregistrées sur une carte mémoire peuvent être imprimées | ||||||||||||
Setting the Print Mark is only available when using a memory card. | directement sur une imprimante qui peut accueillir le format DPOF. | ||||||||||||||||||||
There are 2 ways to make a Print Mark. |
|
|
|
|
|
|
| Le réglage des marques d’impression n’est disponible qu’avec une carte | |||||||||||||
- | This File: You can set a print mark on the photo | 3 |
|
|
|
|
|
|
|
|
|
|
|
|
| mémoire. |
|
| |||
| image displayed on the LCD Screen. | Photo |
|
|
|
|
|
|
| Il existe deux façons d’apposer une marque d’ | |||||||||||
| It can be set up to 999. |
|
|
|
|
|
|
| [1/10] |
| impression. |
|
| ||||||||
- All Files: To print 1 copy each of all of the stored |
|
|
|
|
|
|
| - This File: Permet d’apposer une marque d’ | |||||||||||||
|
|
|
|
|
|
|
|
|
|
|
|
|
|
| |||||||
| images. |
|
|
|
|
|
|
|
|
|
|
|
|
|
|
|
|
| impression à la photo affichée à l’écran ACL. | ||
|
|
|
|
|
|
|
|
|
|
|
|
|
|
|
|
|
|
| Il est possible d’en apposer jusqu’à 999. | ||
1. Set the [Mode] switch to [CARD]. |
|
|
|
|
|
|
|
|
|
|
|
|
|
|
| - All Files: Permet d’imprimer une copie de toutes | |||||
2. Set the [Power] switch to [ | (Player)]. |
|
|
|
|
|
|
|
|
|
|
|
|
|
|
|
| les images stockées. |
|
| |
| The thumbnail index of photo images appears. |
|
|
|
|
|
|
|
|
|
|
|
|
|
| 1. | Placez l’interrupteur [Mode] sur [CARD]. | ||||
| If there are no recorded images on the Memory |
|
|
|
|
|
|
|
|
|
|
|
|
|
| ||||||
|
|
|
|
|
|
|
|
|
|
|
|
|
|
| |||||||
| Card, the <No file!> message will appear. |
|
|
|
|
|
|
|
|
|
|
|
|
|
| 2. | Placez l’interrupteur [Power] sur [ | (Player)]. | |||
|
|
|
|
|
|
|
|
|
|
|
|
|
|
| |||||||
3. Use the [Joystick] to search for the photo image | 8 |
|
|
|
|
|
|
|
|
|
|
|
|
|
| | L’index des vignettes des images figées s’ ffiche. | ||||
that you want to mark. |
|
|
|
|
| M.Player Mode |
|
|
|
|
|
| S’il n’existe pas d’images enregistrées sur la | ||||||||
4. Press the [MENU] button. |
|
|
|
| ►Memory |
|
|
|
|
|
|
|
|
| carte mémoire, le message <No file!>s’affiche. | ||||||
|
|
|
|
|
|
|
|
|
|
| 3. | Déplacez le [Joystick] pour rechercher l’image | |||||||||
| The menu list will appear. |
|
|
|
| Delete |
|
|
|
|
|
|
| ||||||||
5. Move the [Joystick] up or down to select |
|
|
|
| Delete All |
|
|
|
|
|
|
|
| figée que vous souhaitez marquer. |
|
| |||||
<Memory>, then press the | [Joystick]. |
|
|
|
| Protect |
|
|
|
|
|
|
| 4. | Appuyez sur la touche [MENU]. |
|
| ||||
6. Move the [Joystick] up or down to select <Print |
|
|
|
| Print Mark |
| All Off |
|
|
|
|
| | La liste des menus apparaît. |
|
| |||||
|
|
|
| Format |
| All Files |
|
|
|
| 5. | Déplacez le [Joystick] vers le haut ou vers le bas | |||||||||
Mark>, then press the [Joystick]. |
|
|
|
|
|
| | ||||||||||||||
7. Move the [Joystick] up or down to select desired |
|
|
|
|
|
|
|
| This File 005 |
| pour sélectionner <Memory>, puis appuyez sur | ||||||||||
|
|
|
|
|
|
|
|
|
|
| |
| |||||||||
option (All Off, All Files or This File), then press |
|
|
|
| Move OK Select MENU Exit |
| [Joystick]. |
|
| ||||||||||||
the [Joystick]. |
|
|
|
|
|
|
|
|
|
|
|
|
|
|
| 6. | Déplacez le [Joystick] vers le haut ou vers le bas | ||||
8. If you select <This File>, move the [Joystick] | 9 | Photo |
|
|
|
|
|
|
|
| pour sélectionner <Print Mark>,puis appuyez sur | ||||||||||
up or down to select the quantity, then press the |
|
|
|
|
|
| [1/10] |
| [Joystick]. |
|
| ||||||||||
|
|
|
|
|
| 7. | Déplacez le [Joystick] vers le haut ou vers le bas | ||||||||||||||
[Joystick]. |
|
|
|
|
|
|
| ||||||||||||||
|
|
|
|
|
|
|
|
|
|
|
|
|
|
| |||||||
9. To exit, press the [MENU] button. |
|
|
|
|
|
|
|
|
|
|
|
|
|
|
| pour sélectionner l’option de votre choix (All Off, All | |||||
| Print Mark icon( ) and number of prints are |
|
|
|
|
|
|
|
|
|
|
|
|
|
|
| Files ou This File) puis appuyez sur [Joystick]. | ||||
|
|
|
|
|
|
|
|
|
|
|
|
|
| 8. | Si vous sélectionnez <This File> déplacez | ||||||
| displayed. |
|
| 5 |
|
|
|
|
|
|
|
|
| ||||||||
|
|
|
|
|
|
|
|
|
|
|
|
|
|
|
|
|
| le [Joystick] vers le haut ou vers le bas pour | |||
|
|
|
|
|
|
|
|
|
|
|
|
|
|
|
|
|
| sélectionner la quantité puis appuyez sur [Joystick]. | |||
|
|
|
|
|
|
|
|
|
|
|
|
|
|
|
|
| 9. Pour quitter, appuyez sur la touche [MENU]. | ||||
|
|
|
|
|
|
|
|
|
|
|
|
|
|
|
|
|
| | L’icône de marque d’impression( | ) et la | |
|
|
|
|
|
|
|
|
|
|
|
|
|
|
|
|
|
|
| quantité d’impressions s’affichent. |
|
|
103