ENGLISH
FRANÇAIS
Initial Setting : System Menu Setting | Réglage initial : réglage du menu System (Système) | ||||||||||||||||||
|
|
|
|
|
|
|
|
|
|
|
|
| |||||||
Setting the Clock (Clock Set) |
|
|
|
|
| Réglage de l’horloge (Clock Set) | |||||||||||||
| Clock setup works in Camera Mode/Player Mode/M.Cam Mode/ | |
| La configuration de l’horloge est effective en Camera Mode/Player | |||||||||||||||
| M.Player Mode. page 26 |
|
|
|
|
|
|
|
| Mode/ M.Cam Mode/M.Player Mode. page 26 | |||||||||
| The date/time is automatically recorded onto a disc. Before recording, | |
| L’indication date/heure s’enregistre automatiquement sur un disque. | |||||||||||||||
| please set the date/time. |
|
|
|
|
|
|
|
| Avant l’ enregistrement, pensez au réglage de date/heure. | |||||||||
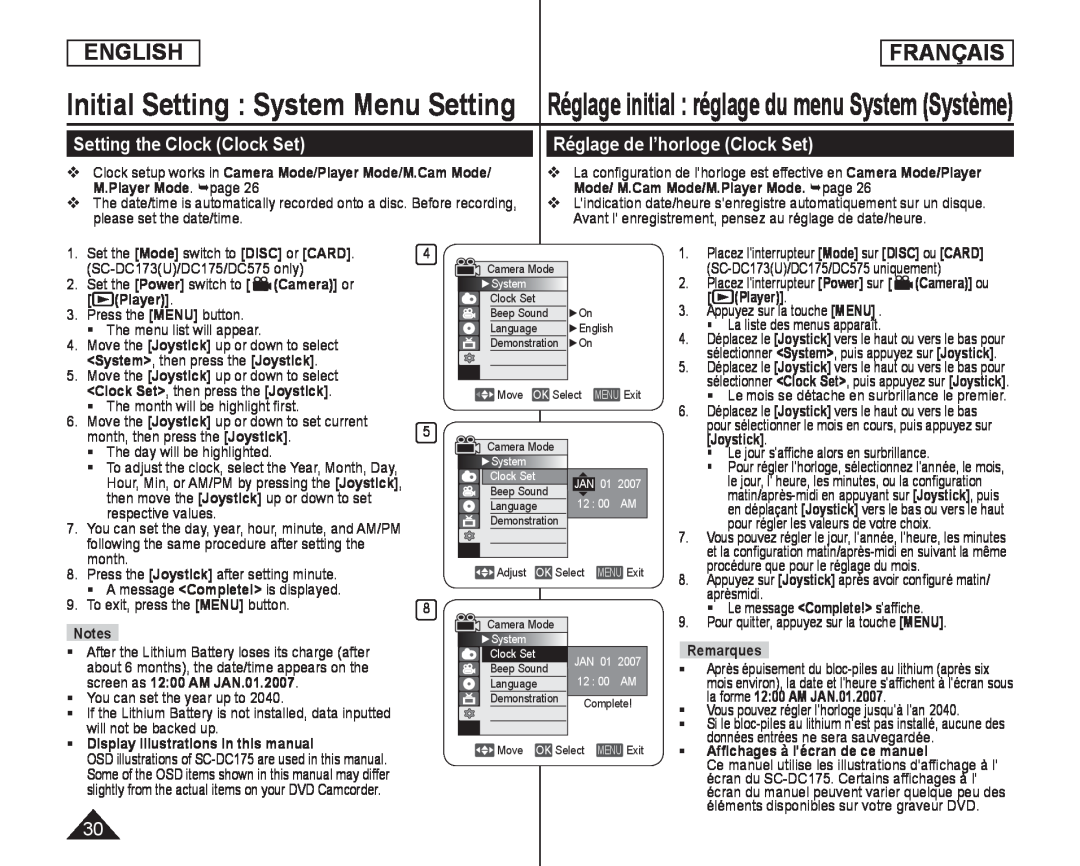
1. | Set the [Mode] switch to [DISC] or [CARD]. | 4 |
|
|
|
|
|
|
|
|
|
| 1. | Placez l’interrupteur [Mode] sur [DISC] ou [CARD] | |||||
|
|
| Camera Mode |
|
|
|
|
|
| ||||||||||
2. | Set the [Power] switch to [ (Camera)] or |
|
| ►System |
|
|
|
|
|
|
| 2. | Placez l’interrupteur [Power] sur [ (Camera)] ou | ||||||
| [ | (Player)]. |
|
|
| Clock Set |
|
|
|
|
|
| [ | (Player)]. | |||||
3. | Press the [MENU] button. |
|
|
| Beep Sound |
| ►On |
|
| 3. | Appuyez sur la touche [MENU] . | ||||||||
| | The menu list will appear. |
|
|
| Language |
| ►English |
|
|
| | La liste des menus apparaît. | ||||||
4. | Move the [Joystick] up or down to select |
|
|
| Demonstration |
| ►On |
|
| 4. | Déplacez le [Joystick] vers le haut ou vers le bas pour | ||||||||
| <System>, then press the [Joystick]. |
|
|
|
|
|
|
|
|
|
|
|
|
| sélectionner <System>, puis appuyez sur [Joystick]. | ||||
|
|
|
|
|
|
|
|
|
|
|
| 5. | Déplacez le [Joystick] vers le haut ou vers le bas pour | ||||||
5. | Move the [Joystick] up or down to select |
|
|
|
|
|
|
|
|
|
|
| |||||||
|
|
|
|
|
|
|
|
|
|
|
|
| sélectionner <Clock Set>, puis appuyez sur [Joystick]. | ||||||
| <Clock Set>, then press the [Joystick]. |
|
|
|
|
|
|
|
|
|
|
|
|
| |||||
|
|
|
| Move | OK Select | MENU Exit | 6. | | Le mois se détache en surbrillance le premier. | ||||||||||
6. | | The month will be highlight first. |
|
|
|
|
|
|
|
|
|
|
| Déplacez le [Joystick] vers le haut ou vers le bas | |||||
Move the [Joystick] up or down to set current | 5 |
|
|
|
|
|
|
|
|
|
|
|
| pour sélectionner le mois en cours, puis appuyez sur | |||||
| month, then press the [Joystick]. |
|
|
|
|
|
|
|
|
|
|
|
| [Joystick]. | |||||
| The day will be highlighted. |
|
| Camera Mode |
|
|
|
|
|
| Le jour s’affiche alors en surbrillance. | ||||||||
| To adjust the clock, select the Year, Month, Day, |
|
| ►System |
|
|
|
|
|
|
|
|
| Pour régler l’horloge, sélectionnez l’année, le mois, | |||||
|
| Hour, Min, or AM/PM by pressing the [Joystick], |
|
|
| Clock Set |
| JAN 01 2007 |
|
|
| le jour, l’ heure, les minutes, ou la configuration | |||||||
|
| then move the [Joystick] up or down to set |
|
|
| Beep Sound |
| 12 : 00 | AM |
|
|
| |||||||
|
| respective values. |
|
|
| Language |
|
|
| en déplaçant [Joystick] vers le bas ou vers le haut | |||||||||
|
|
|
|
| Demonstration |
|
|
|
|
|
|
|
| ||||||
7. | You can set the day, year, hour, minute, and AM/PM |
|
|
|
|
|
|
|
|
|
|
| pour régler les valeurs de votre choix. | ||||||
|
|
|
|
|
|
|
|
|
|
| 7. | Vous pouvez régler le jour, l’année, l’heure, les minutes | |||||||
| following the same procedure after setting the |
|
|
|
|
|
|
|
|
|
|
| |||||||
|
|
|
|
|
|
|
|
|
|
|
|
|
| et la configuration | |||||
| month. |
|
|
|
|
|
|
|
|
|
|
|
|
| |||||
|
|
|
|
|
|
|
|
|
|
|
|
|
| procédure que pour le réglage du mois. | |||||
8. | Press the [Joystick] after setting minute. |
|
|
| Adjust | OK Select | MENU Exit |
|
| ||||||||||
|
|
| 8. | Appuyez sur [Joystick] après avoir configuré matin/ | |||||||||||||||
| | A message <Complete!> is displayed. |
|
|
|
|
|
|
|
|
|
|
| ||||||
9. | 8 |
|
|
|
|
|
|
|
|
|
|
|
| aprèsmidi. | |||||
To exit, press the [MENU] button. |
|
|
|
|
|
|
|
|
|
|
|
| | Le message <Complete!> s’affiche. | |||||
|
|
|
|
|
| Camera Mode |
|
|
|
| 9. | Pour quitter, appuyez sur la touche [MENU]. | |||||||
| Notes |
|
|
|
|
| ||||||||||||||
|
|
|
| ►System |
|
|
|
|
|
|
|
| Remarques |
| |||||
| After the Lithium Battery loses its charge (after |
|
|
|
|
|
|
|
|
|
|
| |||||||
|
|
| Clock Set |
| JAN 01 2007 |
|
| ||||||||||||
| about 6 months), the date/time appears on the |
|
|
|
|
|
|
|
|
|
| Après épuisement du | |||||||
|
|
|
| Beep Sound |
| | |||||||||||||
|
|
|
|
|
|
|
| ||||||||||||
| screen as 12:00 AM JAN.01.2007. |
|
|
| Language | 12 : 00 | AM |
|
| mois environ), la date et l’heure s’affichent à l’écran sous | |||||||||
| You can set the year up to 2040. |
|
|
| Demonstration |
| Complete! | | la forme 12:00 AM JAN.01.2007. | ||||||||||
| If the Lithium Battery is not installed, data inputted |
|
|
|
|
|
|
|
|
|
|
| Vous pouvez régler l’horloge jusqu’à l’an 2040. | ||||||
| will not be backed up. |
|
|
|
|
|
|
|
|
|
|
| | Si le | |||||
| Display illustrations in this manual |
|
|
|
|
|
|
|
|
|
|
|
|
| données entrées ne sera sauvegardée. | ||||
|
|
| Move | OK Select | MENU Exit | | Affichages à l’écran de ce manuel | ||||||||||||
| OSD illustrations of |
|
|
| |||||||||||||||
|
|
|
|
|
|
|
|
|
|
|
|
|
| Ce manuel utilise les illustrations d’affichage à l’ | |||||
| Some of the OSD items shown in this manual may differ |
|
|
|
|
|
|
|
|
|
|
|
|
| |||||
|
|
|
|
|
|
|
|
|
|
|
|
|
| écran du | |||||
| slightly from the actual items on your DVD Camcorder. |
|
|
|
|
|
|
|
|
|
|
|
|
| écran du manuel peuvent varier quelque peu des | ||||
|
|
|
|
|
|
|
|
|
|
|
|
|
|
|
|
| éléments disponibles sur votre graveur DVD. | ||
30
