ENGLISH
FRANÇAIS
DVD Camcorder: Advanced Recording |
| DVD Caméscope: Enregistrement avancé | |||||||||||||||||||
|
|
|
|
|
|
|
|
|
|
| |||||||||||
Setting the Digital Image Stabilizer (DIS) |
|
|
|
|
|
| Réglage du stabilisateur d’image numérique (DIS) | ||||||||||||||
The DIS function works only in Camera Mode. page 26 |
|
|
|
|
| La fonction DIS ne peut être activée qu’enCamera Mode. page 26 | |||||||||||||||
DIS (Digital Image Stabilizer) is a function that compensates for any |
| Le DIS (stabilisateur numérique d’image) permet de compenser, dans | |||||||||||||||||||
| shaking or hand movement while holding the DVD Camcorder (within |
|
| des limites raisonnables, les tremblements ou les mouvements de vos | |||||||||||||||||
| reasonable limits). |
|
|
|
|
|
|
|
| mains lorsque vous tenez le DVD caméscope. |
| ||||||||||
It provides more stable pictures when: |
|
|
|
|
|
| Elle permet d’obtenir des images plus stables lors d’un : |
| |||||||||||||
| - Recording with the zoom (Digital Zoom is not available in the DIS |
|
| - Enregistrement à l’aide du zoom (La fonction Digital Zoom n’est pas | |||||||||||||||||
|
| mode.) |
|
|
|
|
|
|
|
|
|
|
| disponible en mode DIS.) |
|
| |||||
|
|
|
|
|
|
|
|
|
|
|
|
|
|
| - enregistrement d’un petit objet en gros plan ; | ||||||
| - Recording a small object | 4 |
|
|
|
|
|
|
|
|
|
| |||||||||
|
|
|
|
|
|
|
|
|
|
| - enregistrement tout en marchant ; |
| |||||||||
| - Recording and walking at the same time |
|
|
|
|
|
|
|
|
|
|
| |||||||||
| - Recording through the window of a vehicle |
|
|
| Camera Mode |
|
|
|
| - enregistrement par la fenêtre d’un véhicule. | |||||||||||
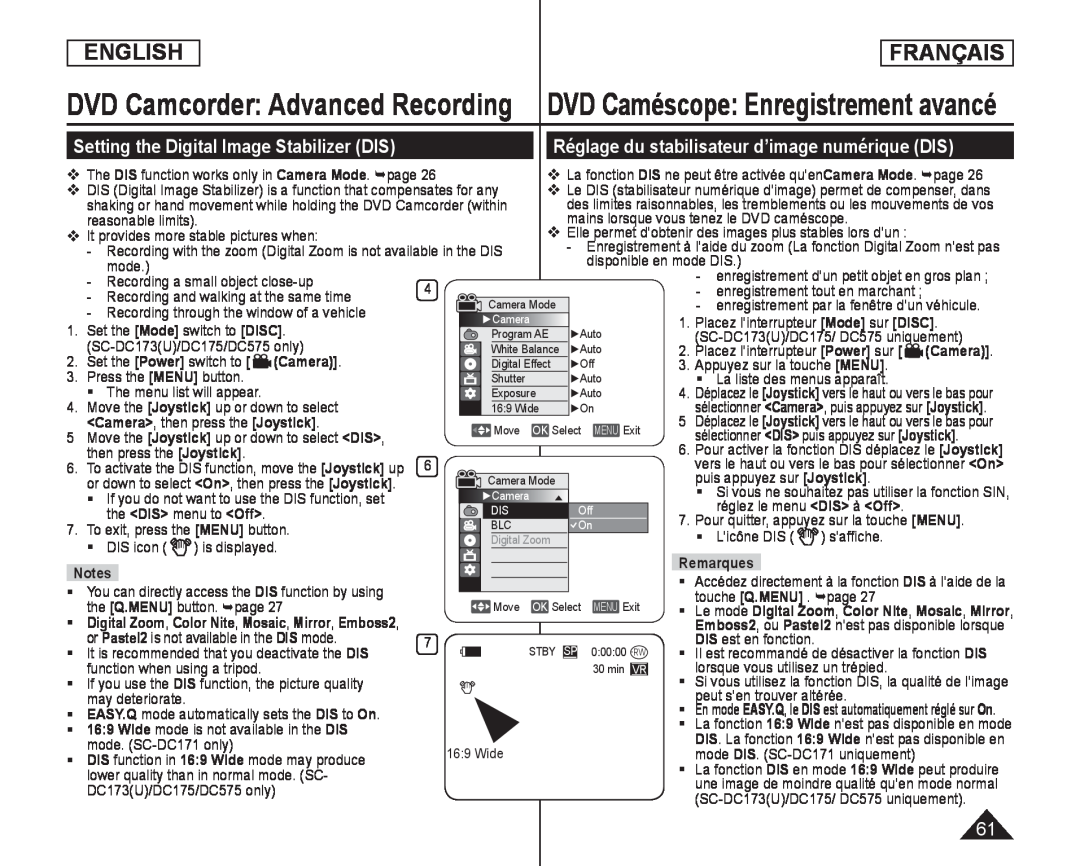
1. | Set the [Mode] switch to [DISC]. |
|
|
| ►Camera |
|
|
|
|
| 1. | Placez l’interrupteur [Mode] sur [DISC]. | |||||||||
|
|
|
| Program AE |
| ►Auto |
| ||||||||||||||
|
|
|
|
| White Balance |
| ►Auto | 2. | Placez l’interrupteur [Power] sur [ | (Camera)]. | |||||||||||
2. | Set the [Power] switch to [ | (Camera)]. |
|
|
|
| Digital Effect |
| ►Off | 3. | Appuyez sur la touche [MENU]. |
| |||||||||
3. | Press the [MENU] button. |
|
|
|
|
| Shutter |
|
|
| ►Auto |
| | La liste des menus apparaît. |
| ||||||
| | The menu list will appear. |
|
|
|
| Exposure |
|
| ►Auto | 4. | Déplacez le [Joystick] vers le haut ou vers le bas pour | |||||||||
4. | Move the [Joystick] up or down to select |
|
|
|
| 16:9 Wide |
|
| ►On |
| sélectionner <Camera>, puis appuyez sur | [Joystick]. | |||||||||
| <Camera>, then press the | [Joystick]. |
|
|
|
| Move | OK Select | MENU Exit | 5 | Déplacez le [Joystick] vers le haut ou vers le bas pour | ||||||||||
5 | Move the [Joystick] up or down to select <DIS>, |
|
|
|
|
| sélectionner <DIS> puis appuyez sur [Joystick]. | ||||||||||||||
|
|
|
|
|
|
|
|
|
| 6. | |||||||||||
| then press the [Joystick]. |
|
|
|
|
|
|
|
|
|
|
| Pour activer la fonction DIS déplacez le [Joystick] | ||||||||
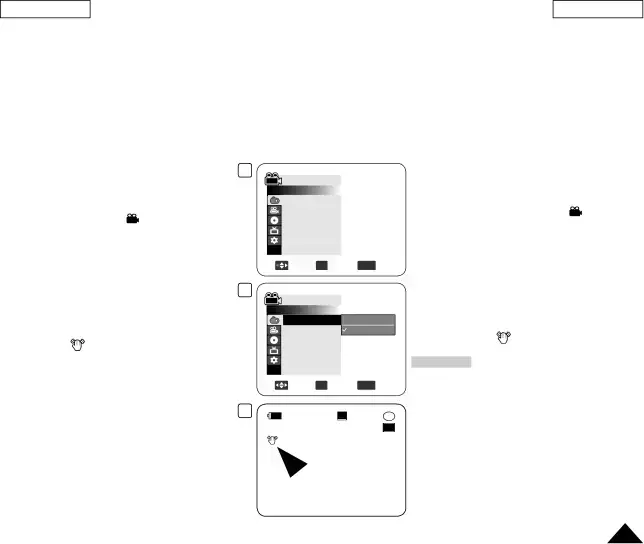
6. | To activate the DIS function, move the [Joystick] up | 6 |
|
|
|
|
|
|
|
|
|
| vers le haut ou vers le bas pour sélectionner <On> | ||||||||
| or down to select <On>, then press the [Joystick]. |
|
|
| Camera Mode |
|
|
|
| puis appuyez sur [Joystick]. |
| ||||||||||
|
|
|
|
|
|
|
|
|
|
|
| Si vous ne souhaitez pas utiliser la fonction SIN, | |||||||||
| If you do not want to use the DIS function, set |
|
|
| ►Camera |
| ▲ |
|
|
| |||||||||||
|
|
|
|
|
|
|
|
|
|
|
|
| réglez le menu <DIS> à <Off>. |
| |||||||
|
| the <DIS> menu to <Off>. |
|
|
| DIS |
|
|
| Off |
|
|
| ||||||||
|
|
|
|
|
|
|
|
|
|
|
| 7. | Pour quitter, appuyez sur la touche [MENU]. | ||||||||
7. | To exit, press the [MENU] button. |
|
|
| BLC |
|
|
| On | ||||||||||||
|
|
|
|
|
|
|
|
|
|
| | L’icône DIS ( | ) s’affiche. |
| |||||||
| | DIS icon ( | ) is displayed. |
|
|
| Digital Zoom |
|
|
|
|
| |||||||||
|
|
|
|
|
|
|
|
|
|
| Remarques |
|
|
| |||||||
|
|
|
|
|
|
|
|
|
|
|
|
|
|
|
|
|
|
| |||
|
|
|
|
|
|
|
|
|
|
|
|
|
|
|
|
|
|
| |||
| Notes |
|
|
|
|
|
|
|
|
|
|
|
|
| directement à la fonction DIS à l’aide de la | |||||||
|
|
|
|
|
|
|
|
|
|
|
|
| | Accédez | |||||||
|
|
|
|
|
|
|
|
|
|
|
|
| |||||||||
| You can directly access the DIS function by using |
|
|
|
|
|
|
|
|
|
| ||||||||||
|
|
|
|
|
|
|
|
|
|
| touche [Q.MENU] . page 27 |
| |||||||||
|
|
|
|
|
|
|
|
|
|
|
| ||||||||||
| the [Q.MENU] button. page 27 |
|
|
|
| Move | OK Select | MENU Exit | | Le mode Digital Zoom, Color Nite, Mosaic, Mirror, | |||||||||||
| Digital Zoom, Color Nite, Mosaic, Mirror, Emboss2, | 7 |
|
|
|
|
|
|
|
|
|
| Emboss2, ou Pastel2 n’est pas disponible lorsque | ||||||||
| or Pastel2 is not available in the DIS mode. |
|
|
|
|
|
|
|
|
|
| DIS est en fonction. |
|
| |||||||
| It is recommended that you deactivate the DIS |
|
|
|
| STBY | SP | 0:00:00 | | Il est recommandé de désactiver la fonction DIS | |||||||||||
| function when using a tripod. |
|
|
|
|
|
|
|
|
| 30 min VR |
| lorsque vous utilisez un trépied. |
| |||||||
| If you use the DIS function, the picture quality |
|
|
|
|
|
|
|
|
|
| | Si vous utilisez la fonction DIS, la qualité de l’image | ||||||||
| may deteriorate. |
|
|
|
|
|
|
|
|
|
|
|
|
| peut s’en trouver altérée. |
| |||||
| EASY.Q mode automatically sets the DIS to On. |
|
|
|
|
|
|
|
|
|
| | En mode EASY.Q, le DIS est automatiquement réglé sur On. | ||||||||
| 16:9 Wide mode is not available in the DIS |
|
|
|
|
|
|
|
|
|
| | La fonction 16:9 Wide n’est pas disponible en mode | ||||||||
|
|
|
|
|
|
|
|
|
|
| DIS. La fonction 16:9 Wide n’est pas disponible en | ||||||||||
| mode. |
|
|
|
|
|
|
|
|
|
|
|
| ||||||||
|
|
| 16:9 Wide |
|
|
|
|
|
| mode DIS. |
| ||||||||||
| DIS function in 16:9 Wide mode may produce |
|
|
|
|
|
|
|
| ||||||||||||
|
|
|
|
|
|
|
|
|
| | La fonction DIS en mode 16:9 Wide peut produire | ||||||||||
| lower quality than in normal mode. (SC- |
|
|
|
|
|
|
|
|
|
| ||||||||||
DC173(U)/DC175/DC575 only) | une image de moindre qualité qu’en mode normal | |
|
61