 SC-DC171/DC173(U)/DC175/DC575
Owner’s Instruction Book
Manuel d’utilisation
AD68-01230B
 Contents
Table des matières
 Contents
Table des matières
 Contents
Table des matières
 Contents
Table des matières
 Notes and Safety Instructions
Avertissements et consignes de sécurité
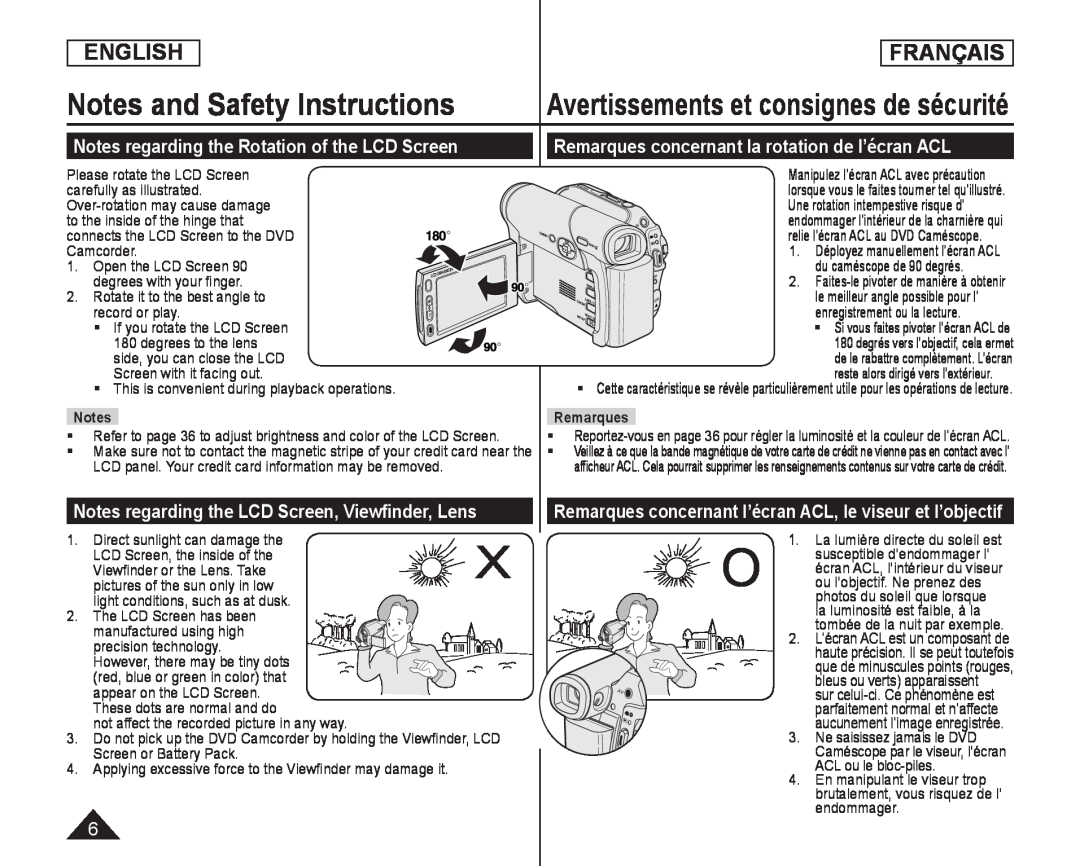
Notes regarding the Rotation of the LCD Screen
Remarques concernant la rotation de l’écran ACL
Notes regarding the LCD Screen, Viewfinder, Lens
Remarques concernant l’écran ACL, le viseur et l’objectif
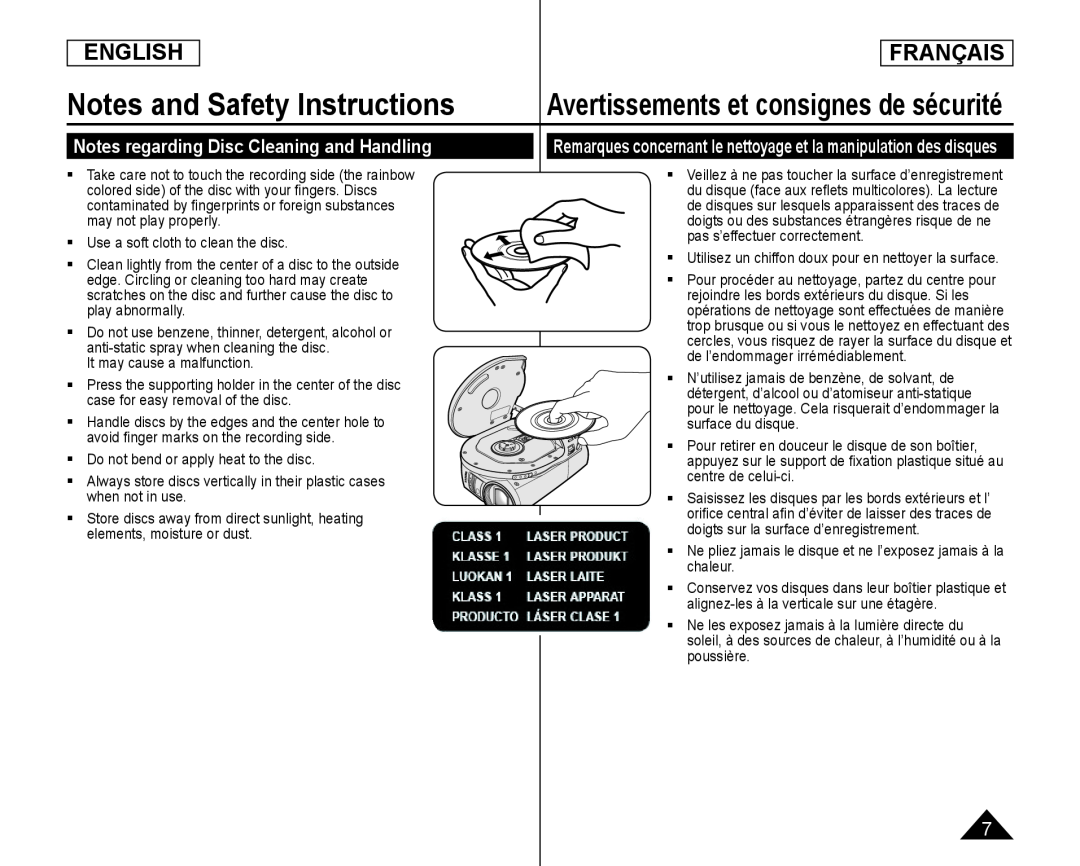 Notes regarding Disc Cleaning and Handling
 Notes regarding DVD Camcorder
Remarques concernant le DVD Caméscope
Notices regarding Copyright (SC-DC175/DC575only)
Remarques concernant les droits d’auteur
(modèles SC-DC175/DC575uniquement)
Servicing & Replacement Parts
Réparations et pièces de rechange
 Getting to Know Your DVD Camcorder Familiarisez-vousavec votre DVD Caméscope
Features
Fonctionnalités
 Familiarisez-vousavec votre DVD Caméscope
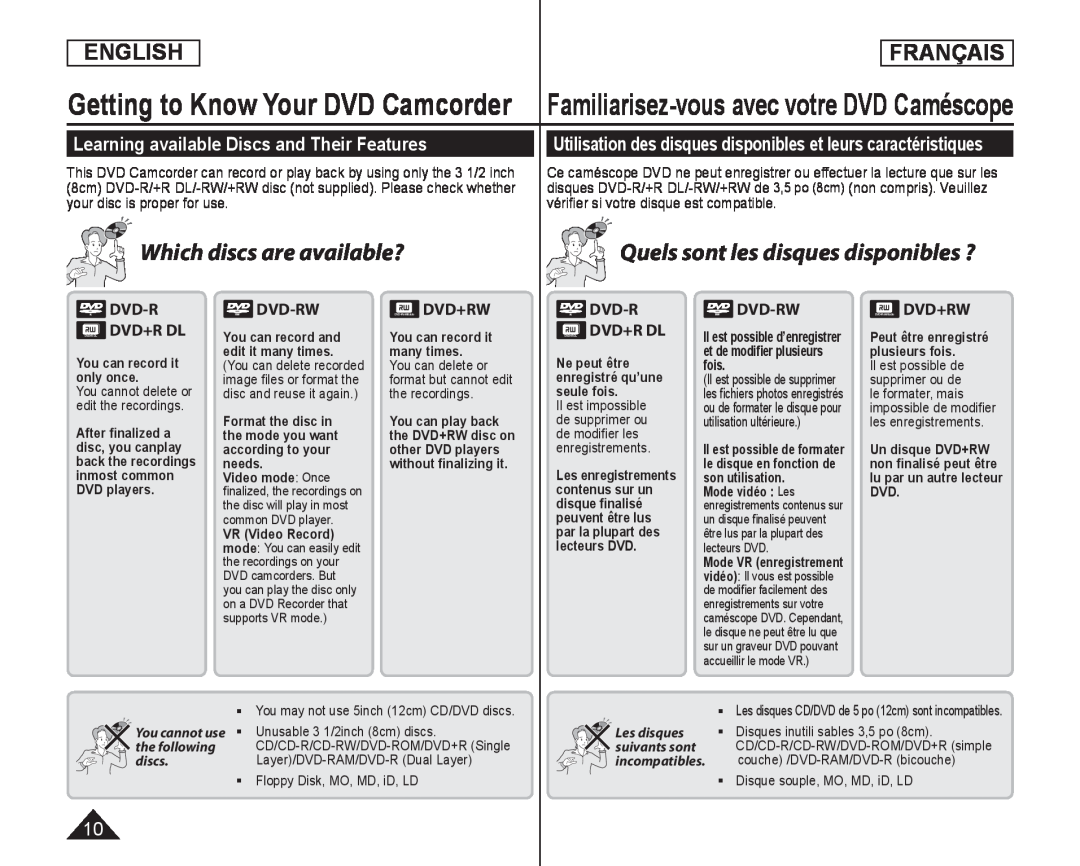
Learning available Discs and Their Features
DVD-R
DVD+RW
 Familiarisez-vousavec votre DVD Caméscope
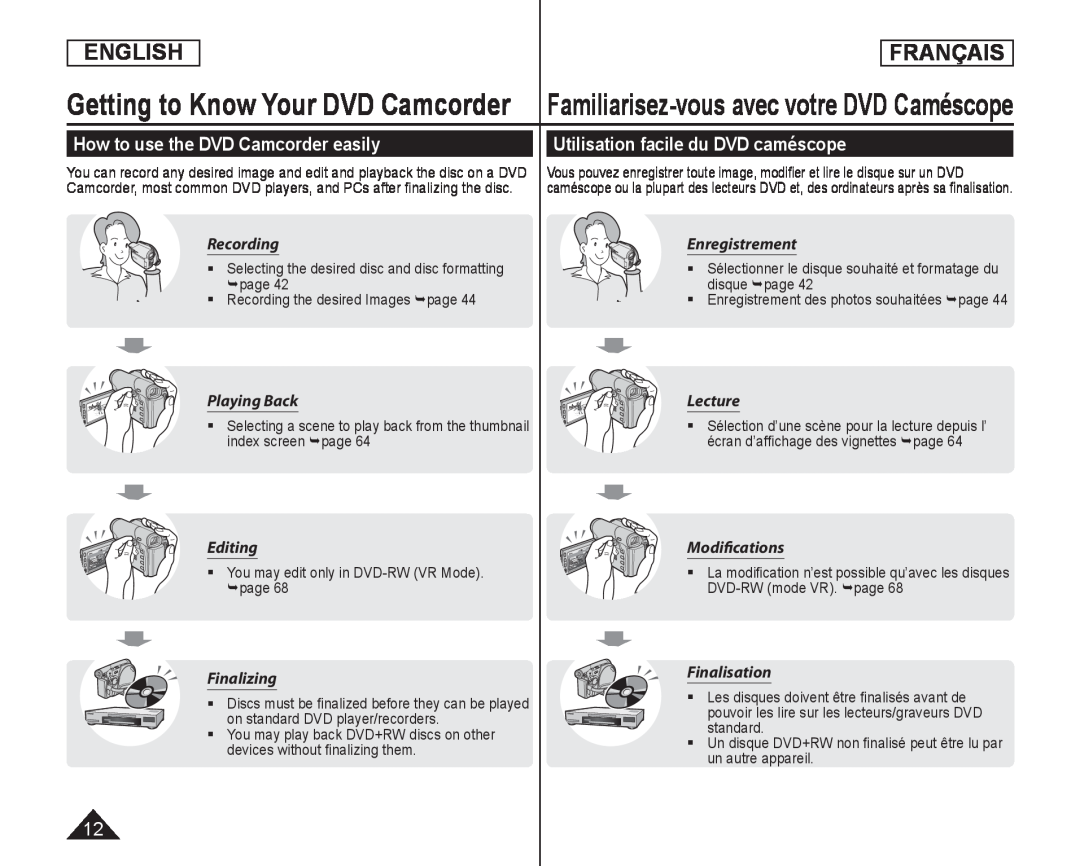 How to use the DVD Camcorder easily
Utilisation facile du DVD caméscope
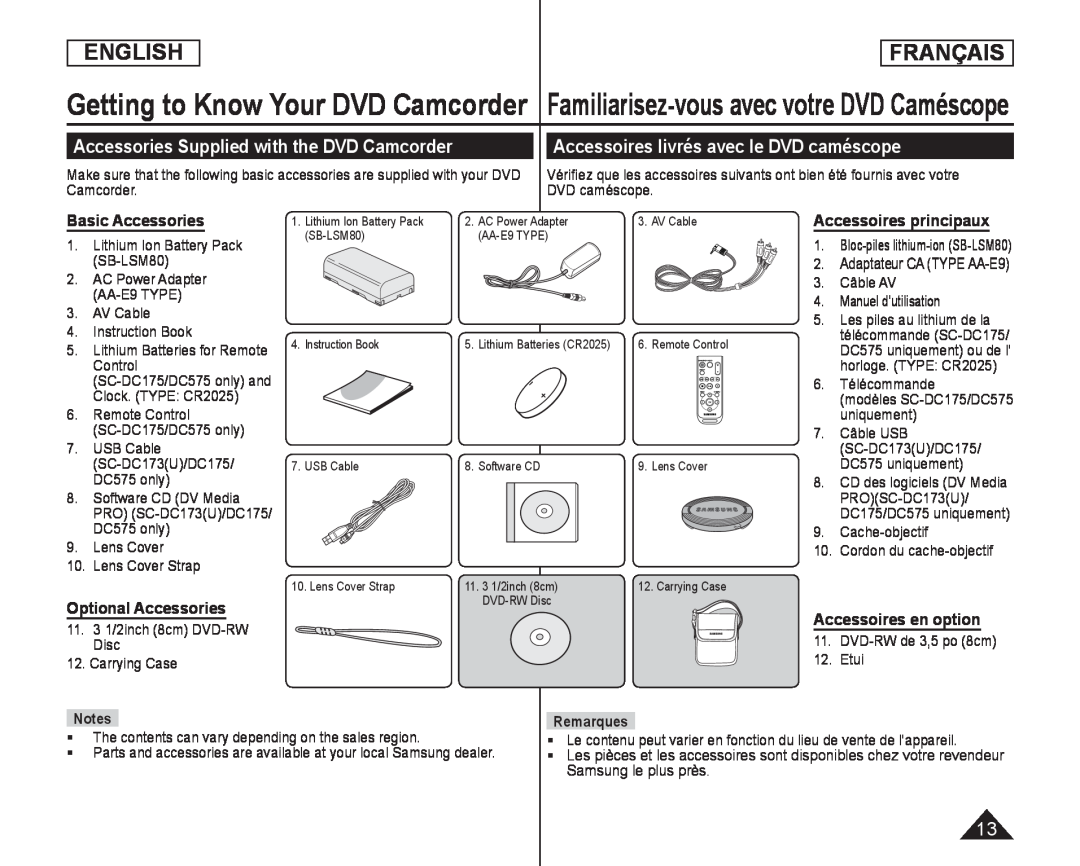 Accessories Supplied with the DVD Camcorder
Accessoires livrés avec le DVD caméscope
Basic Accessories
Optional Accessories
Accessoires principaux
Accessoires en option
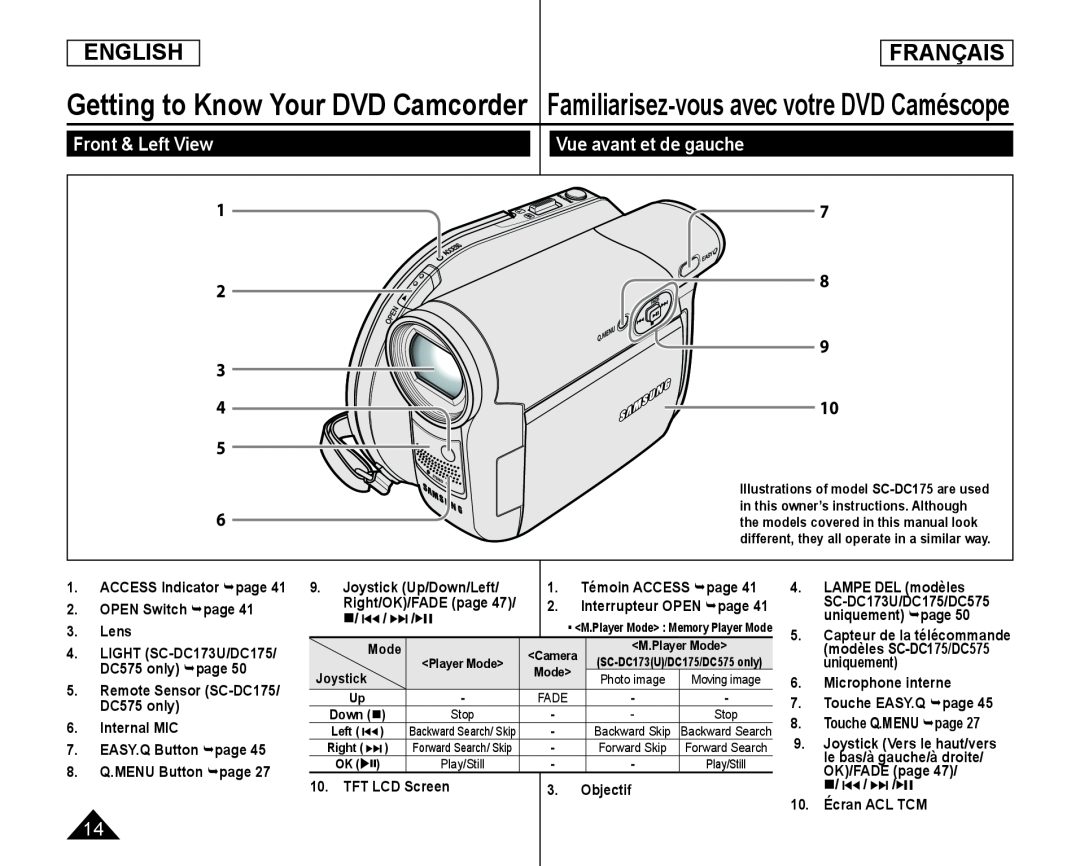 Front & Left View
Vue avant et de gauche
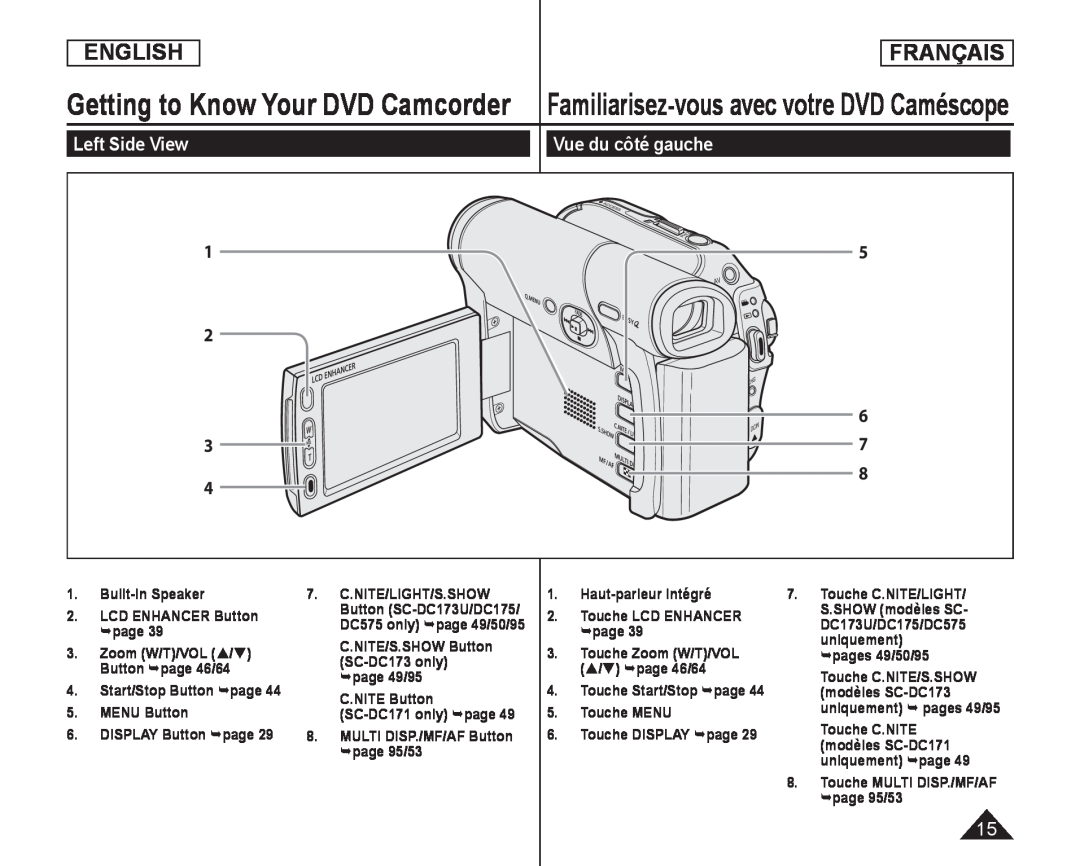 Getting to Know Your DVD Camcorder
Left Side View
Vue du côté gauche
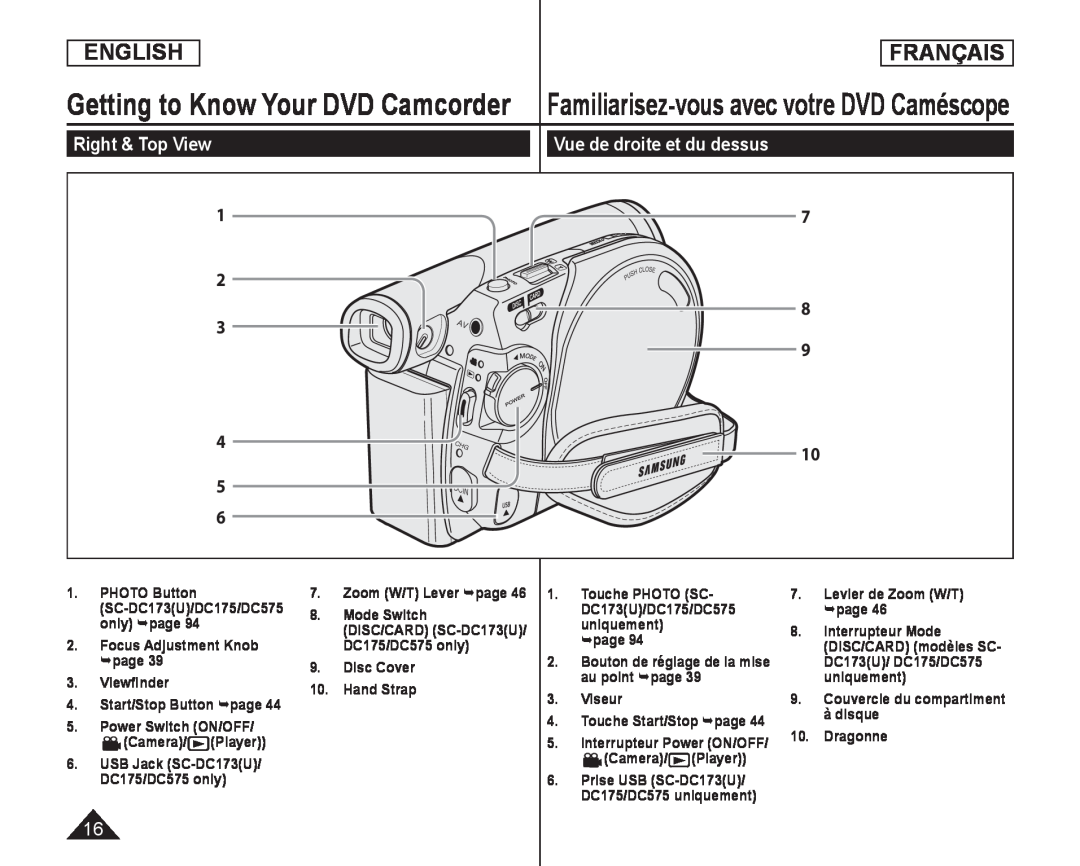 Right & Top View
Vue de droite et du dessus
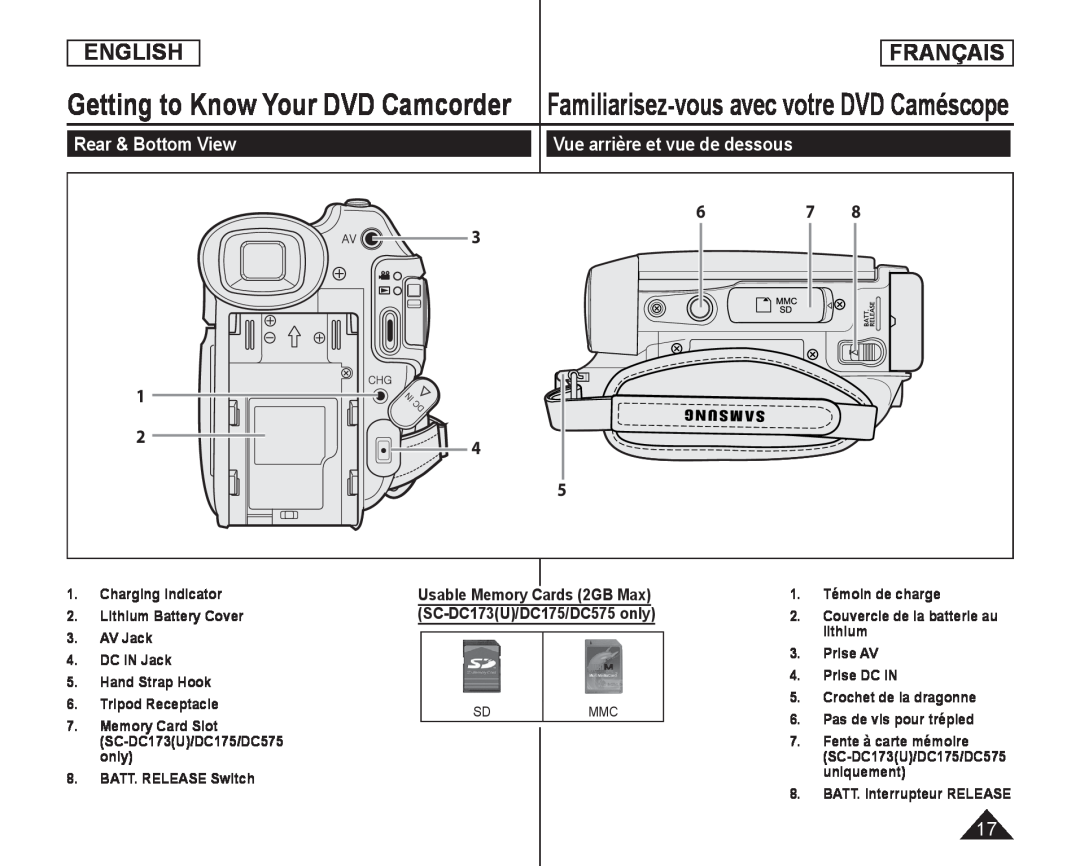 Rear & Bottom View
Vue arrière et vue de dessous
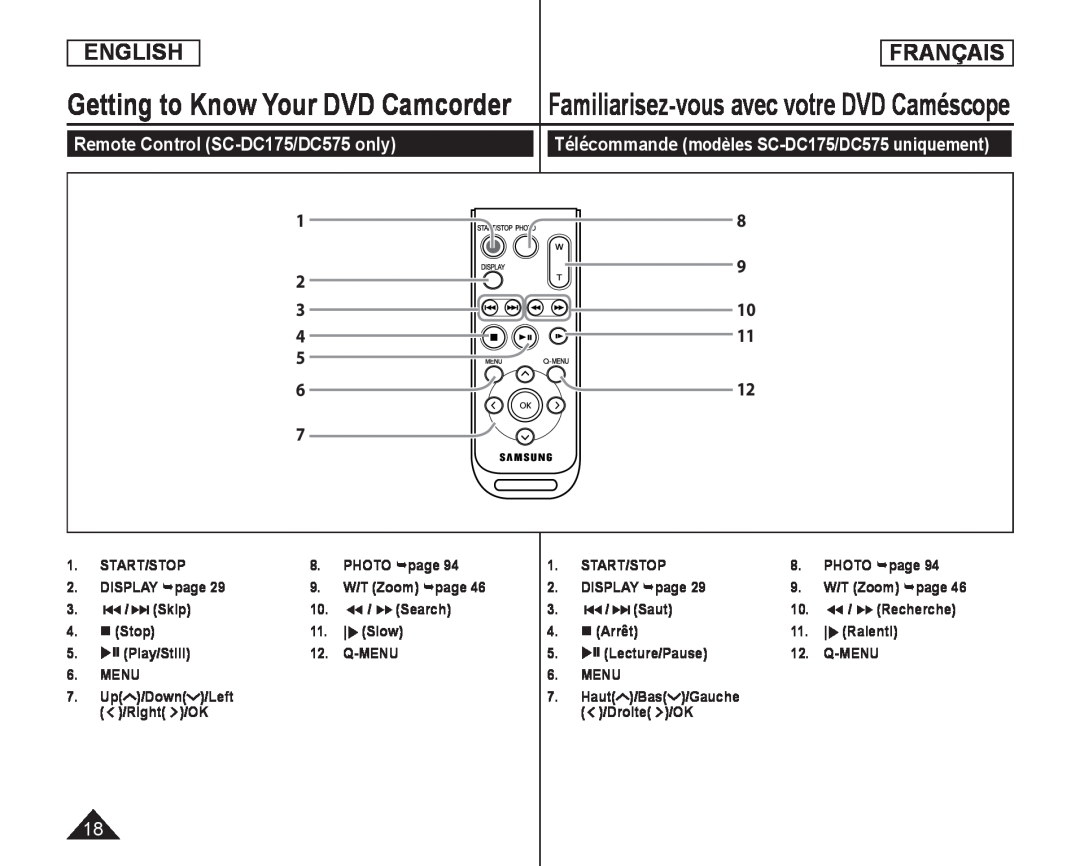 Remote Control (SC-DC175/DC575only)
Télécommande (modèles SC-DC175/DC575uniquement)
 Preparation
Préparatifs
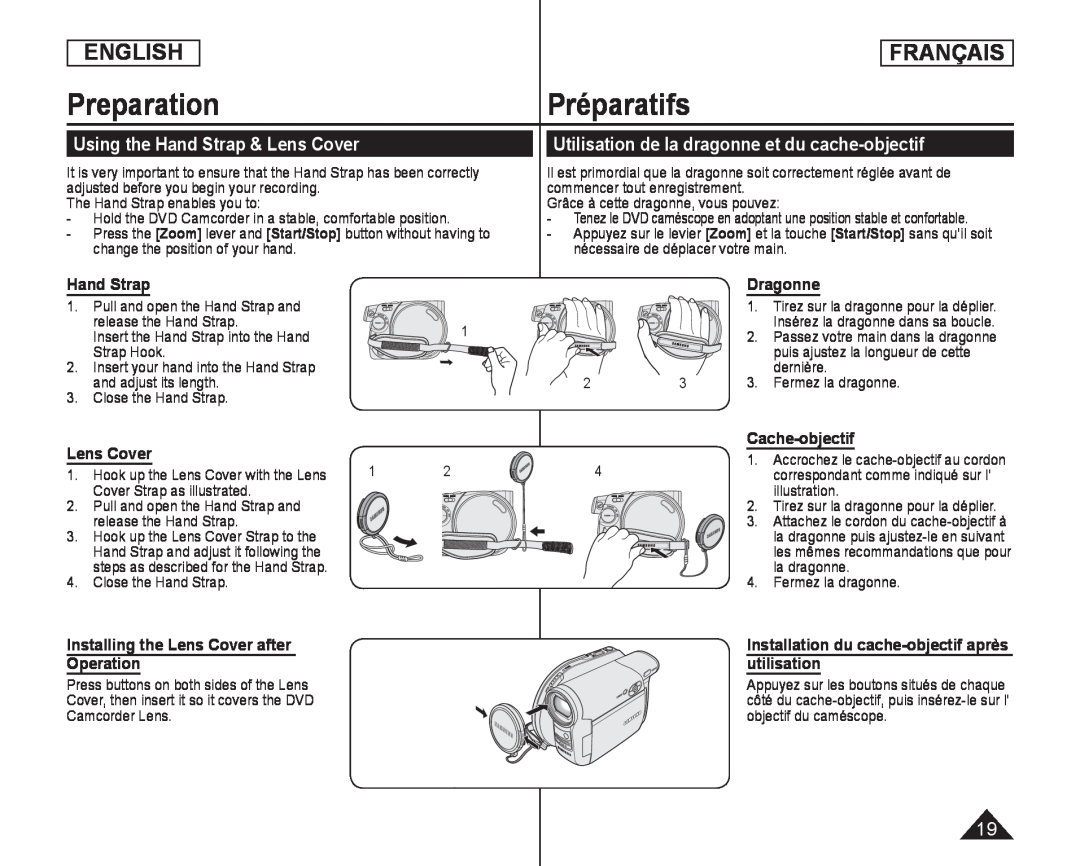
Using the Hand Strap & Lens Cover
Utilisation de la dragonne et du cache-objectif
Hand Strap
Dragonne
Lens Cover
Cache-objectif
Installing the Lens Cover after Operation
Installation du cache-objectifaprès utilisation
 PreparationPréparatifs
Lithium Battery Installation
Lithium Battery Installation for the Internal Clock
Insertion de la pile au lithium
Insertion de la pile au lithium de l’horloge interne
Installing the Lithium Battery in the Remote Control (SC-DC175/DC575only)
Precautions regarding the Lithium Battery
Précautions d’utilisation de la pile au lithium
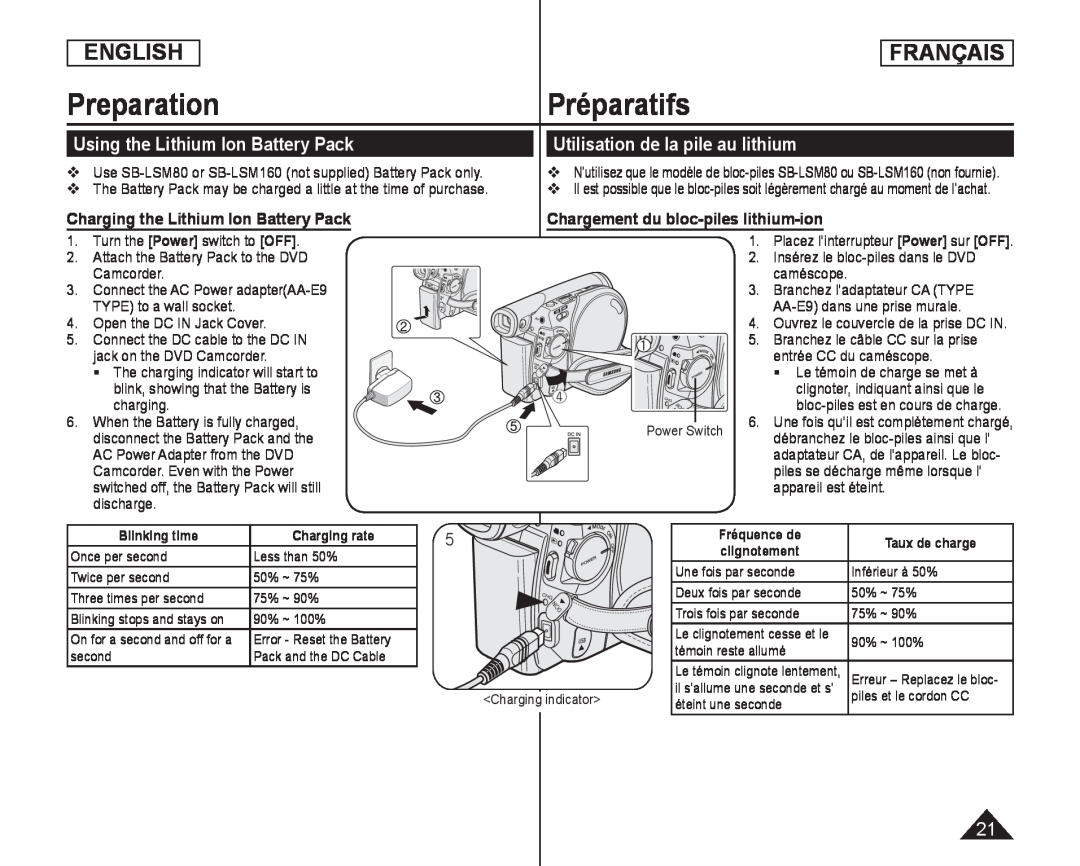 Using the Lithium Ion Battery Pack
Utilisation de la pile au lithium
Charging the Lithium Ion Battery Pack
Chargement du bloc-piles lithium-ion
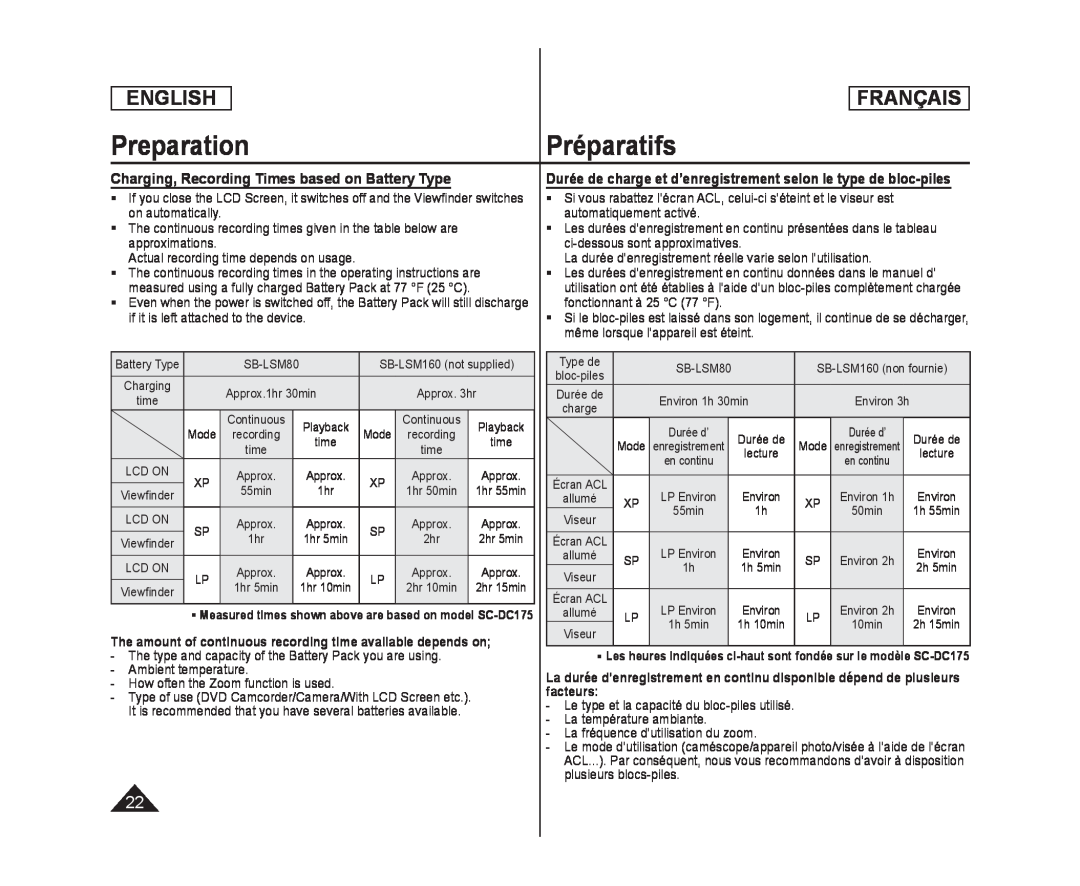 Charging, Recording Times based on Battery Type
Durée de charge et d’enregistrement selon le type de bloc-piles
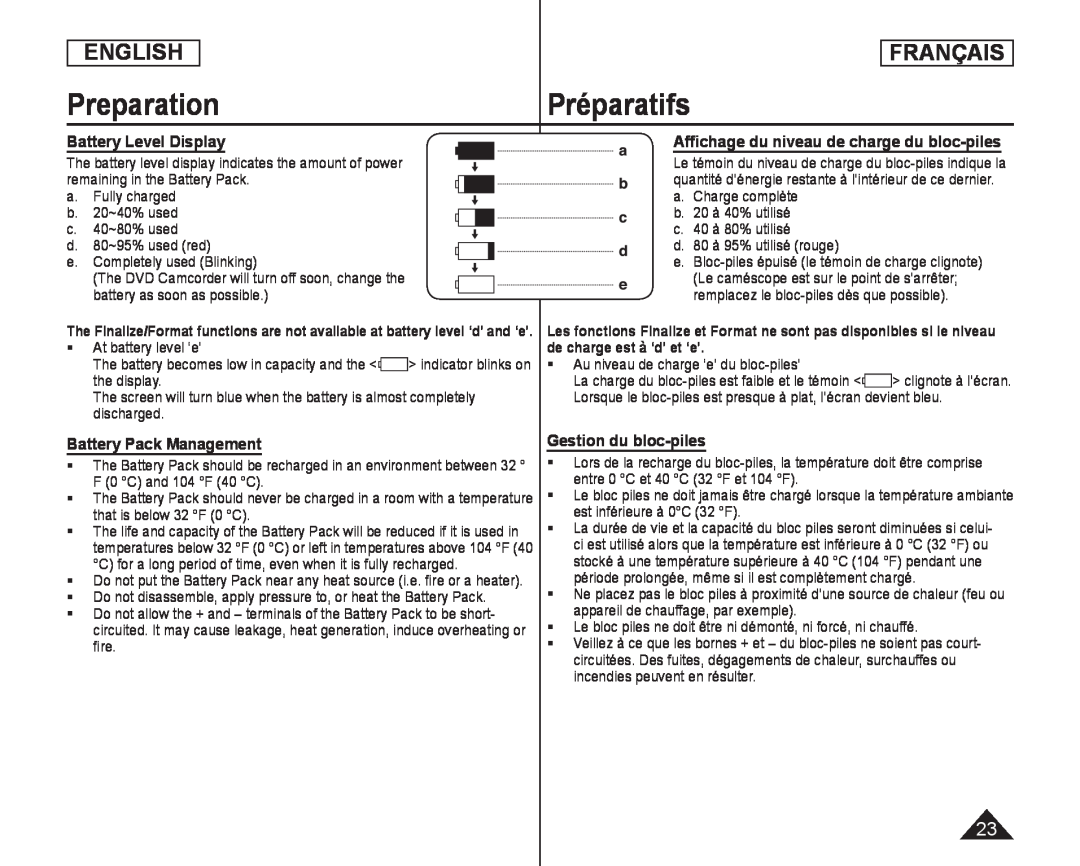 Battery Level Display
Battery Pack Management
Gestion du bloc-piles
 Maintaining the Battery Pack
Entretien du bloc-piles
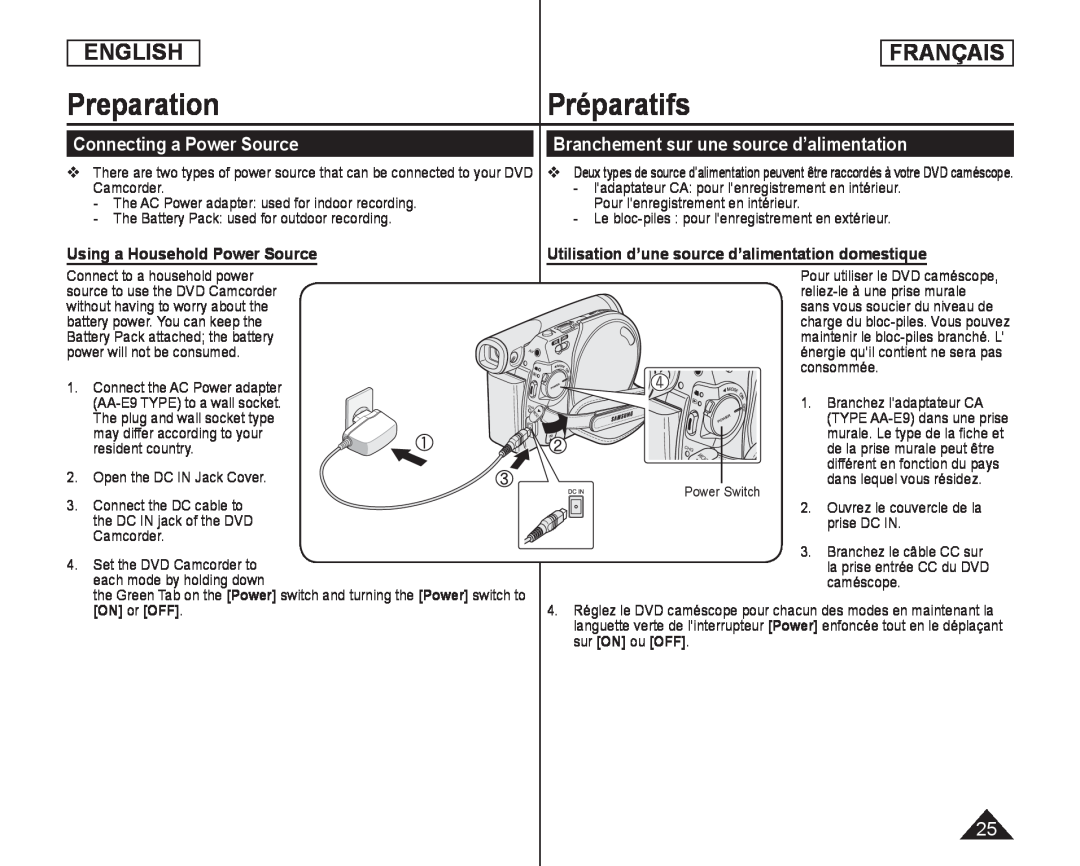 Connecting a Power Source
Branchement sur une source d’alimentation
Using a Household Power Source
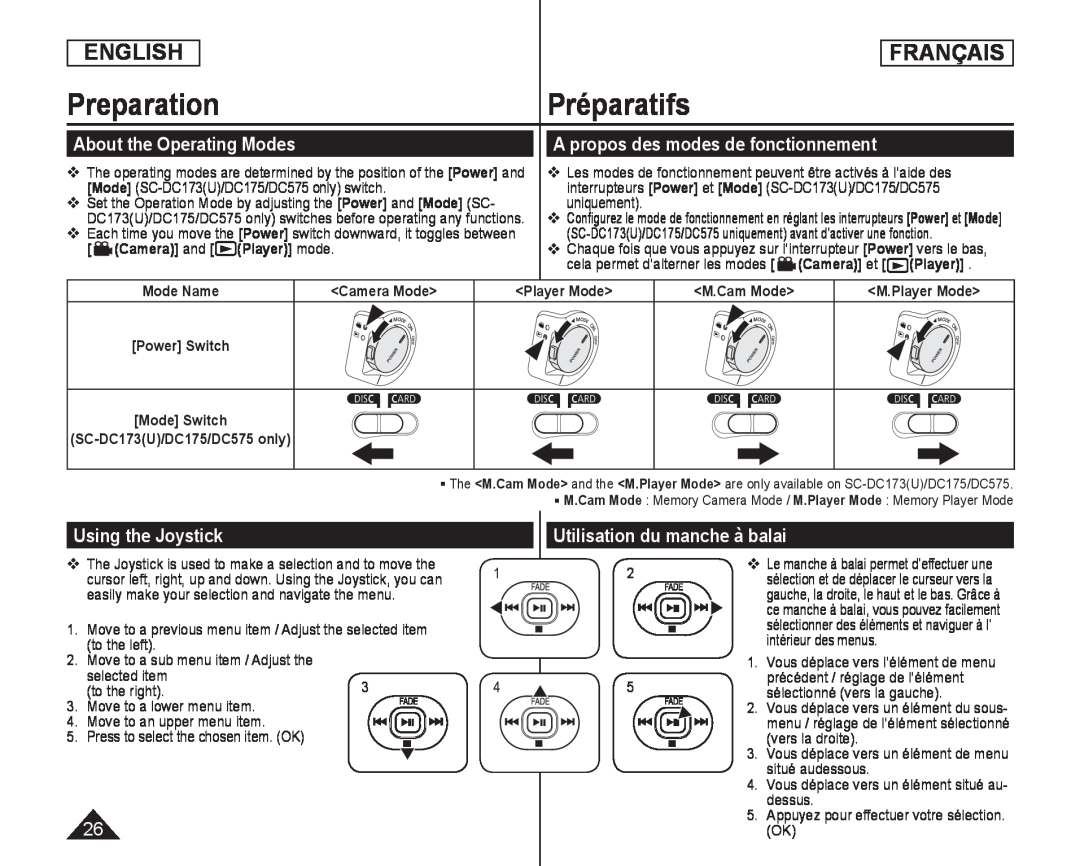 About the Operating Modes
A propos des modes de fonctionnement
Using the Joystick
Utilisation du manche à balai
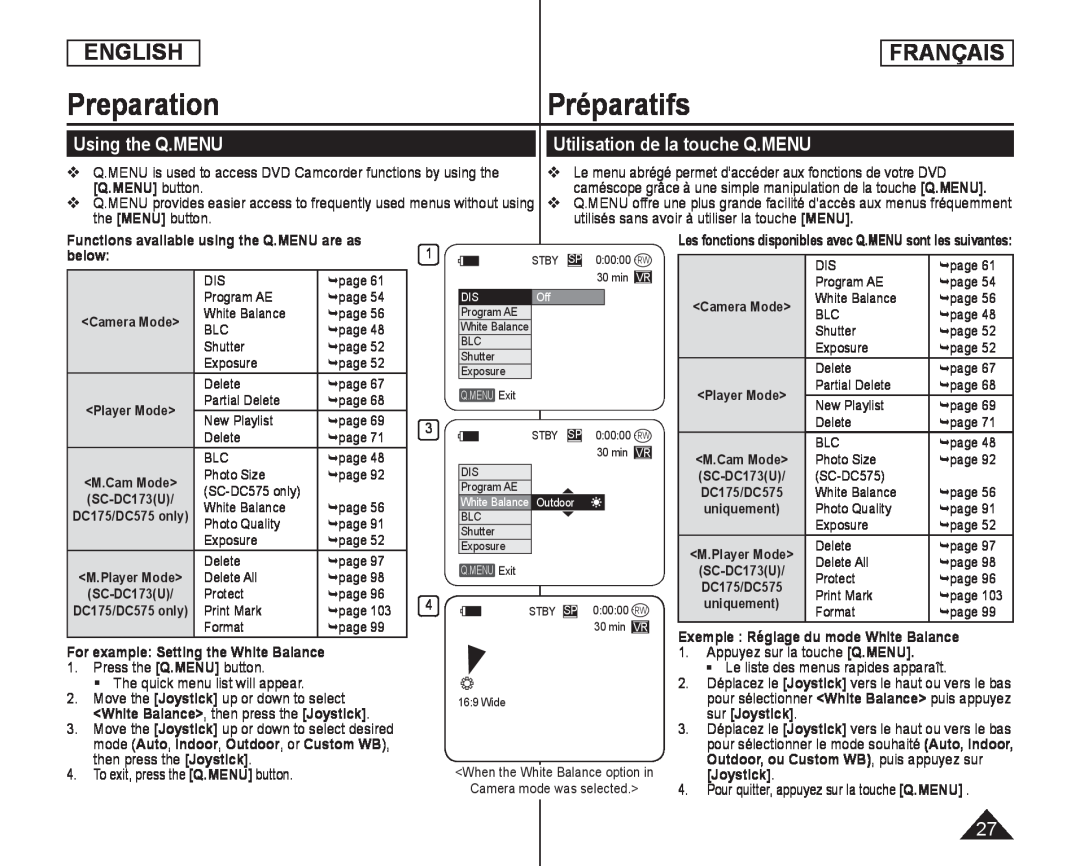 Using the Q.MENU
Utilisation de la touche Q.MENU
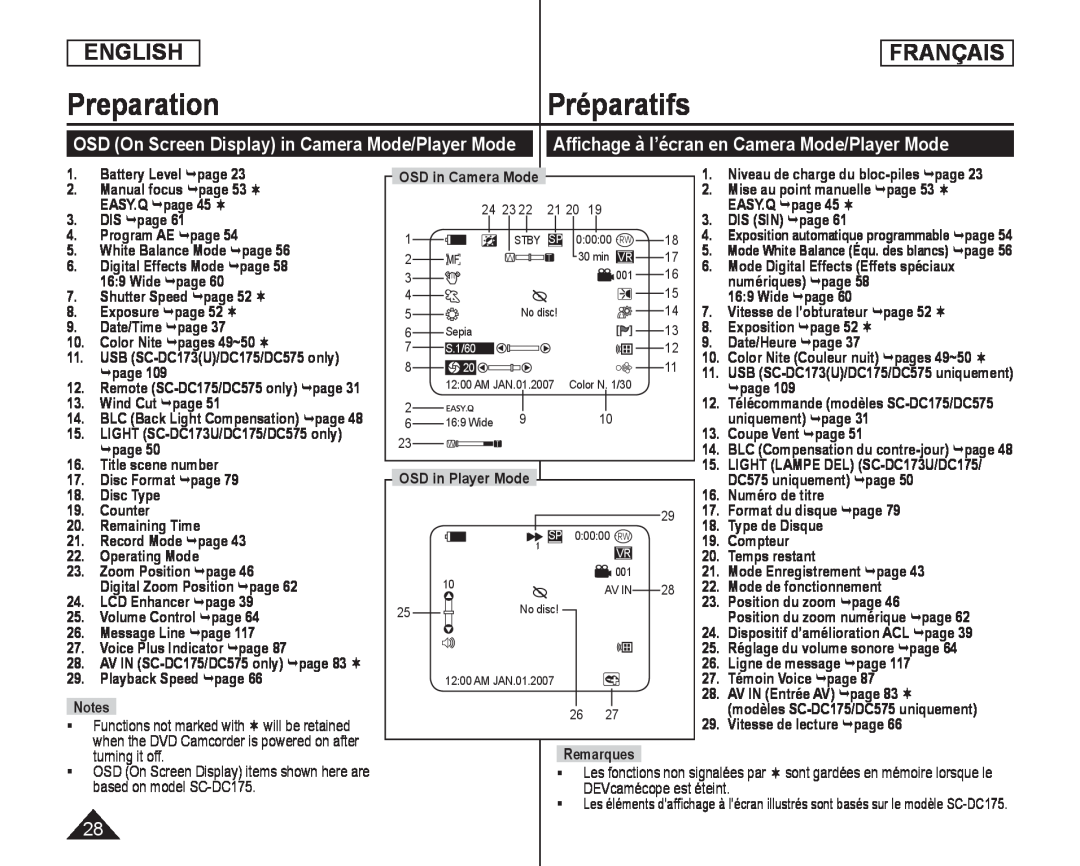 OSD (On Screen Display) in Camera Mode/Player Mode
Affichage à l’écran en Camera Mode/Player Mode
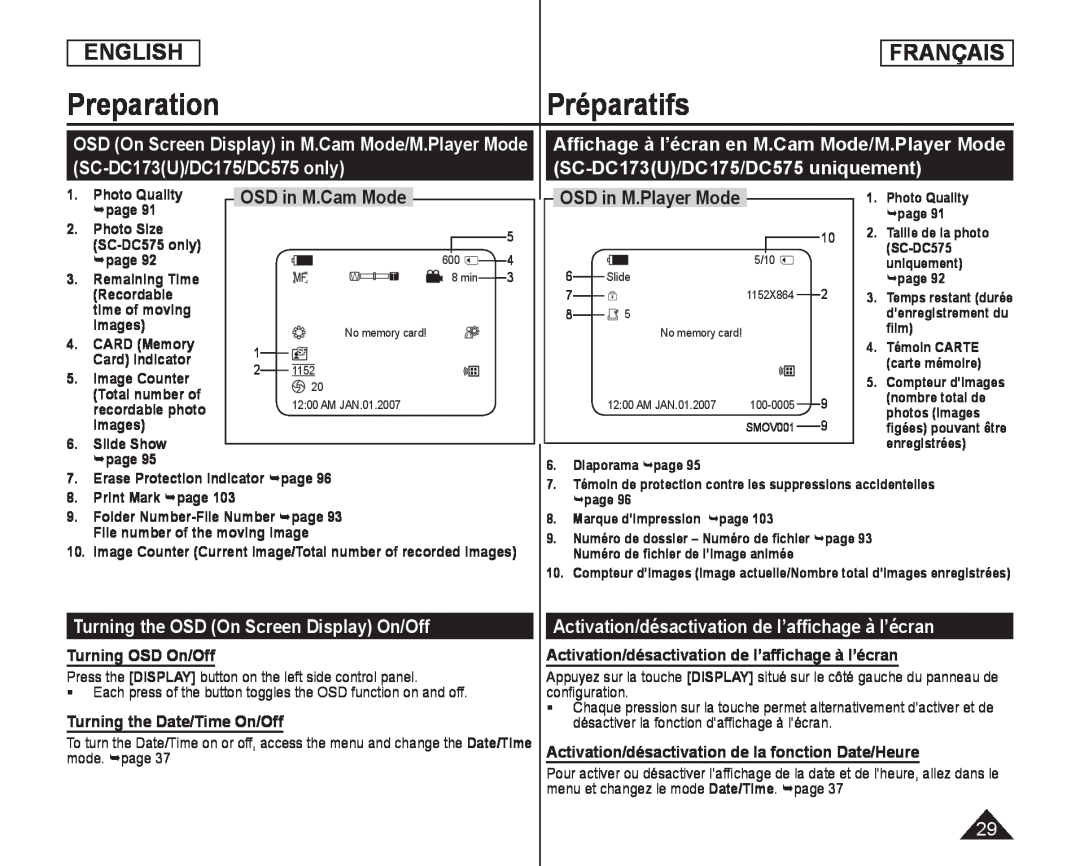 OSD in M.Cam Mode
OSD in M.Player Mode
Turning the OSD (On Screen Display) On/Off
Turning OSD On/Off
Turning the Date/Time On/Off
Activation/désactivation de l’affichage à l’écran
Activation/désactivation de l’affichage à l’écran
Activation/désactivation de la fonction Date/Heure
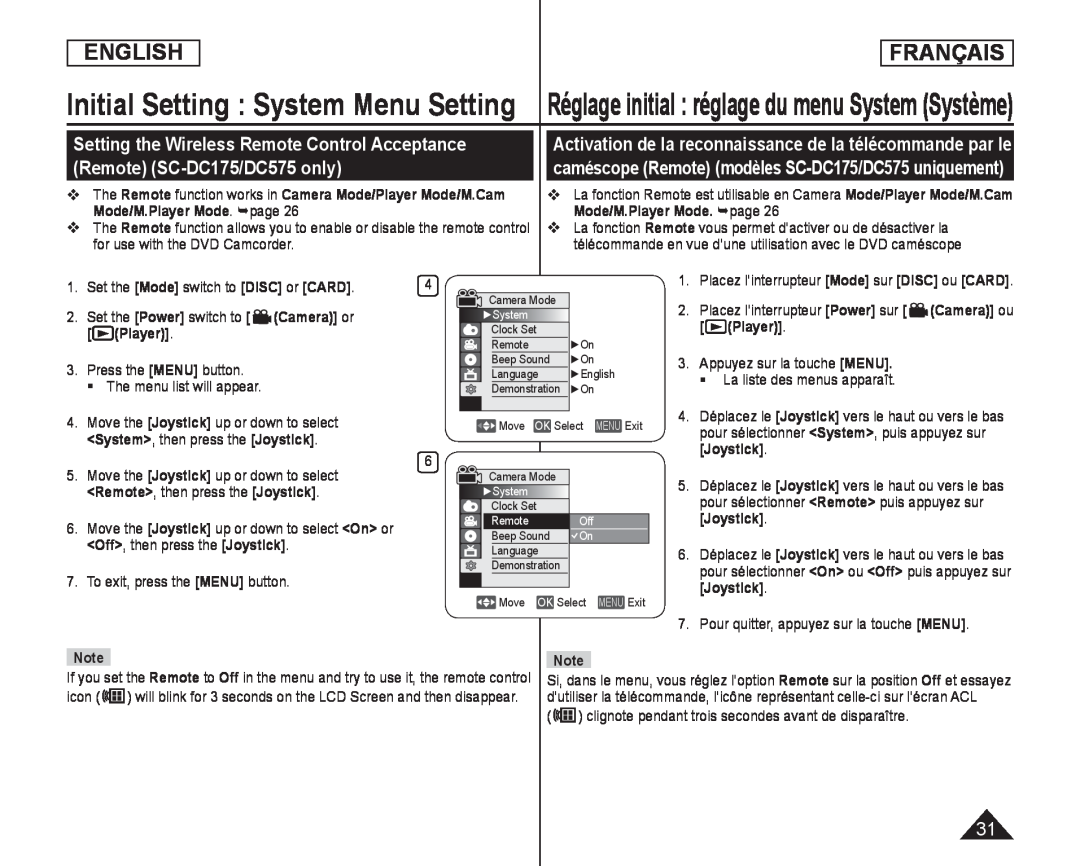
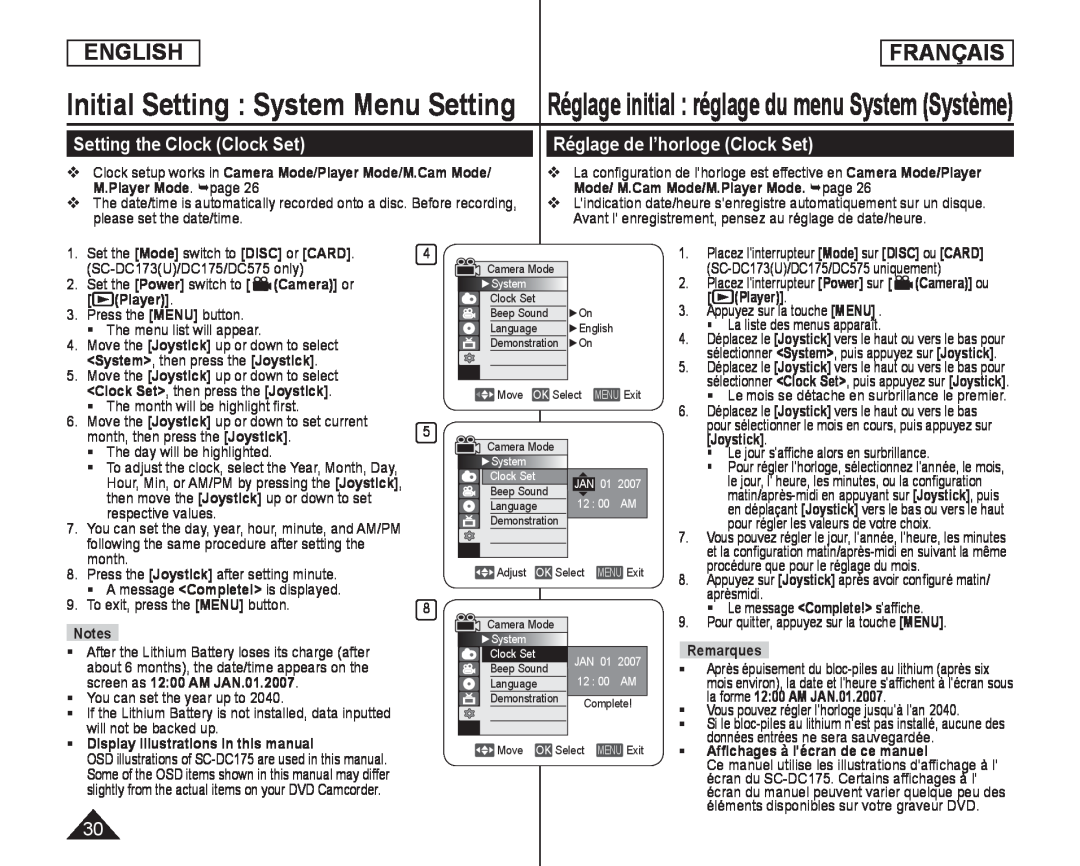 Initial Setting : System Menu Setting
Réglage initial : réglage du menu System (Système)
Setting the Clock (Clock Set)
Réglage de l’horloge (Clock Set)
 Initial Setting : System Menu Setting
Setting the Wireless Remote Control Acceptance (Remote) (SC-DC175/DC575only)
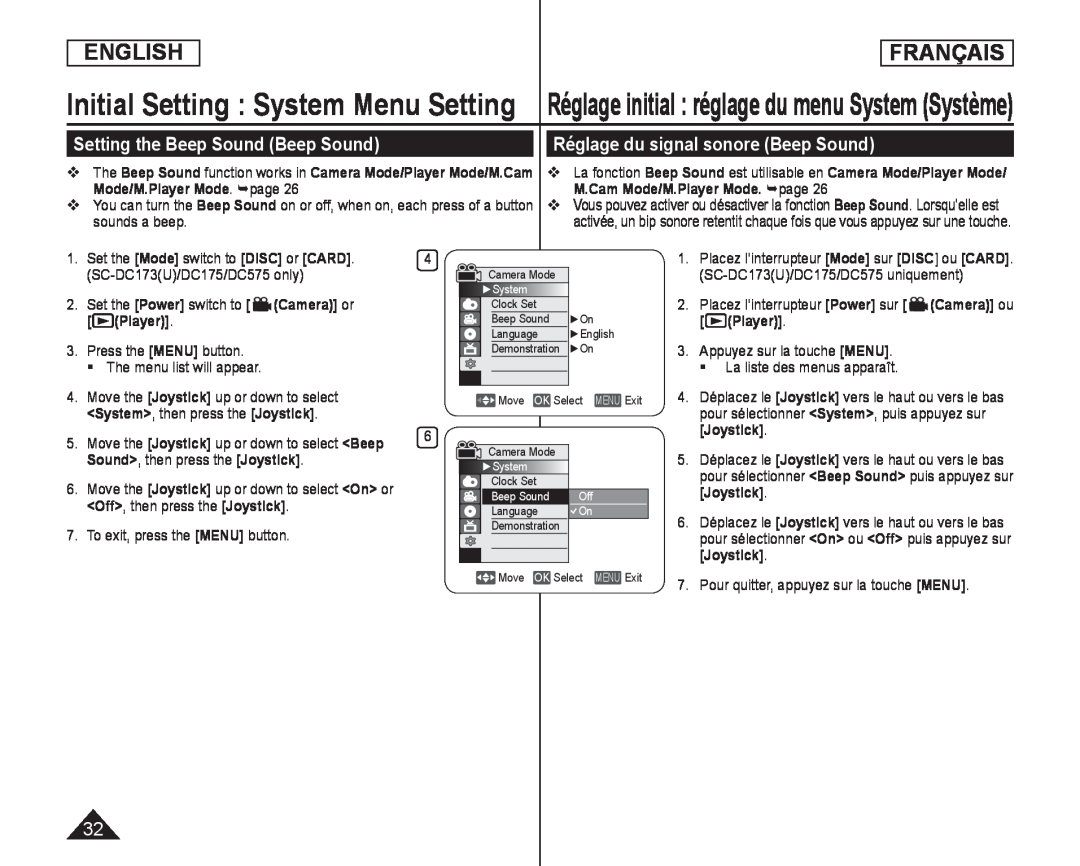 Setting the Beep Sound (Beep Sound)
Réglage du signal sonore (Beep Sound)
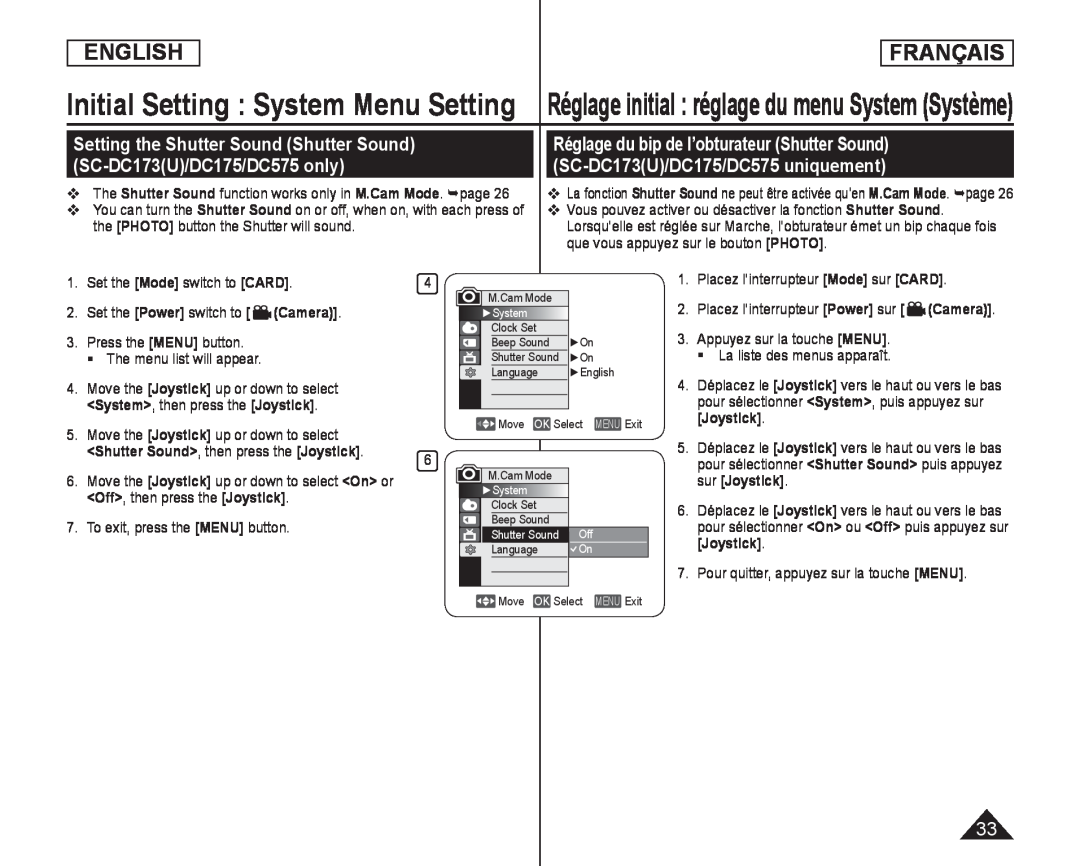 Setting the Shutter Sound (Shutter Sound) (SC-DC173(U)/DC175/DC575only)
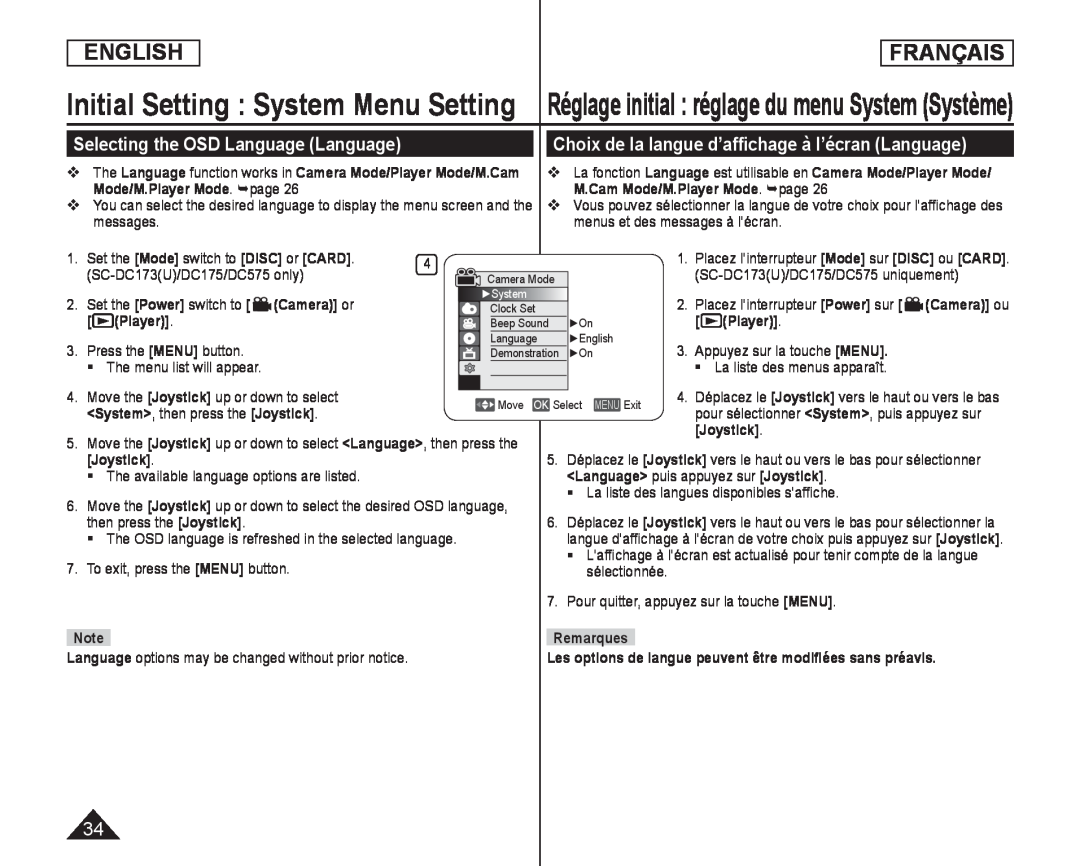 Selecting the OSD Language (Language)
Choix de la langue d’affichage à l’écran (Language)
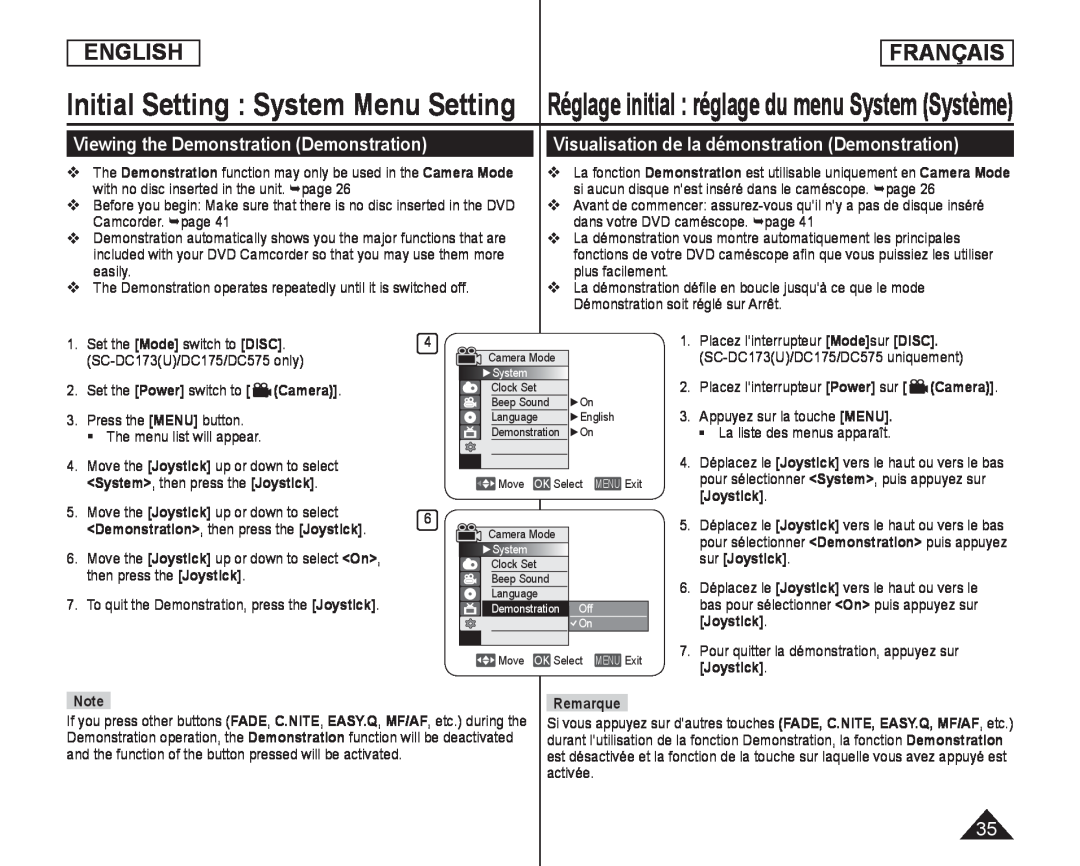 Viewing the Demonstration (Demonstration)
Visualisation de la démonstration (Demonstration)
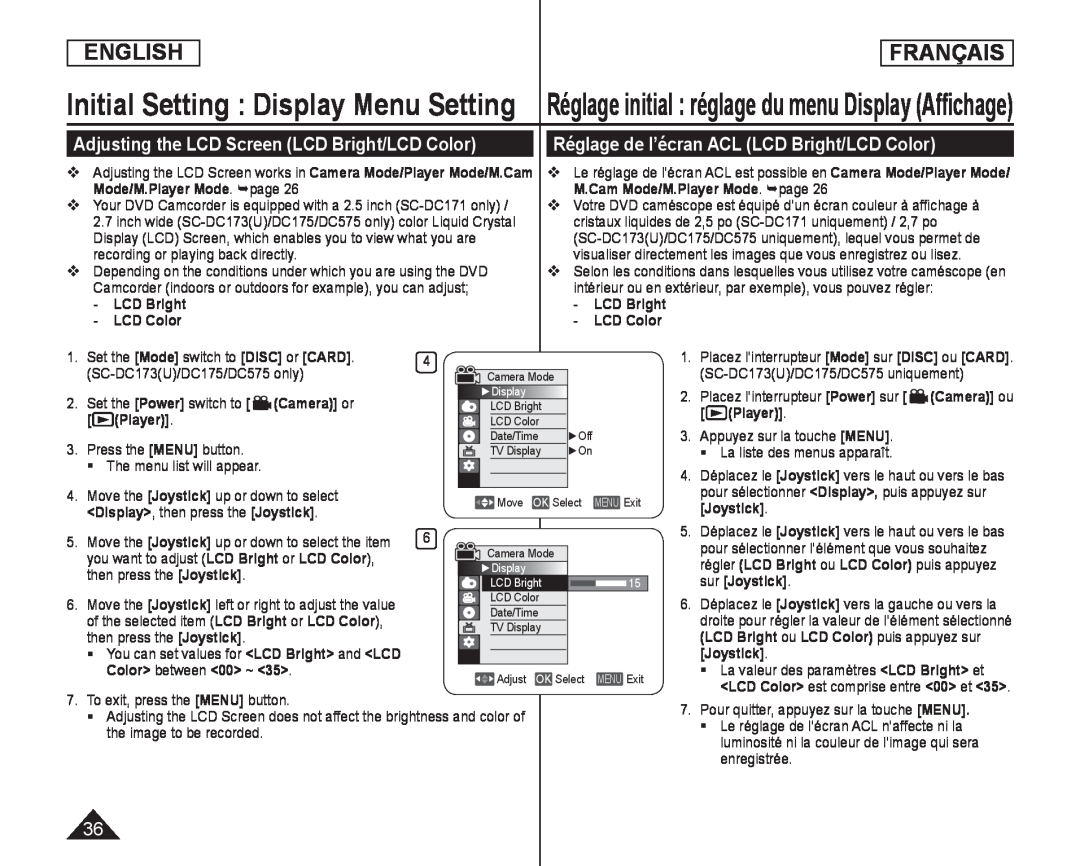 Initial Setting : Display Menu Setting
Adjusting the LCD Screen (LCD Bright/LCD Color)
Réglage initial : réglage du menu Display (Affichage)
Réglage de l’écran ACL (LCD Bright/LCD Color)
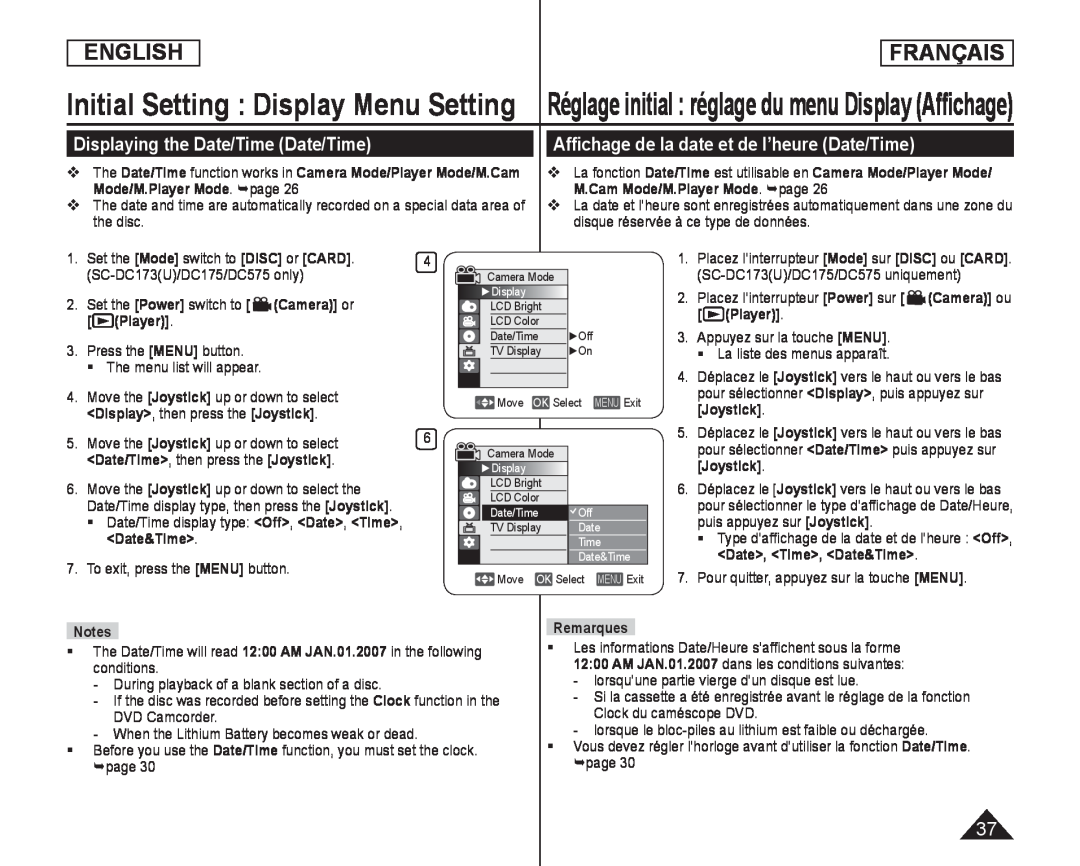 Displaying the Date/Time (Date/Time)
Affichage de la date et de l’heure (Date/Time)
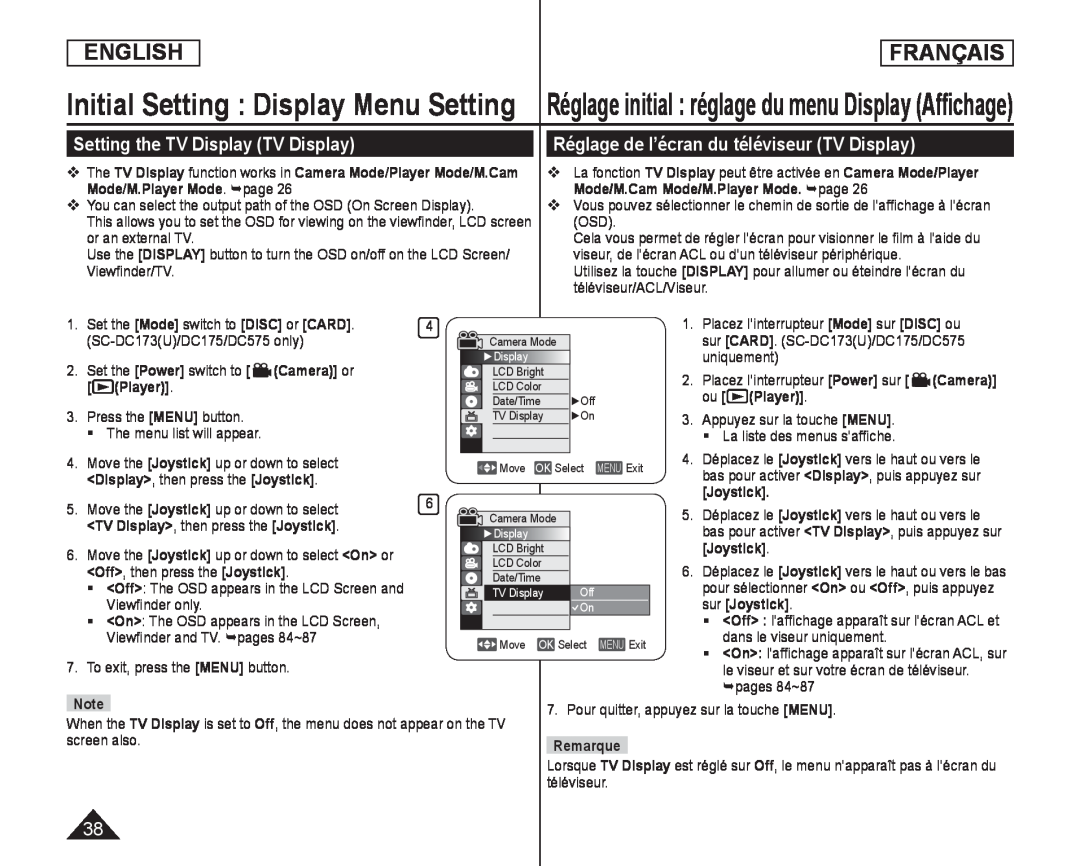 Setting the TV Display (TV Display)
Réglage de l’écran du téléviseur (TV Display)
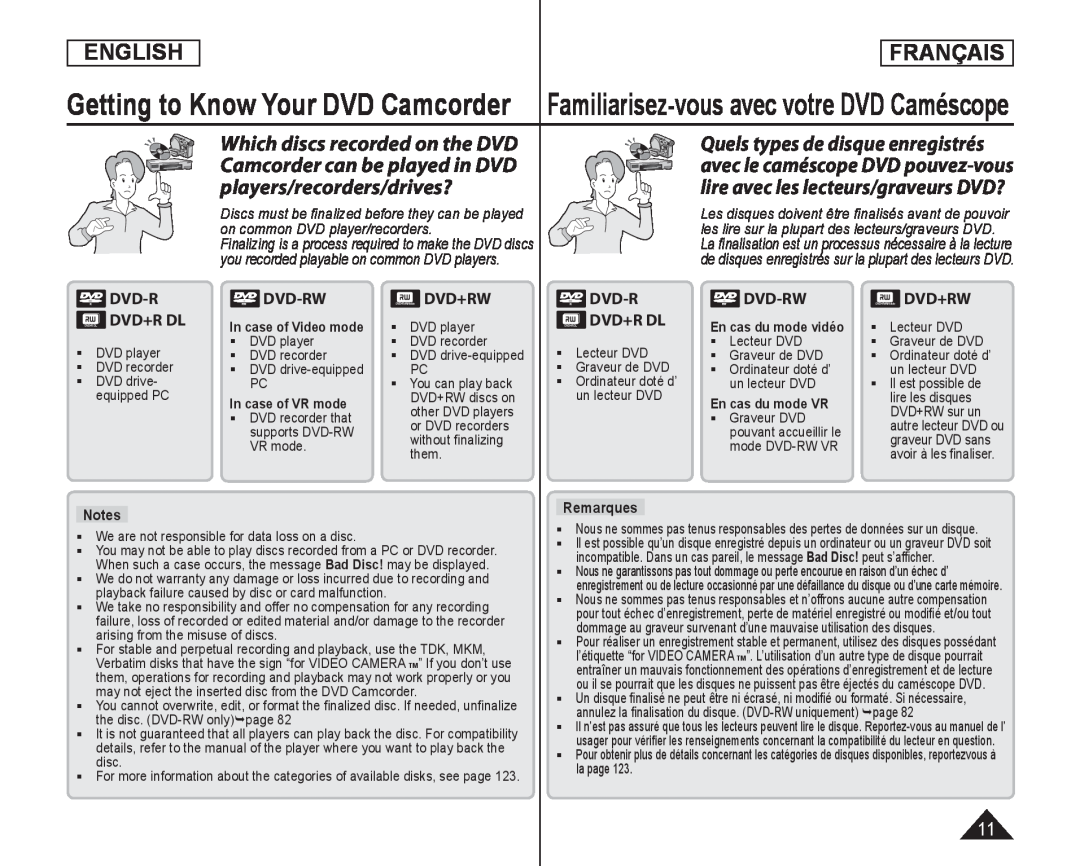
 DVD Camcorder: Before Recording
DVD Caméscope: Avant l’enregistrement
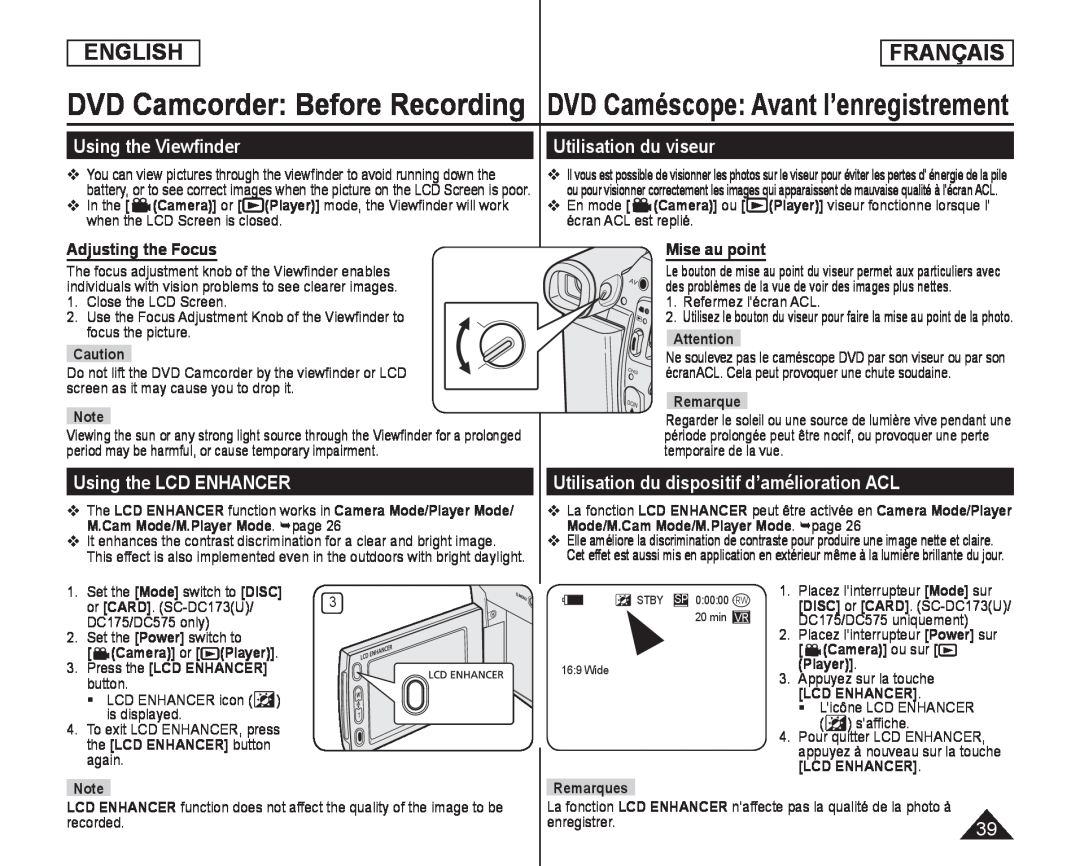
Using the Viewfinder
Utilisation du viseur
Adjusting the Focus
Miseau point
Using the LCD ENHANCER
Utilisation du dispositif d’amélioration ACL
 DVD Camcorder: Before Recording DVD Caméscope: Avant l’enregistrement
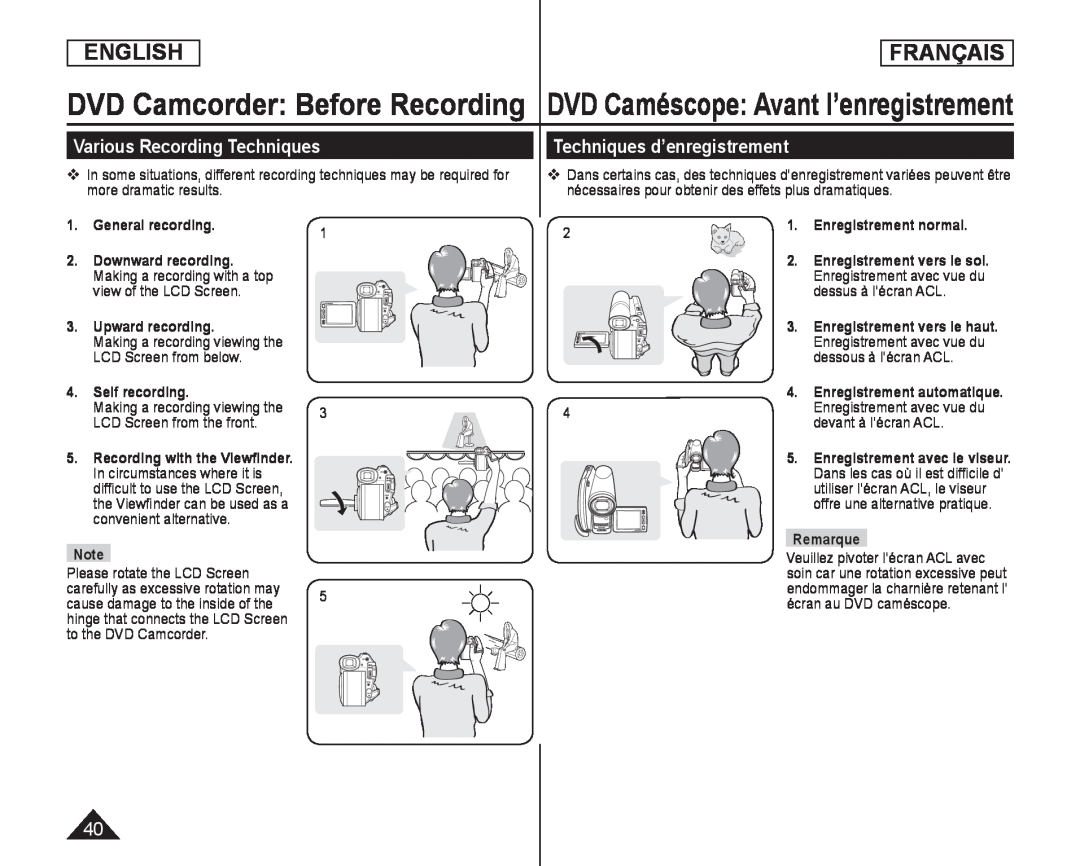
Various Recording Techniques
Techniques d’enregistrement
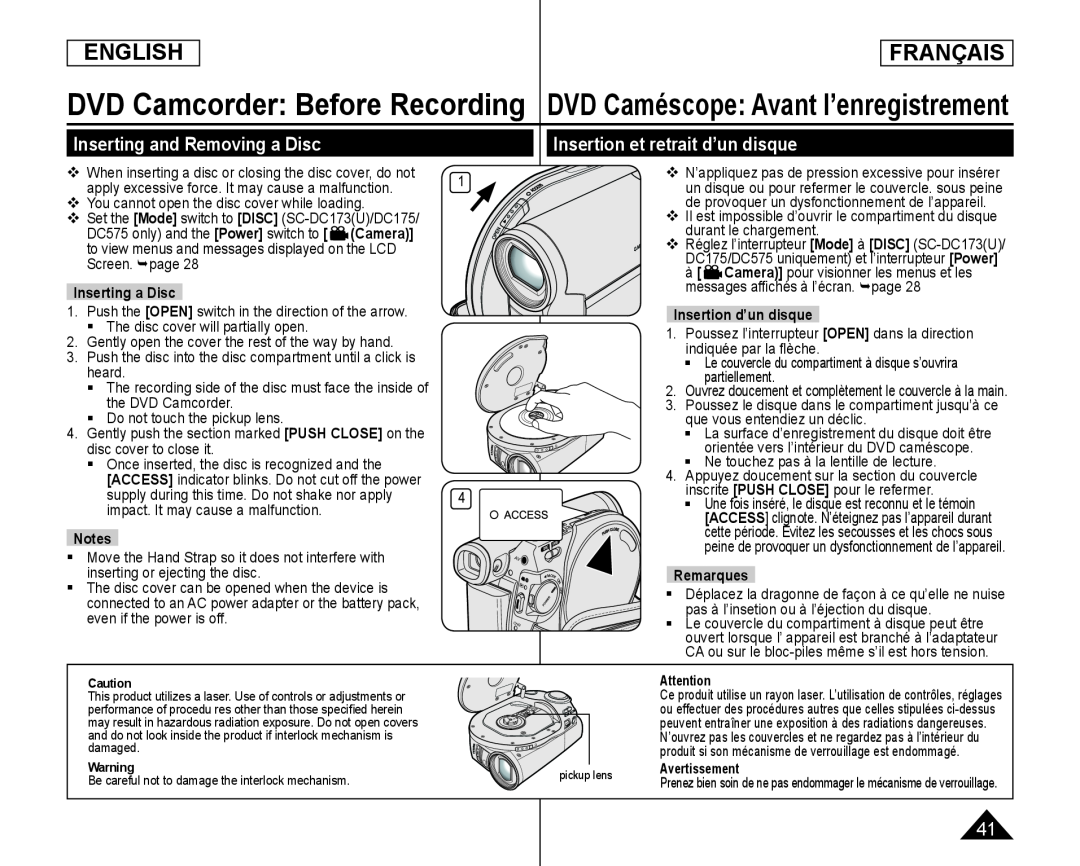 Inserting and Removing a Disc
Insertion et retrait d’un disque
 DVD Camcorder: Before Recording DVD Caméscope: Avant l’enregistrement
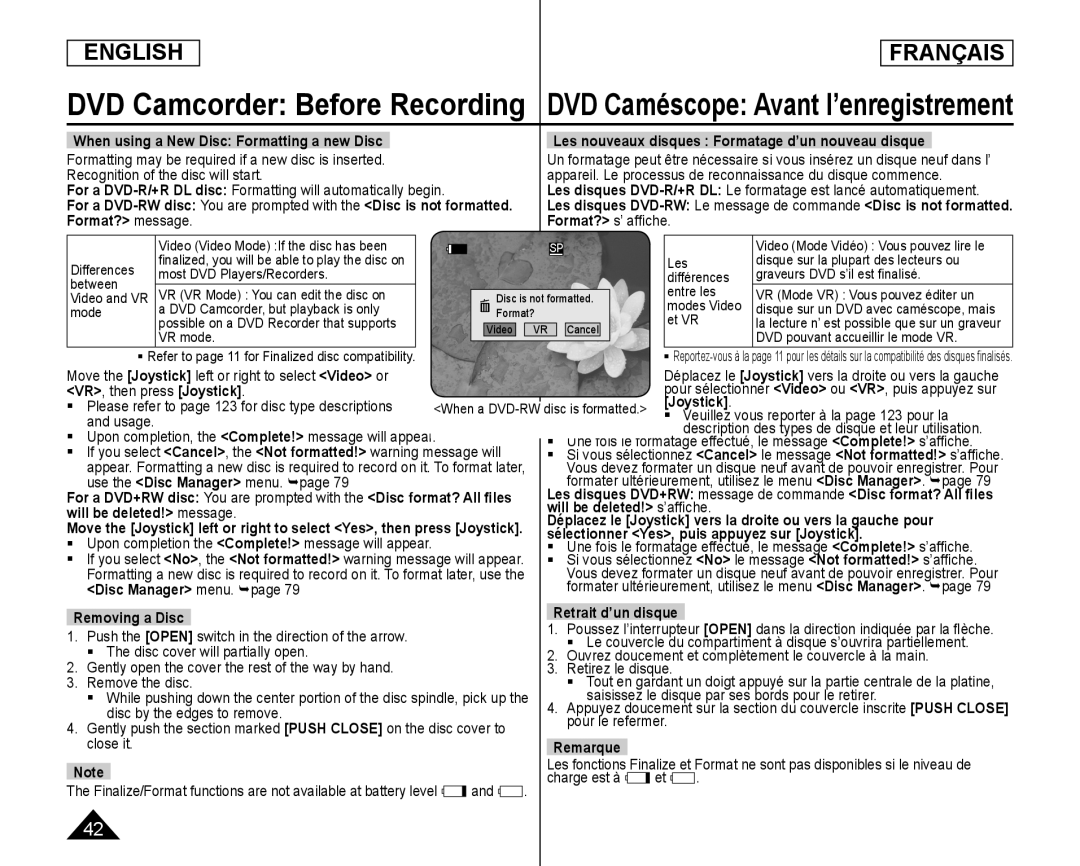
When using a New Disc: Formatting a new Disc
For a
DVD-R/+R
DL disc:
Les nouveaux disques : Formatage d’un nouveau disque
Les disques
DVD-R/+R
DL:
[Joystick]
<Video
<VR
[Joystick]
<Complete
<Cancel
<Not formatted
<Disc Manager
<No
<Not formatted
<Disc Manager
Removing a Disc
[OPEN]
[PUSH CLOSE]
Note
[Joystick]
<Video
<VR
[Joystick]
<Complete
<Cancel
<Not formatted
<Disc Manager
Les disques DVD+RW:
<Disc format? All files
will be deleted!> s’affi che
Retrait d’un disque
[OPEN]
[PUSH CLOSE]
Remarque
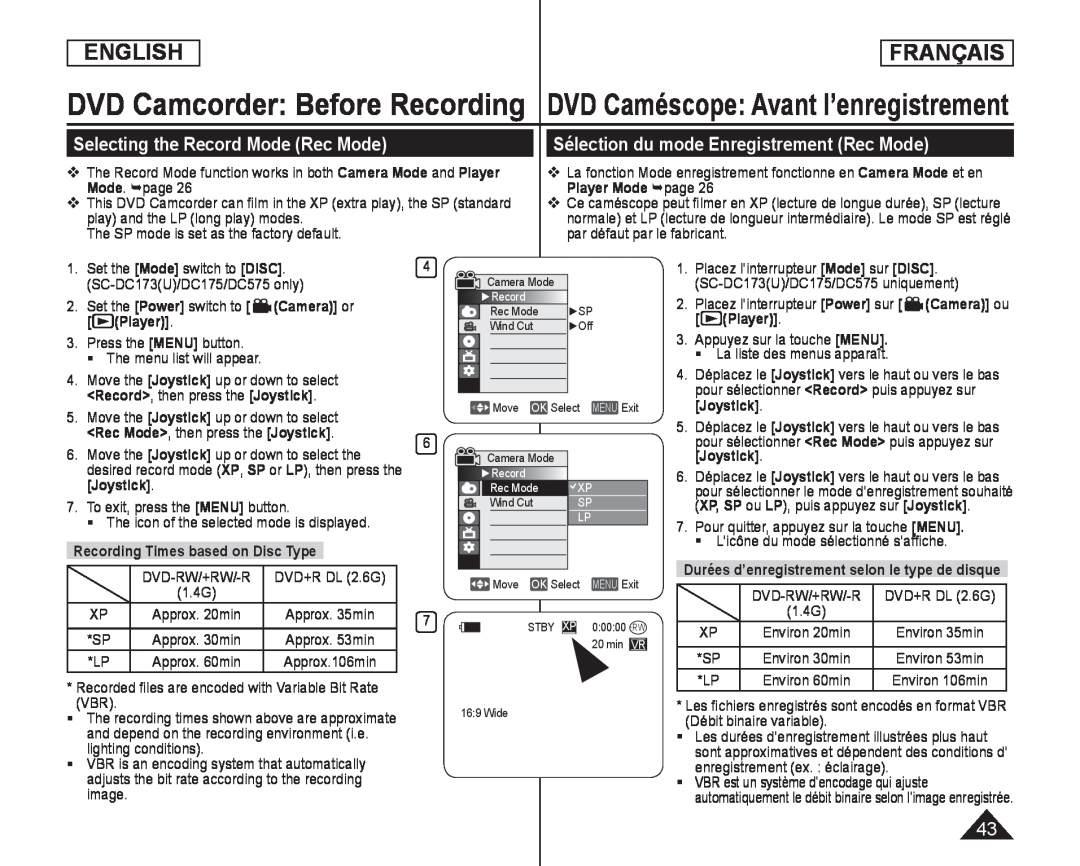 Selecting the Record Mode (Rec Mode)
Sélection du mode Enregistrement (Rec Mode)
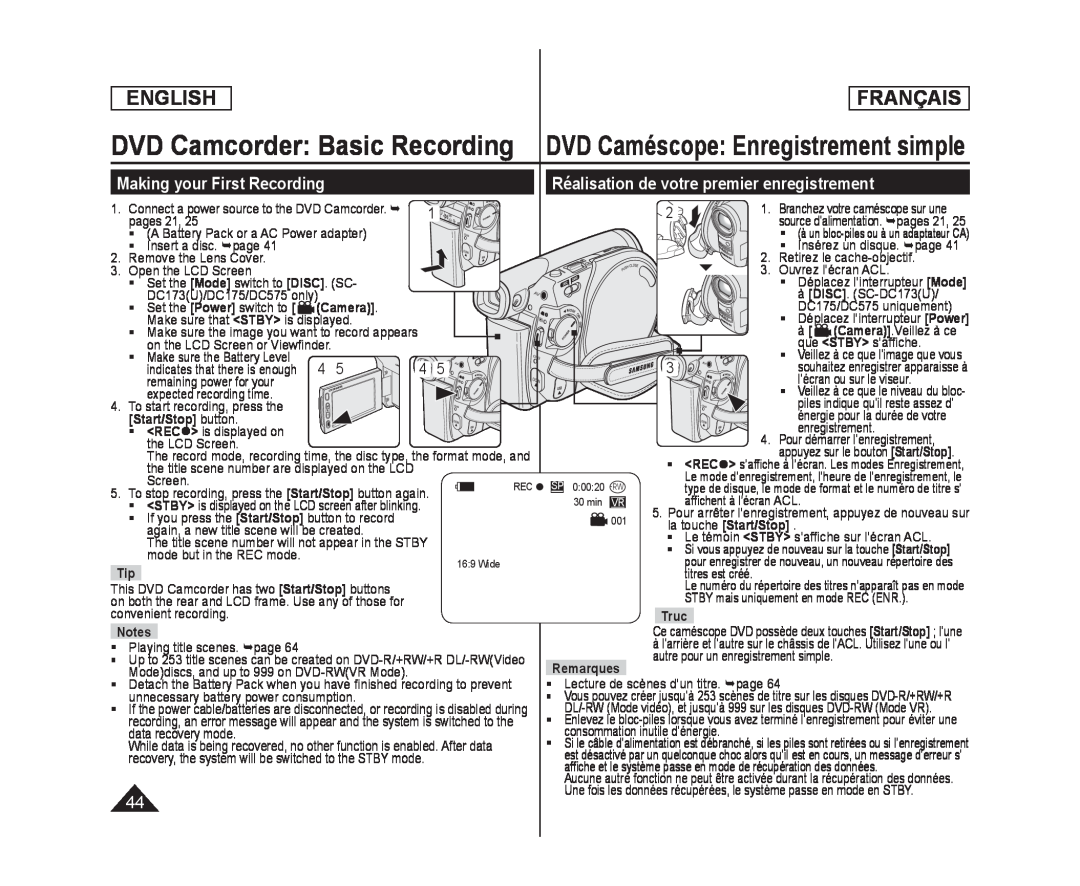 Making your First Recording
DVD Caméscope: Enregistrement simple
Réalisation de votre premier enregistrement
 DVD Camcorder: Basic Recording
DVD Caméscope: Enregistrement simple
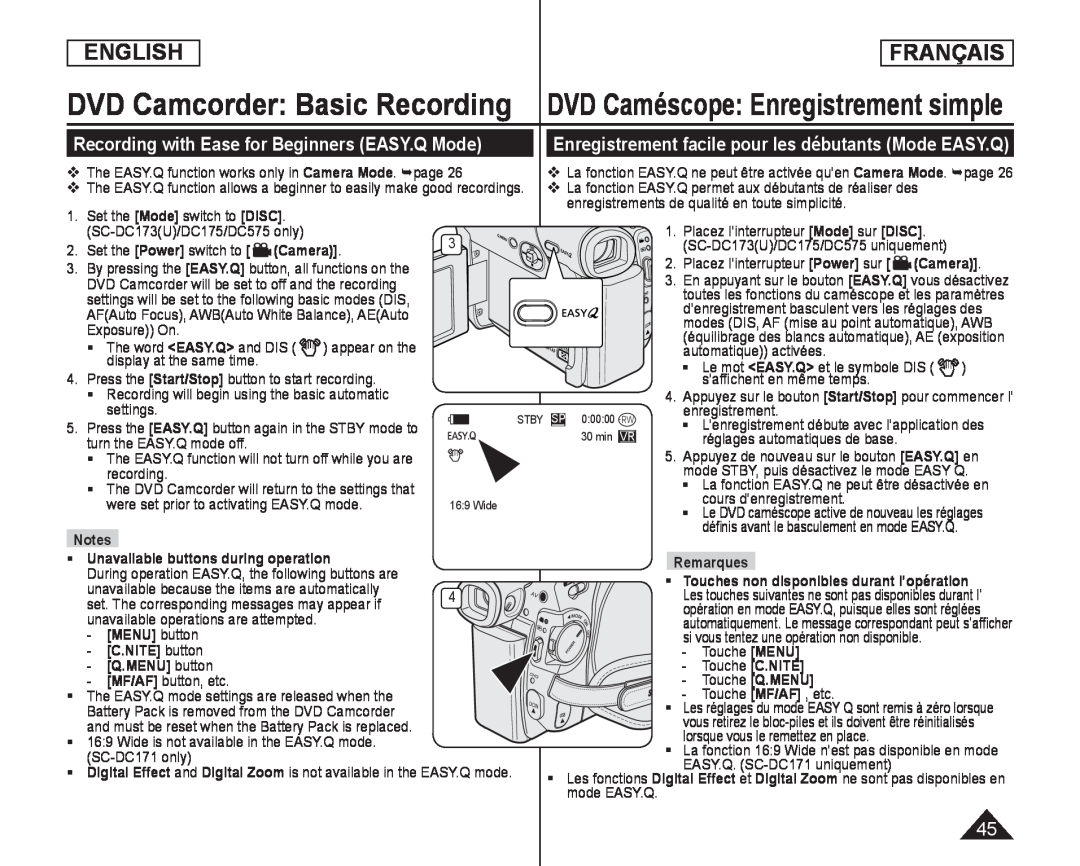
Recording with Ease for Beginners (EASY.Q Mode)
Enregistrement facile pour les débutants (Mode EASY.Q)
 DVD Camcorder: Basic Recording DVD Caméscope: Enregistrement simple
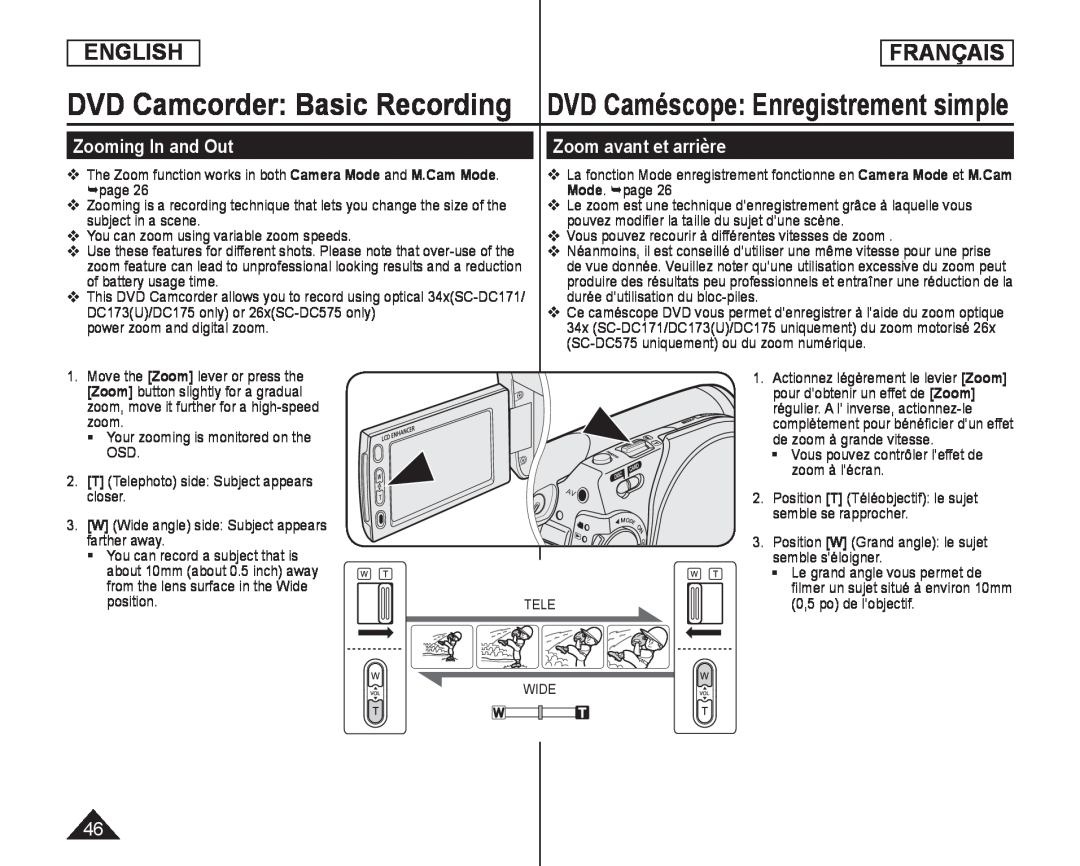
Zooming In and Out
Zoom avant et arrière
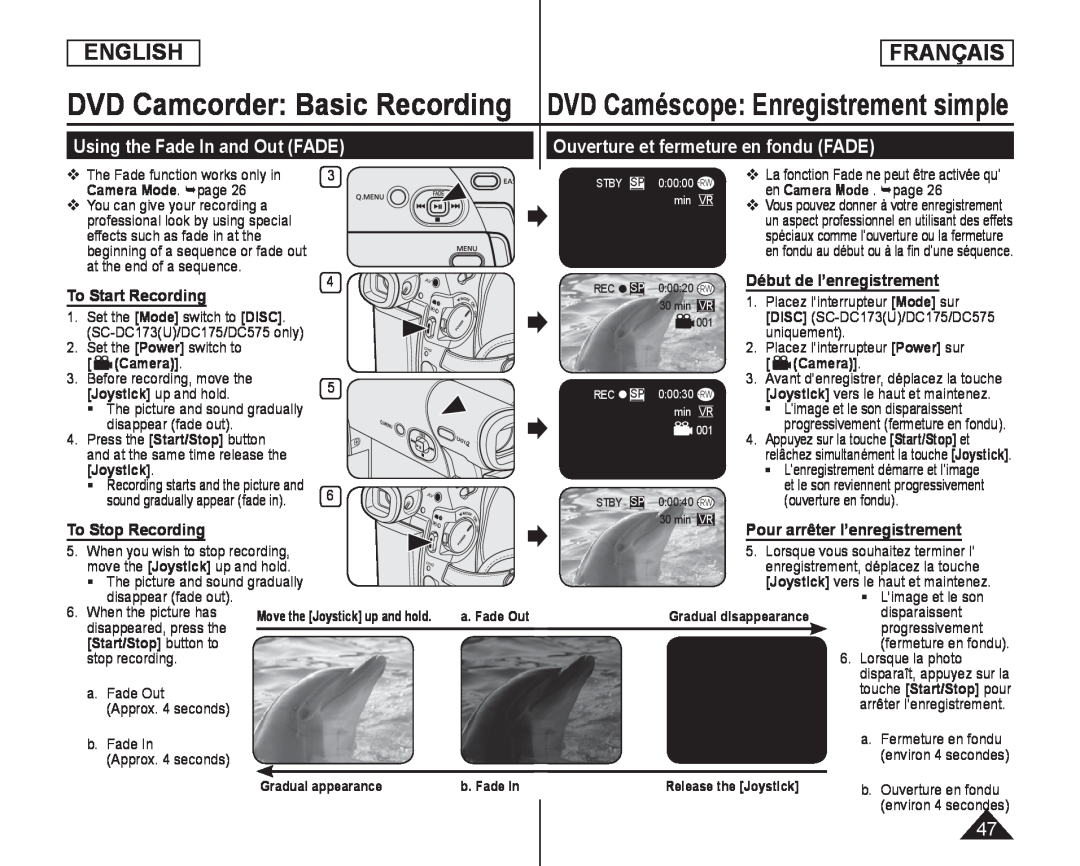 Using the Fade In and Out (FADE)
Ouverture et fermeture en fondu (FADE)
Début de l’enregistrement
To Start Recording
To Stop Recording
Pour arrêter l’enregistrement
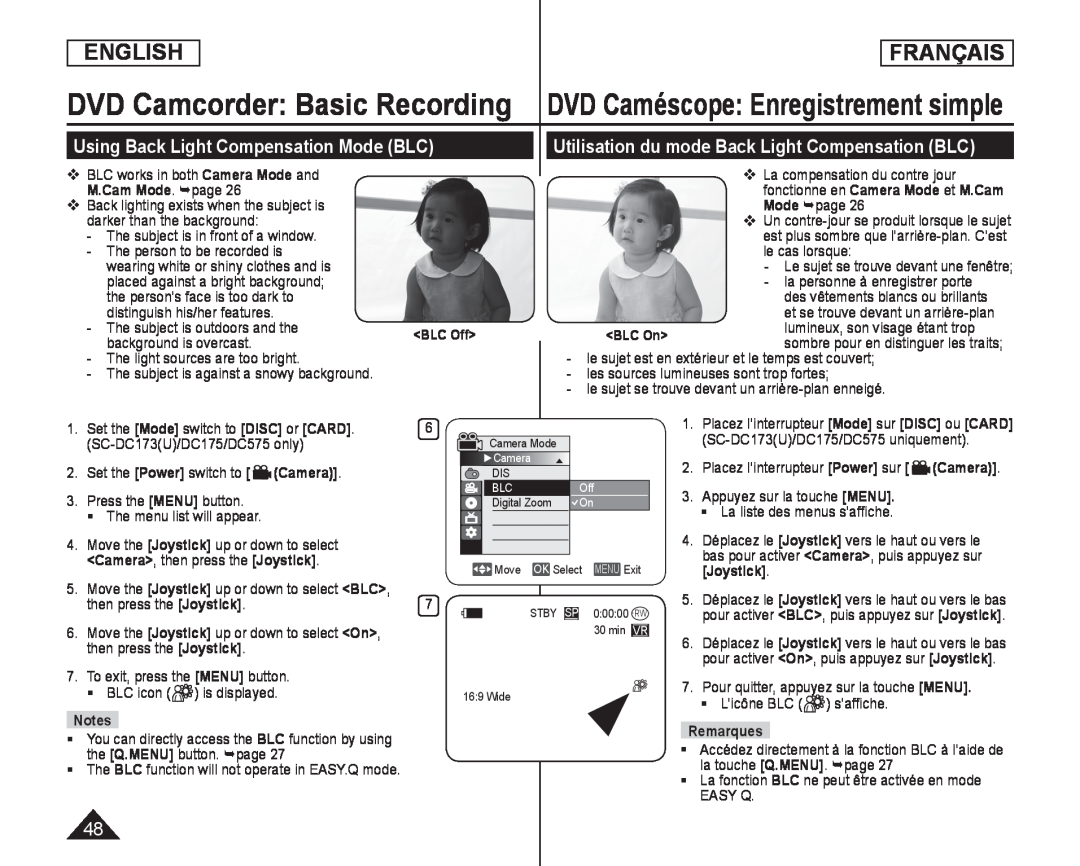 Using Back Light Compensation Mode (BLC)
Utilisation du mode Back Light Compensation (BLC)
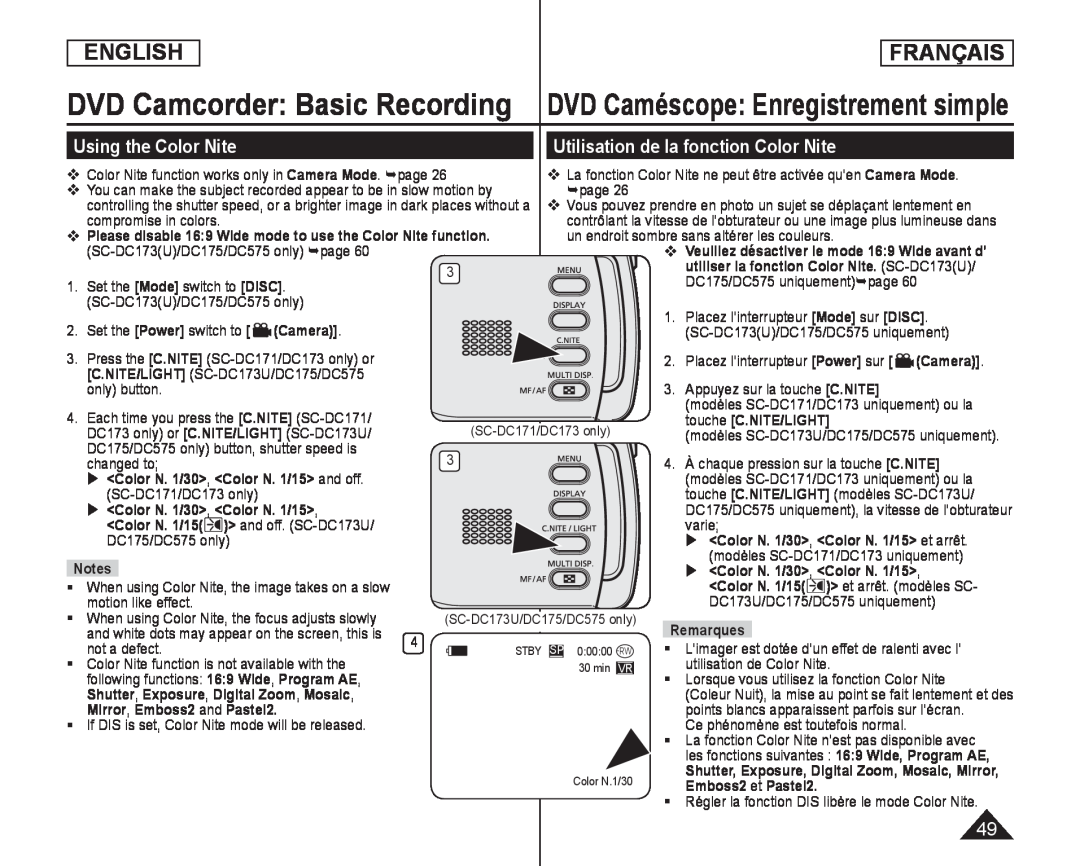 Using the Color Nite
Utilisation de la fonction Color Nite
 Using the LIGHT (SC-DC173U/DC175/DC575only)
Utilisation de la fonction LIGHT
(modèles SC-DC173U/DC175/DC575uniquement)
 DVD Camcorder: Advanced Recording
DVD Caméscope: Enregistrement avancé
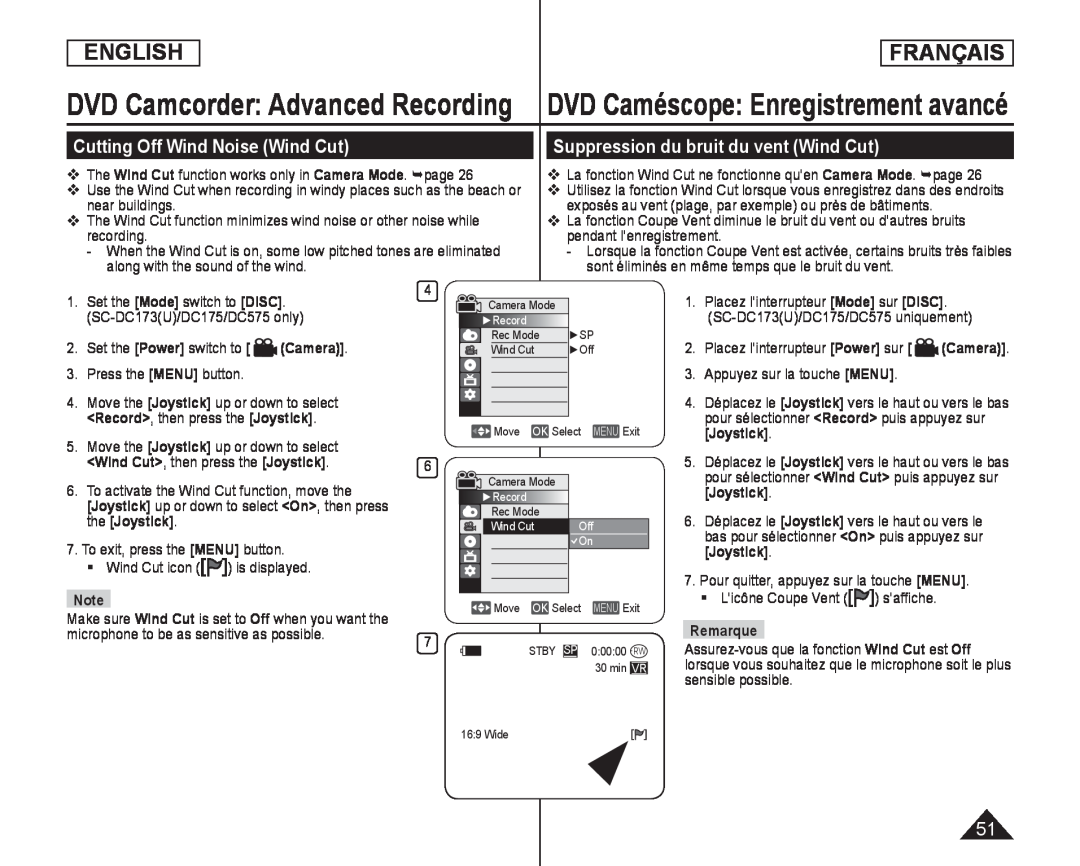
Cutting Off Wind Noise (Wind Cut)
Suppression du bruit du vent (Wind Cut)
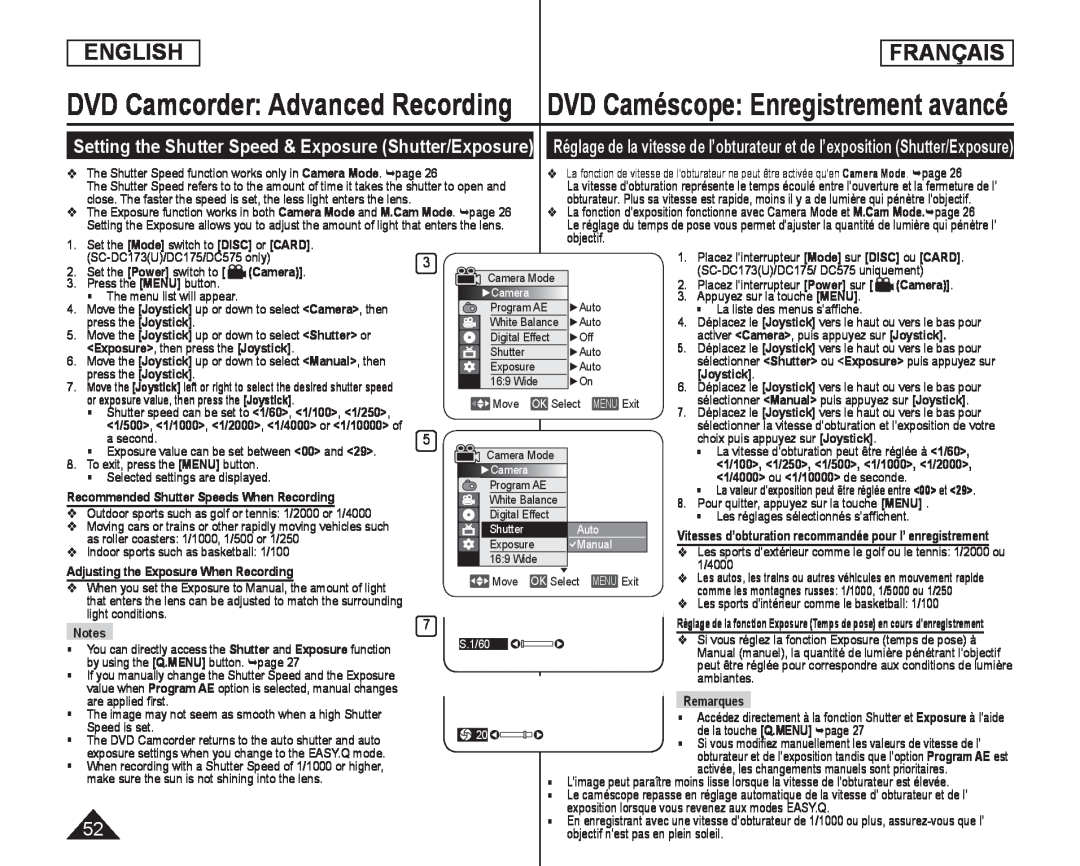 DVD Camcorder: Advanced Recording DVD Caméscope: Enregistrement avancé
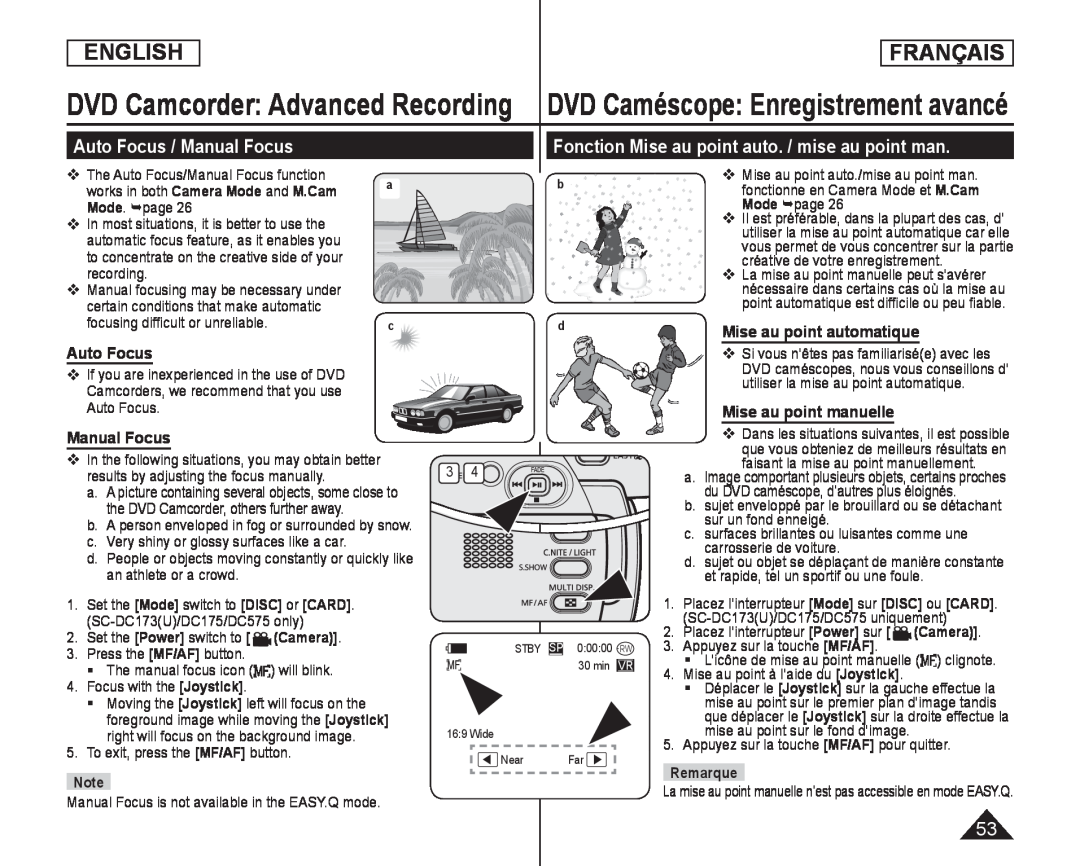 Auto Focus / Manual Focus
Fonction Mise au point auto. / mise au point man
Auto Focus
Manual Focus
Mise au point automatique
Mise au point manuelle
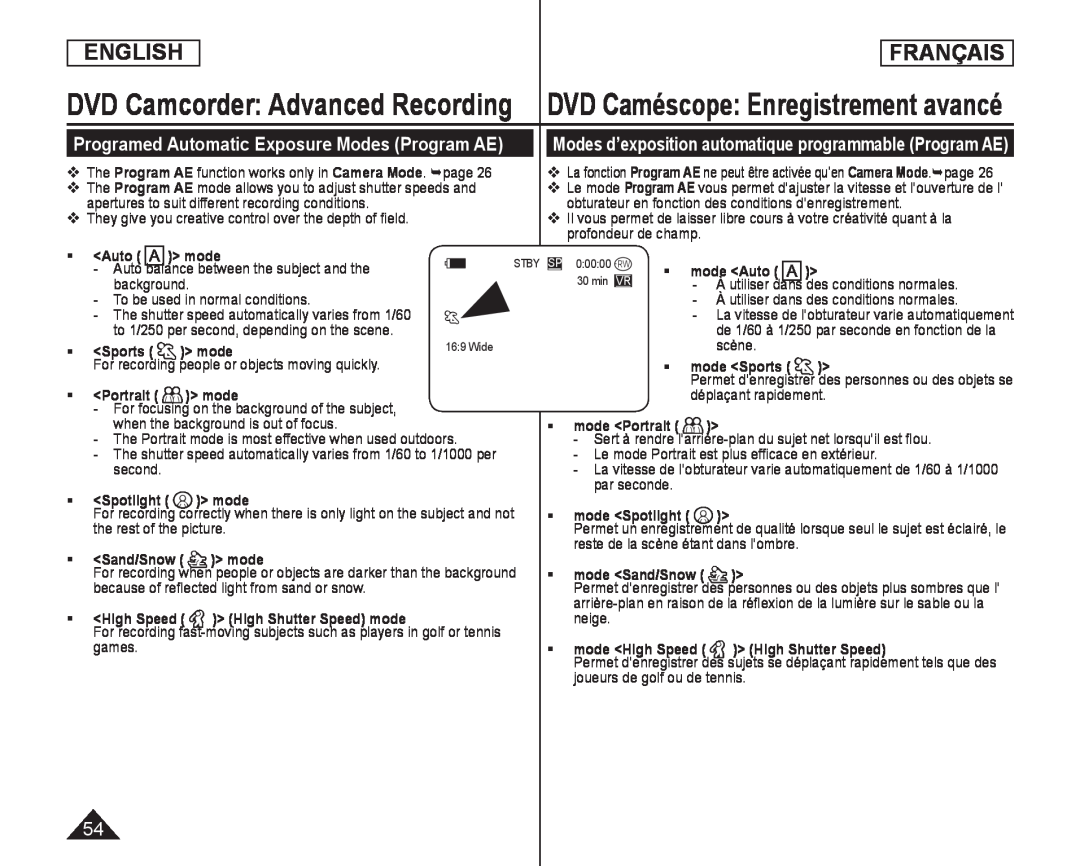 Programed Automatic Exposure Modes (Program AE)
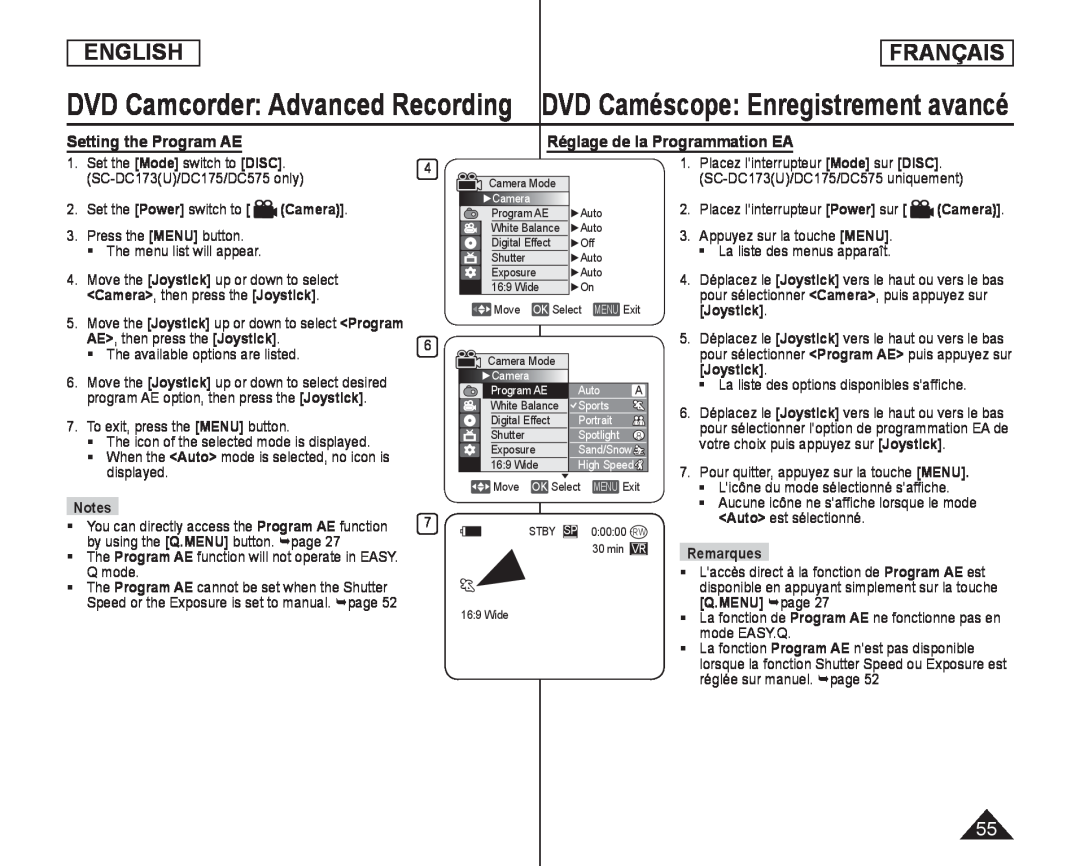 Setting the Program AE
Réglage de la Programmation EA
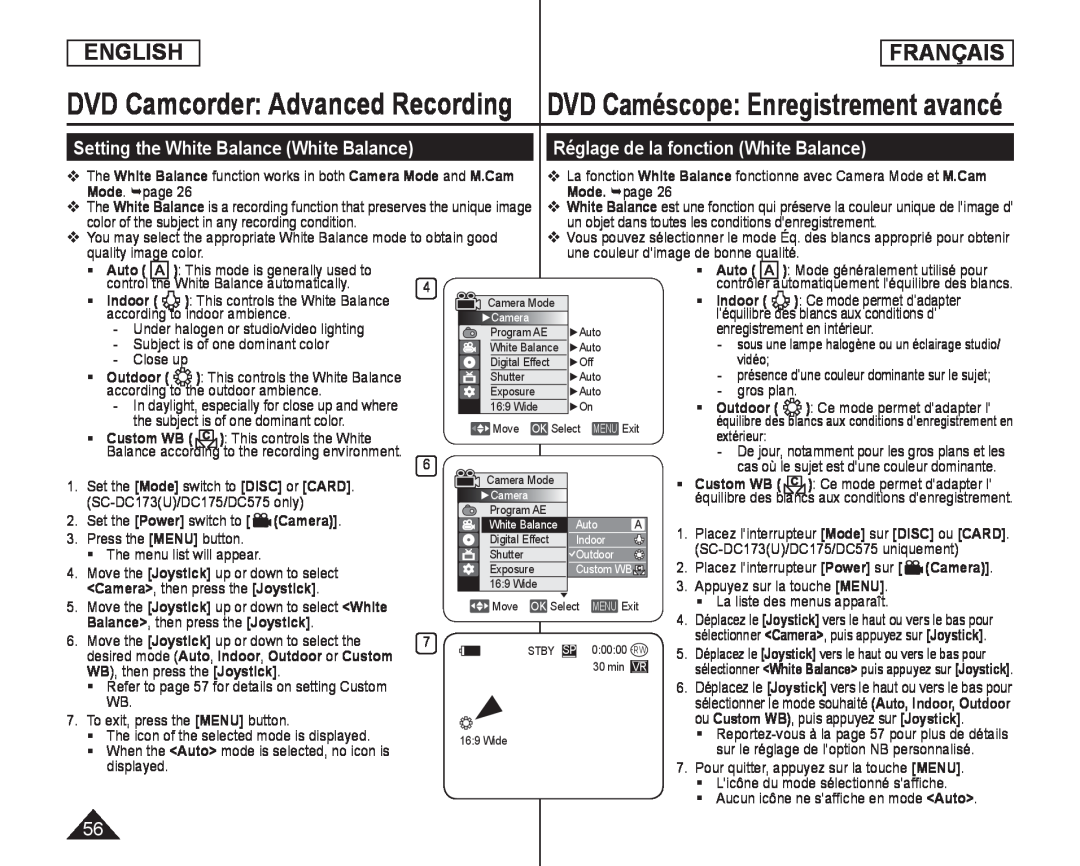 Setting the White Balance (White Balance)
Réglage de la fonction (White Balance)
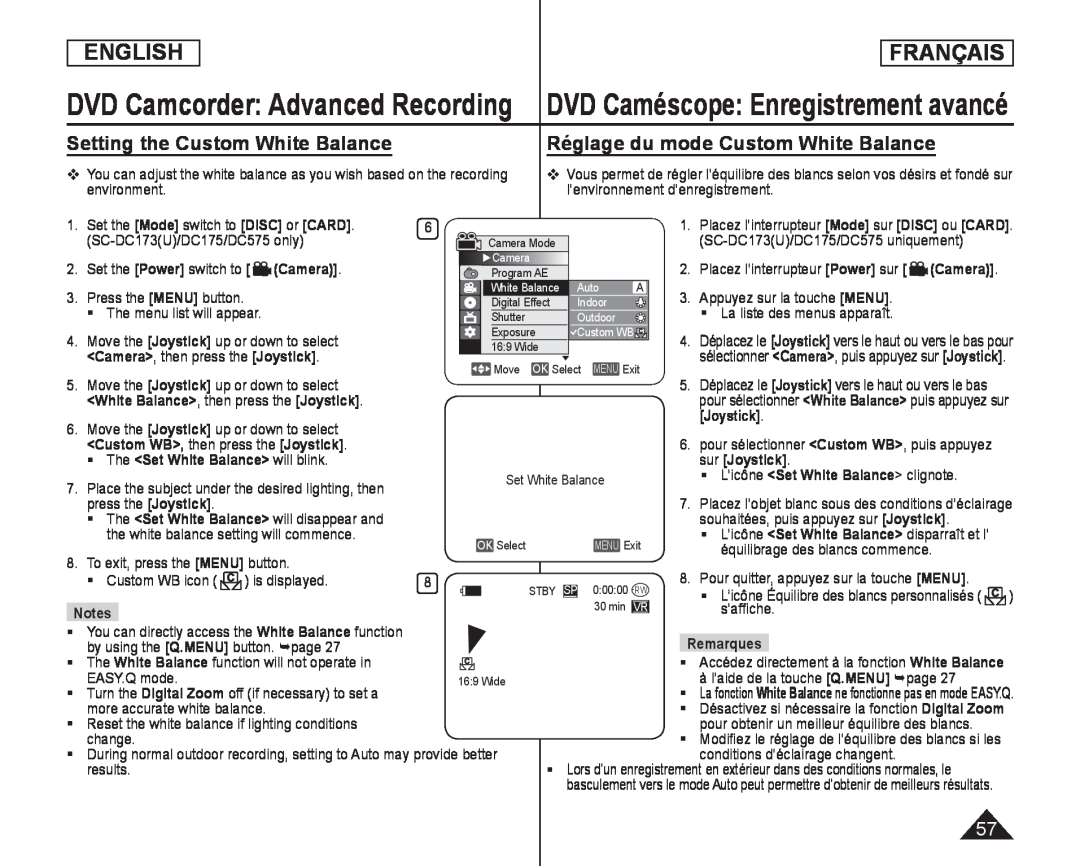 Setting the Custom White Balance
Réglage du mode Custom White Balance
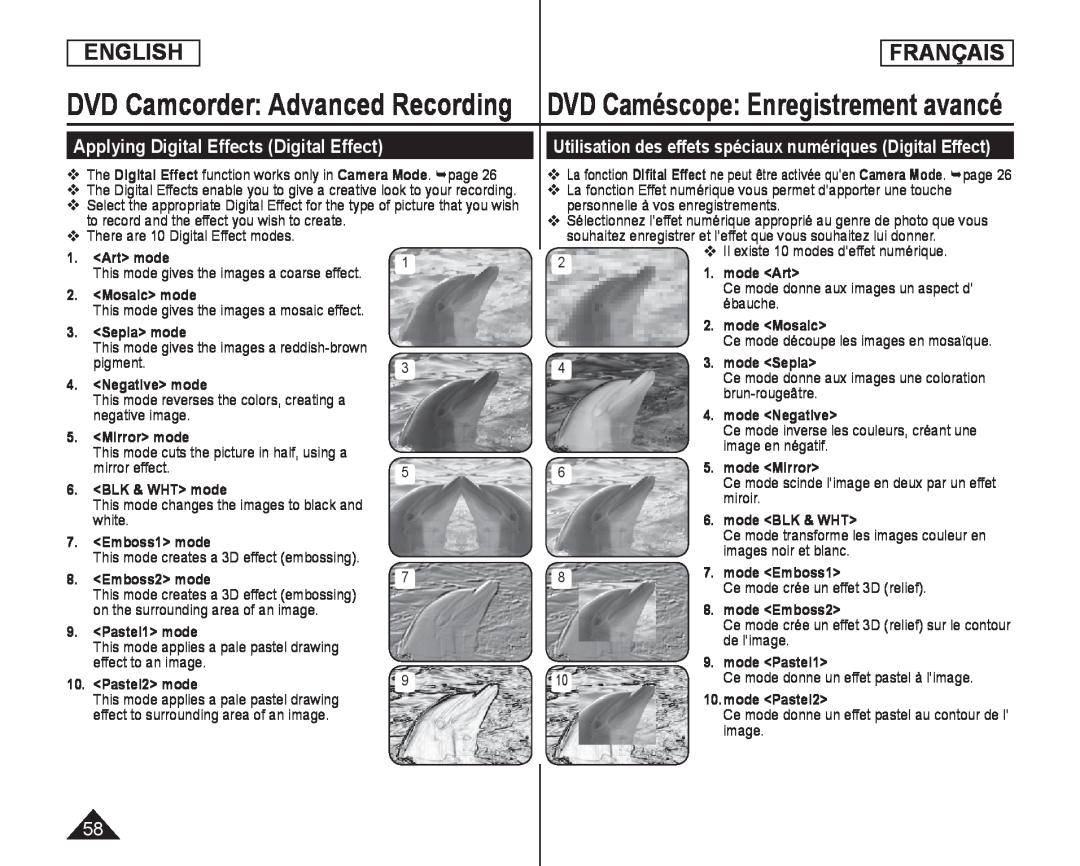 Applying Digital Effects (Digital Effect)
Utilisation des effets spéciaux numériques (Digital Effect)
 Selecting the Digital Effects
Choix des effets spéciaux numériques
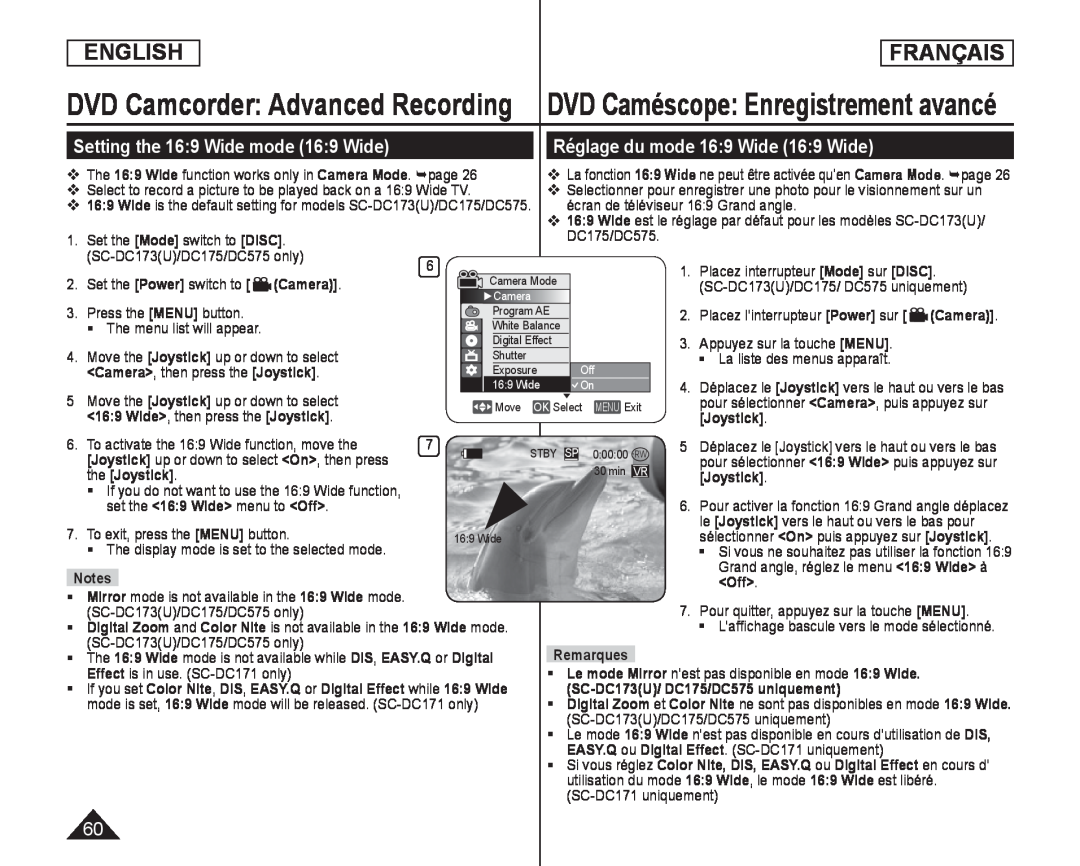 Setting the 16:9 Wide mode (16:9 Wide)
Réglage du mode 16:9 Wide (16:9 Wide)
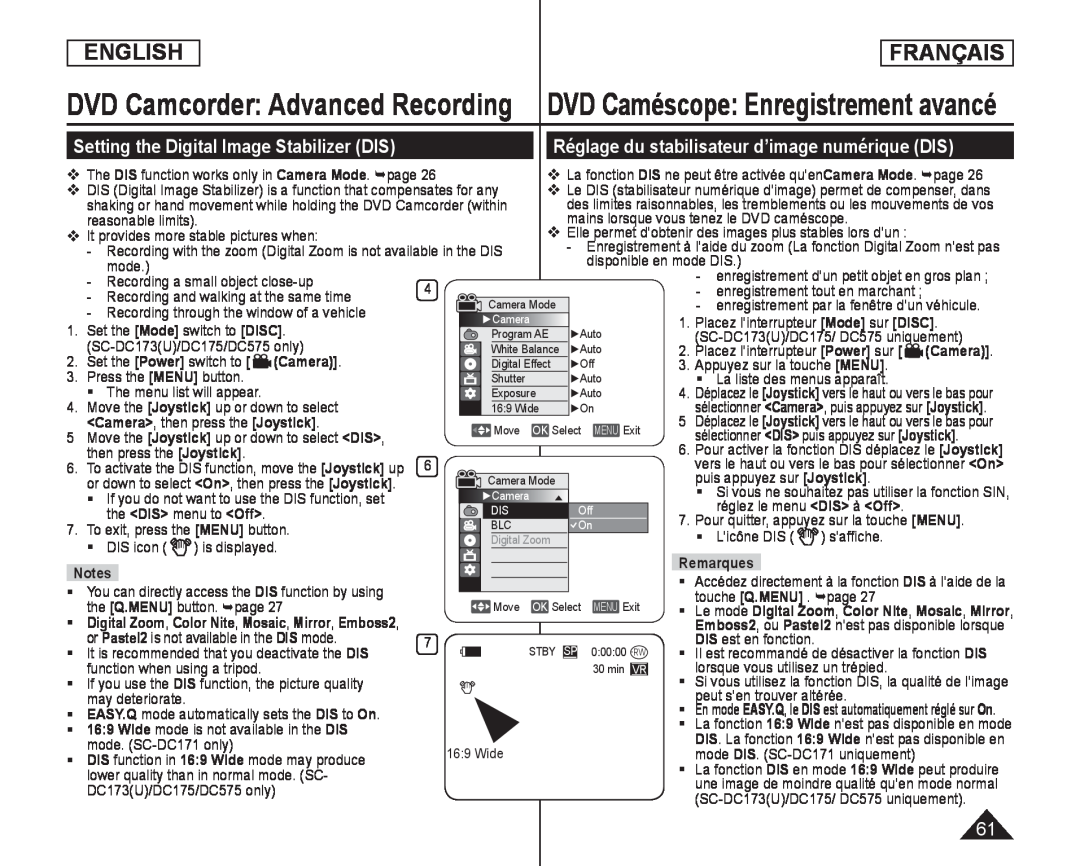 Setting the Digital Image Stabilizer (DIS)
Réglage du stabilisateur d’image numérique (DIS)
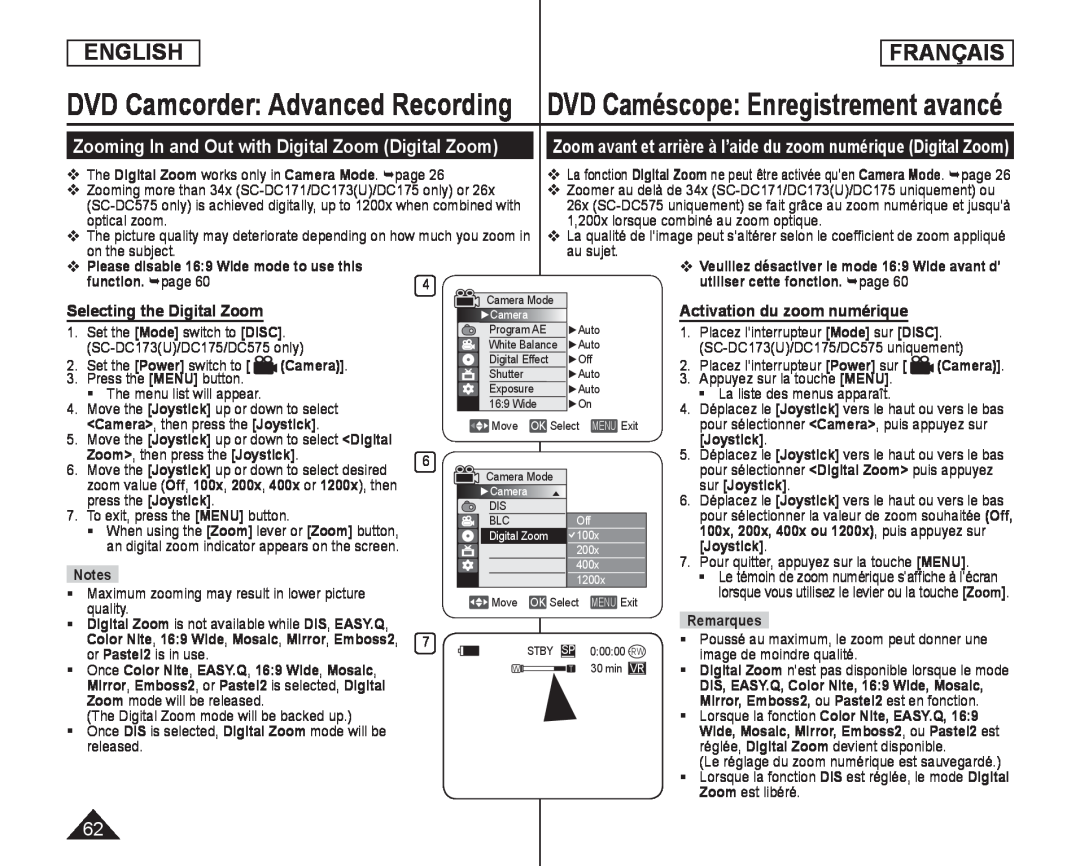 Zooming In and Out with Digital Zoom (Digital Zoom)
Activation du zoom numérique
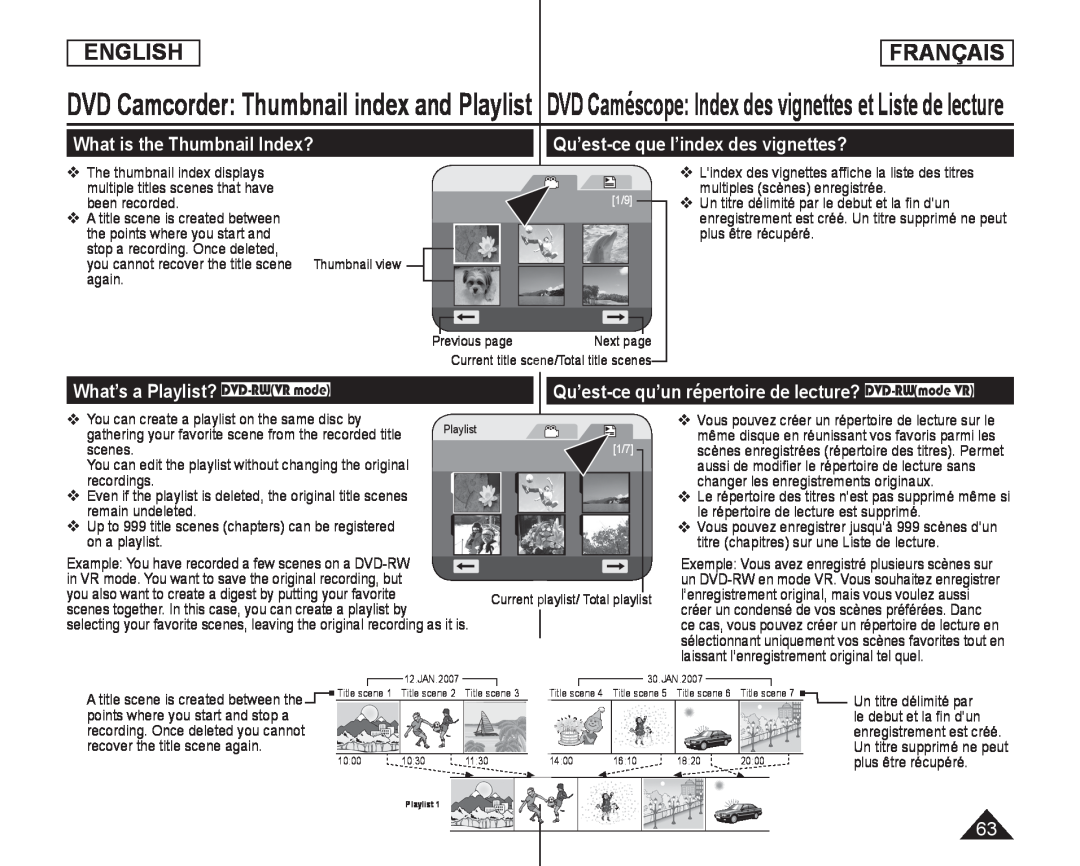 What is the Thumbnail Index
Qu’est-ceque l’index des vignettes
What’s a Playlist? DVD-RW(VRmode)
 DVD Caméscope
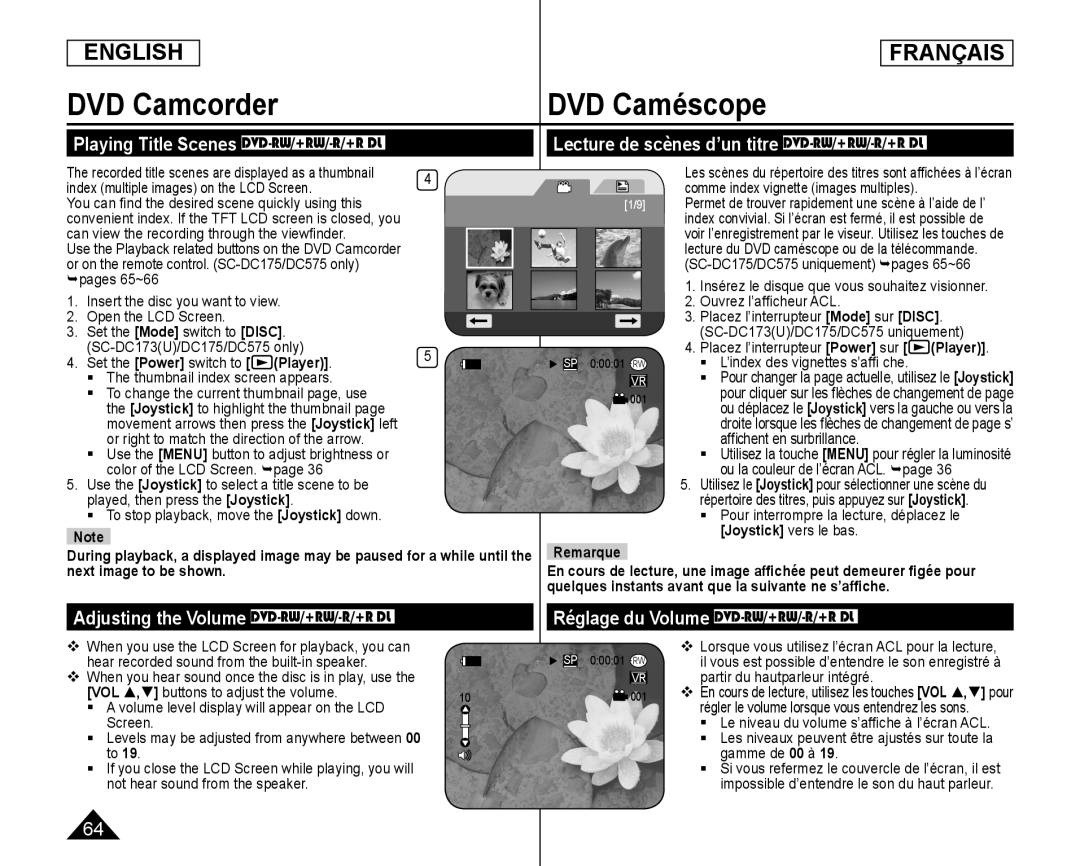
Playing Title Scenes DVD-RW/+RW/-R/+RDL
Lecture de scènes d’un titre DVD-RW/+RW/-R/+RDL
Adjusting the Volume DVD-RW/+RW/-R/+RDL
Réglage du Volume
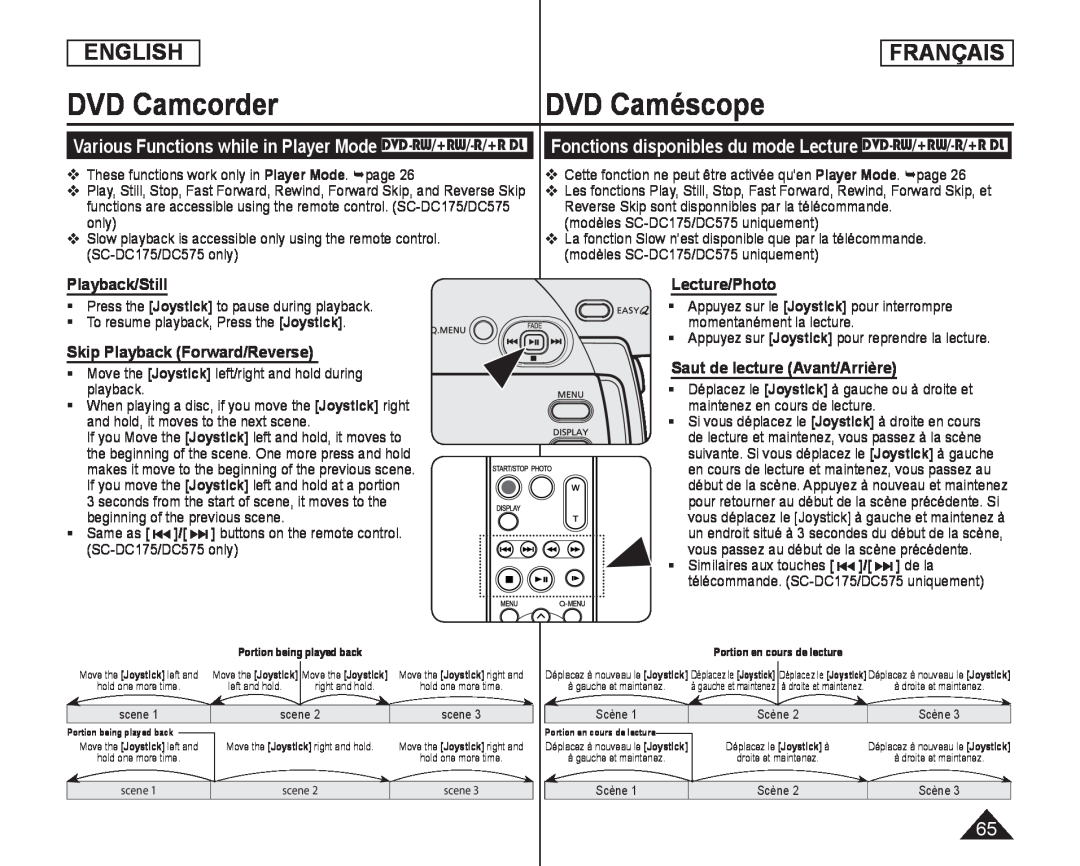 Various Functions while in Player Mode DVD-RW/+RW/-R/+RDL
Playback/Still
Skip Playback (Forward/Reverse)
Fonctions disponibles du mode Lecture DVD-RW/+RW/-R/+RDL
Lecture/Photo
Saut de lecture (Avant/Arrière)
 DVD Caméscope
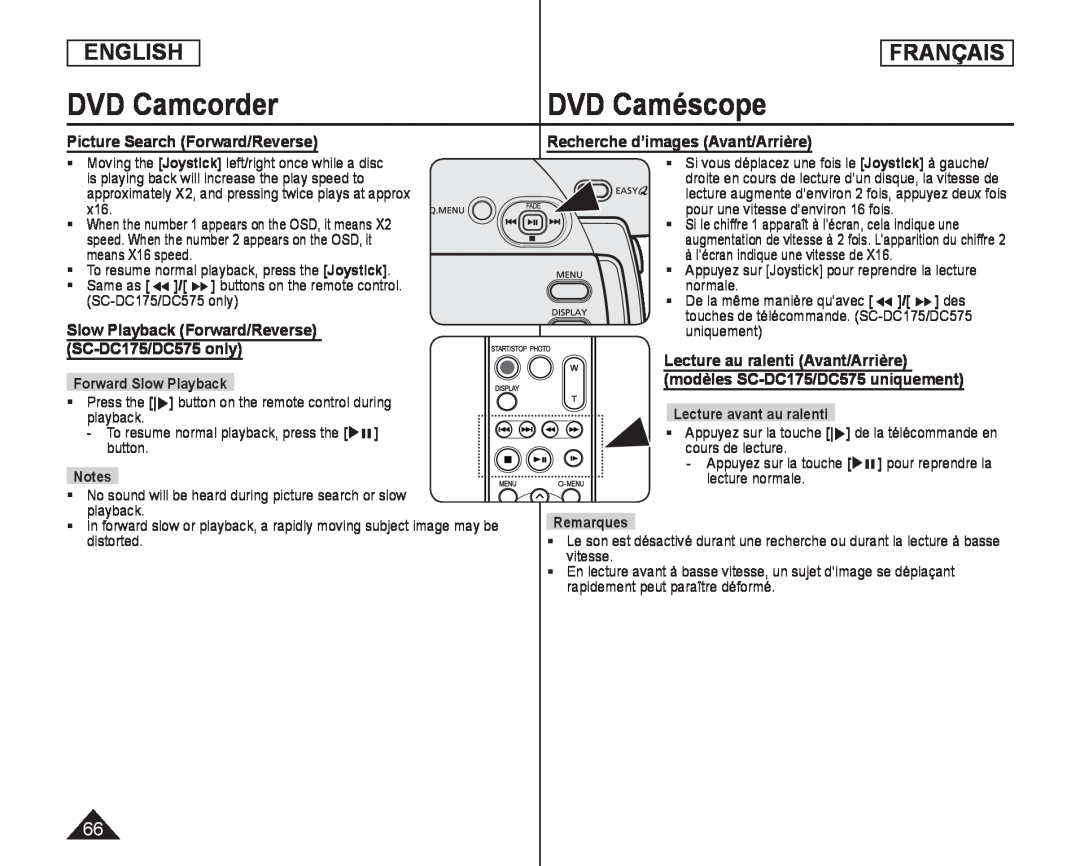
Picture Search (Forward/Reverse)
Recherche d’images (Avant/Arrière)
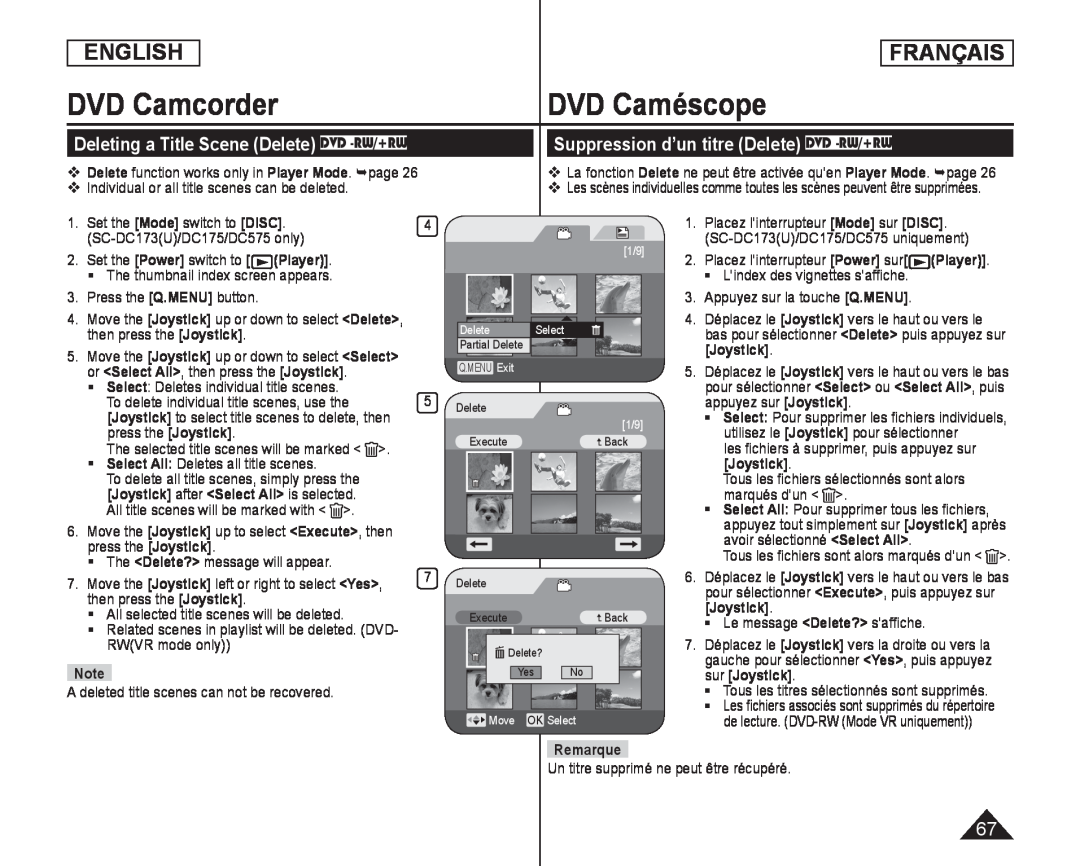 Deleting a Title Scene (Delete) DVD -RW/+RW
Suppression d’un titre (Delete) DVD -RW/+RW
 DVD Camcorder
DVD Caméscope
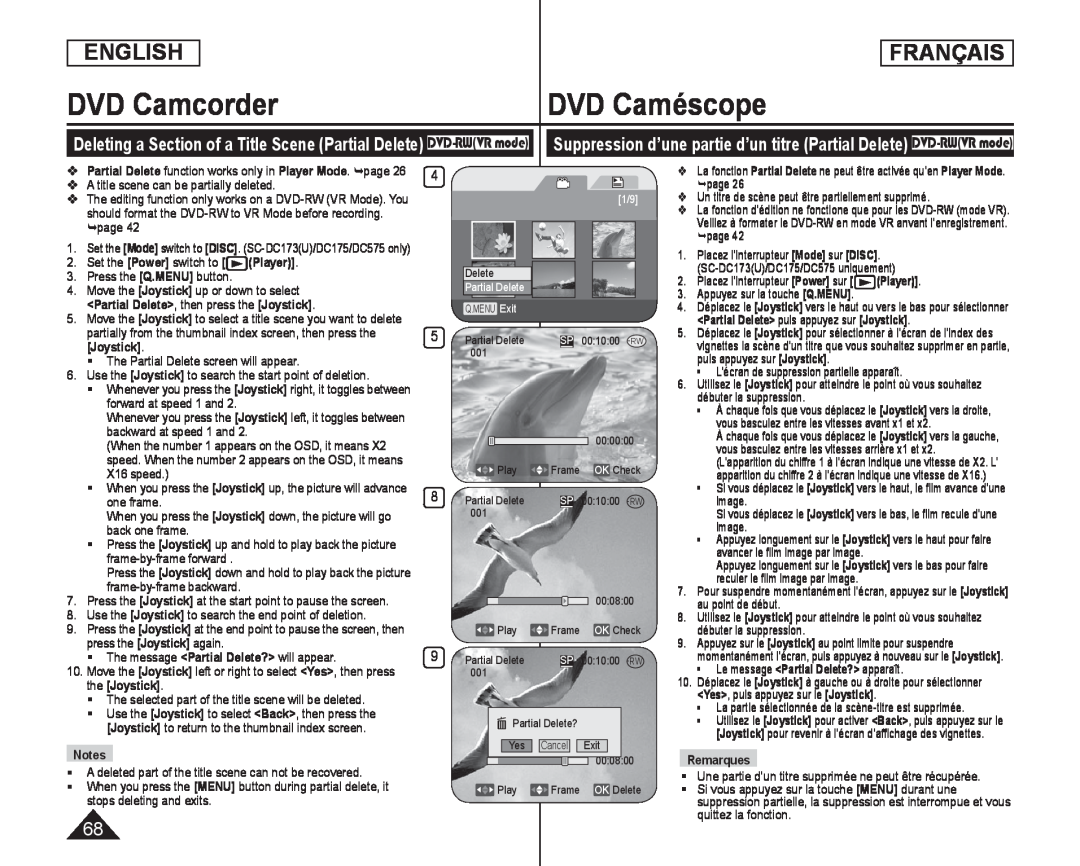
Deleting a Section of a Title Scene (Partial Delete) DVD-RW(VRmode)
Suppression d’une partie d’un titre (Partial Delete) DVD-RW(VRmode)
(Player)]
[Q.MENU]
[Joystick]
[Joystick]
[Joystick]
[Joystick]
[Joystick]
[Joystick]
[Joystick]
[Joystick]
[Joystick]
[Joystick]
[Joystick]
[Joystick]
<Partial Delete
[Joystick]
<Yes
[Joystick]
Notes
[MENU]
Partial Delete
Player Mode
[Power]
[ (Player)]
[Q.MENU]
[Joystick]
[Joystick]
[Joystick]
[Joystick]
[Joystick]
<Partial Delete
Remarques
[MENU]
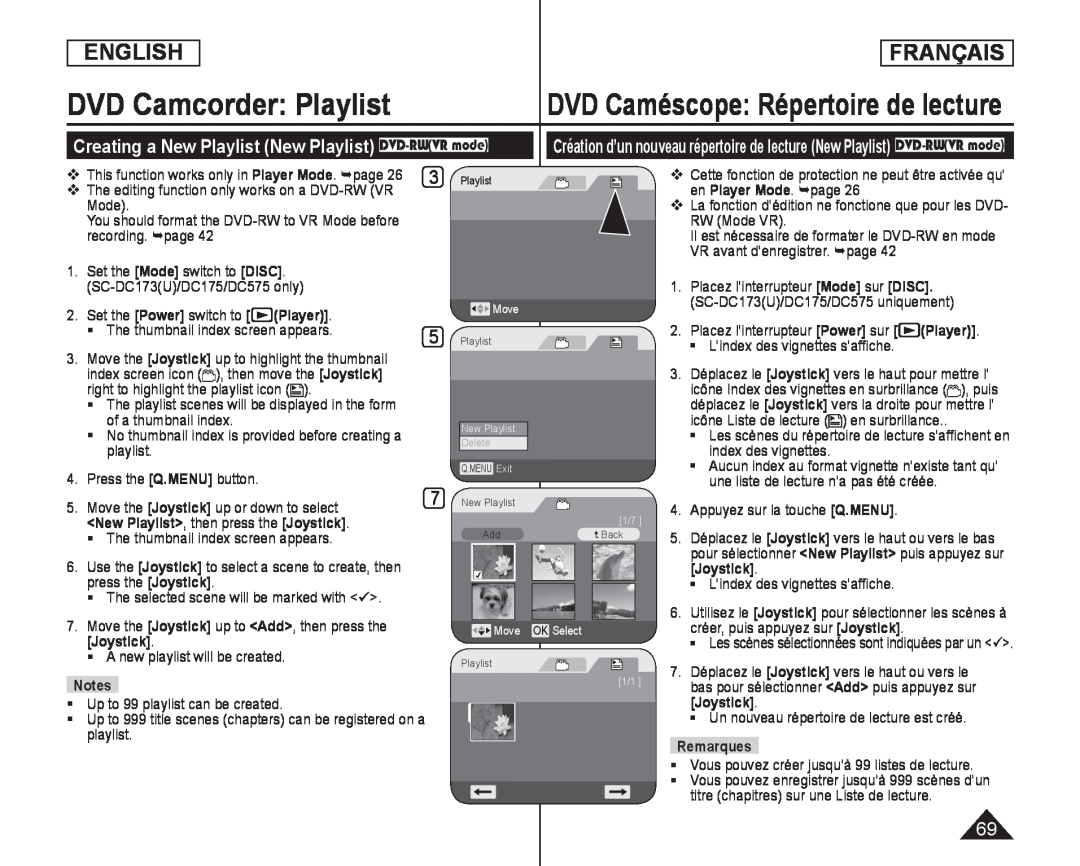 DVD Camcorder: Playlist
Creating a New Playlist (New Playlist) DVD-RW(VRmode)
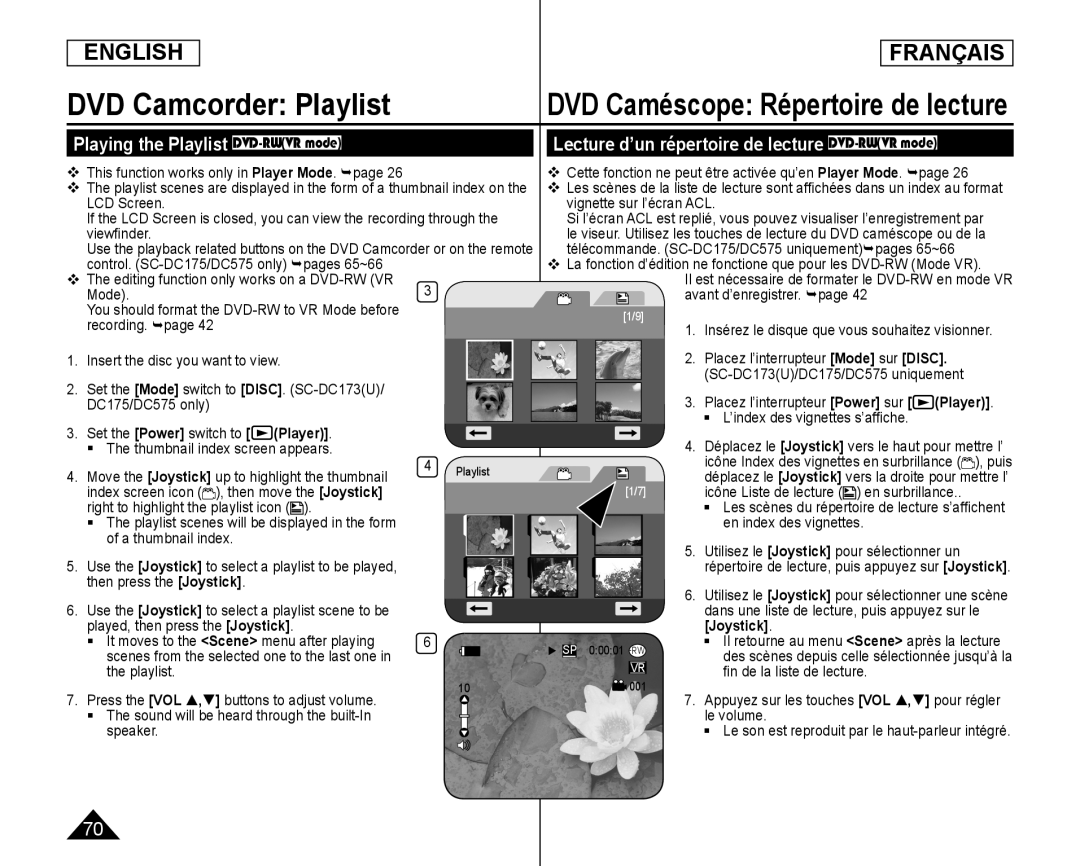 Playing the Playlist DVD-RW(VRmode)
Lecture d’un répertoire de lecture DVD-RW(VRmode)
 DVD Caméscope: Répertoire de lecture
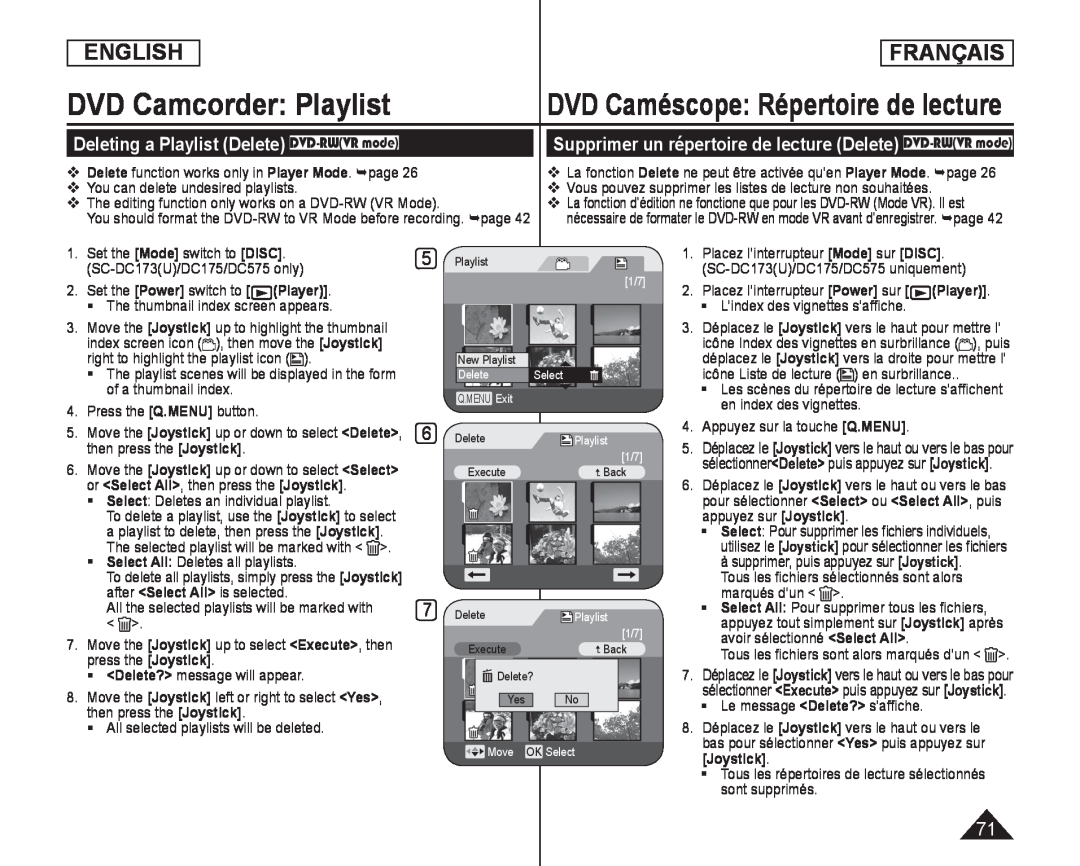
Deleting a Playlist (Delete) DVD-RW(VRmode)
Supprimer un répertoire de lecture (Delete) DVD-RW(VRmode)
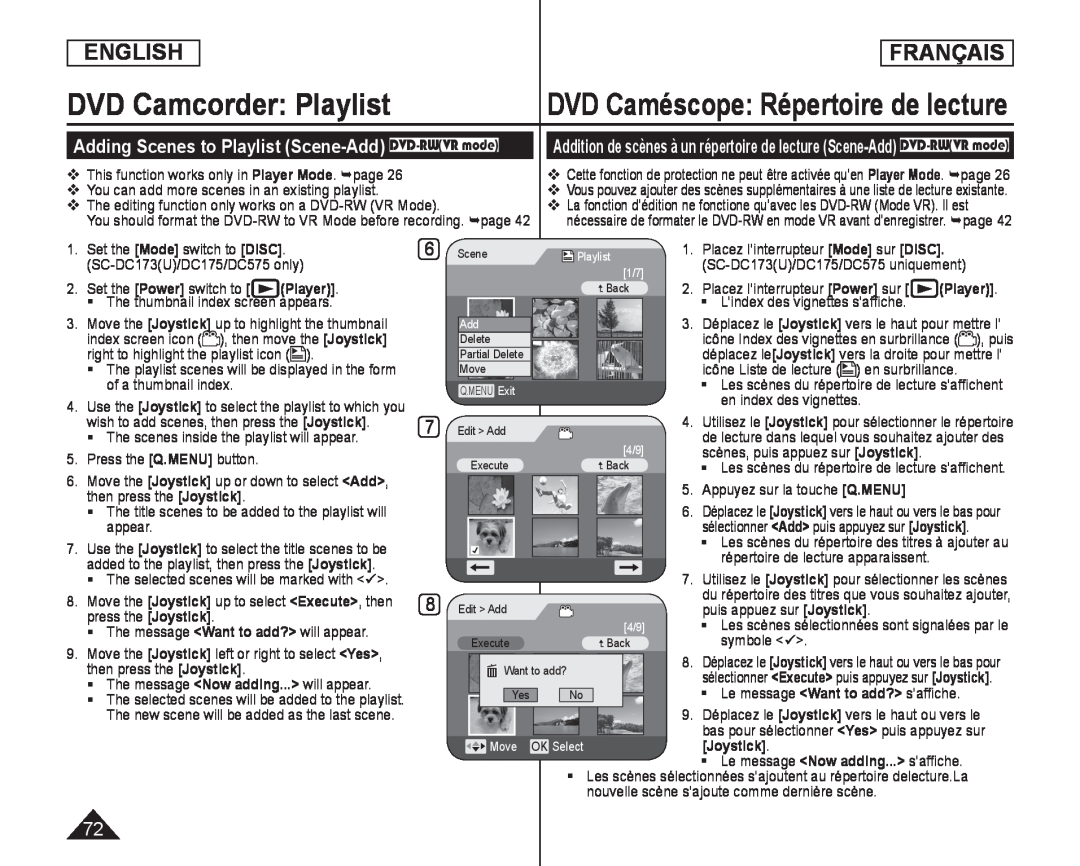 Adding Scenes to Playlist (Scene-Add) DVD-RW(VRmode)
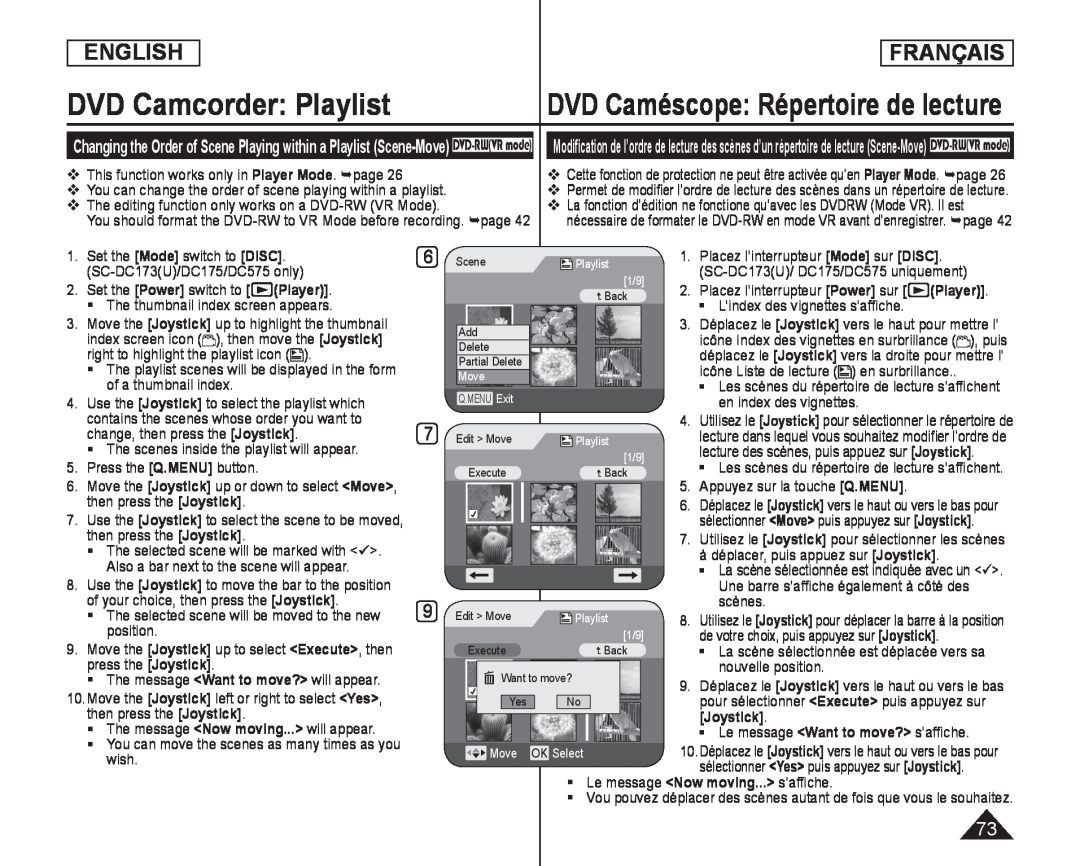 DVD Camcorder: Playlist
DVD Caméscope: Répertoire de lecture
Player Mode
Player Mode
[Mode]
[DISC]
2.Set the [Power] switch to [ (Player)]
[Joystick]
[Joystick]
[Joystick]
[Joystick]
[Q.MENU]
[Joystick]
<Move
[Joystick]
[Joystick]
[Joystick]
[Joystick]
<Execute
[Joystick]
<Want to move
[Joystick]
<Yes
[Joystick]
<Now moving
[Mode]
[DISC]
[Power]
(Player)]
[Joystick]
[Joystick]
[Joystick]
[Q.MENU]
<Move
[Joystick]
[Joystick]
[Joystick]
[Joystick]
<Execute
[Joystick]
<Want to move
<Yes
[Joystick]
<Now moving
 DVD Camcorder: Playlist
DVD Caméscope: Répertoire de lecture
Deleting Scenes from Playlist (Scene-Delete) DVD-RW(VRmode)
Player Mode
Suppression de scènes d’un répertoire de lecture (Scene-Delete) DVD-RW(VRmode)
Player Mode
[Mode]
[DISC]
2.Set the [Power] switch to [ (Player)]
[Joystick]
[Joystick]
[Joystick]
[Joystick]
[Q.MENU]
6.Move the [Joystick] up or down to select <Delete>, then press the [Joystick]
[Joystick]
[Joystick]
[Joystick]
<Execute
[Joystick]
<Delete
[Joystick]
<Yes
[Joystick]
<Now deleting
[Mode]
[DISC]
[Power]
(Player)]
[Joystick]
[Joystick]
[Joystick]
[Joystick]
[Q.MENU]
<Delete
[Joystick]
[Joystick]
[Joystick]
[Joystick]
<Execute
[Joystick]
<Delete
[Joystick]
<Yes
[Joystick]
<Now deleting
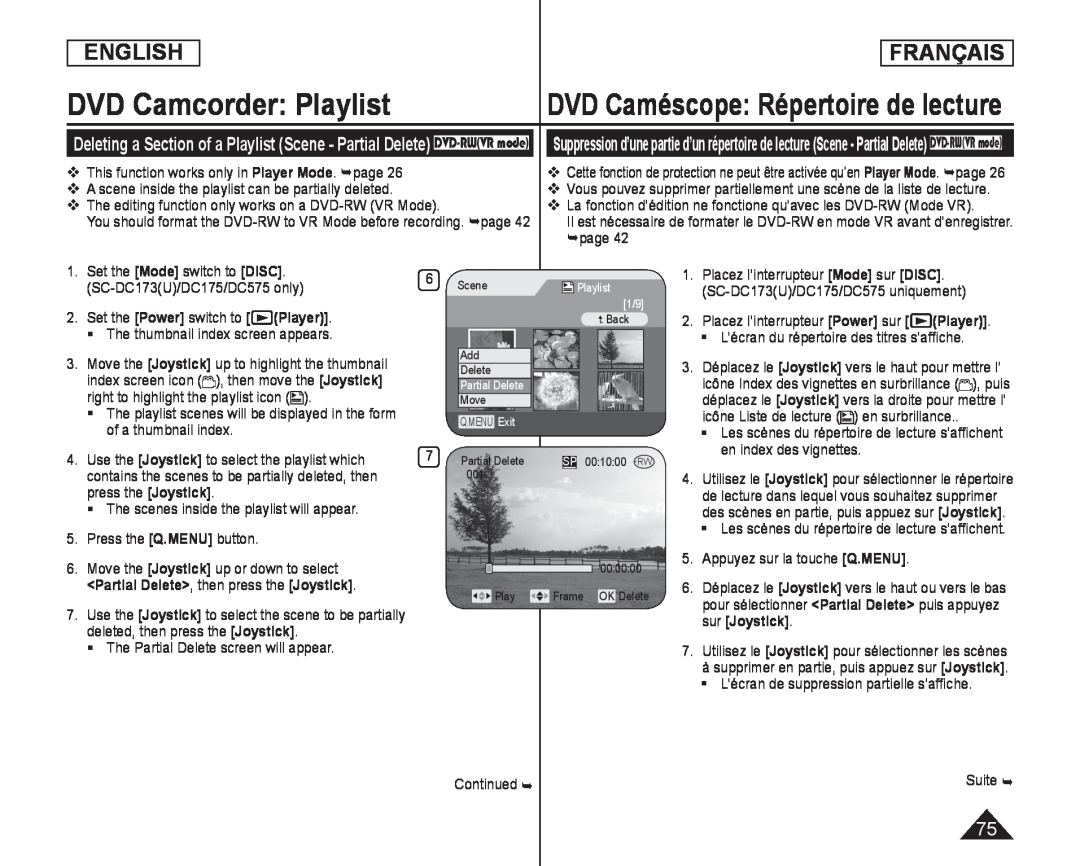 DVD Camcorder: Playlist
DVD Caméscope: Répertoire de lecture
Deleting a Section of a Playlist (Scene - Partial Delete) DVD-RW(VRmode)
Player Mode
Player Mode
[Mode]
[DISC]
2.Set the [Power] switch to [ (Player)]
[Joystick]
[Joystick]
[Joystick]
[Joystick]
[Q.MENU]
[Joystick]
[Joystick]
[Mode]
[DISC]
[Power]
(Player)]
[Joystick]
[Joystick]
[Joystick]
[Joystick]
[Q.MENU]
[Joystick]
<Partial Delete
[Joystick]
[Joystick]
[Joystick]
![[Joystick] [Joystick]](/images/prints/7800/76.1080.webp) DVD Camcorder: Playlist
DVD Camcorder: PlaylistDVD Caméscope: Répertoire de lecture
[Joystick]
[Joystick]
[Joystick]
[Joystick]
[Joystick]
[Joystick]
[Joystick]
[Joystick]
[Joystick]
[Joystick]
[Joystick]
[Joystick]
[Joystick]
[Joystick]
[Joystick]
[Joystick]
<Partial Delete
[Joystick]
<Back
[Joystick]
Note
[MENU]
[Joystick]
[Joystick]
<Partial Delete
[Joystick]
<Yes
[Joystick]
[Joystick]
<Back
[Joystick]
Remarque
[MENU]
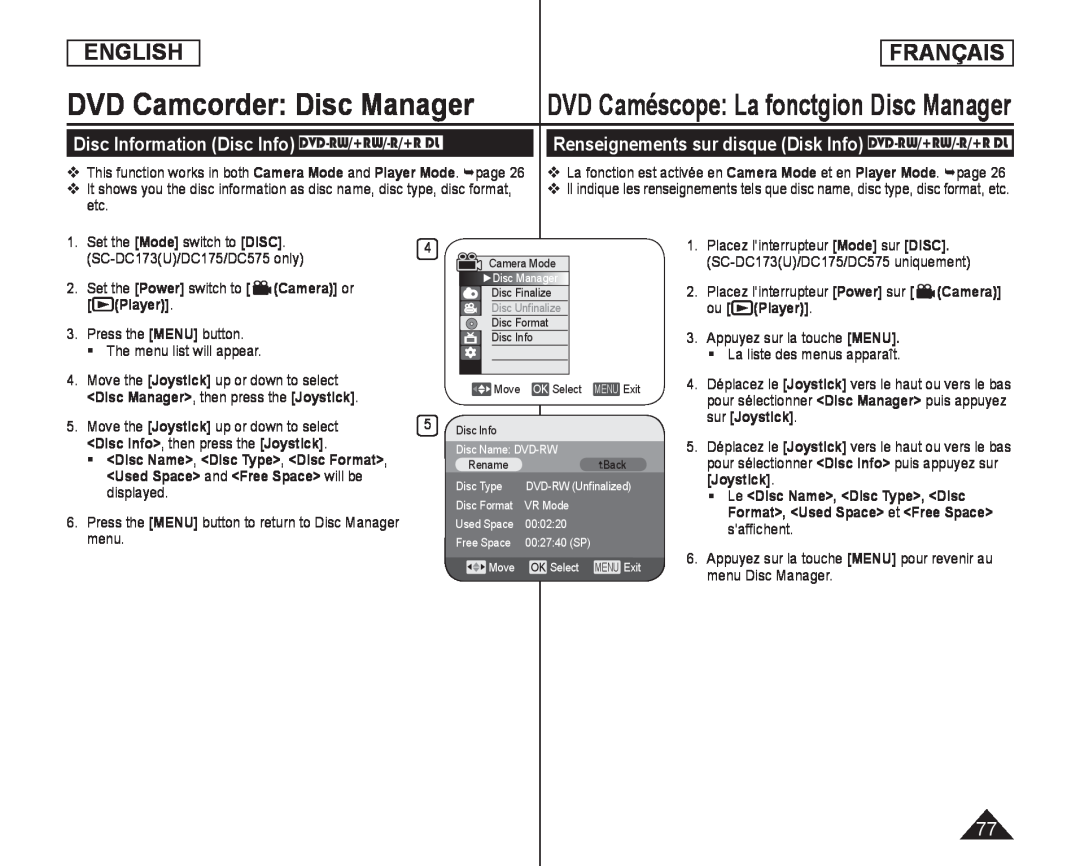 Disc Information (Disc Info) DVD-RW/+RW/-R/+RDL
Renseignements sur disque (Disk Info) DVD-RW/+RW/-R/+RDL
 DVD Camcorder: Disc Manager
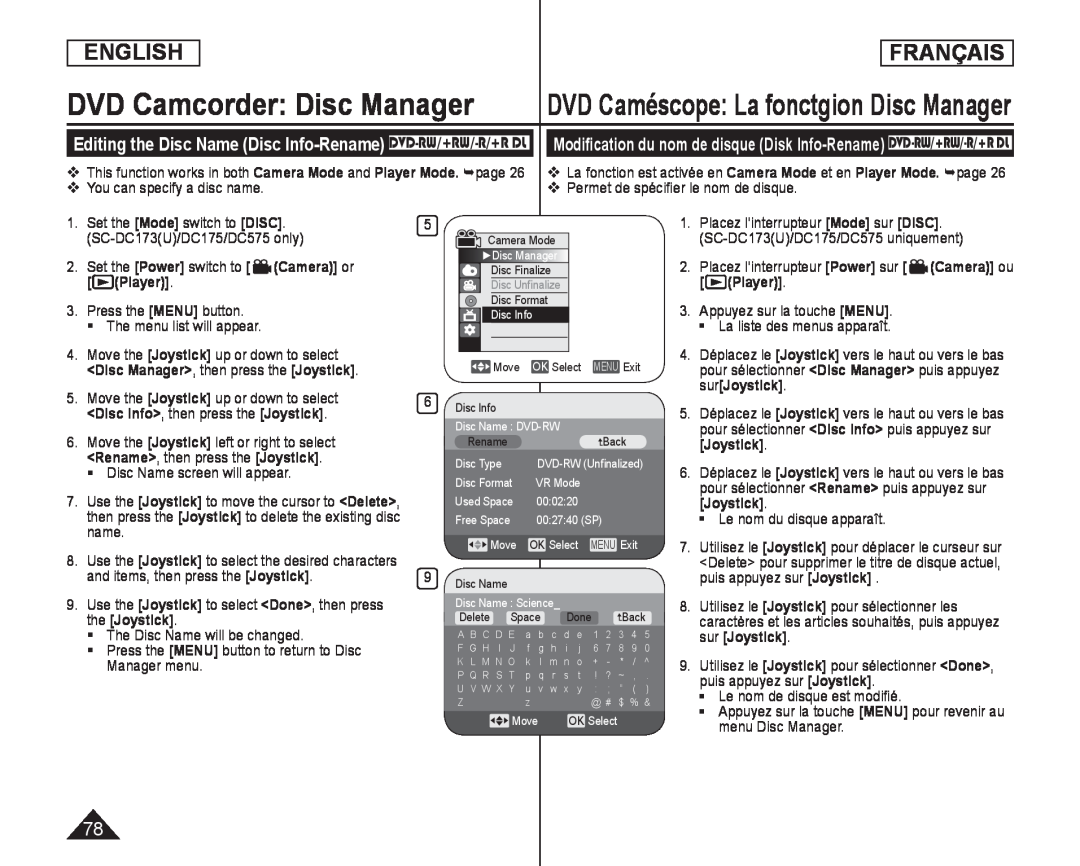
Editing the Disc Name (Disc Info-Rename) DVD-RW/+RW/-R/+RDL
Modification du nom de disque (Disk Info-Rename) DVD-RW/+RW/-R/+RDL
Camera Mode
Player Mode
Camera Mode
Player Mode
[Mode]
[DISC]
2.Set the [Power] switch to [(Camera)] or [(Player)]
[MENU]
[Joystick]
<Delete
[Joystick]
[Joystick]
[Joystick]
[Joystick]
<Done
[Joystick]
[MENU]
[Mode]
[DISC]
2.Placez l’interrupteur [Power] sur [(Camera)] ou [(Player)]
[MENU]
[Joystick]
<Disc Manager
[Joystick]
[Joystick]
<Disc Info
[Joystick]
[Joystick]
<Rename
[Joystick]
[Joystick]
[Joystick]
[Joystick]
[Joystick]
[Joystick]
<Done
[Joystick]
[MENU]
 DVD Camcorder: Disc Manager
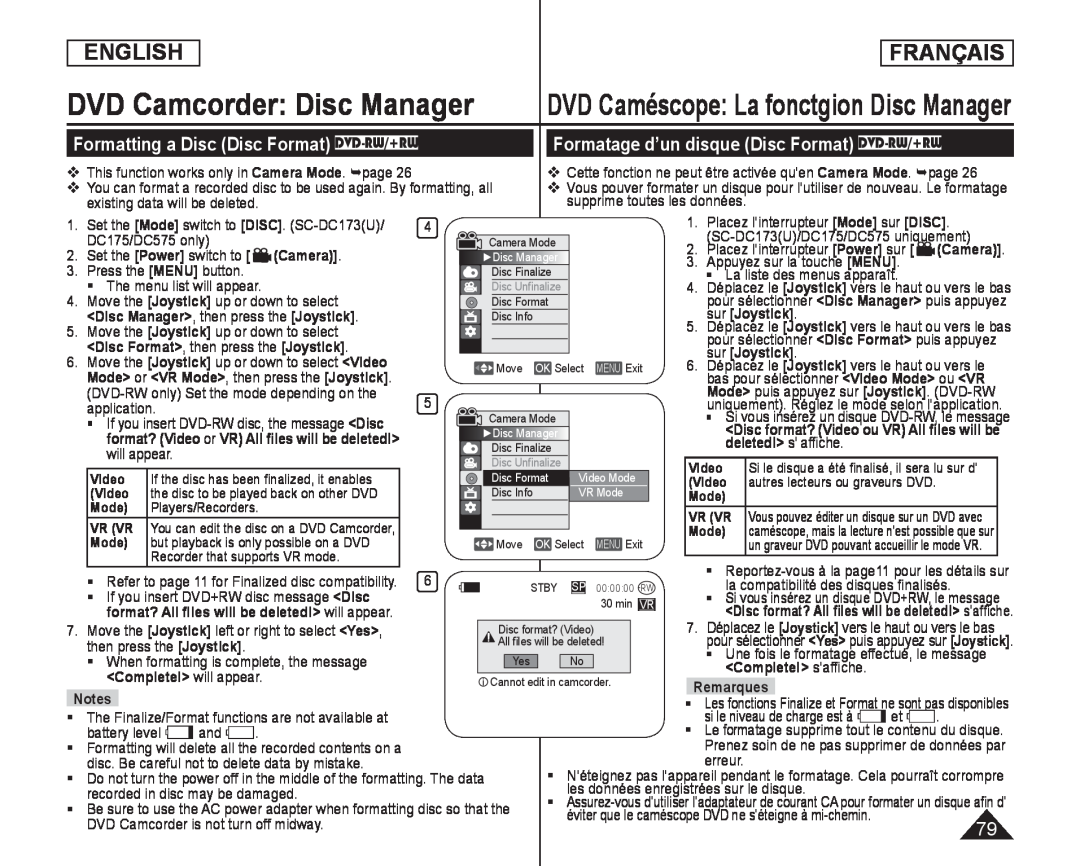
Formatting a Disc (Disc Format) DVD-RW/+RW
Formatage d’un disque (Disc Format) DVD-RW/+RW
 DVD Caméscope: La fonctgion Disc Manager
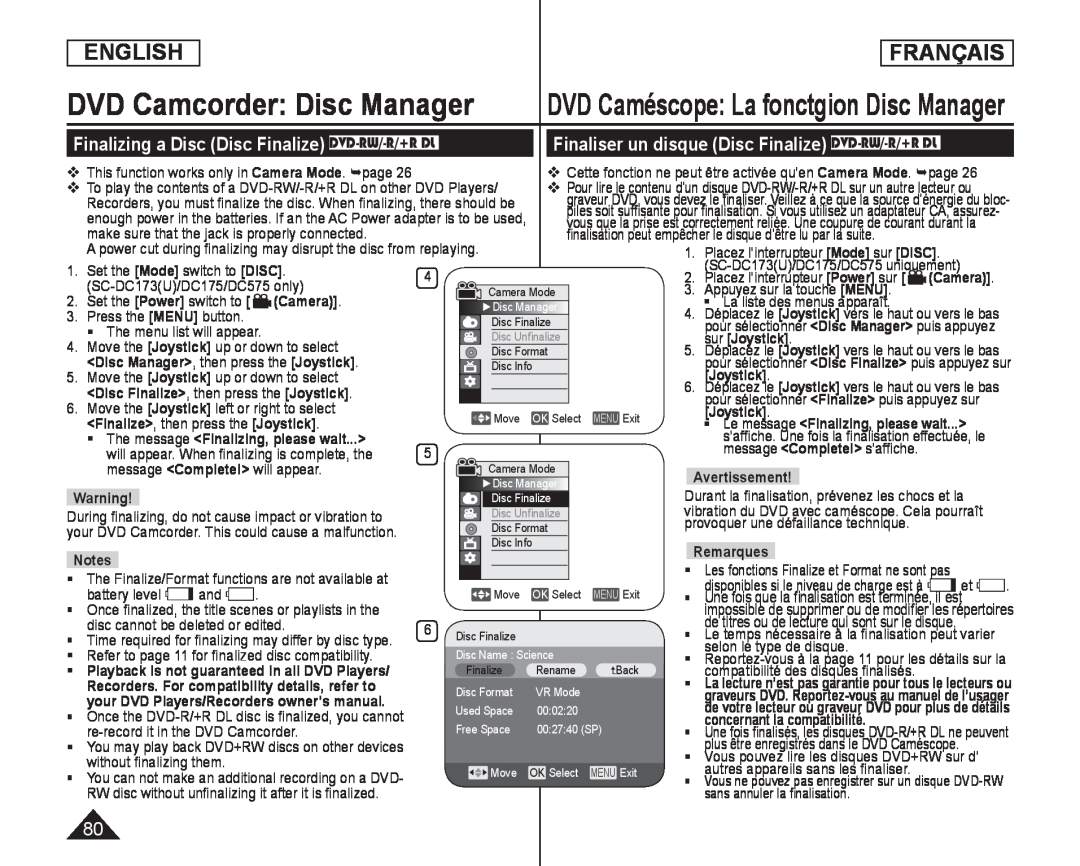
Finalizing a Disc (Disc Finalize) DVD-RW/-R/+RDL
Finaliser un disque (Disc Finalize) DVD-RW/-R/+RDL
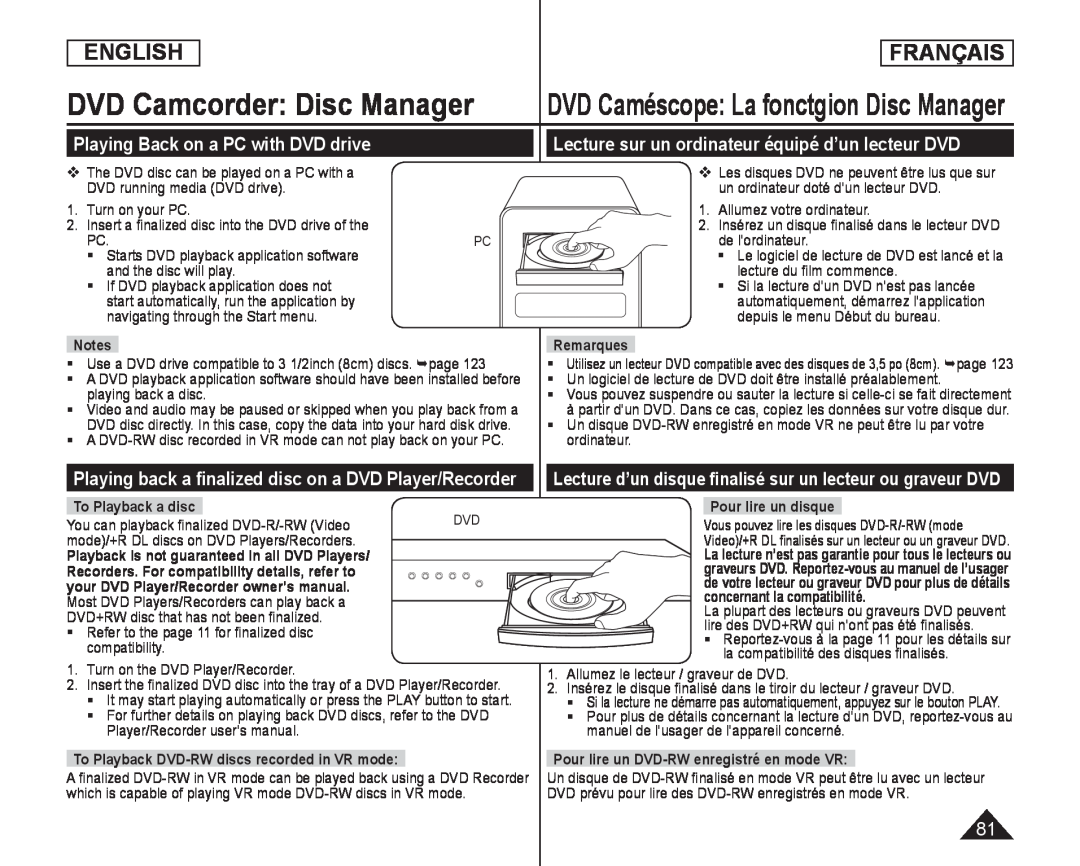 Playing Back on a PC with DVD drive
Lecture sur un ordinateur équipé d’un lecteur DVD
Playing back a finalized disc on a DVD Player/Recorder
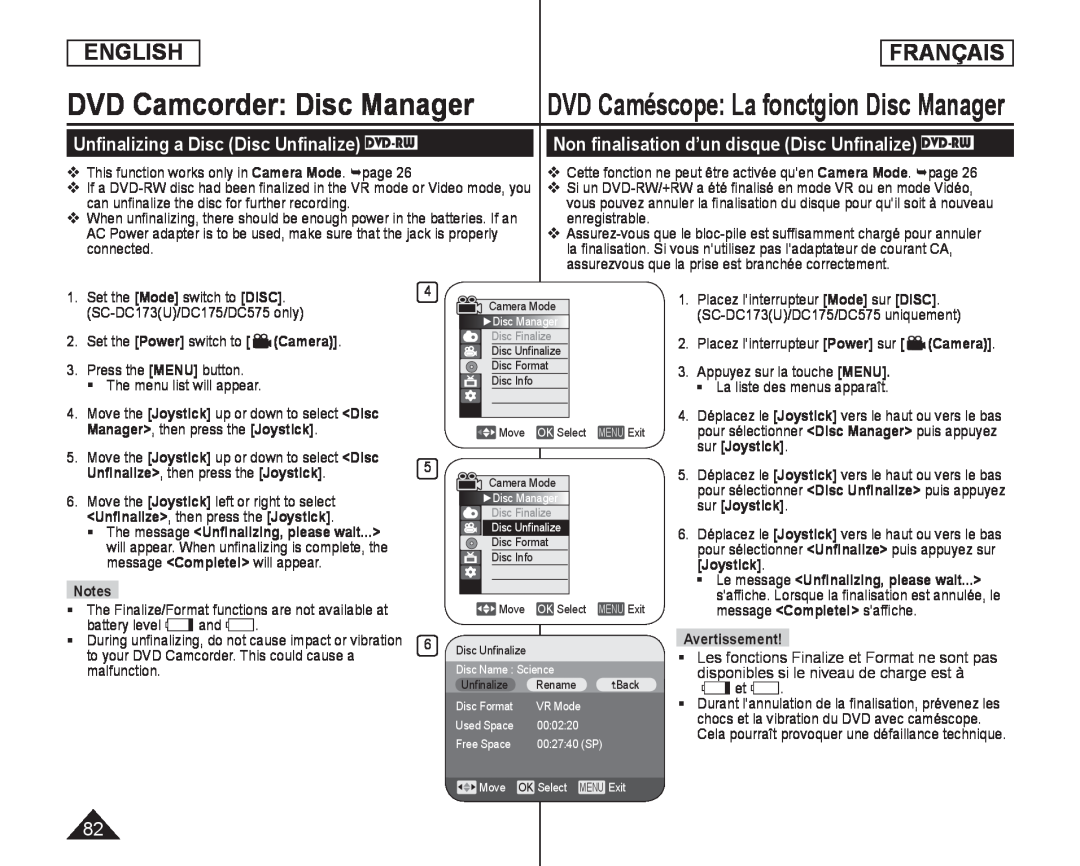 Unfinalizing a Disc (Disc Unfinalize) DVD-RW
Non finalisation d’un disque (Disc Unfinalize) DVD-RW
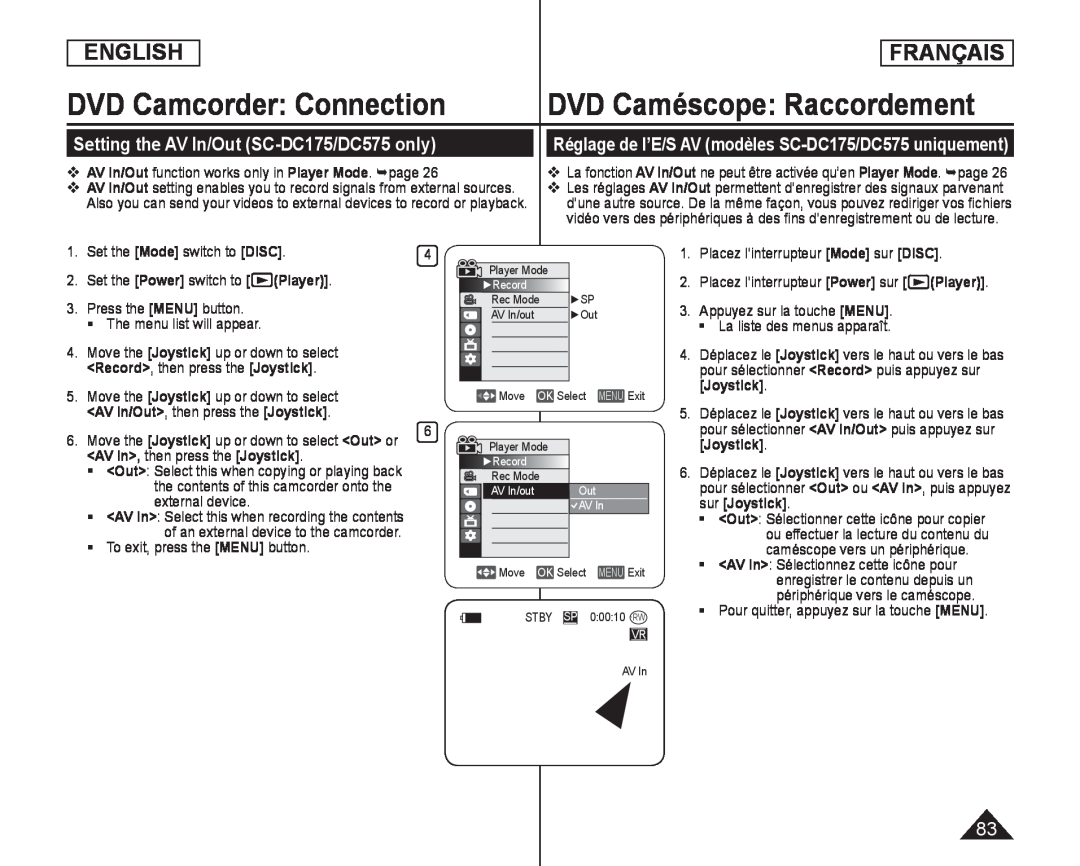 DVD Camcorder: Connection
Setting the AV In/Out (SC-DC175/DC575only)
Réglage de l’E/S AV (modèles SC-DC175/DC575uniquement)
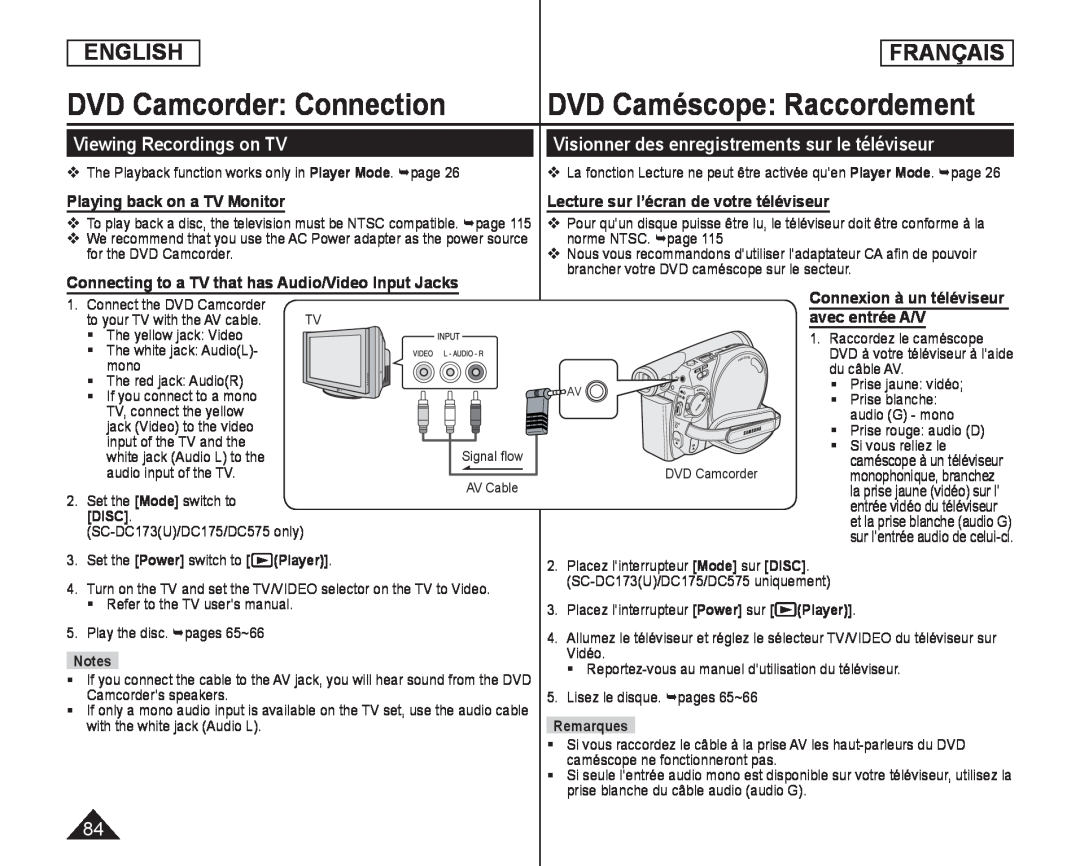 Viewing Recordings on TV
Visionner des enregistrements sur le téléviseur
Playing back on a TV Monitor
Connecting to a TV that has Audio/Video Input Jacks
Lecture sur l’écran de votre téléviseur
 DVD Caméscope: Raccordement
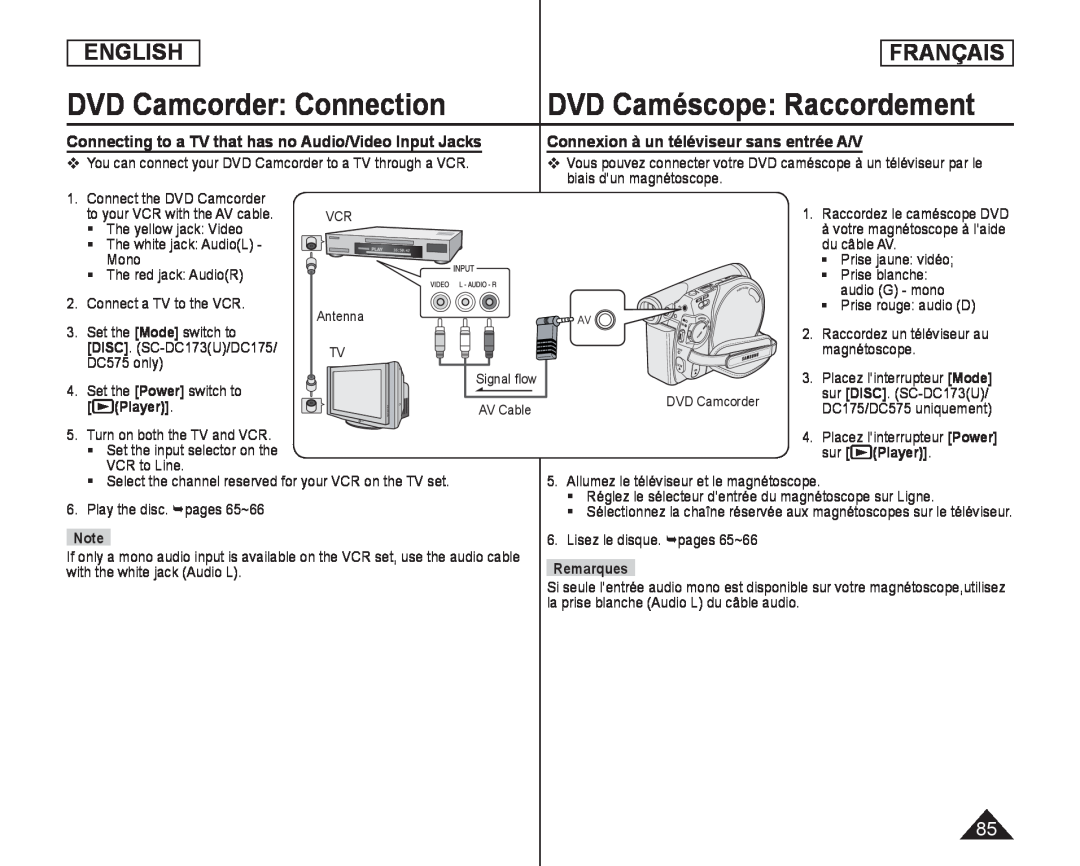
Connecting to a TV that has no Audio/Video Input Jacks
Connexion à un téléviseur sans entrée A/V
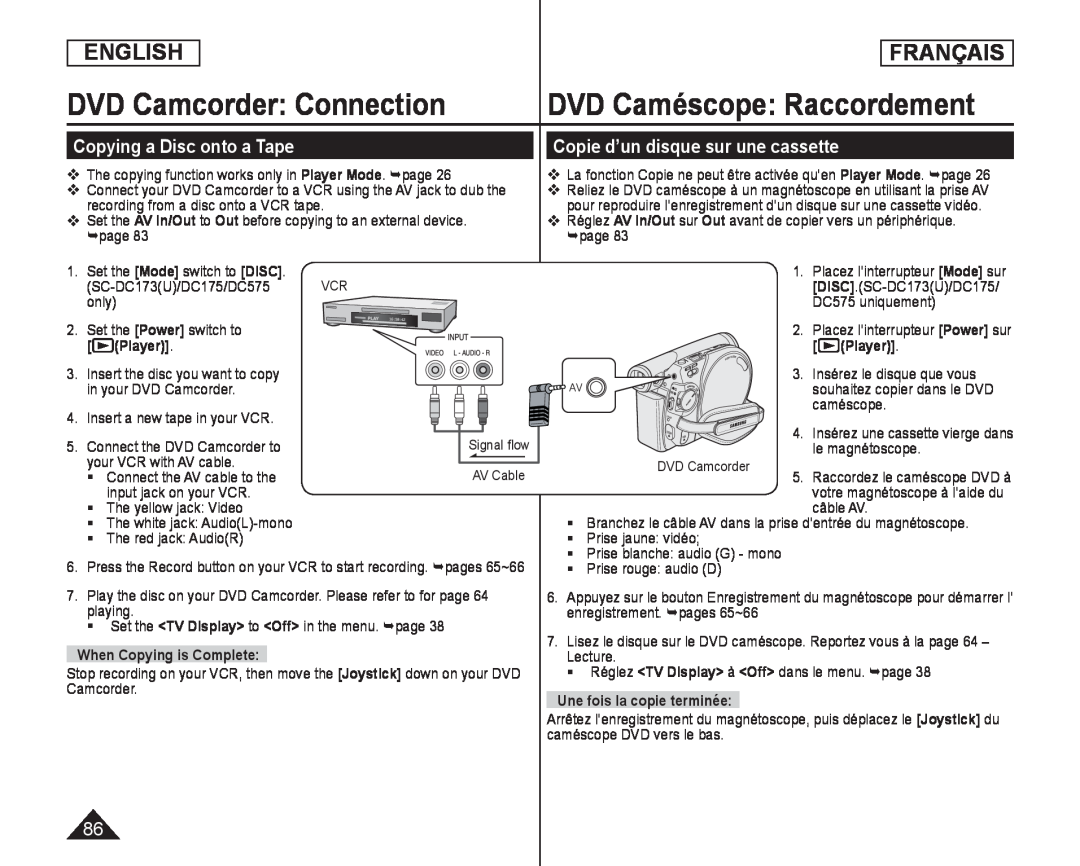 Copying a Disc onto a Tape
Copie d’un disque sur une cassette
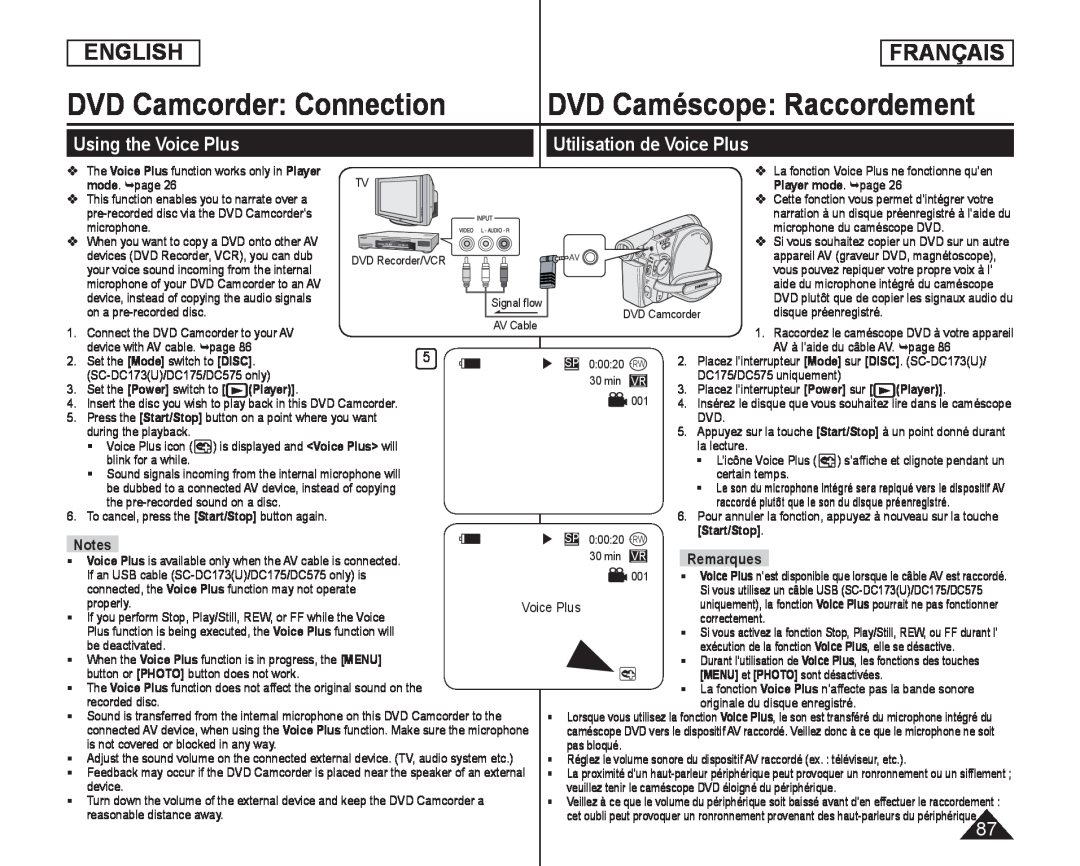 Using the Voice Plus
Utilisation de Voice Plus
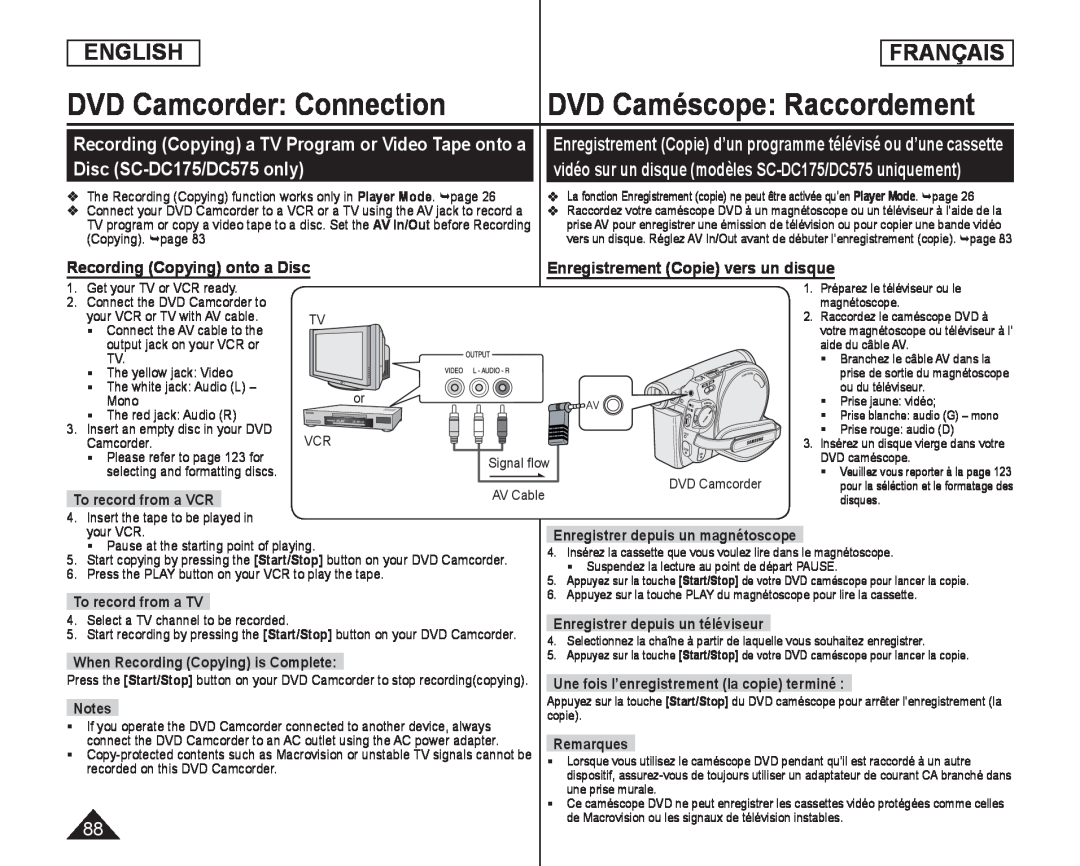 Recording (Copying) a TV Program or Video Tape onto a
Disc (SC-DC175/DC575only)
vidéo sur un disque (modèles SC-DC175/DC575uniquement)
Recording (Copying) onto a Disc
Enregistrement (Copie) vers un disque
 Digital Still Camera Mode (SC-DC173(U)/DC175/DC575only)
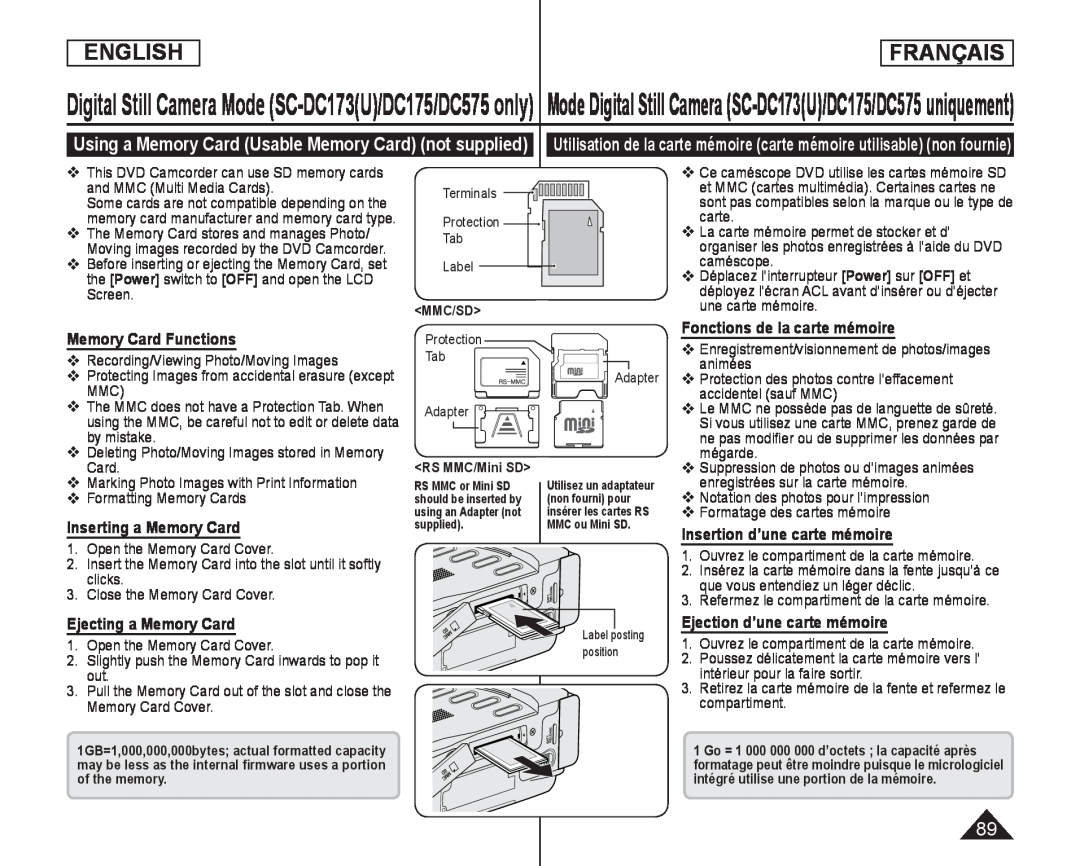
Memory Card Functions
Inserting a Memory Card
Fonctions de la carte mémoire
Insertion d’une carte mémoire
Ejecting a Memory Card
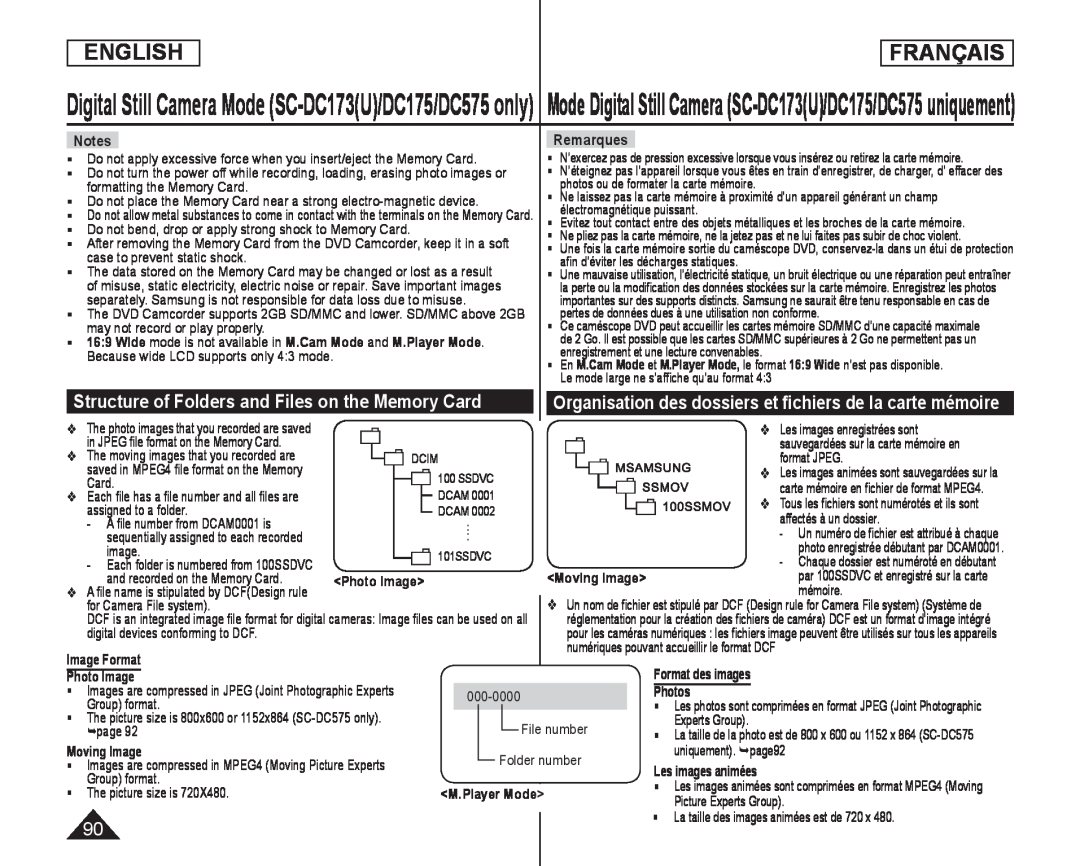 Structure of Folders and Files on the Memory Card
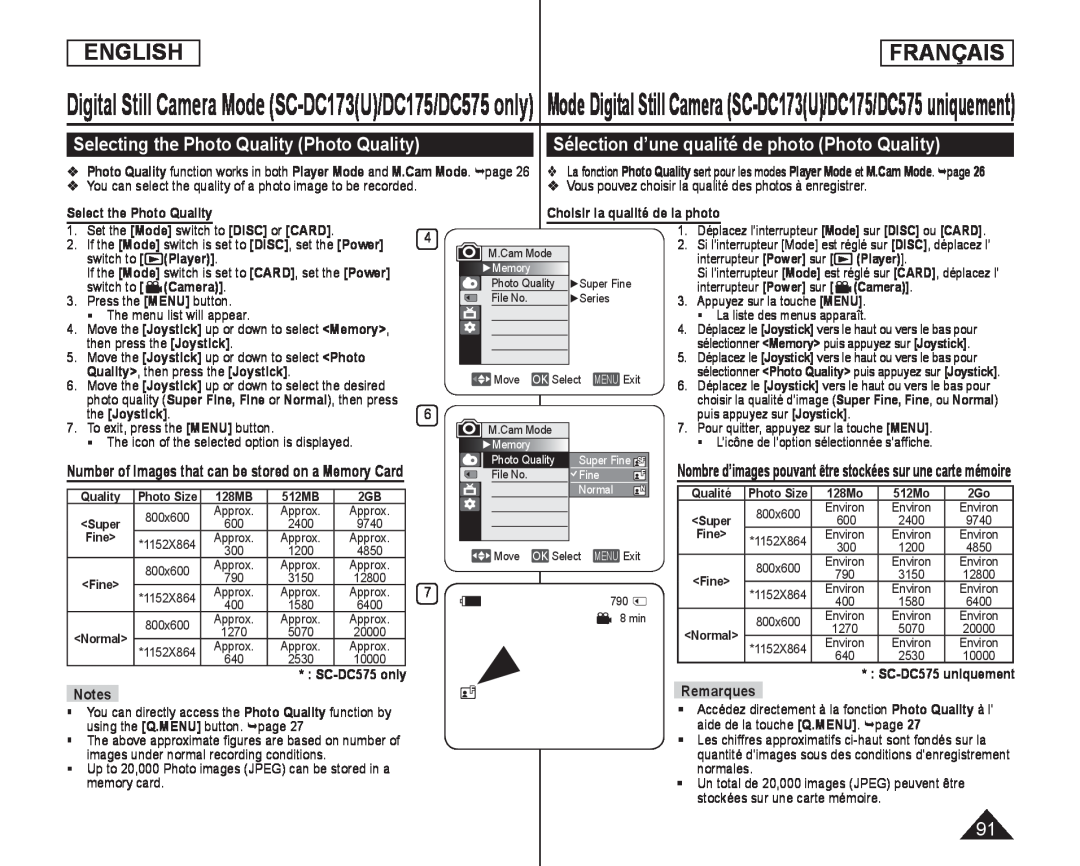 Selecting the Photo Quality (Photo Quality)
Sélection d’une qualité de photo (Photo Quality)
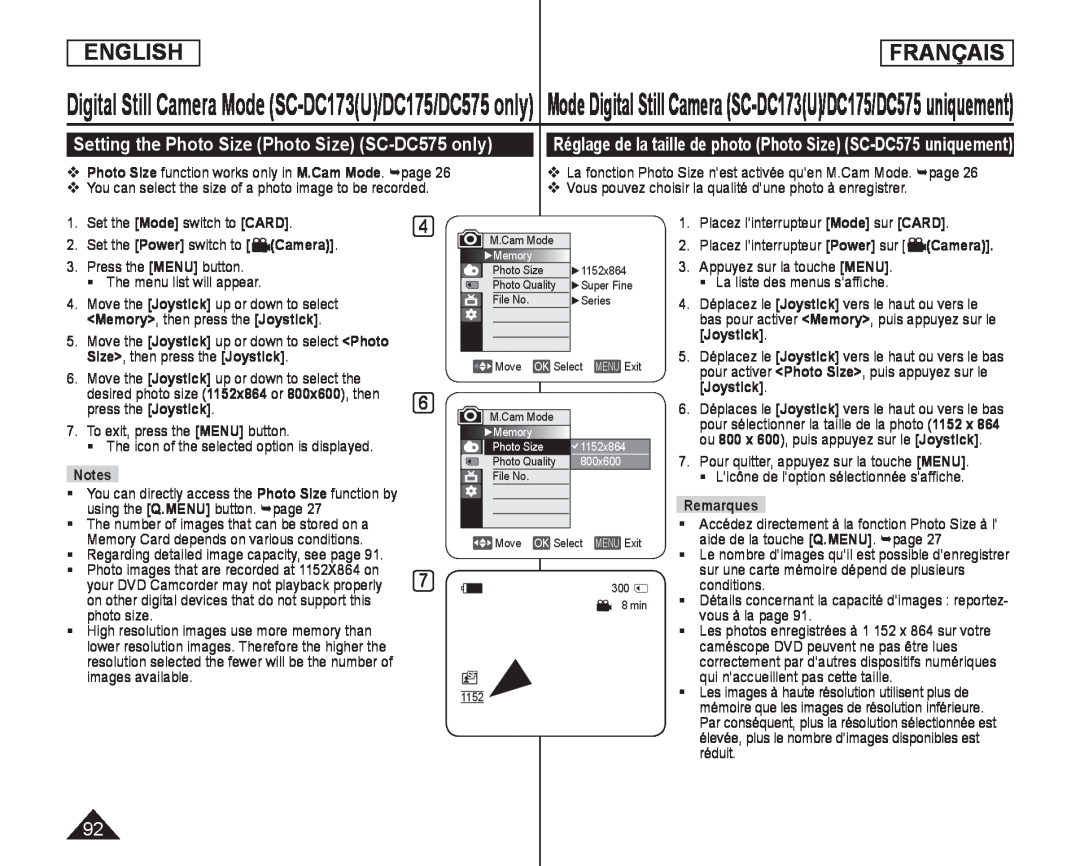 Setting the Photo Size (Photo Size) (SC-DC575only)
Réglage de la taille de photo (Photo Size) (SC-DC575uniquement)
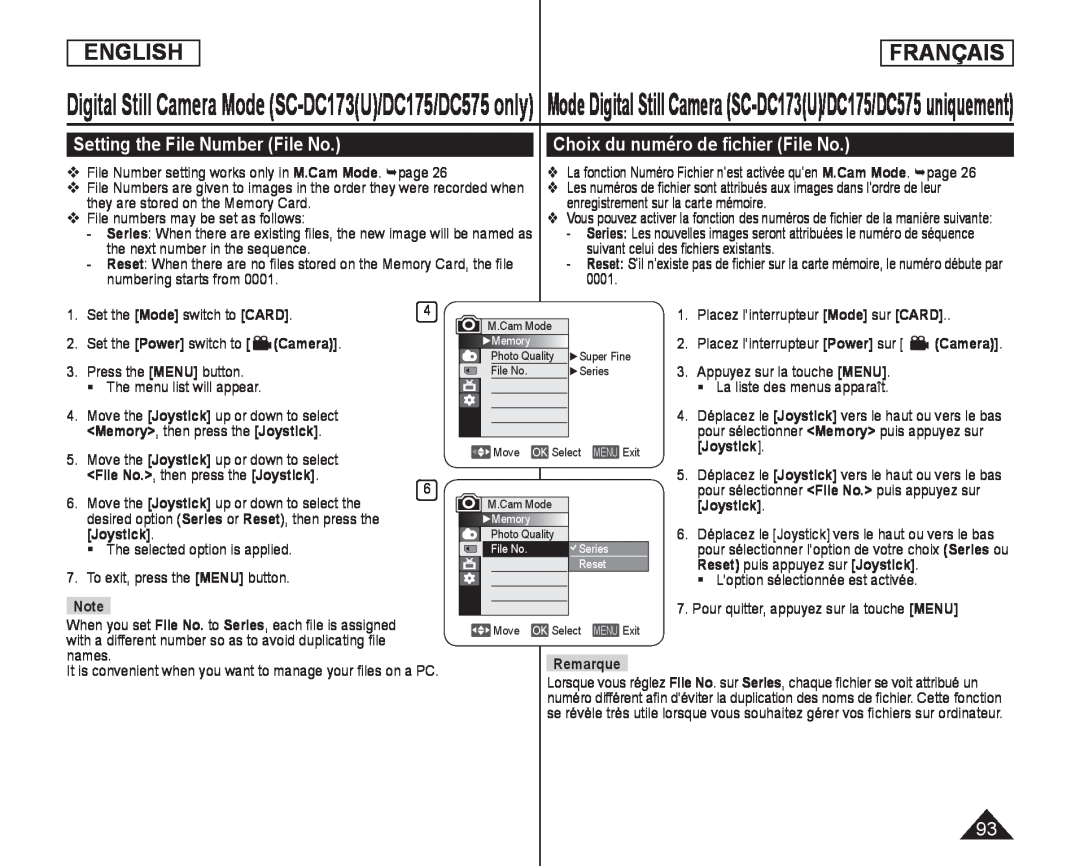 Setting the File Number (File No.)
Choix du numéro de fichier (File No.)
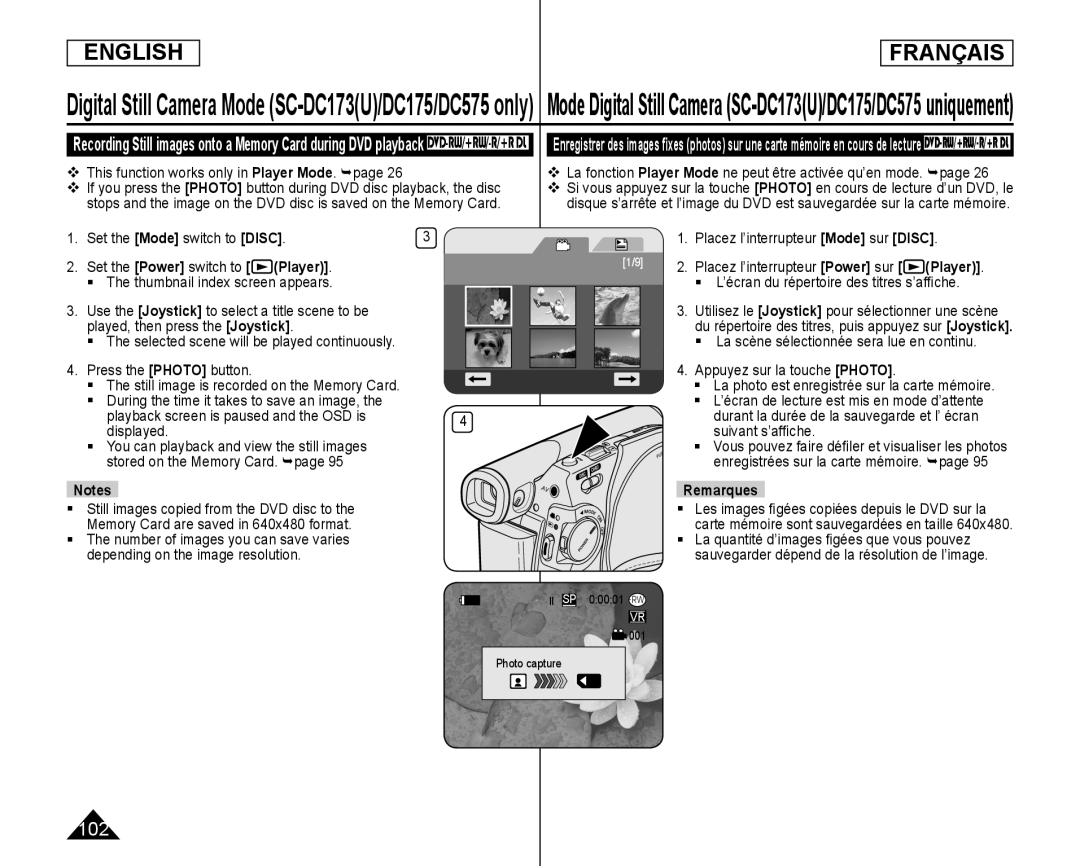
 Taking a Photo Image (JPEG) on a Memory Card
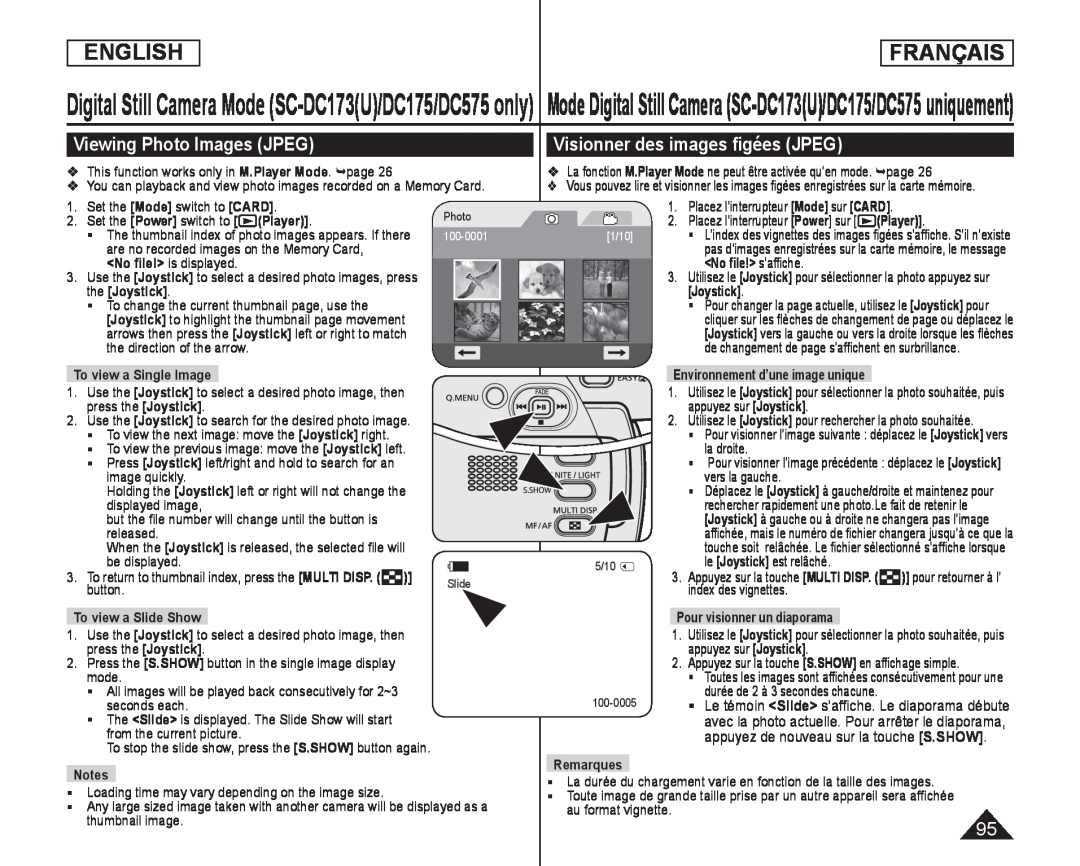 Viewing Photo Images (JPEG)
Visionner des images figées (JPEG)
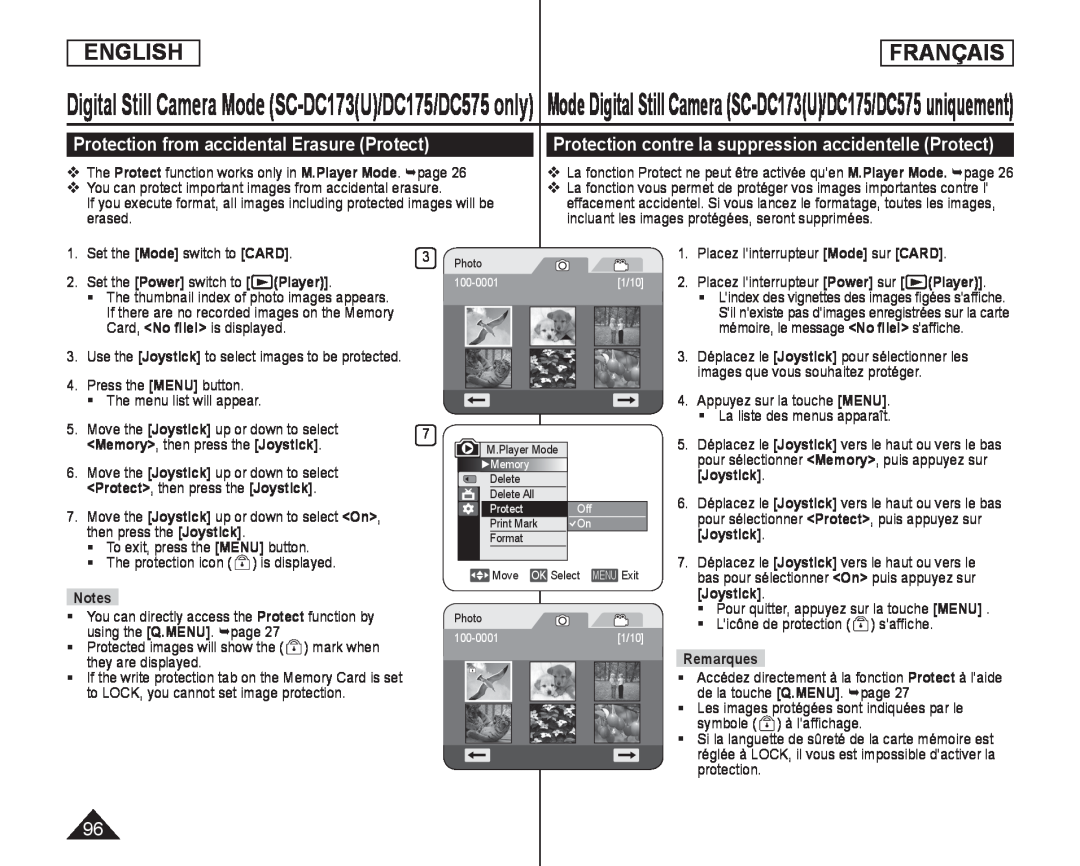 Protection from accidental Erasure (Protect)
Protection contre la suppression accidentelle (Protect)
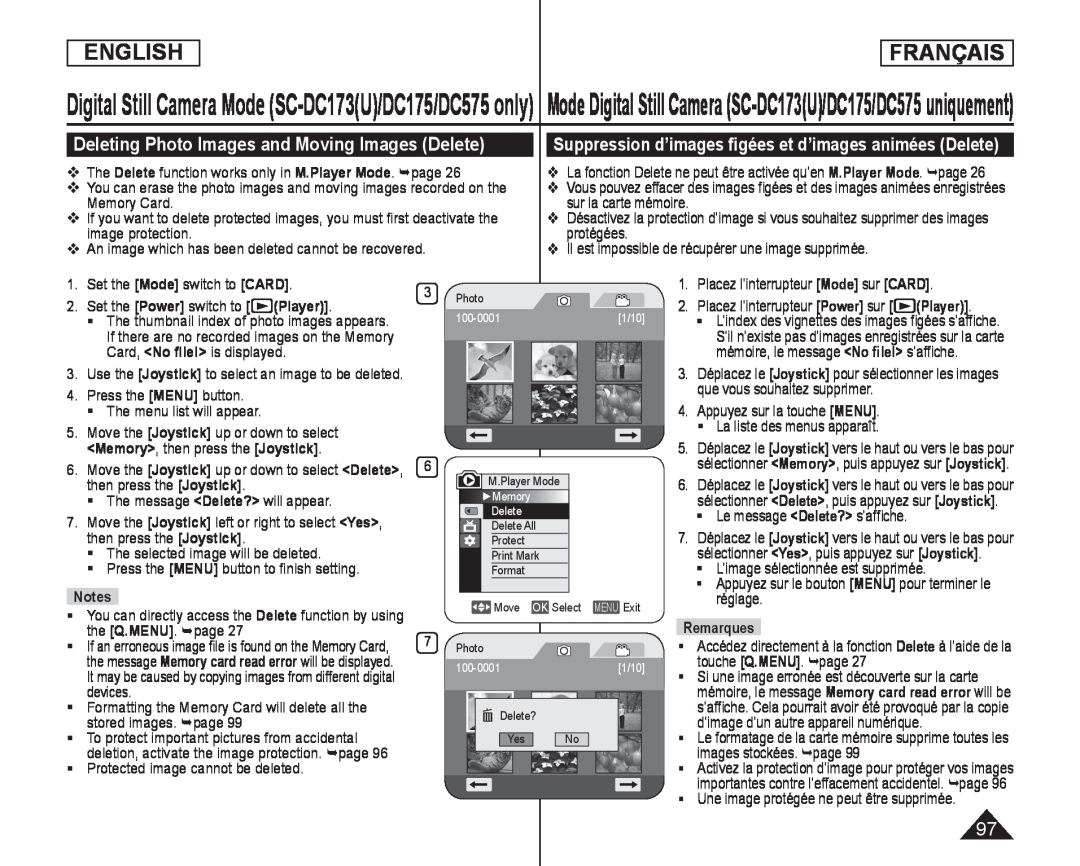 Deleting Photo Images and Moving Images (Delete)
Suppression d’images figées et d’images animées (Delete)
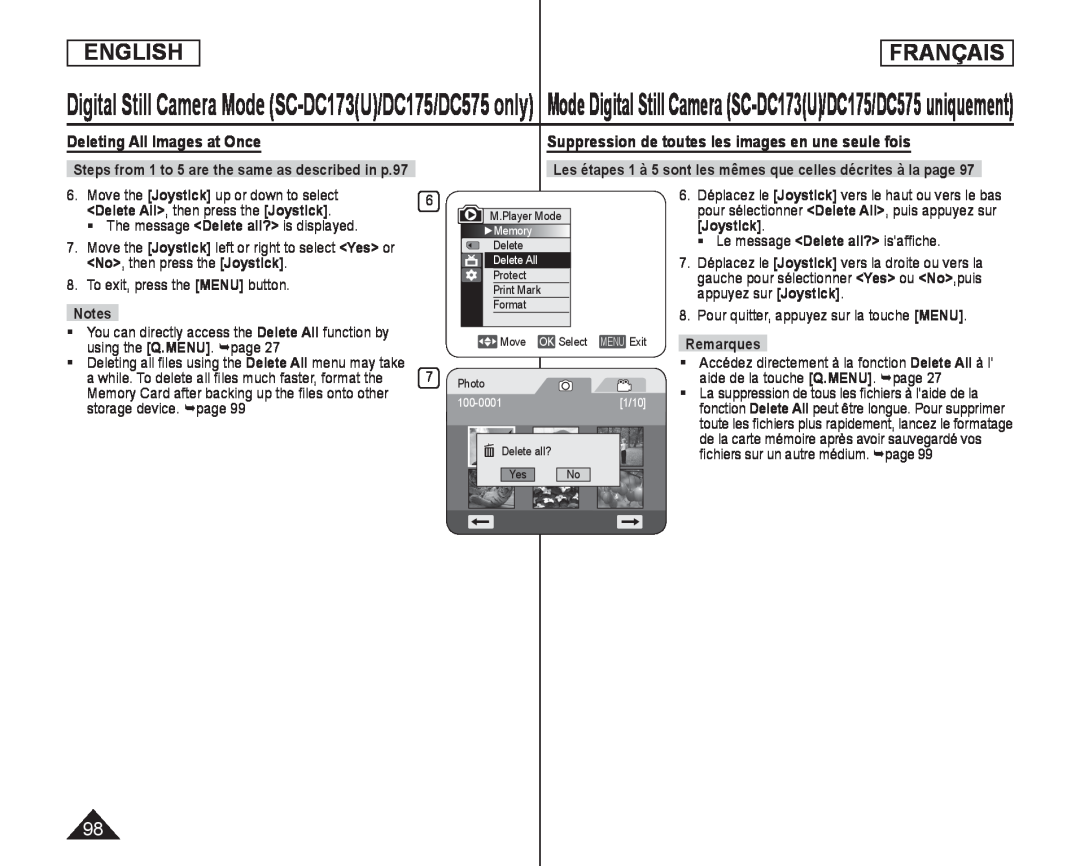 Deleting All Images at Once
Suppression de toutes les images en une seule fois
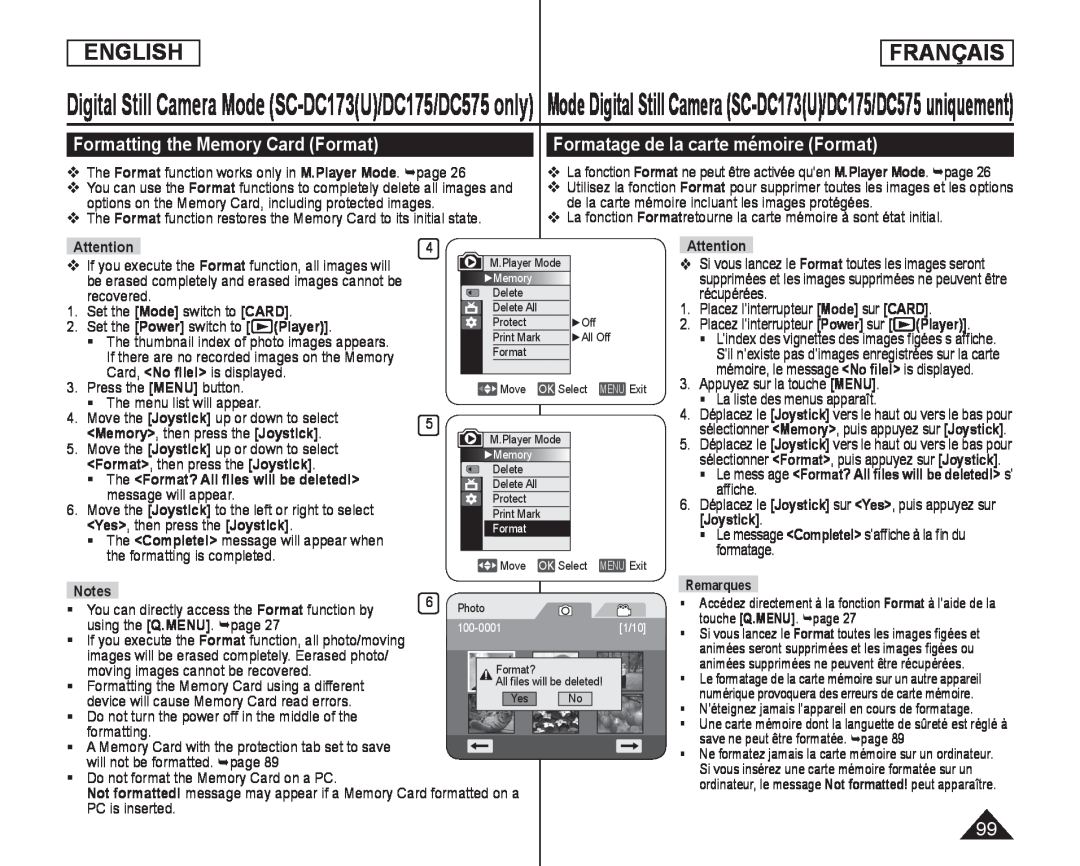 Formatting the Memory Card (Format)
Formatage de la carte mémoire (Format)
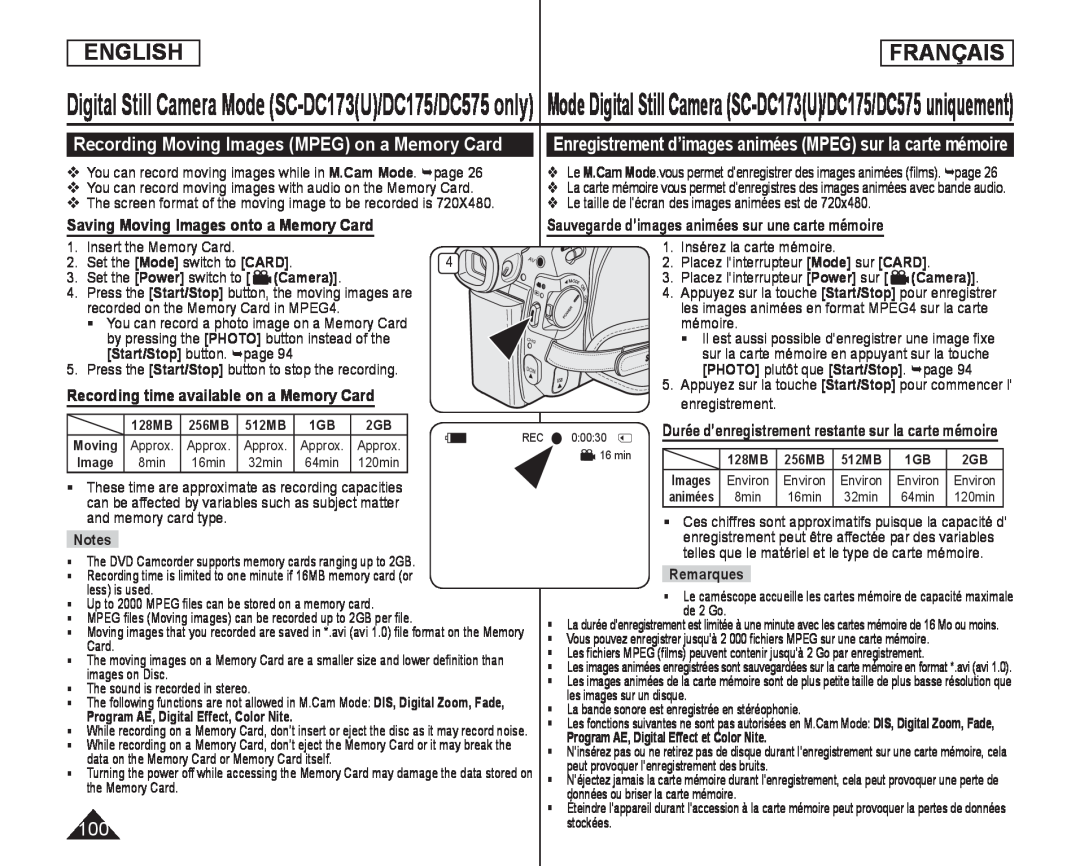 Recording Moving Images (MPEG) on a Memory Card
Saving Moving Images onto a Memory Card
Recording time available on a Memory Card
Sauvegarde d’images animées sur une carte mémoire
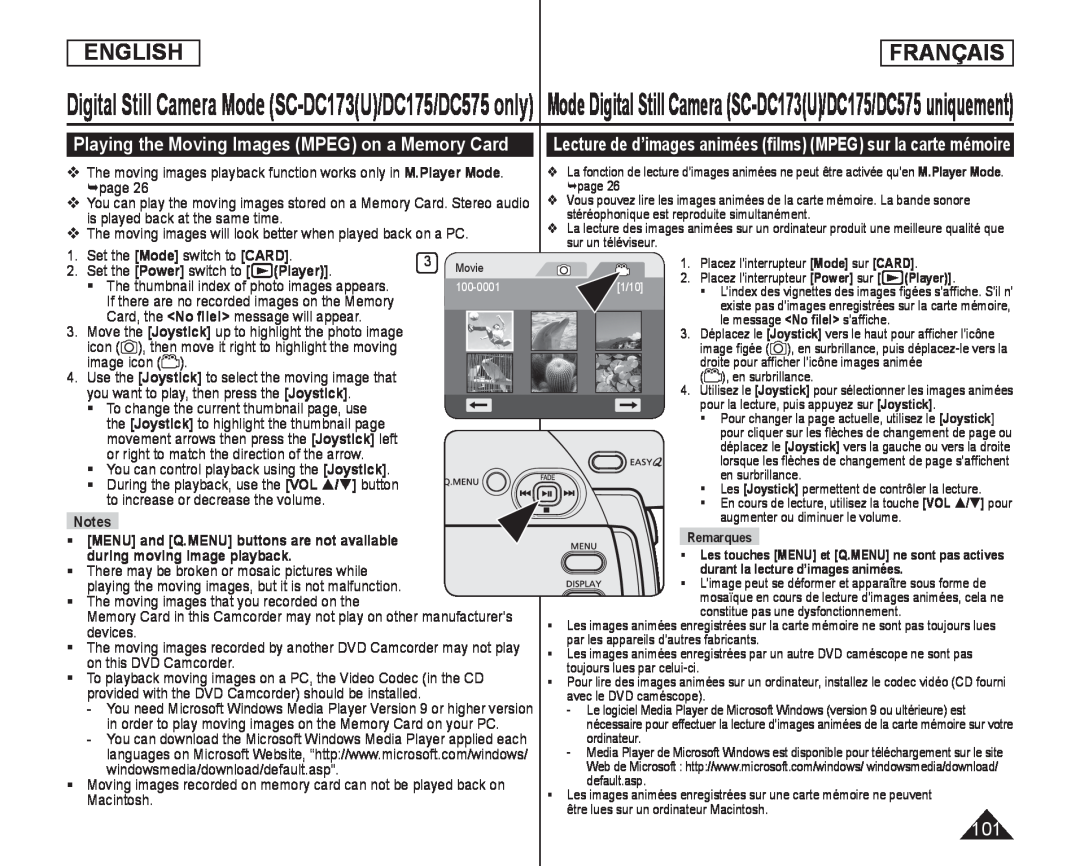 Playing the Moving Images (MPEG) on a Memory Card
 Digital Still Camera Mode (SC-DC173(U)/DC175/DC575only)
 SP
 Marking Images for Printing (Print Mark)
Marquage des images pour l’impression (Print Mark)
 Removing the Print Mark
Suppression de la marque d’impression
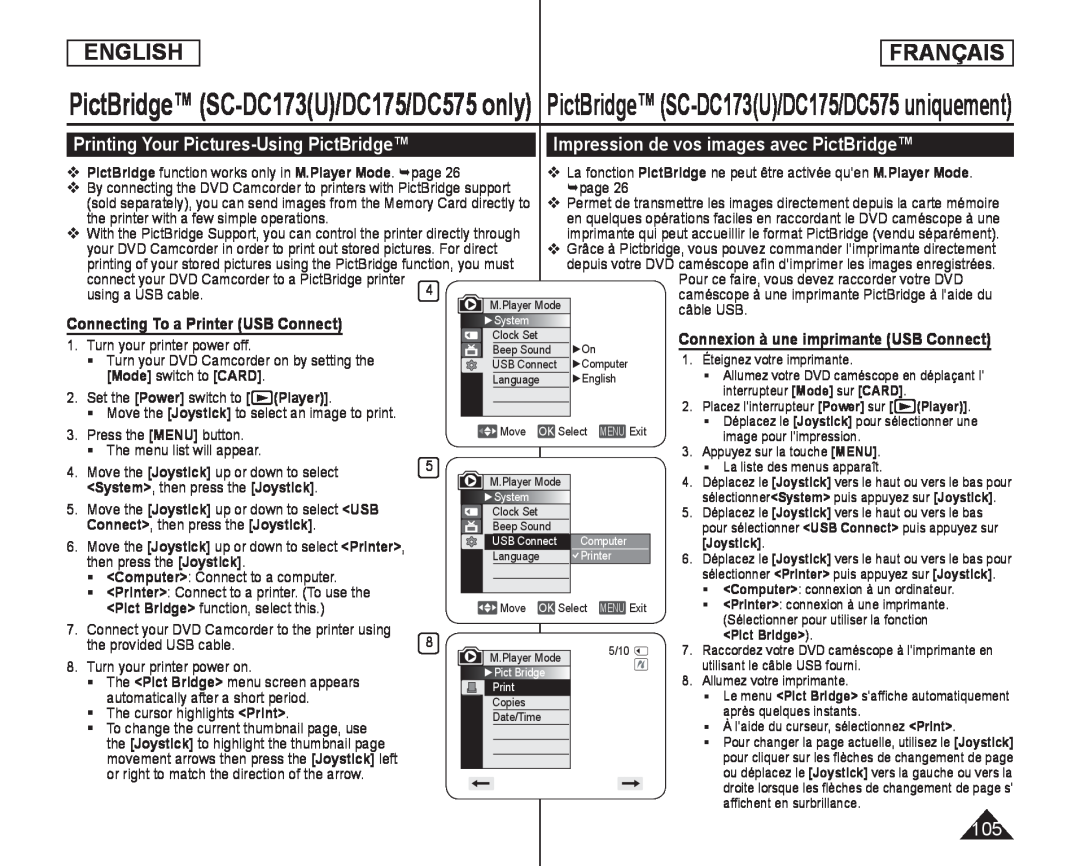 Printing Your Pictures-UsingPictBridge™
Impression de vos images avec PictBridge™
Connecting To a Printer (USB Connect)
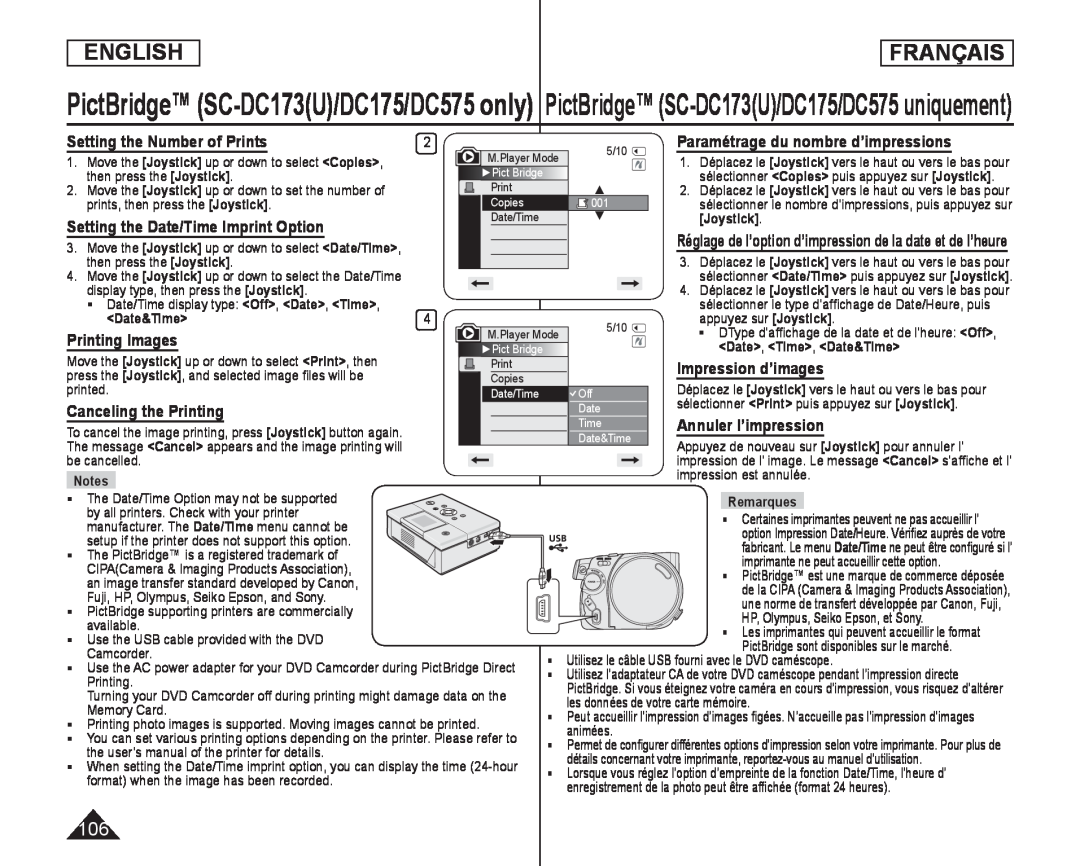 Setting the Number of Prints
Paramétrage du nombre d’impressions
Setting the Date/Time Imprint Option
Printing Images
Impression d’images
Canceling the Printing
Annuler l’impression
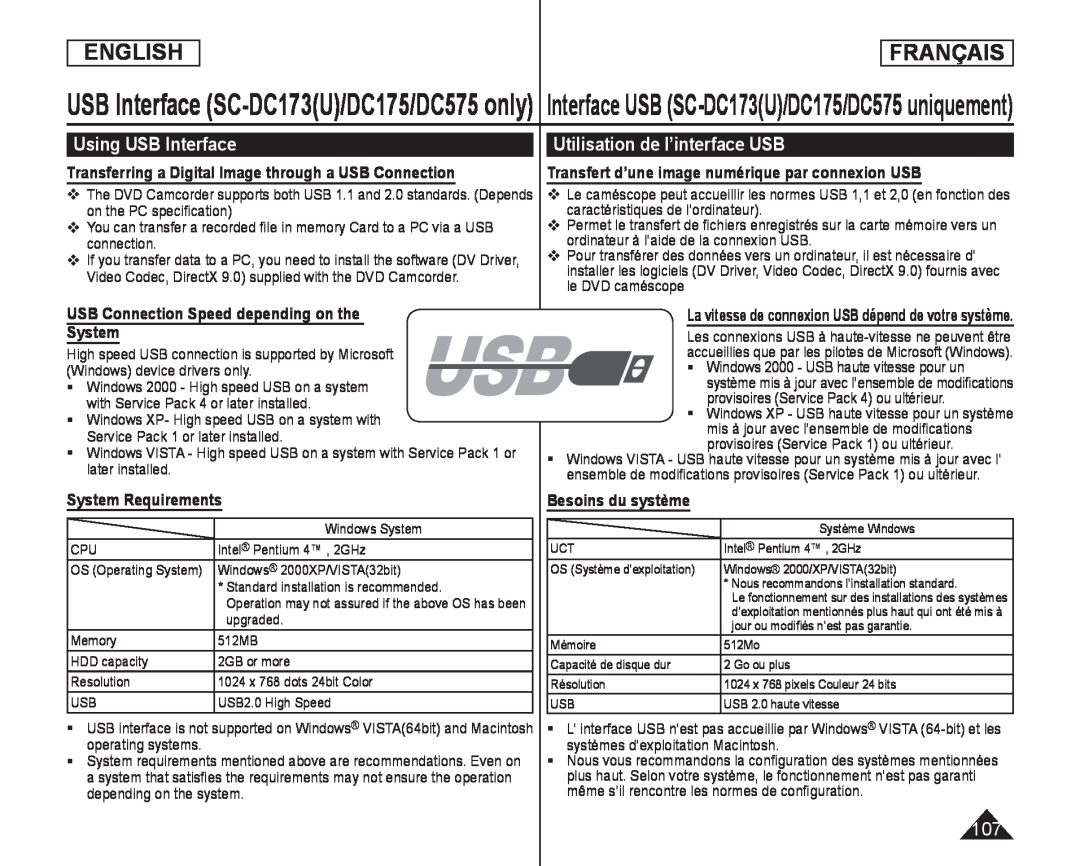 Using USB Interface
Transferring a Digital Image through a USB Connection
Utilisation de l’interface USB
Transfert d’une image numérique par connexion USB
USB Connection Speed depending on the
System
System Requirements
Besoins du système
 Notes
NotesM.Cam Mode
M.Player Mode
USB Streaming requires Video Codec, DV Driver and DirectX
Remarques
M.Cam Mode ou M.Player Mode
Video Codec, DV Driver, et DirectX
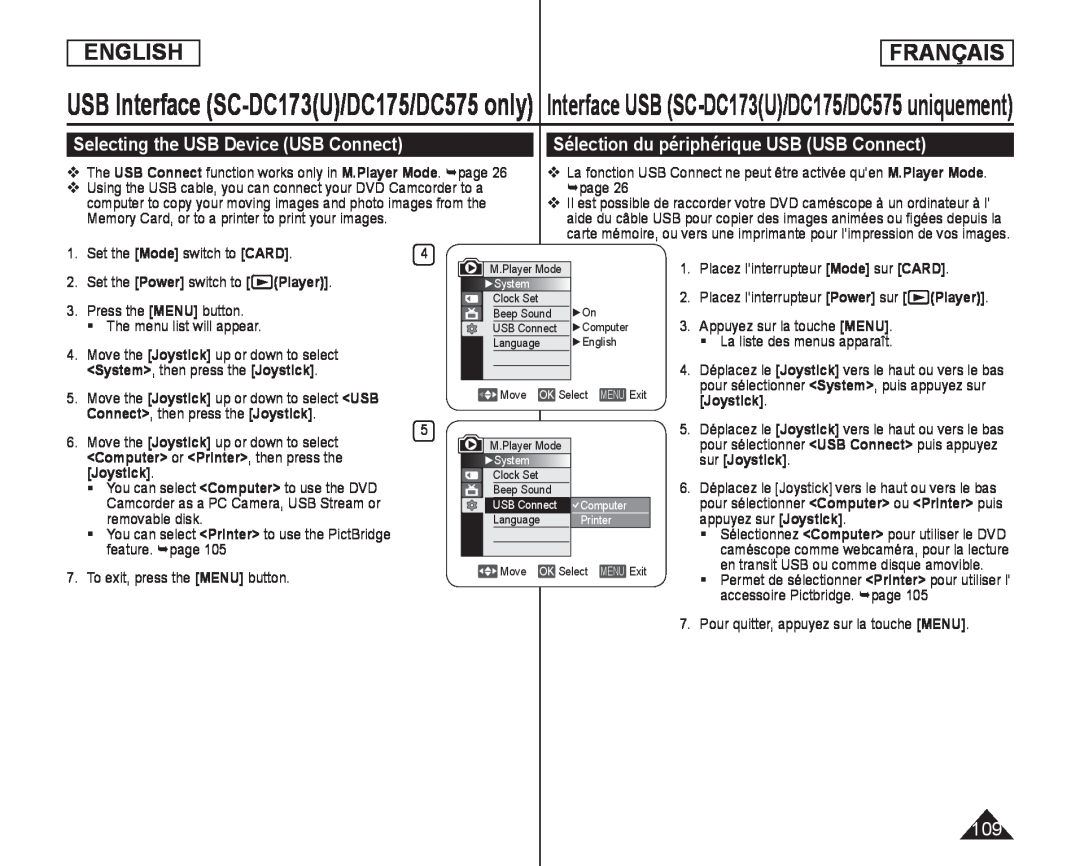 Selecting the USB Device (USB Connect)
Sélection du périphérique USB (USB Connect)
 Installing DV Media PRO Program
Installation du logiciel DV Media PRO Program
1.Click on <DV Driver> on the Setup screen
2.Click on <Confirm> to finish driver installation
1.Cliquez sur <DV Driver> à l’écran de configuration
2.Cliquez sur <Confirm> pour terminer l’installation des pilotes
 1.Click <Photo Express> on the Setup screen
1.Click <Quick Time> on the Setup screen
1.Cliquez sur <Photo Express> à l’écran de configuration
1.Cliquez sur <Quick Time> à l’écran de configuration
 Connecting to a PC
Raccordement à un ordinateur
Disconnecting the USB Cable
Débranchement du câble USB
 Using the PC Camera Function
Utilisation de la fonction Web cam
 Using the USB Streaming Function
Utilisation de la fonction USB Streaming
Using the removable Disk Function
Utilisation de la fonction Disque amovible
 MaintenanceEntretien
Using Your DVD Camcorder Abroad
Power sources
Color system
Utiliser de votre caméscope à l’étranger
Sources d’alimentation
Système de couleurs
PAL-compatibleCountries/Regions
NTSC-compatibleCountries/Regions
Pays et régions compatibles aux normes PAL
Pays et régions compatibles aux normes NTSC
 Troubleshooting
Dépannage
Troubleshooting
Dépannage
Self Diagnosis Display in <Camera/Player> Modes
Écran Auto-diagnosticen mode <Camera/Player
 TroubleshootingDépannage
 TroubleshootingDépannage
Symptom
Explanation/Solution
Symptôme
Explication/Solution
 TroubleshootingDépannage
Symptom
Explanation/Solution
[Power]
(Camera)]
[Start
Stop]
[Power]
(Player)]
[Joystick] does not
Symptôme
Explication/Solution
[Power]
(Camera)]
touche [Start/Stop]
[Power]
(Player)]
[Joystick] ne
 TroubleshootingDépannage
Symptom
Explanation/Solution
[OPEN] switch
Symptôme
Explication/Solution
[OPEN]
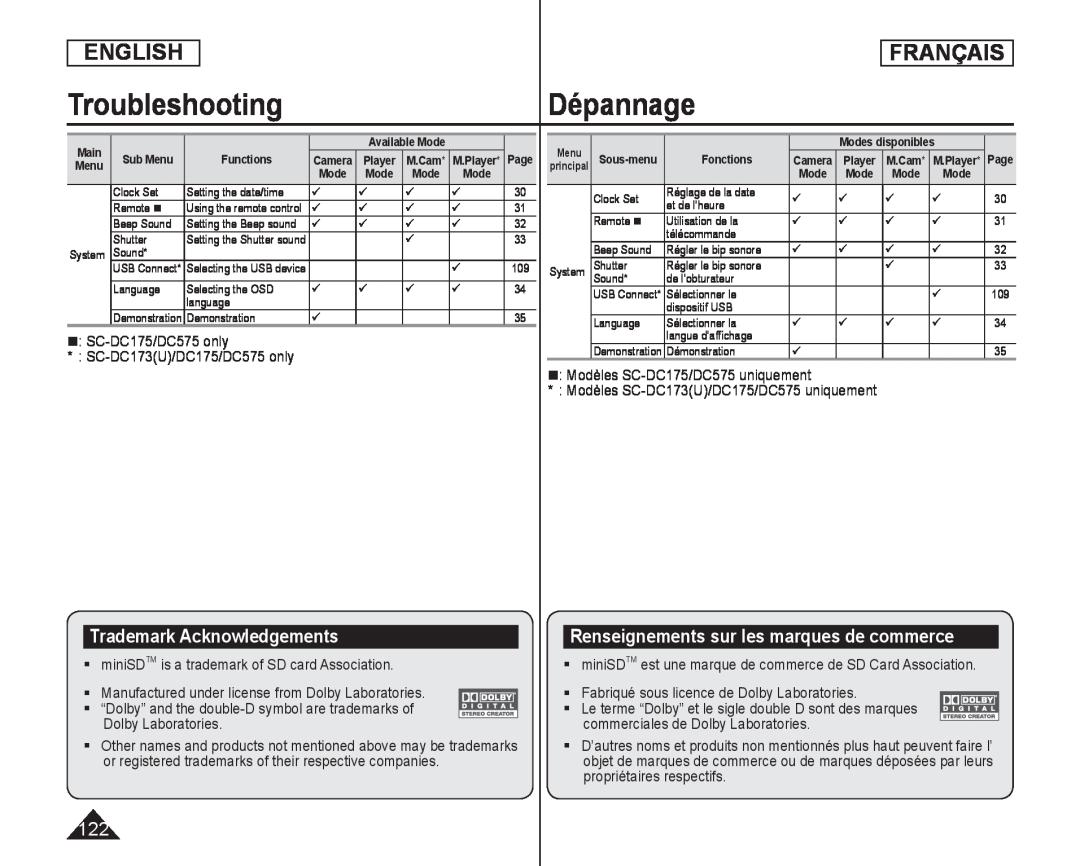
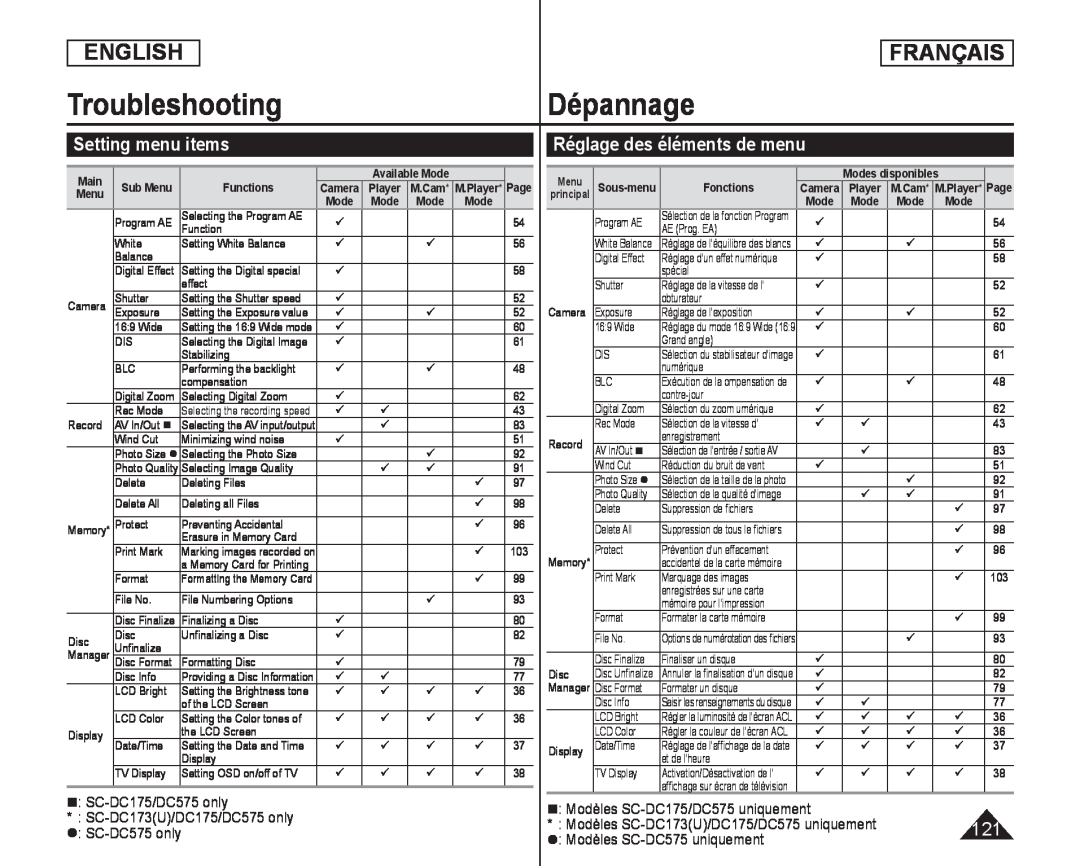 Setting menu items
Réglage des éléments de menu
 Trademark Acknowledgements
Renseignements sur les marques de commerce
 Miscellaneous Information
Renseignements généraux
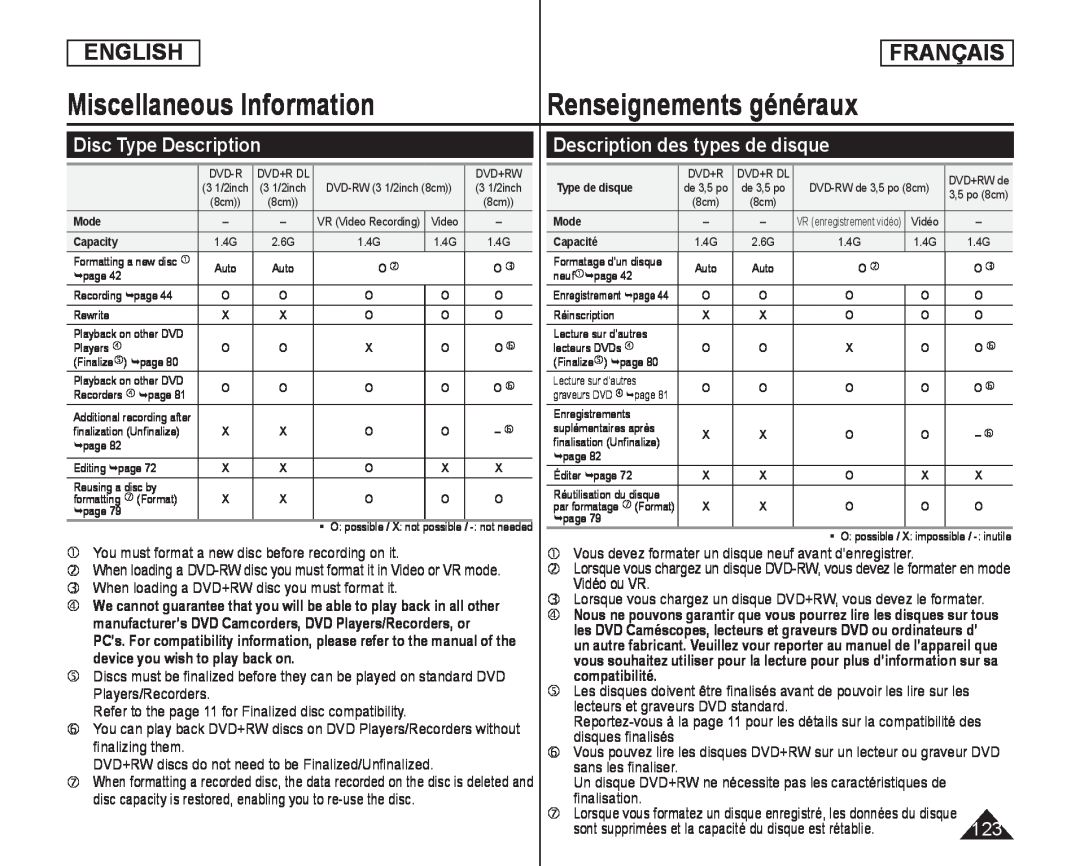
Disc Type Description
Description des types de disque
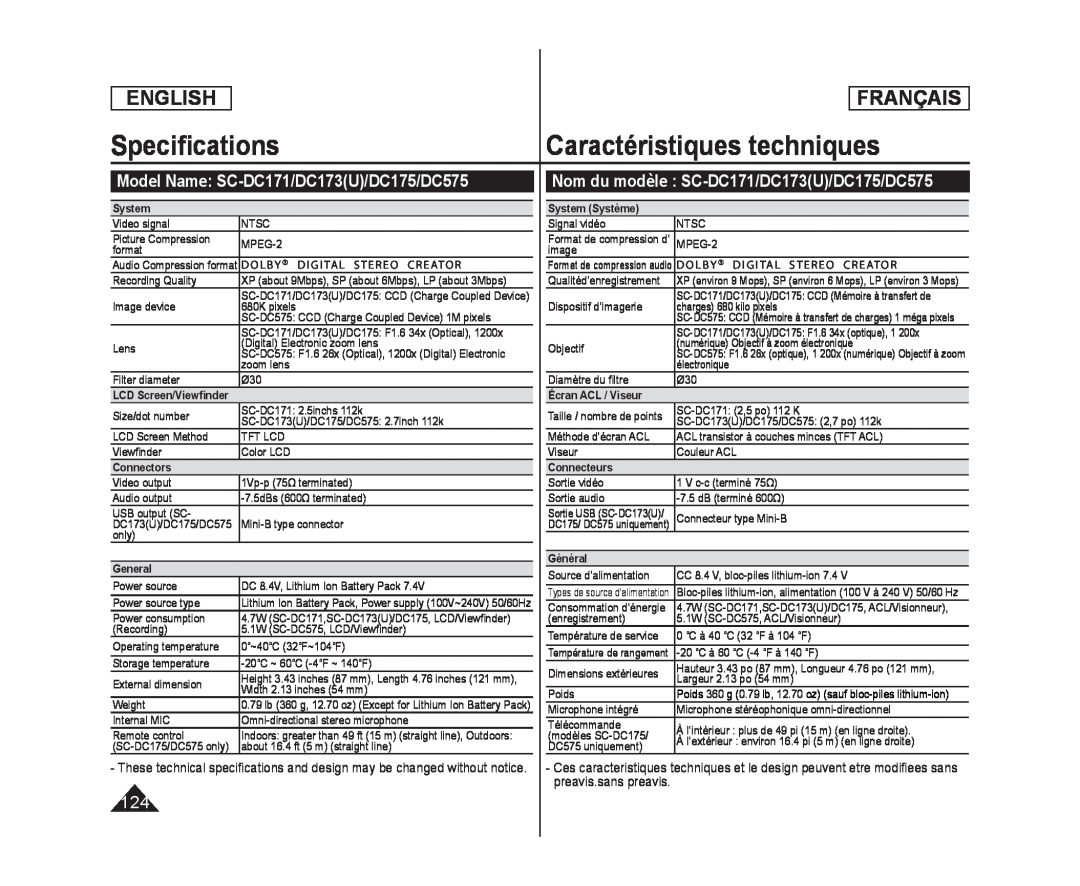 Specifications
Caractéristiques techniques
Model Name: SC-DC171/DC173(U)/DC175/DC575
Nom du modèle : SC-DC171/DC173(U)/DC175/DC575
 Index
IndexIndex
- N
- O
- P
- Q
- R
- S
- T
- U
- W
- Z
- O
- P
- R
- S
- T
- U
- W
- Z
 Warranty (Canada users only)
Garantie pour le Canada
SAMSUNG
LIMITED WARRANTY
EXCLUSIONS (WHAT IS NOT COVERED)
GARANTIE
SAMSUNG LIMITÉE
EXCEPTIONS (RESPONSABILITÉS NON COUVERTES)
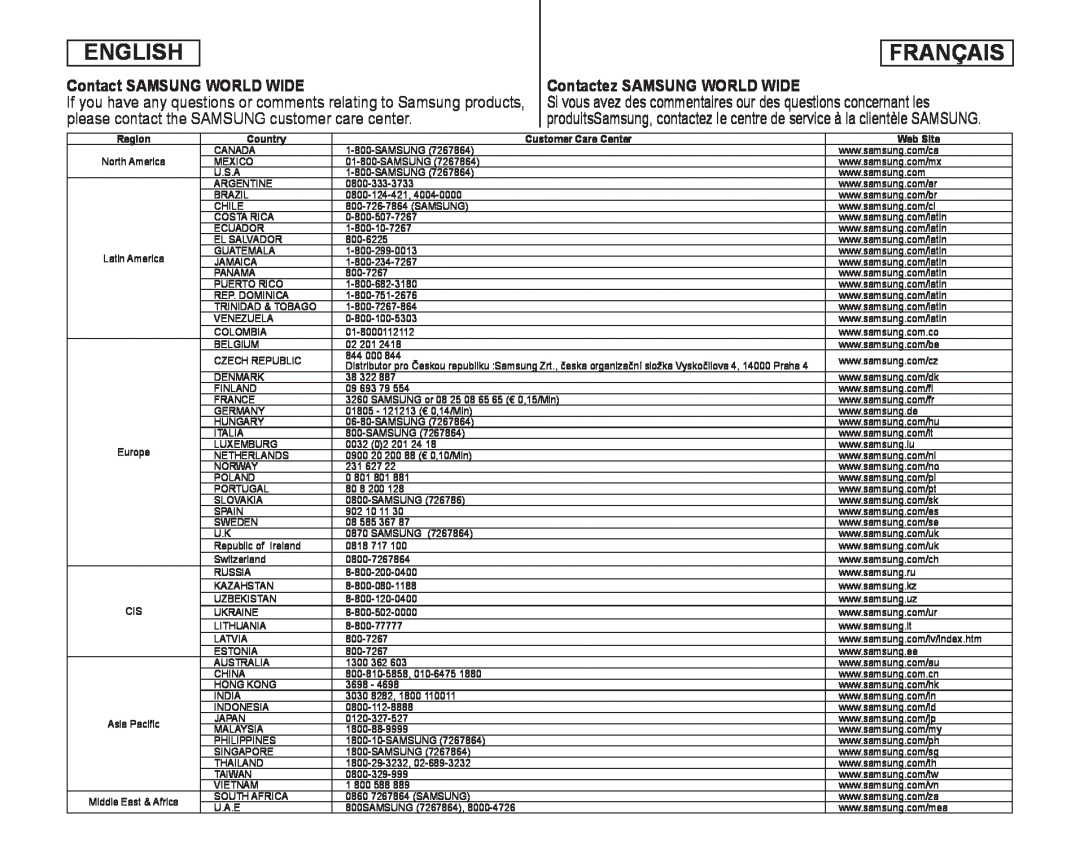 Contact SAMSUNG WORLD WIDE
Contactez SAMSUNG WORLD WIDE
 THIS DVD CAMCORDER IS MANUFACTURED BY: CE DVD CAMÉSCOPE EST FABRIQUÉ PAR:
RoHS compliant
Normes RoHS