 ENGLISH
ESPAÑOL
Owner’s Instruction Book
AD68-01230C
 ContentsÍndice
 Contents
Índice
 ENGLISH
ESPAÑOL
ContentsÍndice
 ENGLISH
ESPAÑOL
ContentsÍndice
 Notes and Safety Instructions
Notas e instrucciones de seguridad
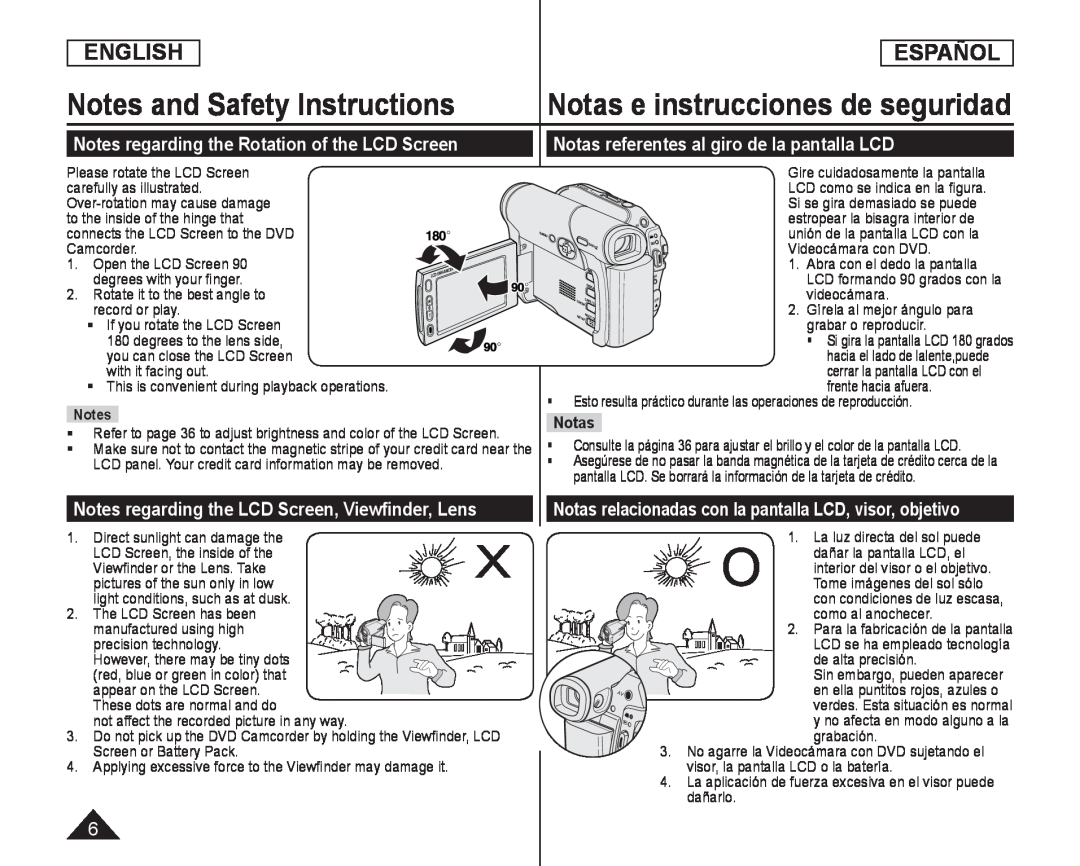
Notes regarding the Rotation of the LCD Screen
Notas referentes al giro de la pantalla LCD
Notes regarding the LCD Screen, Viewfinder, Lens
 Notes regarding Disc Cleaning and Handling
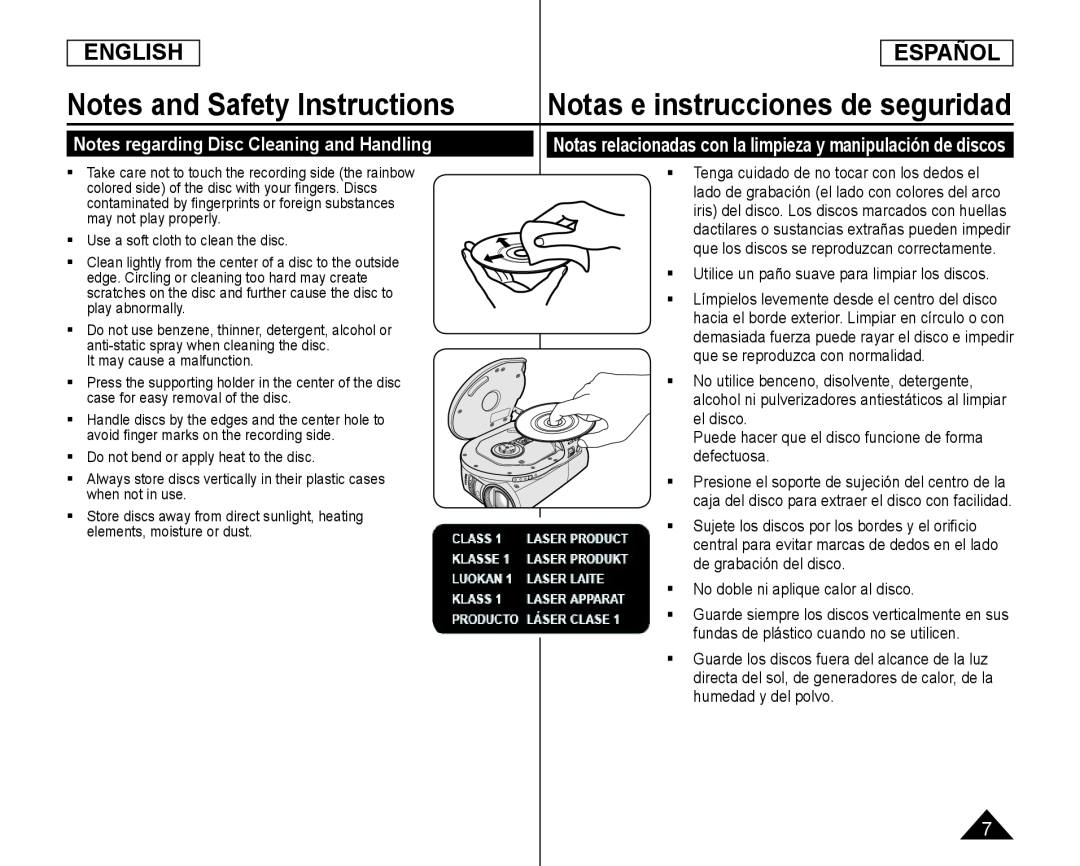
Notas relacionadas con la limpieza y manipulación de discos
Utilice un paño suave para limpiar los discos
Puede hacer que el disco funcione de forma defectuosa
No doble ni aplique calor al disco
 Notes regarding DVD Camcorder
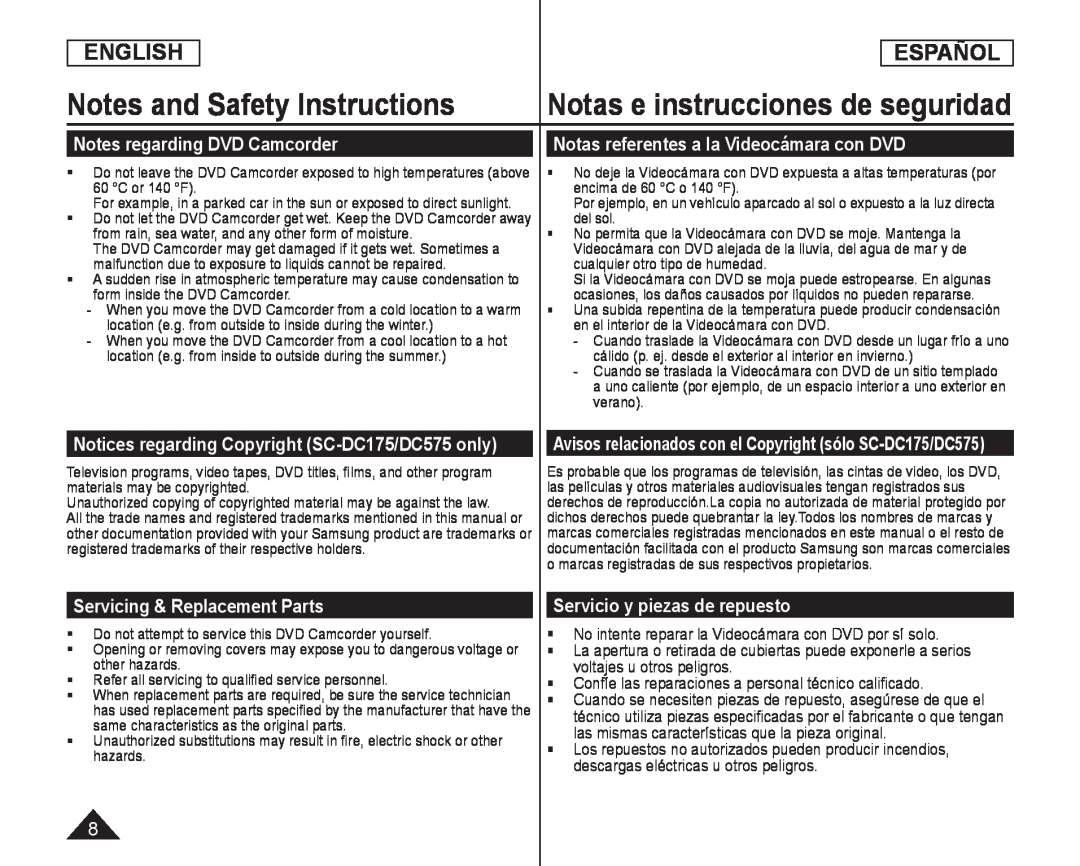
Notas referentes a la Videocámara con DVD
Notices regarding Copyright (SC-DC175/DC575only)
Avisos relacionados con el Copyright (sólo SC-DC175/DC575)
Servicing & Replacement Parts
Servicio y piezas de repuesto
No intente reparar la Videocámara con DVD por sí solo
Confíe las reparaciones a personal técnico calificado
 Getting to Know Your DVD Camcorder Introducción a la Videocámara con DVD
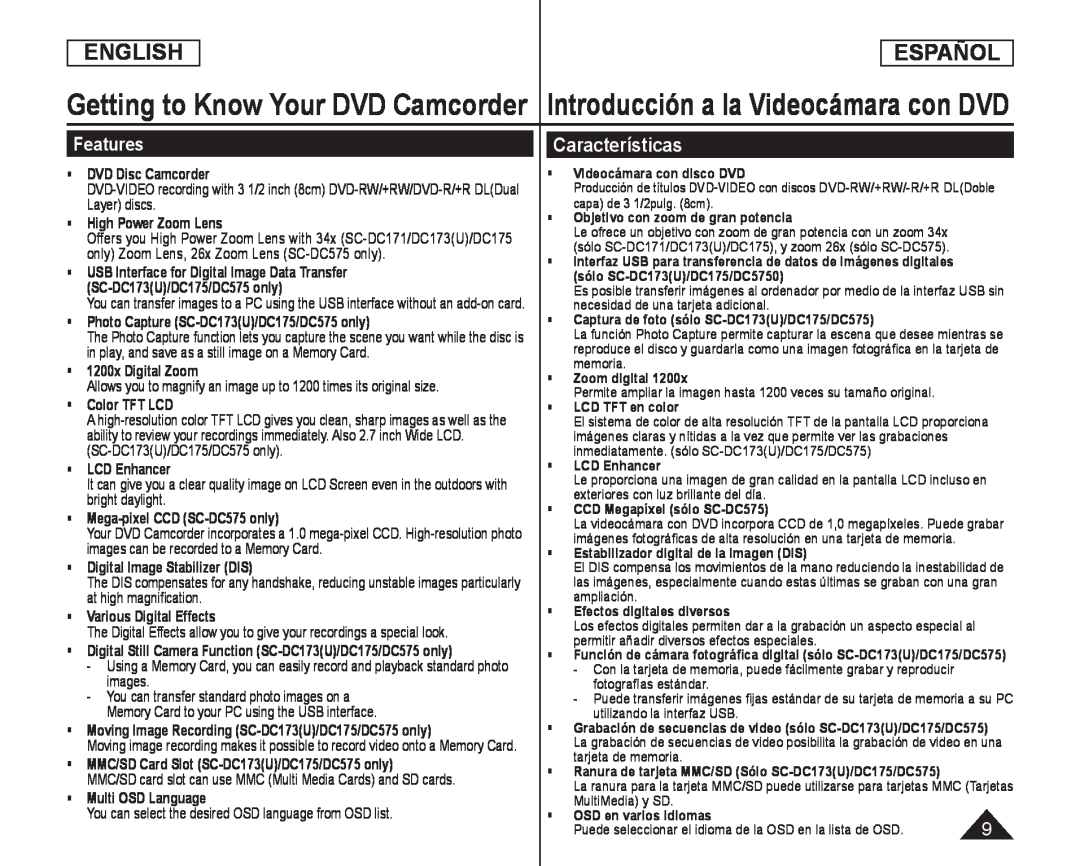
Features
Características
 Getting to Know Your DVD Camcorder
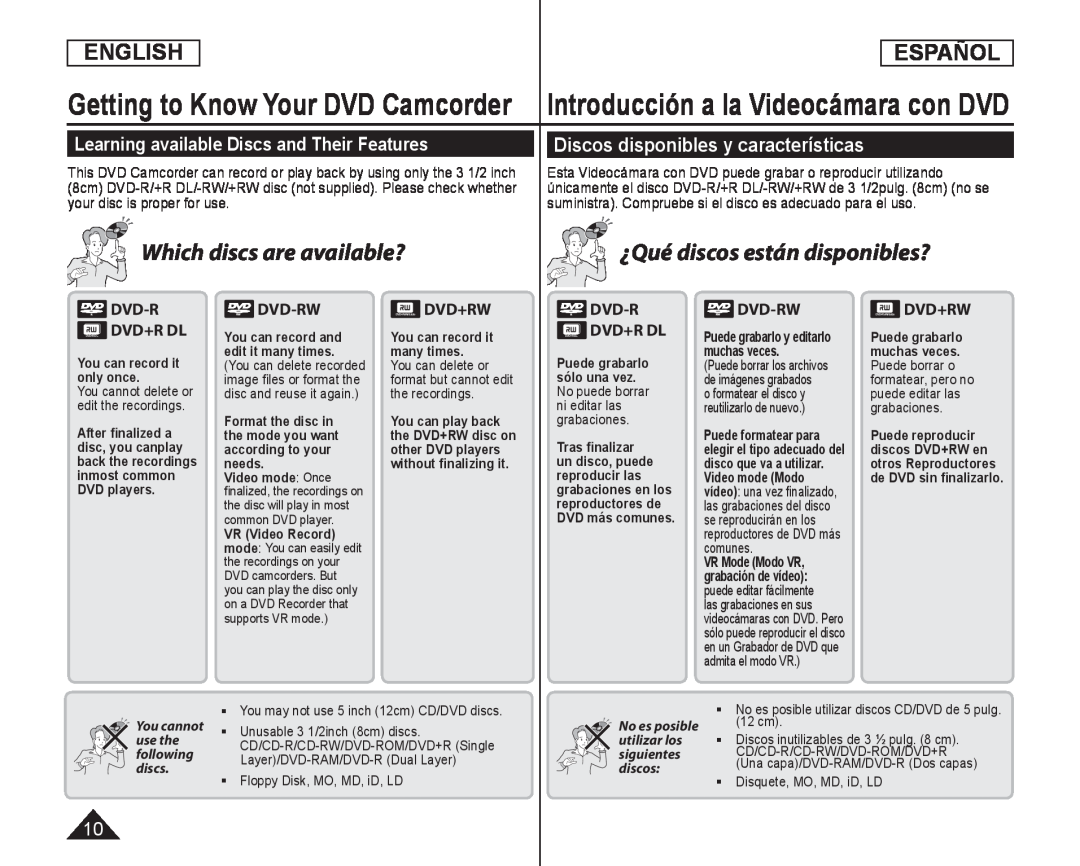
Learning available Discs and Their Features
Introducción a la Videocámara con DVD
Discos disponibles y características
DVD+R DL
 ENGLISH
ESPAÑOL
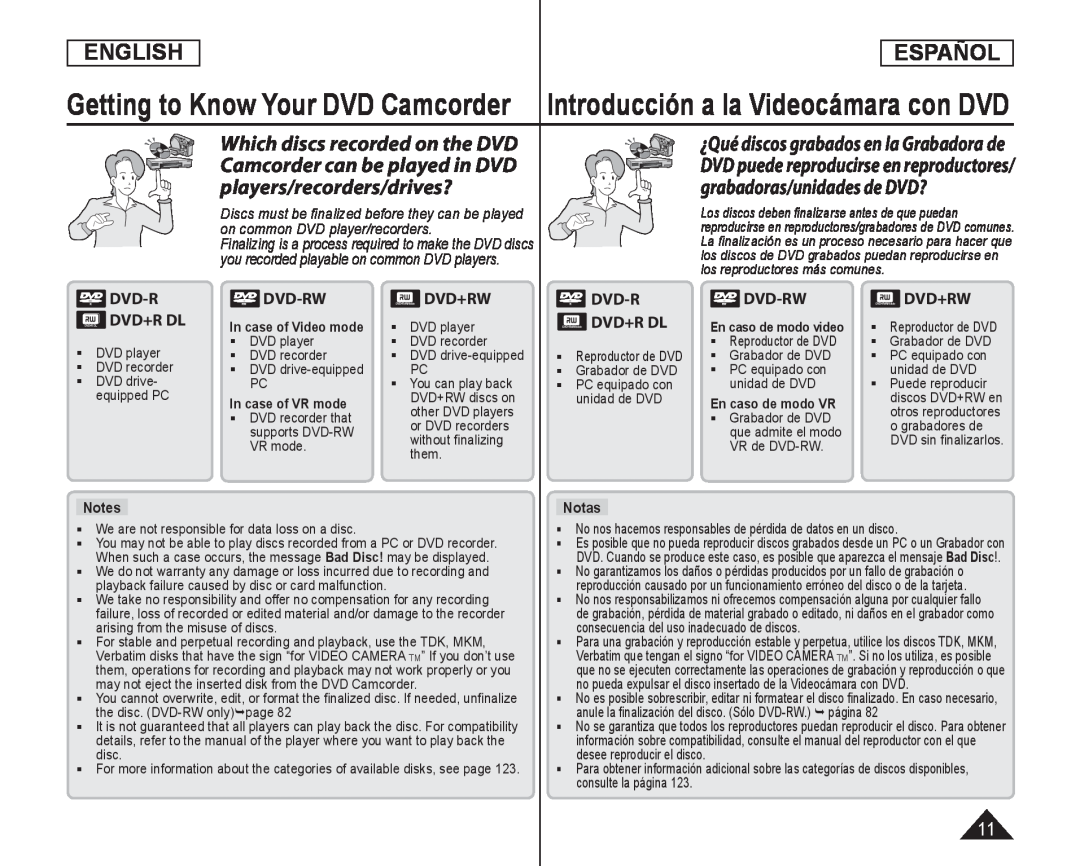
Getting to Know Your DVD Camcorder
Introducción a la Videocámara con DVD
DVD-R
DVD+R DL
DVD player
DVD recorder
DVD drive- equipped PC
DVD-RW
In case of Video mode DVD player
DVD recorder
DVD drive-equipped
VR mode
DVD+RW
DVD player
DVD recorder
DVD drive-equipped
DVD-R
DVD+R DL
Reproductor de DVD
Grabador de DVD
DVD-RW
unidad de DVD
VR de DVD-RW
DVD+RW
Reproductor de DVD
Grabador de DVD
We are not responsible for data loss on a disc
No nos hacemos responsables de pérdida de datos en un disco
 How to use the DVD Camcorder easily
Cómo utilizar la Videocámara con DVD
 Introducción a la Videocámara con DVD
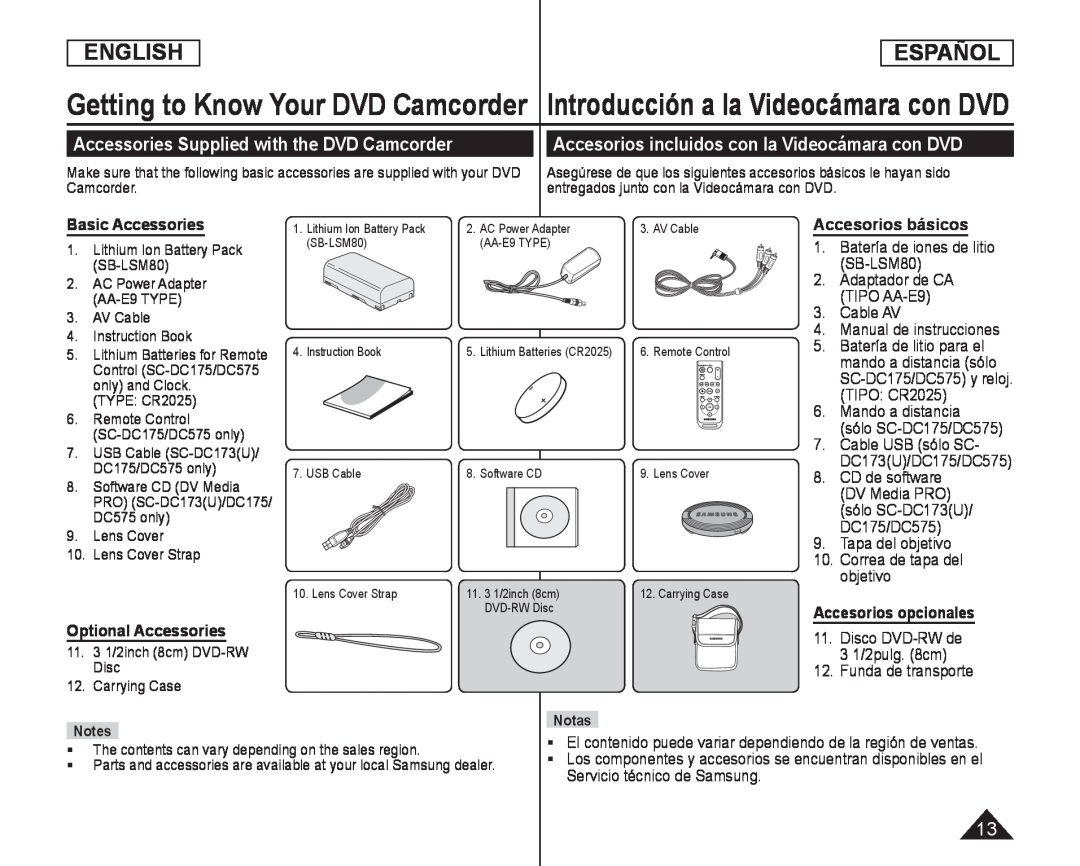
Accessories Supplied with the DVD Camcorder
Accesorios incluidos con la Videocámara con DVD
Basic Accessories
Accesorios básicos
Batería de iones de litio
(SB-LSM80)
Adaptador de CA
(TIPO AA-E9)
Cable AV
Manual de instrucciones
Batería de litio para el
mando a distancia (sólo
(TIPO: CR2025)
Mando a distancia
(sólo SC-DC175/DC575)
Cable USB (sólo SC
CD de software
(DV Media PRO)
(sólo SC-DC173(U)
DC175/DC575)
Tapa del objetivo
Correa de tapa del
objetivo
Optional Accessories
Accesorios opcionales
Disco DVD-RWde
3 1/2pulg. (8cm)
Funda de transporte
El contenido puede variar dependiendo de la región de ventas
Servicio técnico de Samsung
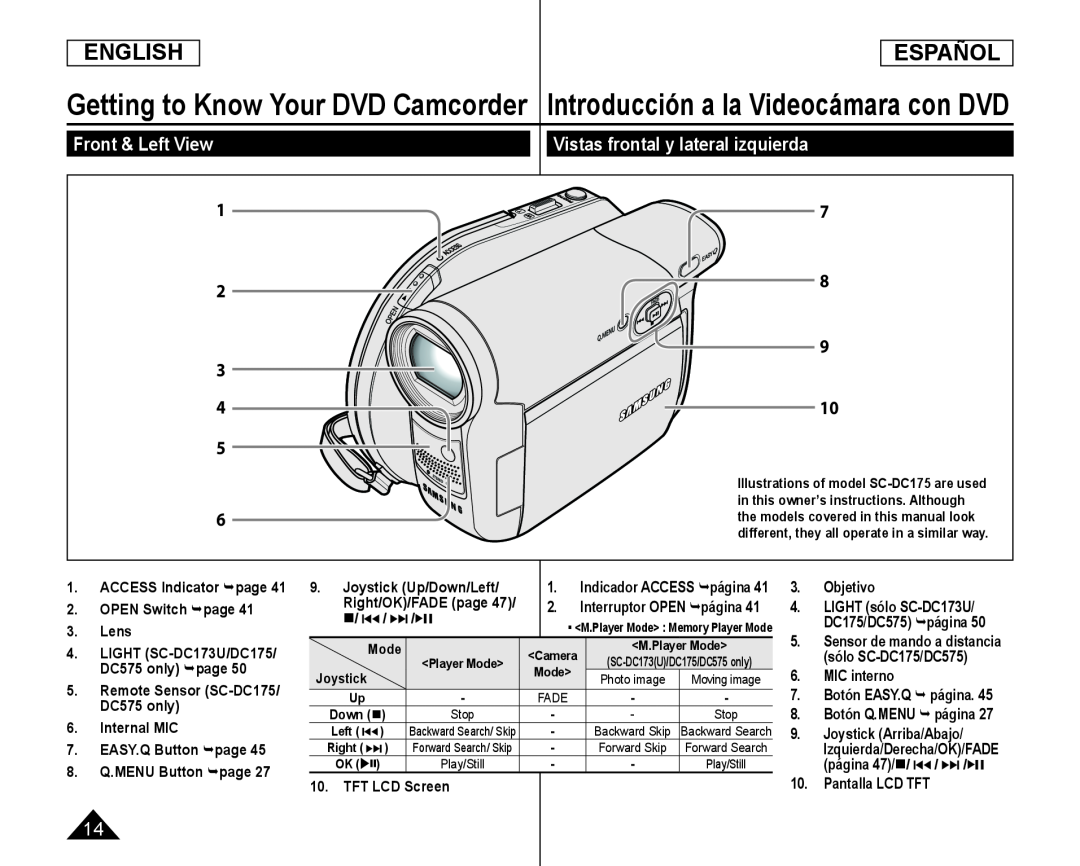 Vistas frontal y lateral izquierda
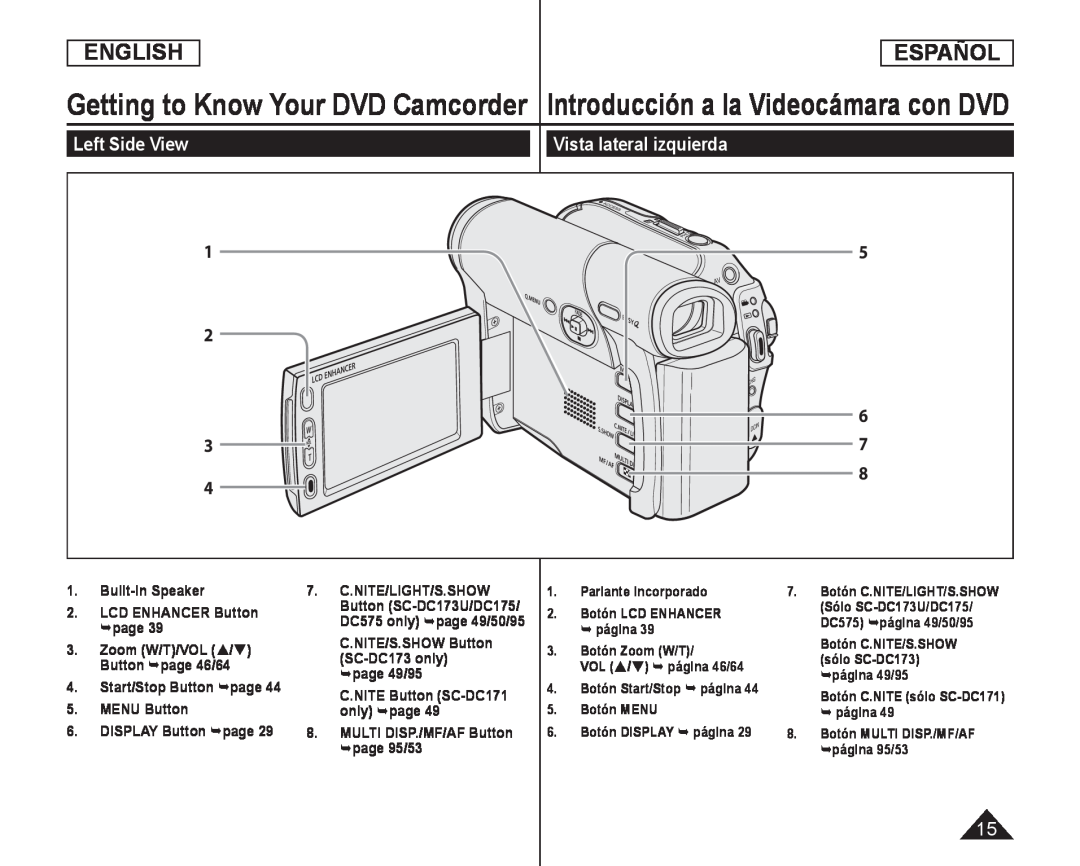 Vista lateral izquierda
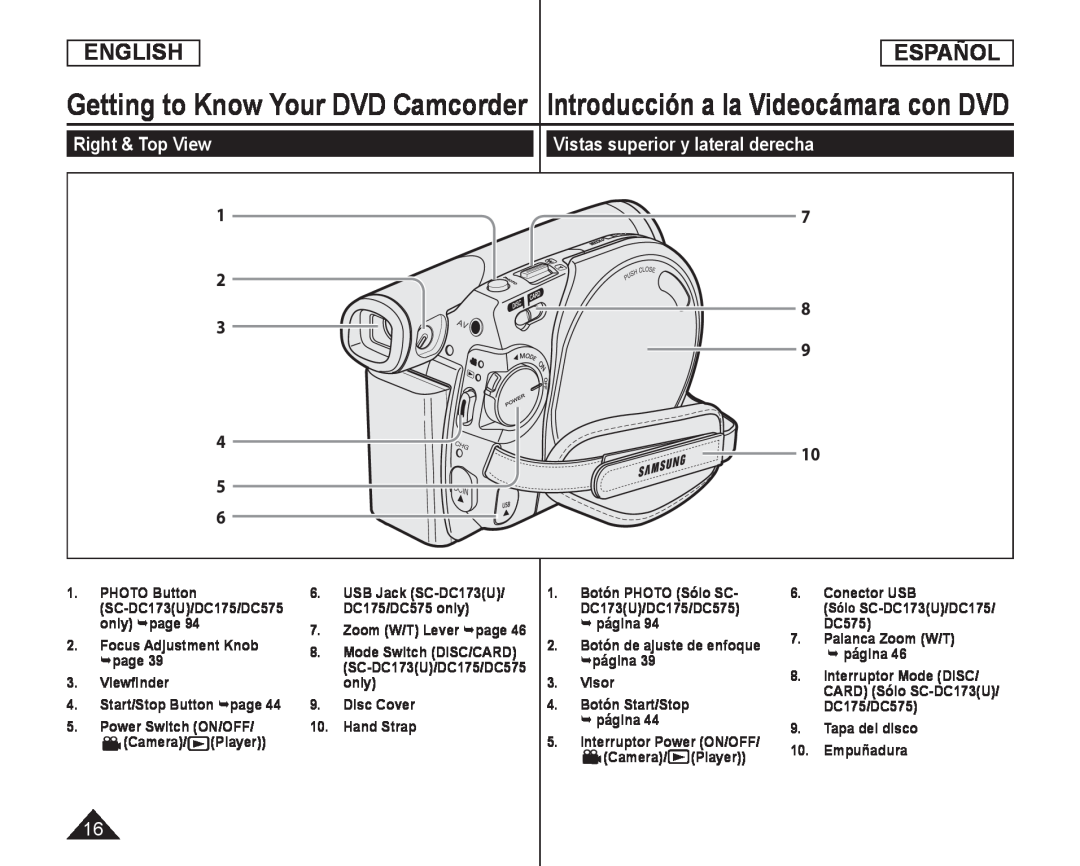 Vistas superior y lateral derecha
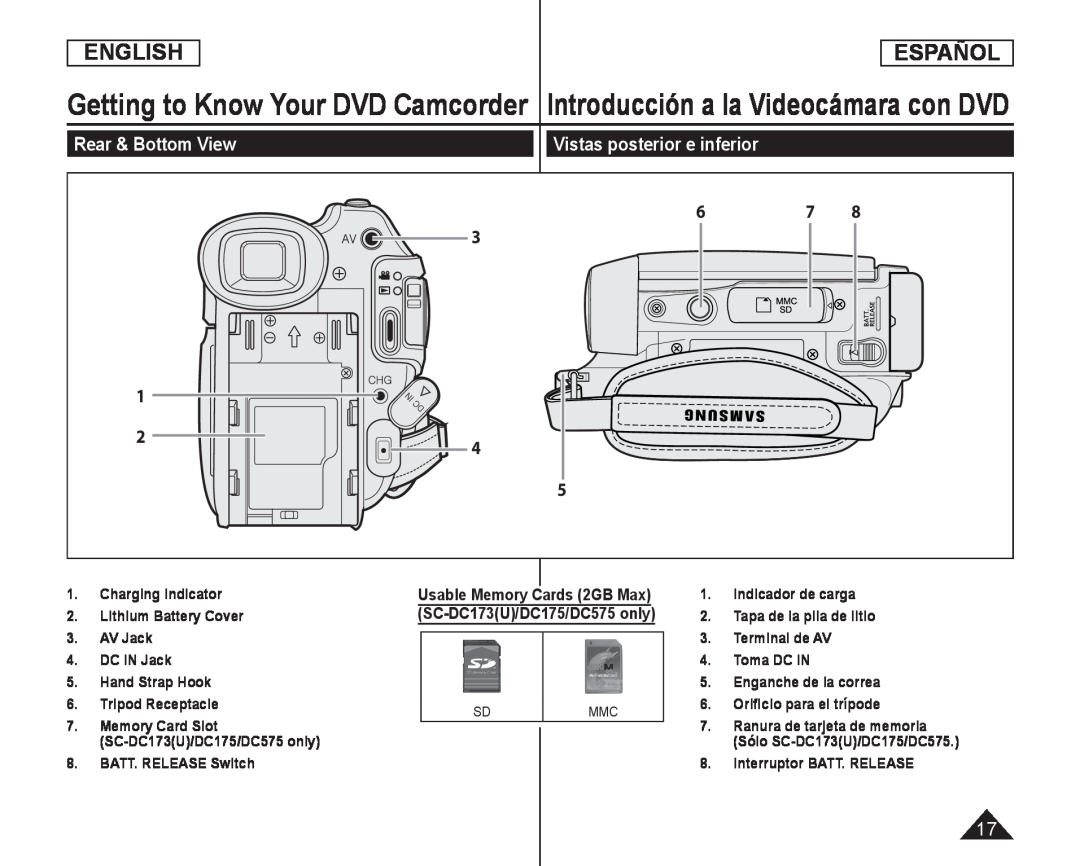 Rear & Bottom View
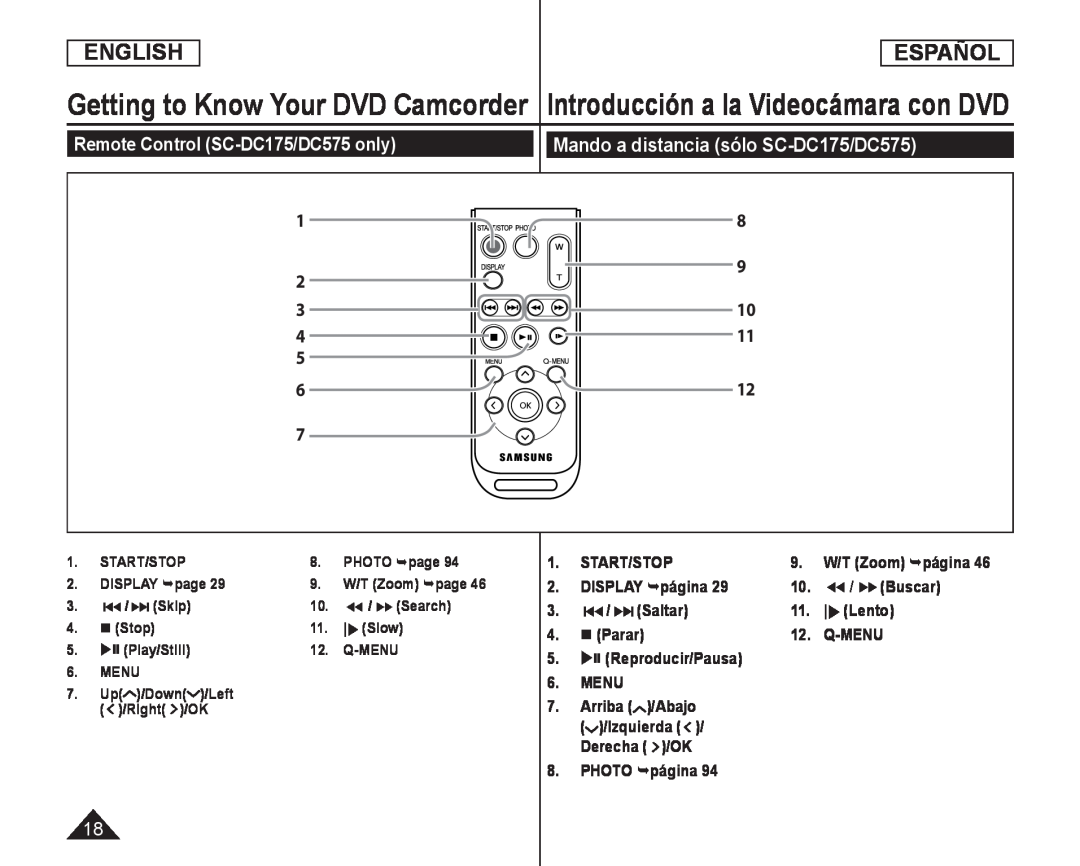 Remote Control (SC-DC175/DC575only)
Mando a distancia (sólo SC-DC175/DC575)
START/STOP
DISPLAY página
/(Buscar)
/(Saltar)
|(Lento)
(Parar)
Q-MENU
5. (Reproducir/Pausa)
6.MENU
8.PHOTO página
 Preparation
Preparación
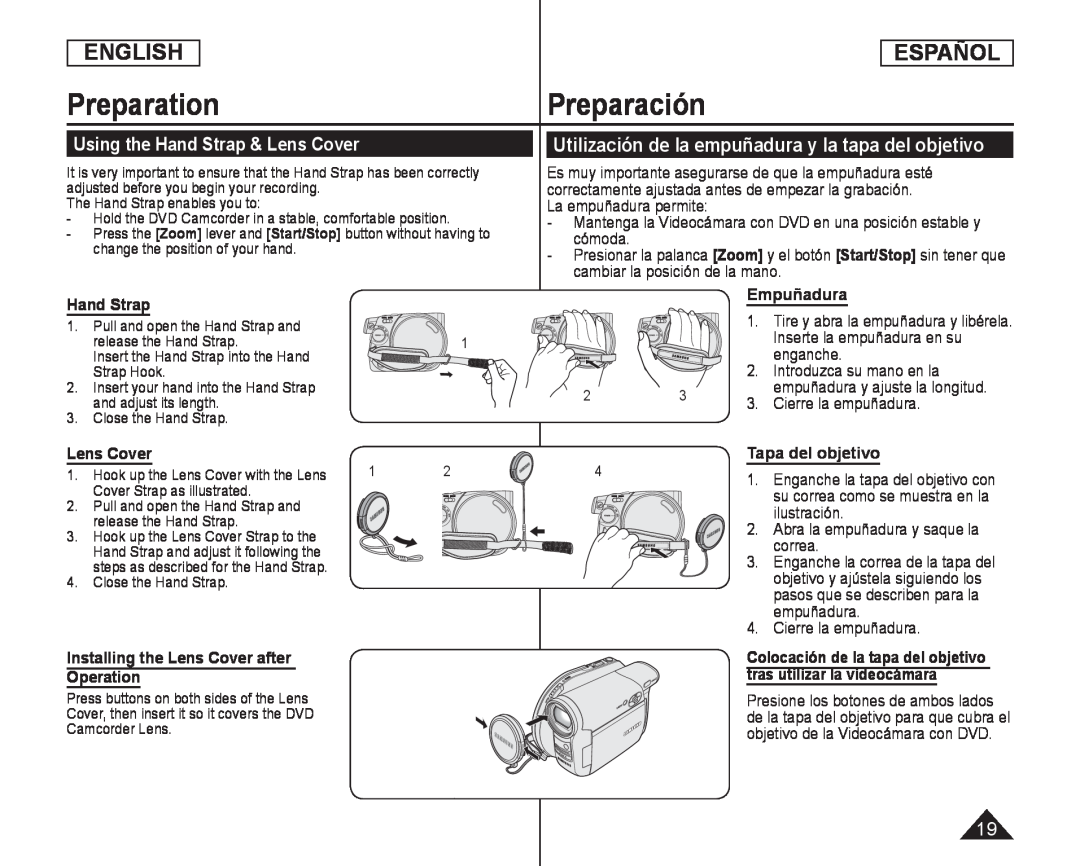
Using the Hand Strap & Lens Cover
Utilización de la empuñadura y la tapa del objetivo
Hand Strap
Lens Cover
Installing the Lens Cover after
Operation
- Mantenga la Videocámara con DVD en una posición estable y cómoda
[Start/Stop]
Empuñadura
Inserte la empuñadura en su
enganche
Introduzca su mano en la
empuñadura y ajuste la longitud
Cierre la empuñadura
Tapa del objetivo
Enganche la tapa del objetivo con
su correa como se muestra en la
ilustración
Abra la empuñadura y saque la
correa
Enganche la correa de la tapa del
objetivo y ajústela siguiendo los
pasos que se describen para la
empuñadura
tras utilizar la videocámara
objetivo de la Videocámara con DVD
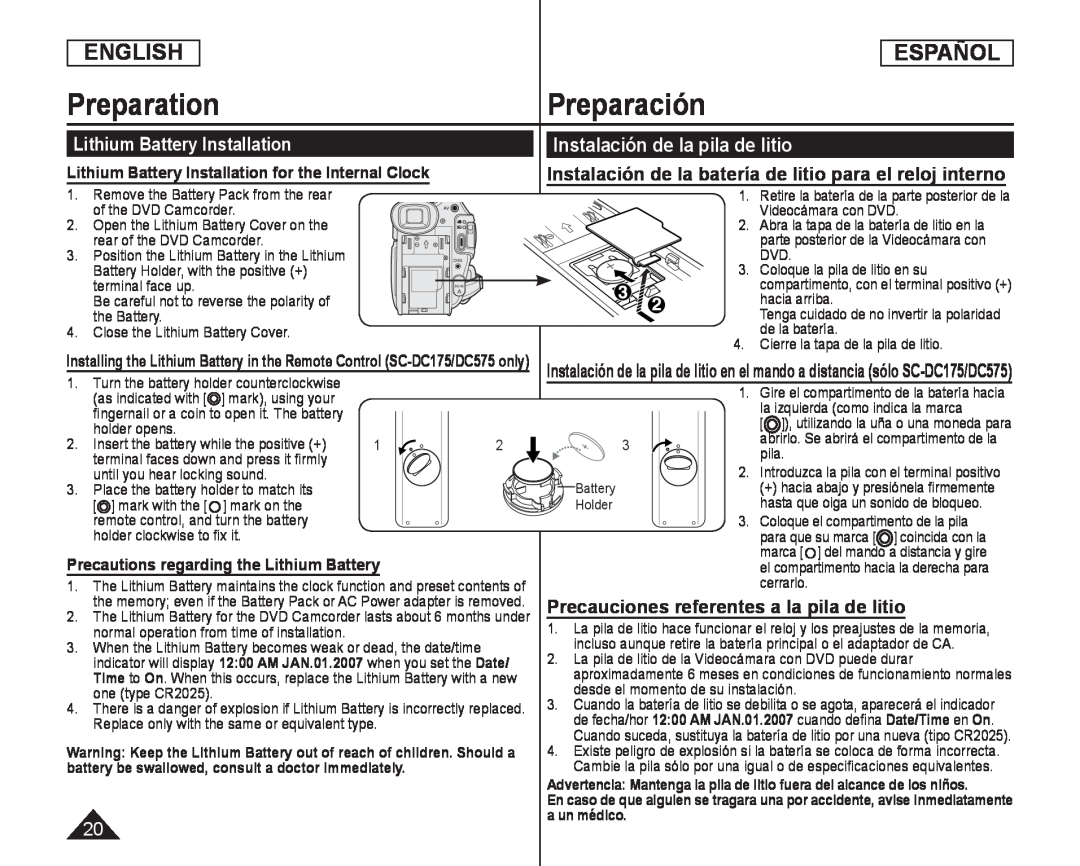 Lithium Battery Installation
Instalación de la pila de litio
Lithium Battery Installation for the Internal Clock
Instalación de la batería de litio para el reloj interno
Precautions regarding the Lithium Battery
Precauciones referentes a la pila de litio
 PreparationPreparación
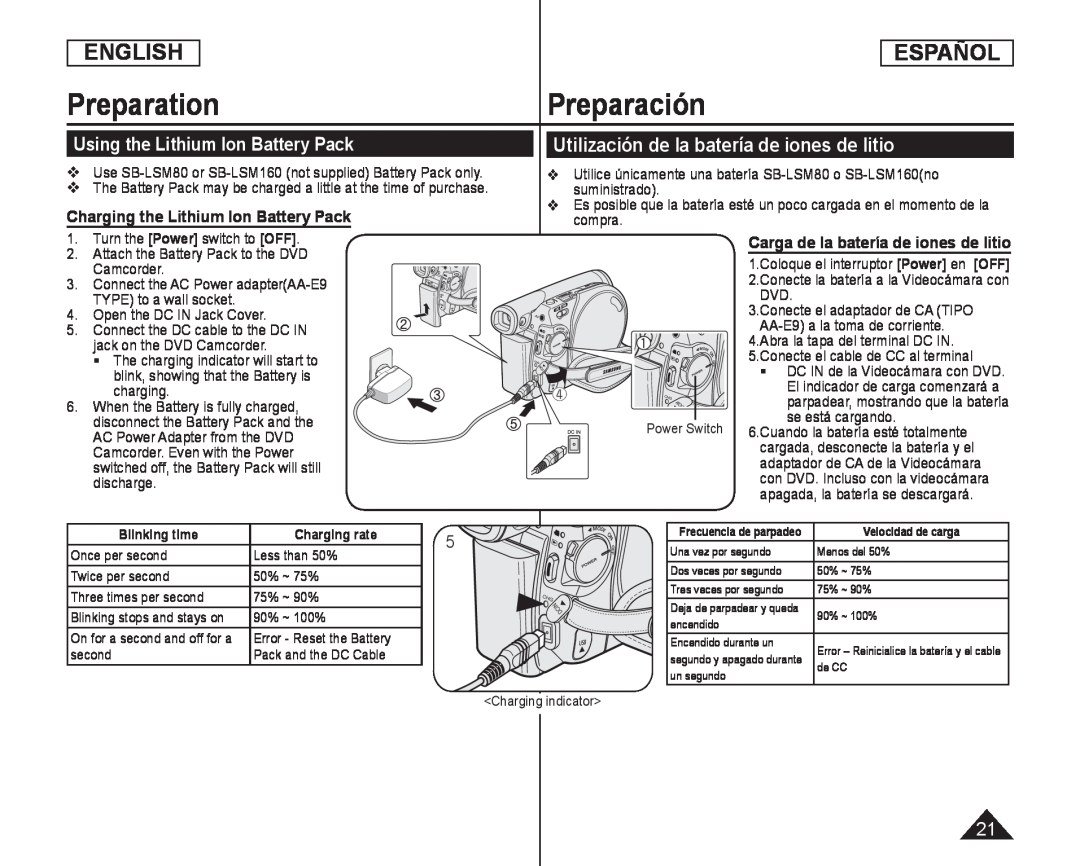
Using the Lithium Ion Battery Pack
Charging the Lithium Ion Battery Pack
Utilización de la batería de iones de litio
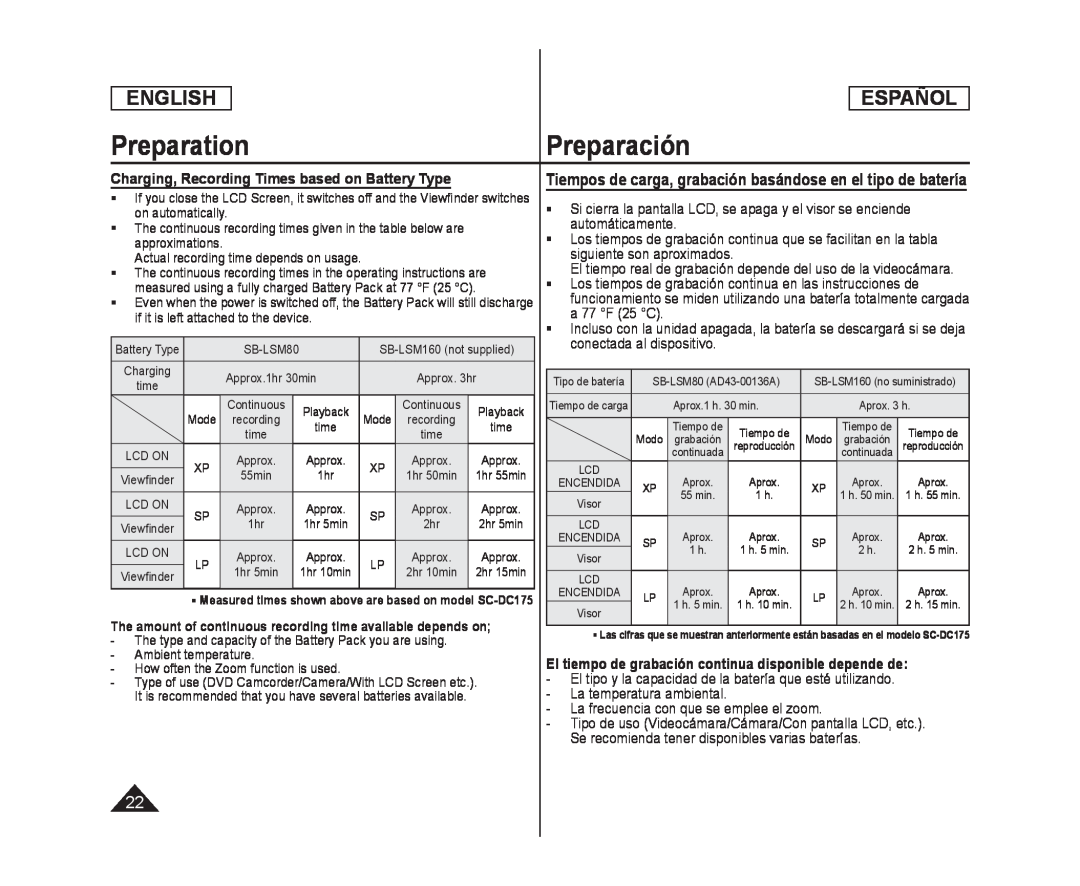 Charging, Recording Times based on Battery Type
Tiempos de carga, grabación basándose en el tipo de batería
Si cierra la pantalla LCD, se apaga y el visor se enciende automáticamente
El tiempo real de grabación depende del uso de la videocámara
- La frecuencia con que se emplee el zoom
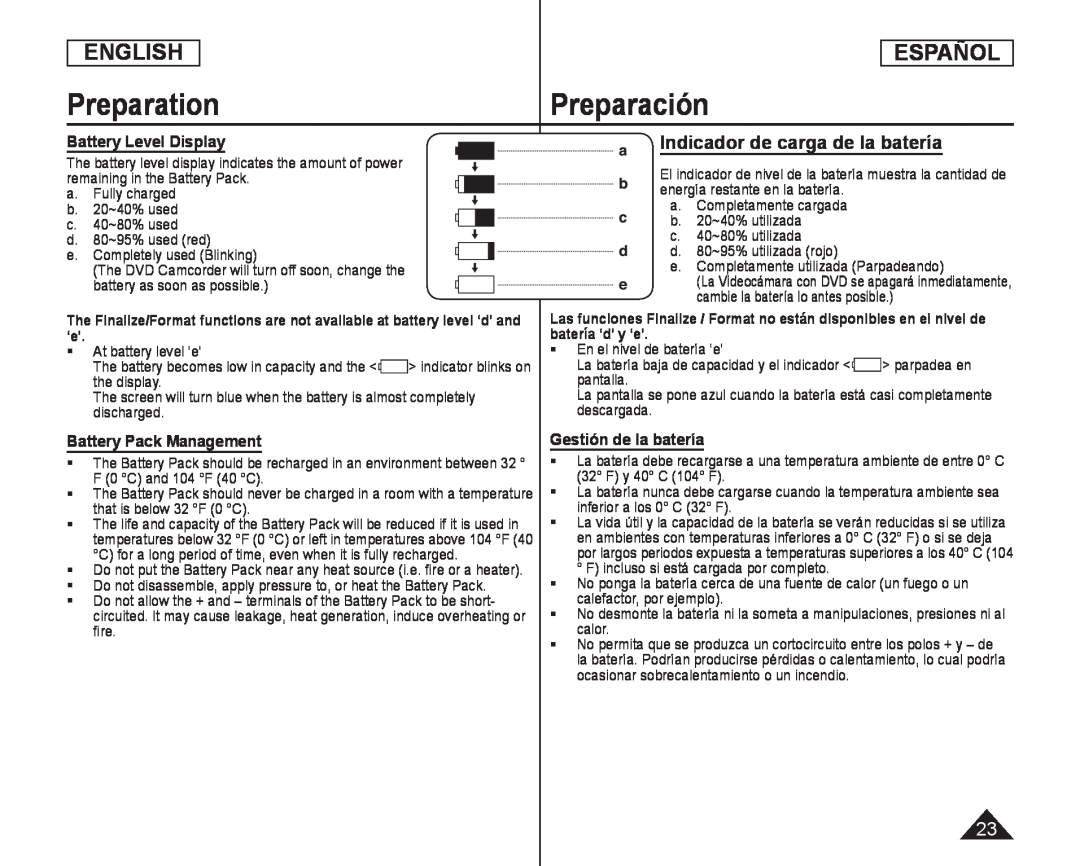 Battery Level Display
Indicador de carga de la batería
Battery Pack Management
Gestión de la batería
 Maintaining the Battery Pack
Mantenimiento de la batería
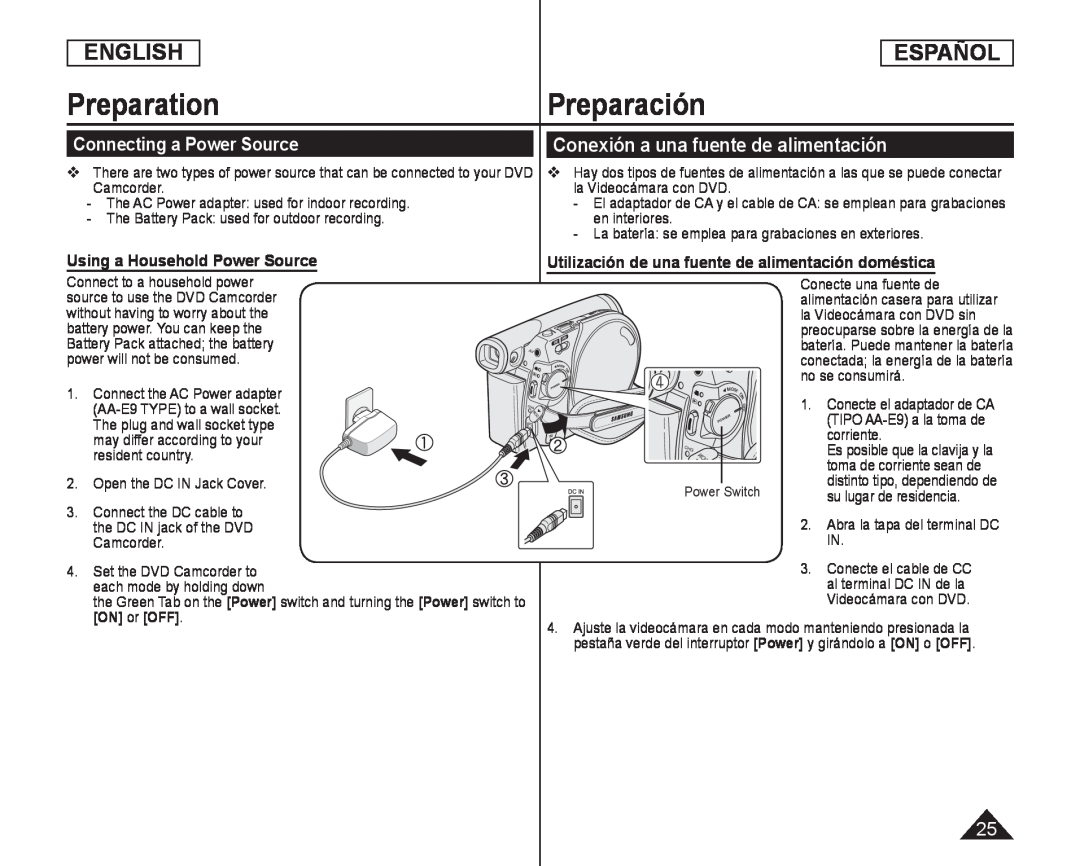 Connecting a Power Source
Conexión a una fuente de alimentación
Using a Household Power Source
Utilización de una fuente de alimentación doméstica
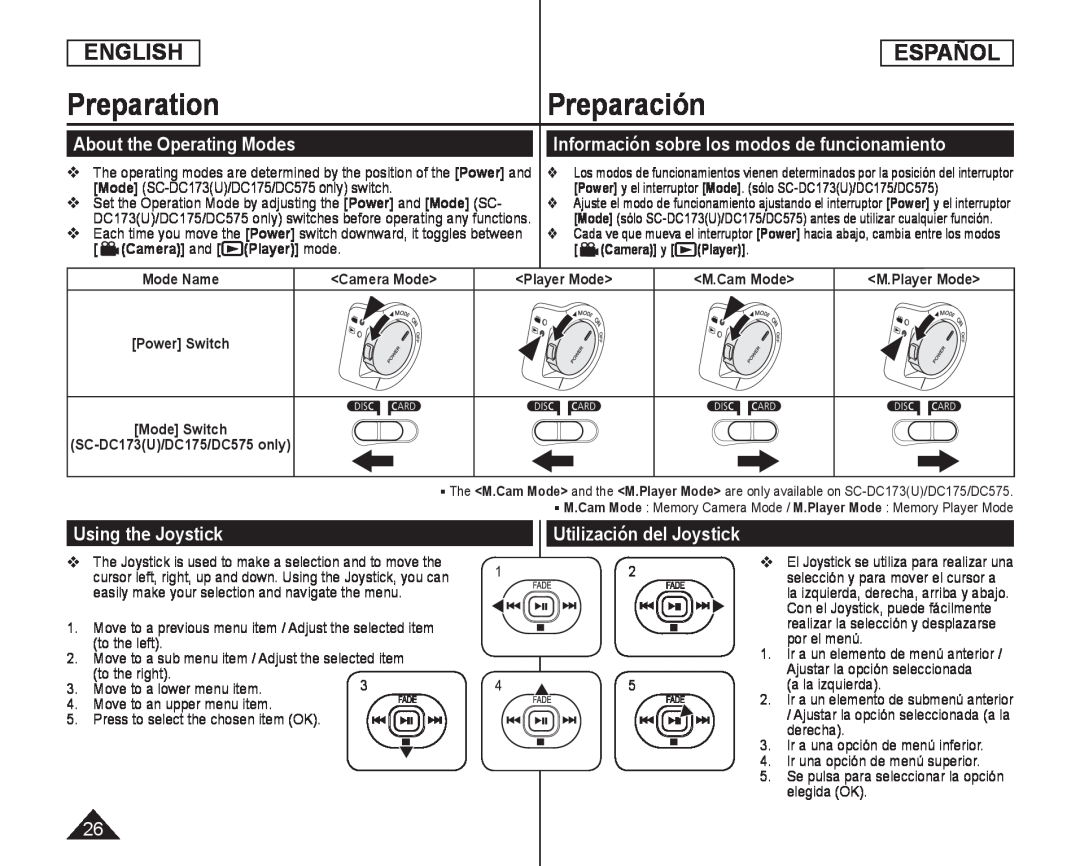 About the Operating Modes
Información sobre los modos de funcionamiento
Using the Joystick
Utilización del Joystick
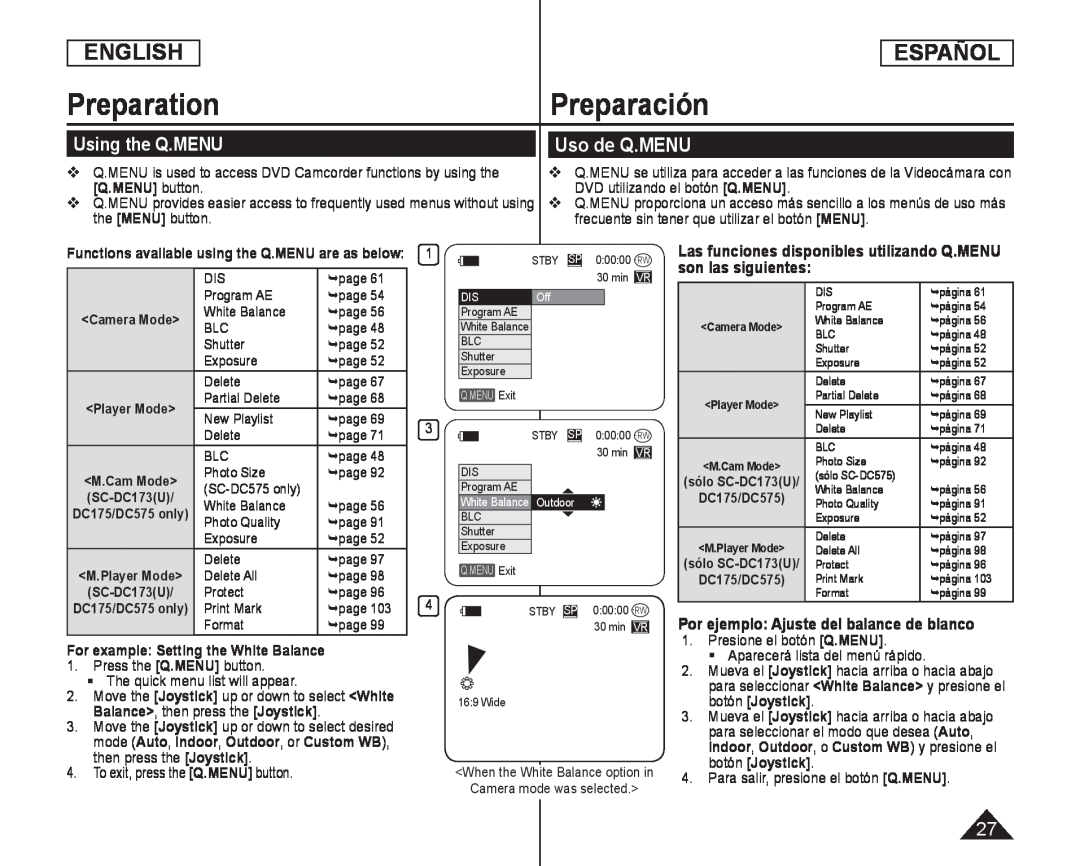 Using the Q.MENU
Uso de Q.MENU
Las funciones disponibles utilizando Q.MENU son las siguientes:
Por ejemplo: Ajuste del balance de blanco
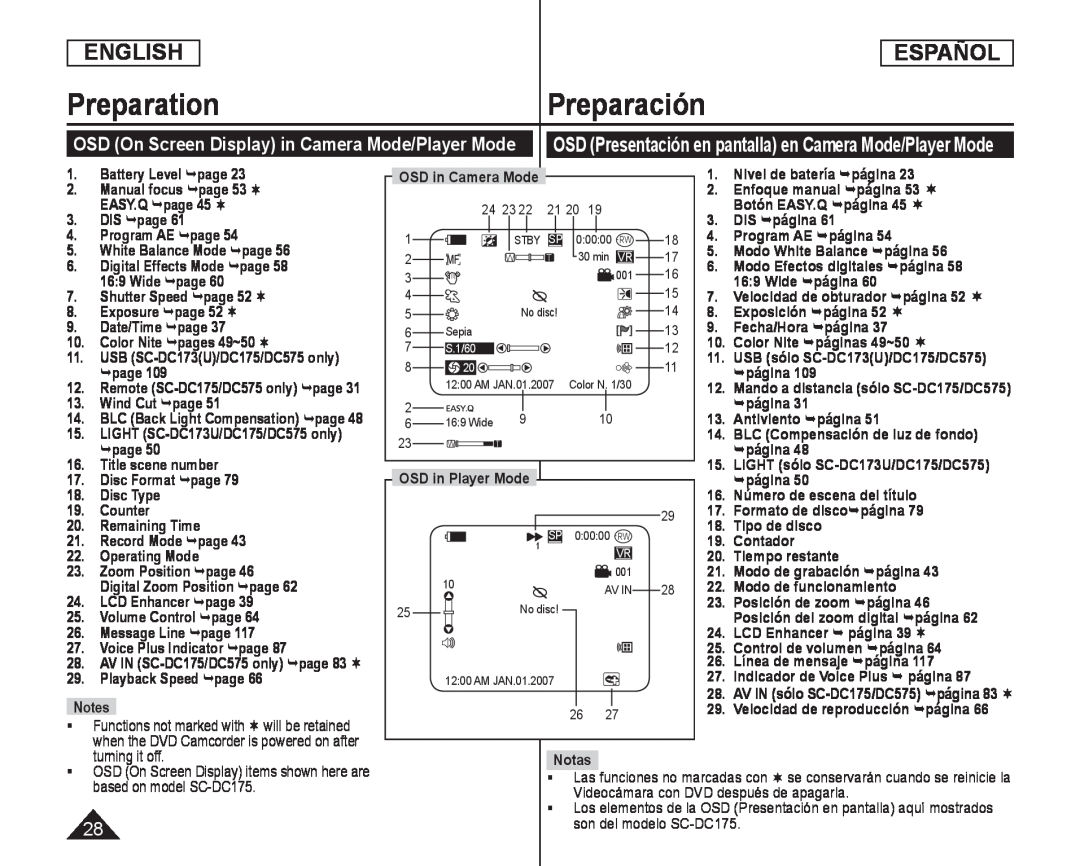 OSD (On Screen Display) in Camera Mode/Player Mode
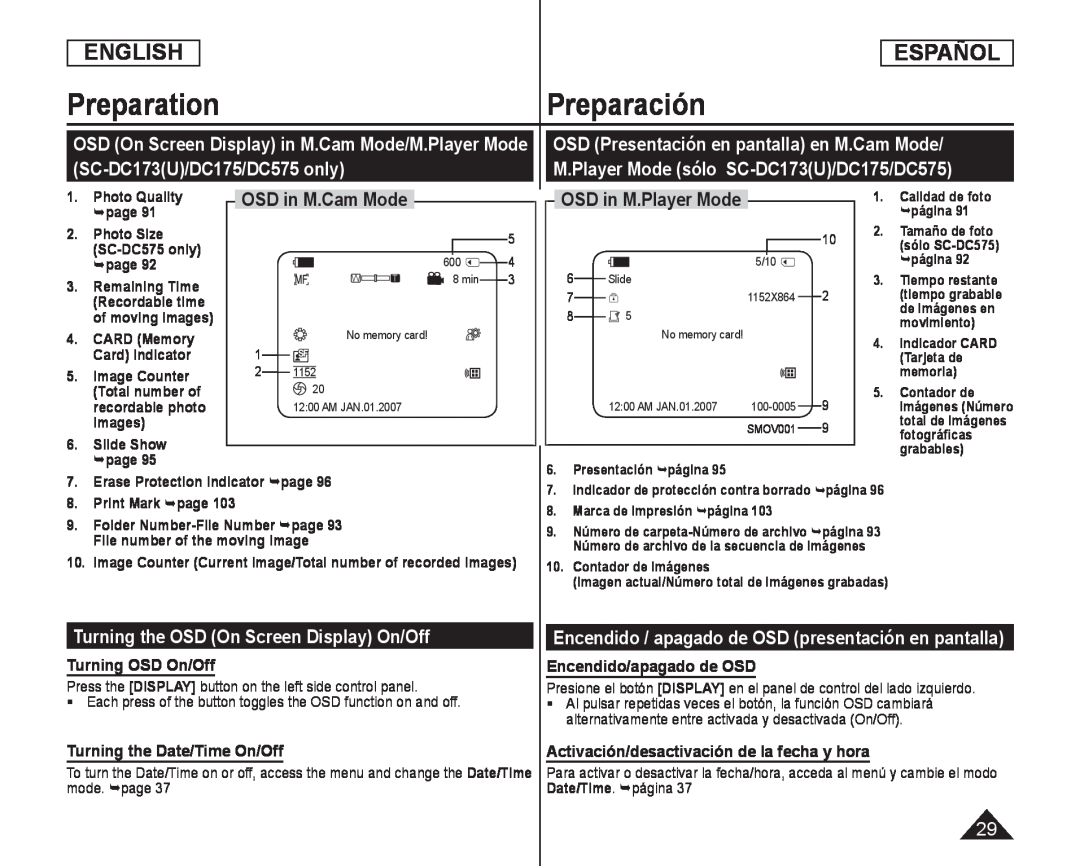 OSD (On Screen Display) in M.Cam Mode/M.Player Mode
(SC-DC173(U)/DC175/DC575only)
OSD (Presentación en pantalla) en M.Cam Mode
M.Player Mode (sólo SC-DC173(U)/DC175/DC575)
OSD in M.Cam Mode
OSD in M.Player Mode
Turning the OSD (On Screen Display) On/Off
Turning OSD On/Off
Encendido / apagado de OSD (presentación en pantalla)
Encendido/apagado de OSD
Turning the Date/Time On/Off
Activación/desactivación de la fecha y hora
 Initial Setting : System Menu Setting
Ajuste inicial: Ajuste del menú System
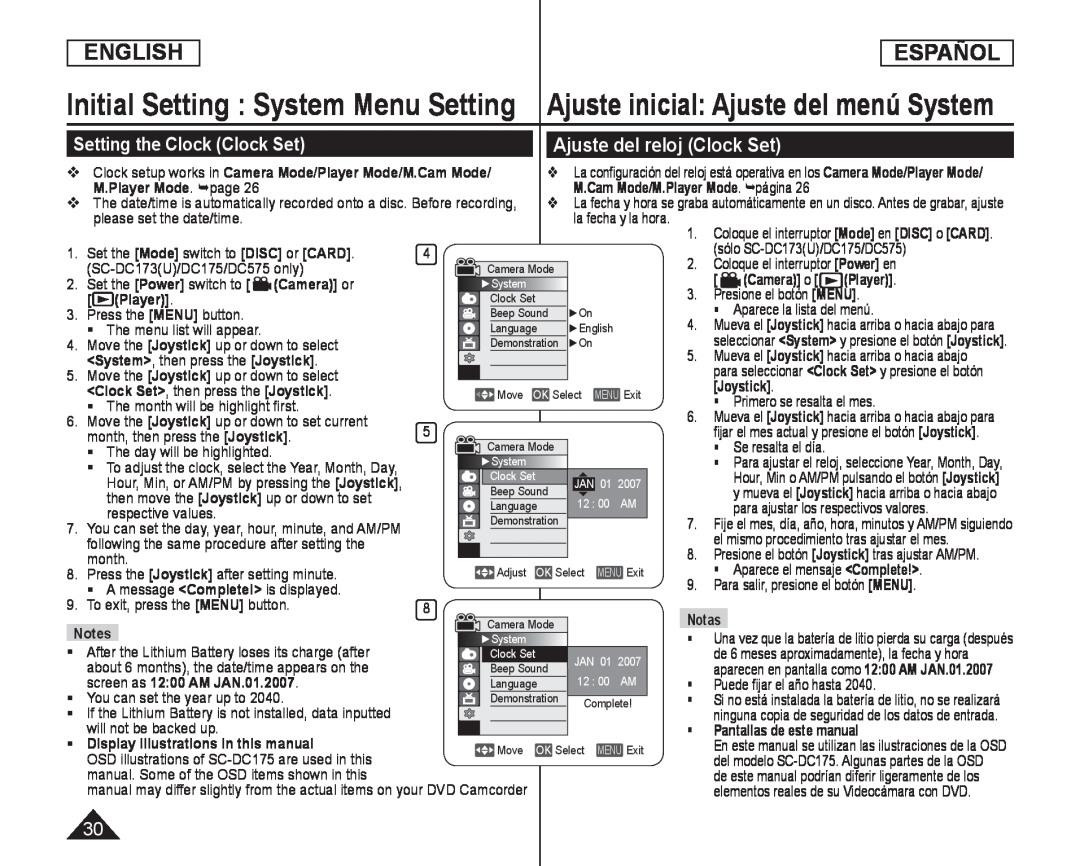
Setting the Clock (Clock Set)
Ajuste del reloj (Clock Set)
![Coloque el interruptor [Mode] en [DISC] o para seleccionar <System> y presione el](/images/prints/7795/31.1080.webp) Setting the Wireless Remote Control Acceptance (Remote) (SC-DC175/DC575only)
Setting the Wireless Remote Control Acceptance (Remote) (SC-DC175/DC575only)Coloque el interruptor [Mode] en [DISC] o
[DISC
[CARD]
para seleccionar <System> y presione el
para seleccionar <Remote> y presione el
<Remote
Off
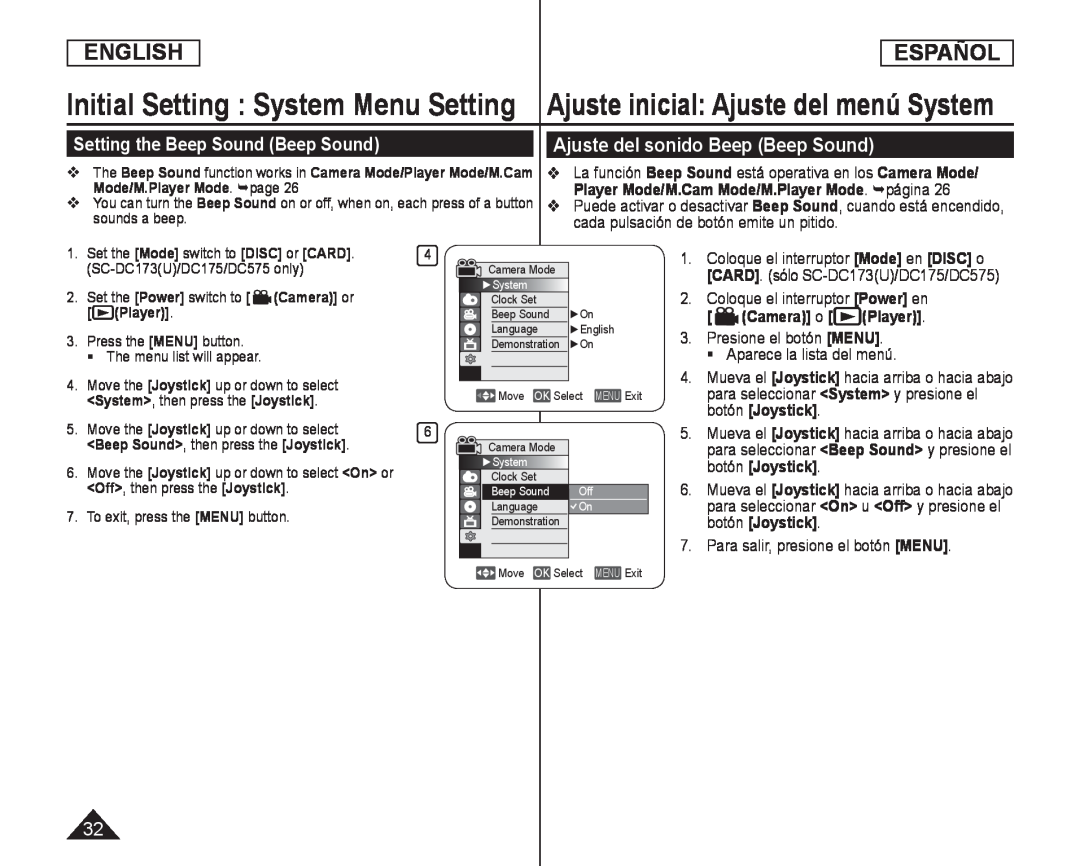 Setting the Beep Sound (Beep Sound)
Ajuste del sonido Beep (Beep Sound)
Puede activar o desactivar
Beep Sound
<Beep Sound
![La función Shutter Sound sólo está operativa en el M.Cam Mode. página 1.Coloque el interruptor [Mode] en [CARD]](/images/prints/7795/33.1080.webp) Setting the Shutter Sound (Shutter Sound) (SC-DC173(U)/DC175/DC575only)
Setting the Shutter Sound (Shutter Sound) (SC-DC173(U)/DC175/DC575only)Ajuste del sonido del obturador (Shutter Sound)
(sólo SC-DC173(U)/DC175/DC575)
La función Shutter Sound sólo está operativa en el M.Cam Mode. página
Shutter Sound
1.Coloque el interruptor [Mode] en [CARD]
<Shutter Sound
 Initial Setting : System Menu Setting
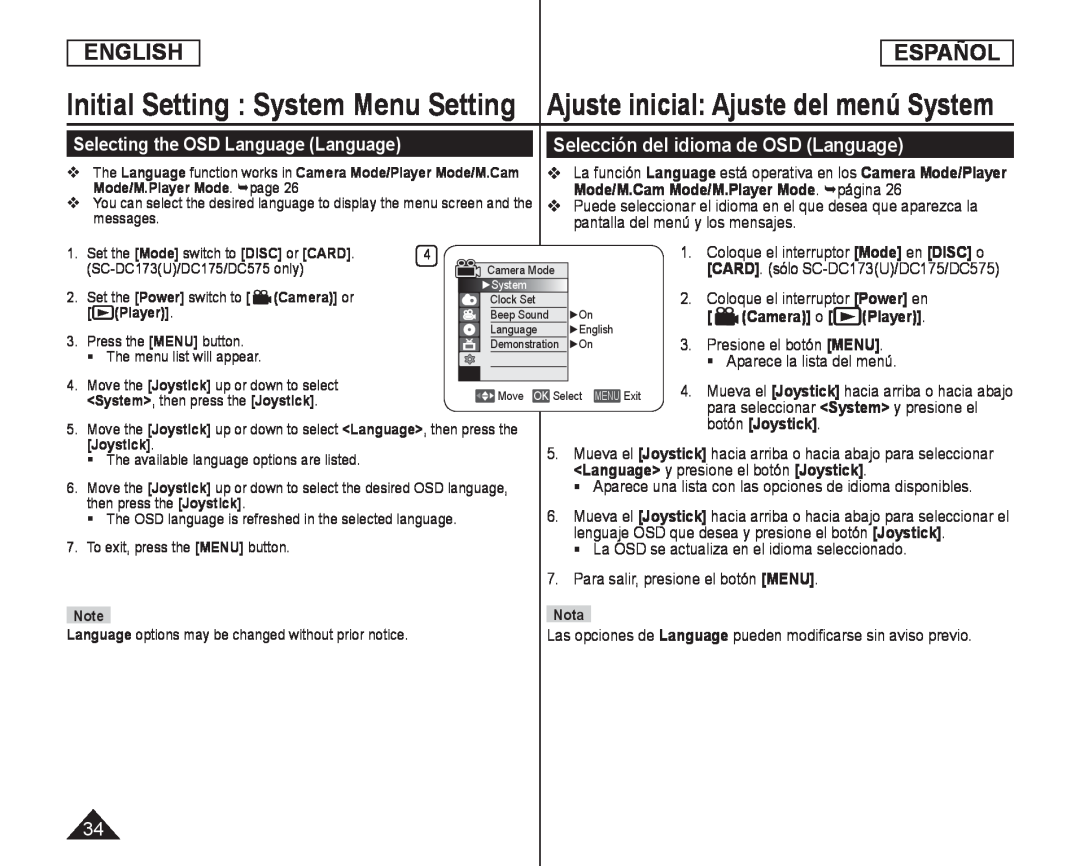
Selecting the OSD Language (Language)
Selección del idioma de OSD (Language)
Mode/M.Cam Mode/M.Player Mode. página
Puede seleccionar el idioma en el que desea que aparezca la
pantalla del menú y los mensajes
1. Coloque el interruptor [Mode] en [DISC] o
2. Coloque el interruptor [Power] en
3. Presione el botón [MENU]
<Language> y presione el botón [Joystick]
Aparece una lista con las opciones de idioma disponibles
lenguaje OSD que desea y presione el botón [Joystick]
La OSD se actualiza en el idioma seleccionado
Las opciones de Language pueden modificarse sin aviso previo
Language
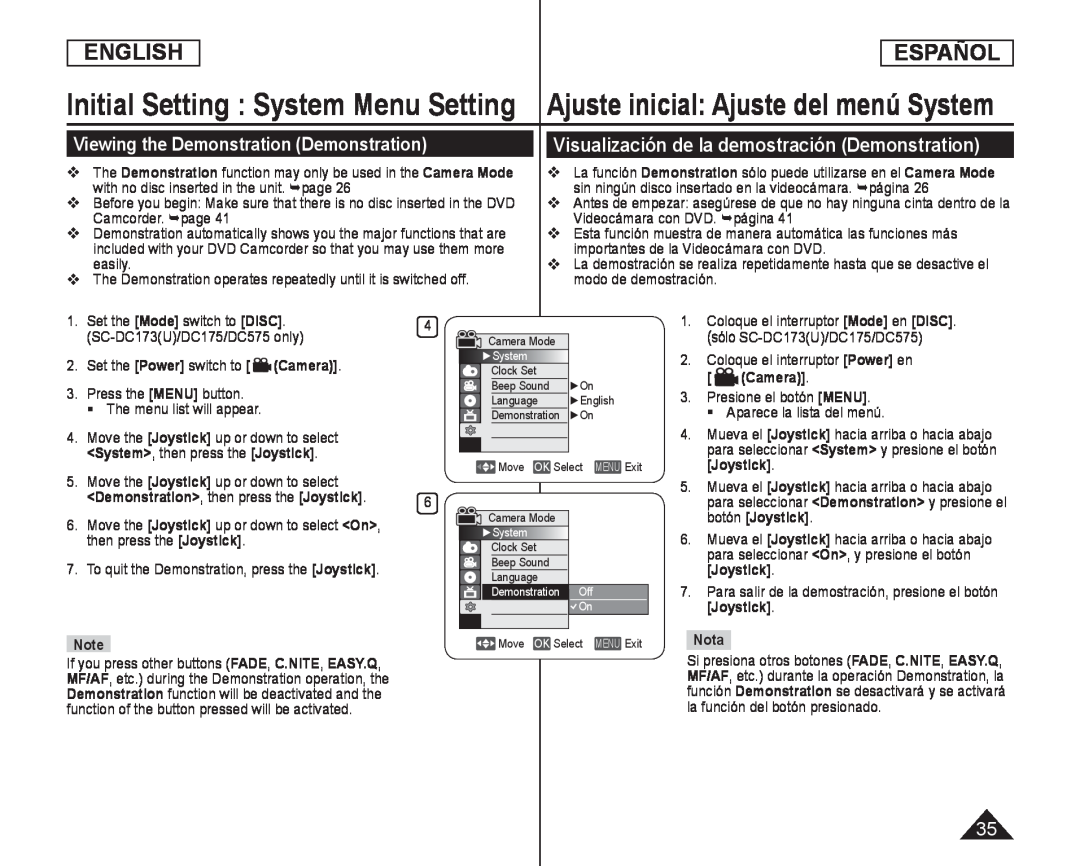 Viewing the Demonstration (Demonstration)
Visualización de la demostración (Demonstration)
![para seleccionar <Display> y presione el Mueva el [Joystick] a la izquierda o la](/images/prints/7795/36.1080.webp) Adjusting the LCD Screen (LCD Bright/LCD Color)
Adjusting the LCD Screen (LCD Bright/LCD Color)Ajuste de la pantalla LCD (LCD Bright/LCD Color)
-LCD Bright
-LCD Color
para seleccionar <Display> y presione el
Mueva el [Joystick] a la izquierda o la
derecha para ajustar el valor de la opción
presione el botón [Joystick]
<LCD Color> entre <00> y <35
7. Para salir, presione el botón [MENU]
imagen que se grabe
![La fecha y la hora se graban automáticamente en una zona fecha/hora y presione el botón [Joystick]](/images/prints/7795/37.1080.webp) Initial Setting : Display Menu Setting
Initial Setting : Display Menu SettingAjuste inicial: Ajuste del menú Display
Displaying the Date/Time (Date/Time)
Visualización de la fecha y hora (Date/Time)
La fecha y la hora se graban automáticamente en una zona
fecha/hora y presione el botón [Joystick]
Aparecerá 12:00 AM JAN.01.2007 en Date/Time en las siguientes condiciones
12:00 AM JAN.01.2007
-Durante la reproducción de una parte del disco que no esté grabada
Si la cinta fue grabada antes de ajustar la función Set
Clock
-Cuando la batería de litio se debilita o se agota
Antes de utilizar la función Date/Time, debe ajustar el reloj. página
Date/Time
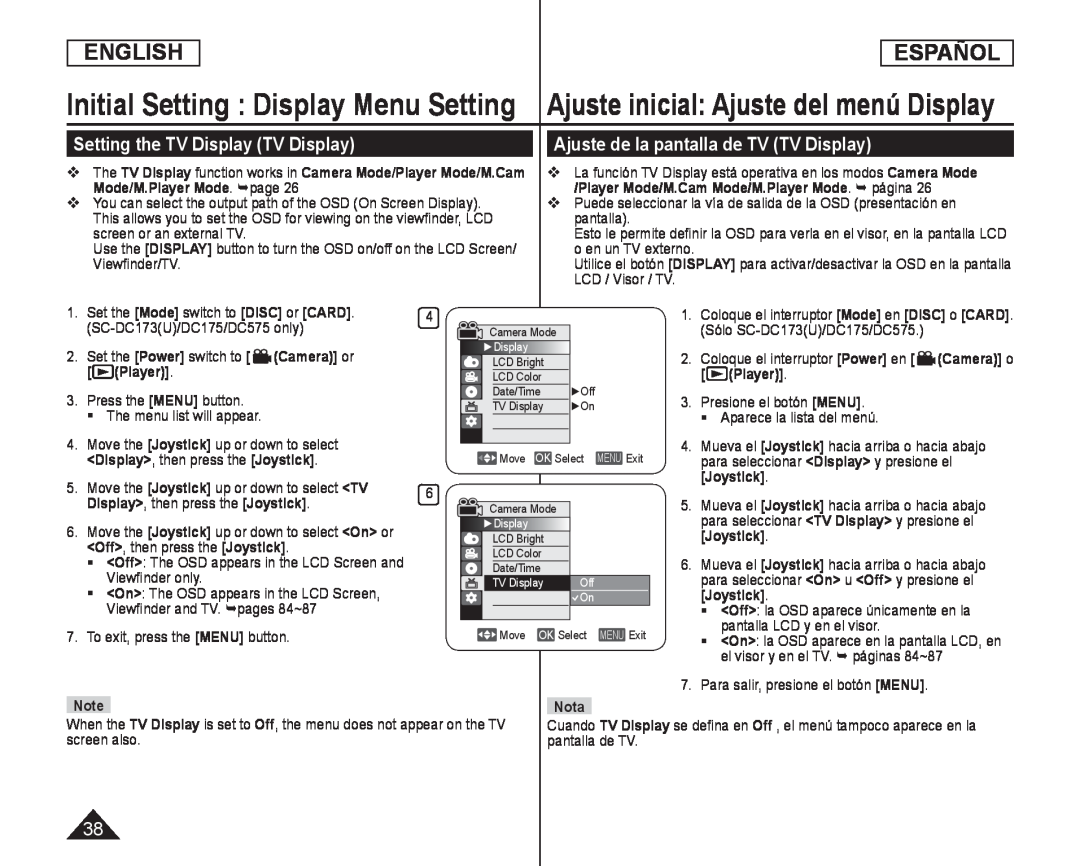 Setting the TV Display (TV Display)
Ajuste de la pantalla de TV (TV Display)
 DVD Camcorder: Before Recording Videocámara con DVD: Antes de grabar
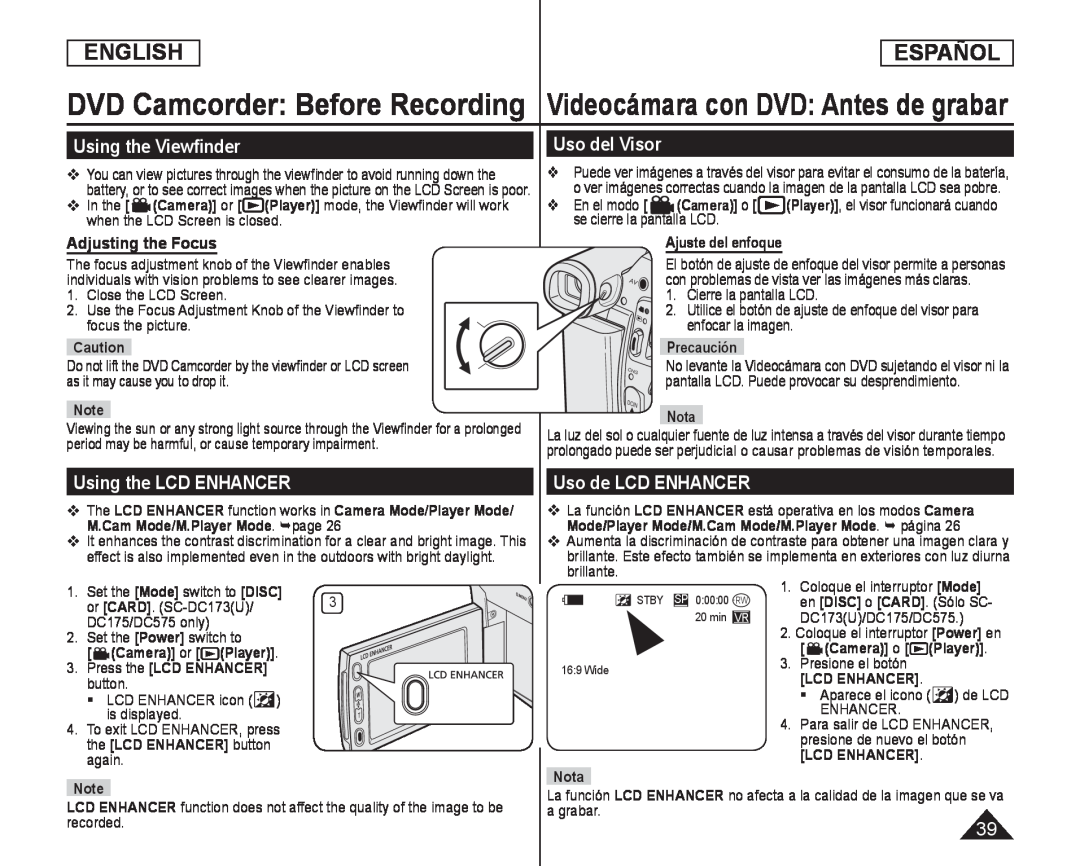
Using the Viewfinder
Adjusting the Focus
Uso del Visor
Using the LCD ENHANCER
Uso de LCD ENHANCER
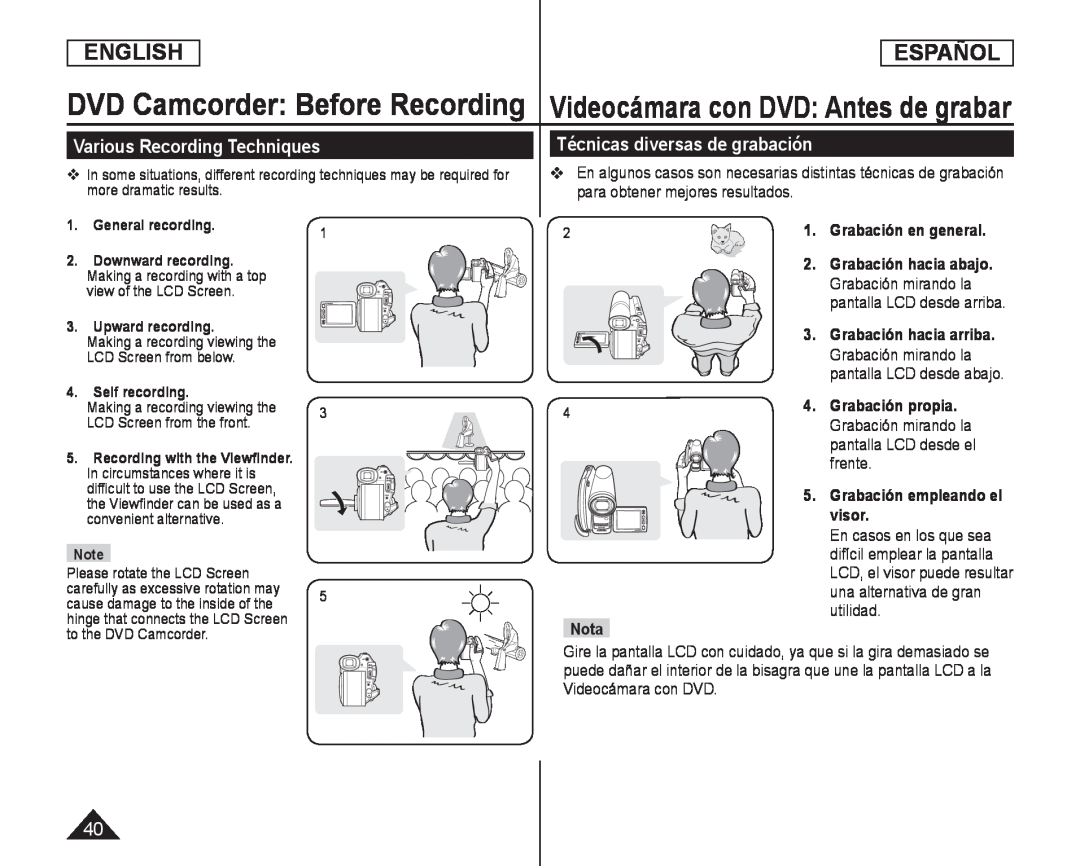 Various Recording Techniques
Técnicas diversas de grabación
Grabación en general
Grabación hacia abajo
Grabación mirando la
Grabación hacia arriba
Grabación propia
pantalla LCD desde el
frente
visor
En casos en los que sea
difícil emplear la pantalla
una alternativa de gran
utilidad
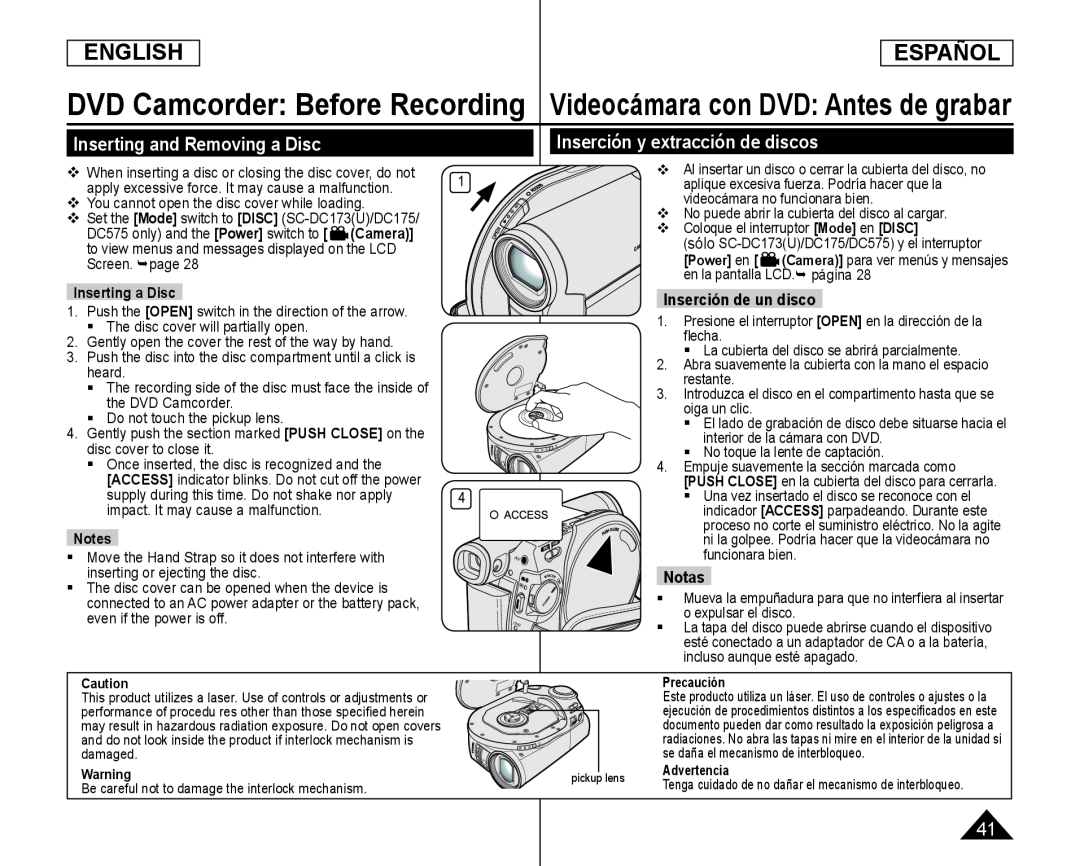 Inserting and Removing a Disc
Inserción y extracción de discos
Inserción de un disco
 ENGLISH
ESPAÑOL
DVD Camcorder: Before Recording Videocámara con DVD: Antes de grabar
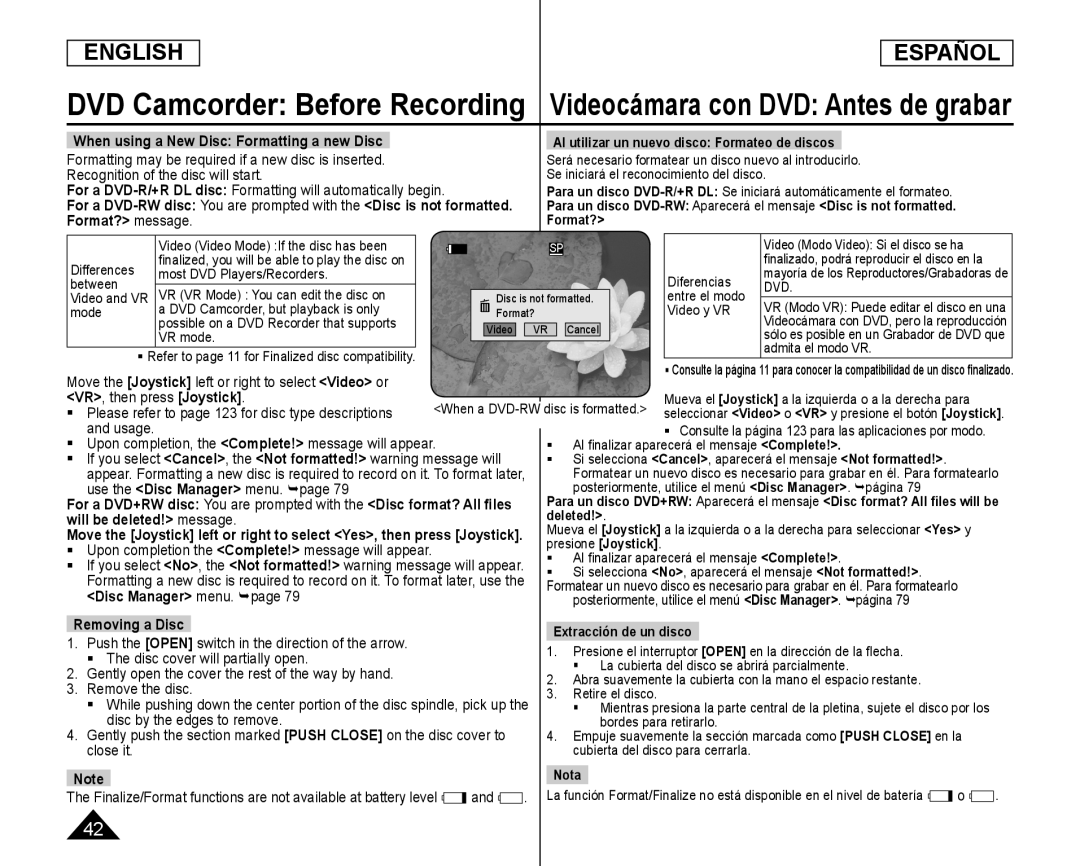
When using a New Disc: Formatting a new Disc
Formatting may be required if a new disc is inserted
Recognition of the disc will start
For a DVD-R/+RDL disc: Formatting will automatically begin
For a
DVD-R/+R
DL disc:
You are prompted with the
message
Al utilizar un nuevo disco: Formateo de discos
Para un disco DVD-R/+RDL: Se iniciará automáticamente el formateo
Para un disco
DVD-R/+R
DL:
Para un disco DVD-RW: Aparecerá el mensaje <Disc is not formatted
Format
Differences
most DVD Players/Recorders
between
DVD
VR mode
Move the [Joystick] left or right to select <Video> or
[Joystick]
<Video
<VR>, then press [Joystick]
Please refer to page 123 for disc type descriptions
<Complete
Al fi nalizar aparecerá el mensaje <Complete
<Complete
<Cancel
<Not formatted
use the <Disc Manager> menu. page
<Disc Manager
<Disc Manager
For a DVD+RW disc: You are prompted with the <Disc format? All files
will be deleted!> message
deleted
<Complete
Al fi nalizar aparecerá el mensaje <Complete
<Complete
<No
<Not formatted
<Disc Manager> menu. page
<Disc Manager
Removing a Disc
[OPEN]
[OPEN]
The disc cover will partially open
La cubierta del disco se abrirá parcialmente
Remove the disc
disc by the edges to remove
[PUSH CLOSE]
[PUSH CLOSE]
close it
Nota
Note
and
 Selecting the Record Mode (Rec Mode)
Selección del modo de grabación (Rec Mode)
DVD-RW/+RW/-R
DVD+R DL
*SP
*LP
 Videocámara con DVD: Grabación básica
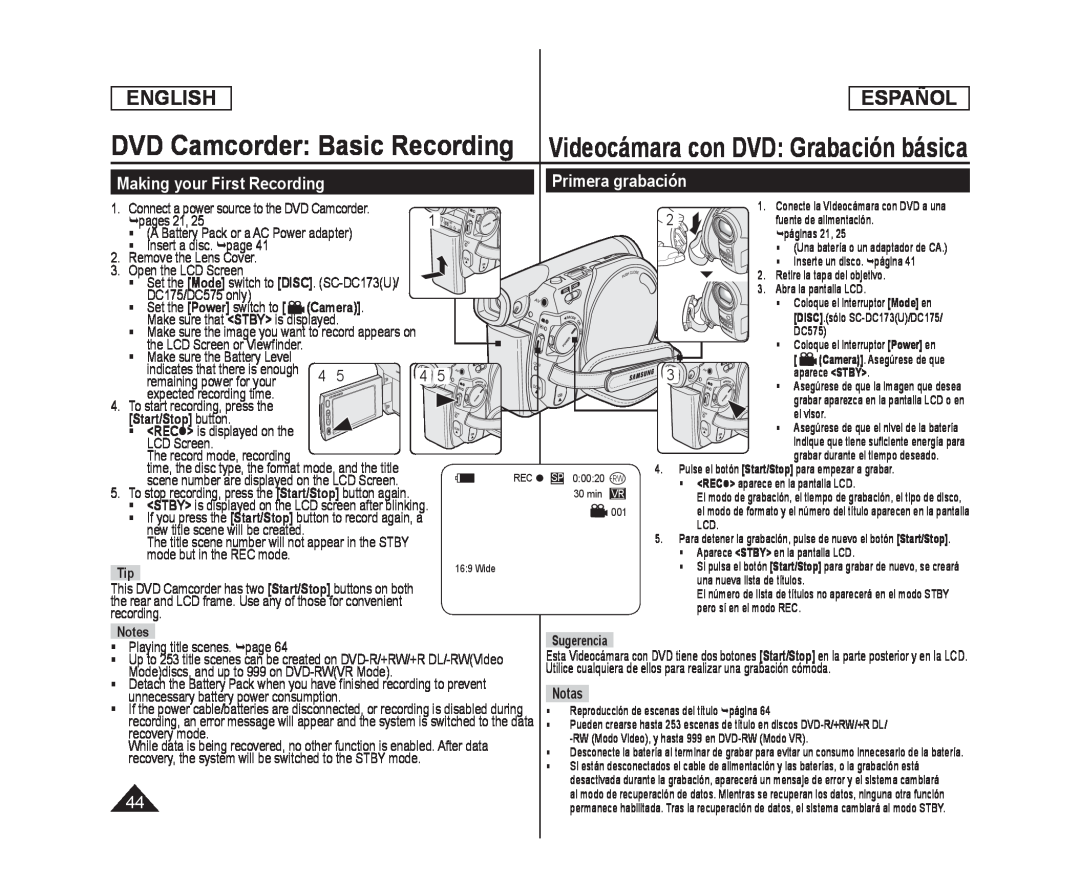
Making your First Recording
Primera grabación
 DVD Camcorder: Basic Recording Videocámara con DVD: Grabación básica
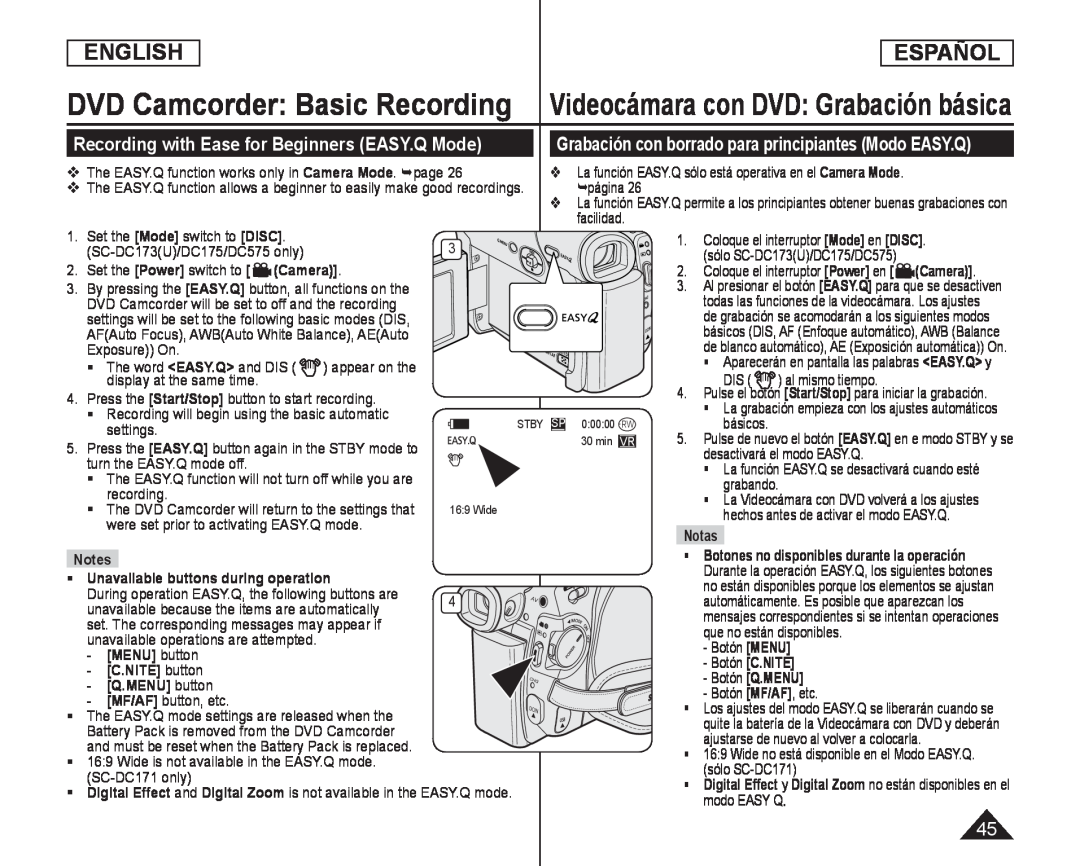
Recording with Ease for Beginners (EASY.Q Mode)
Grabación con borrado para principiantes (Modo EASY.Q)
 DVD Camcorder: Basic Recording
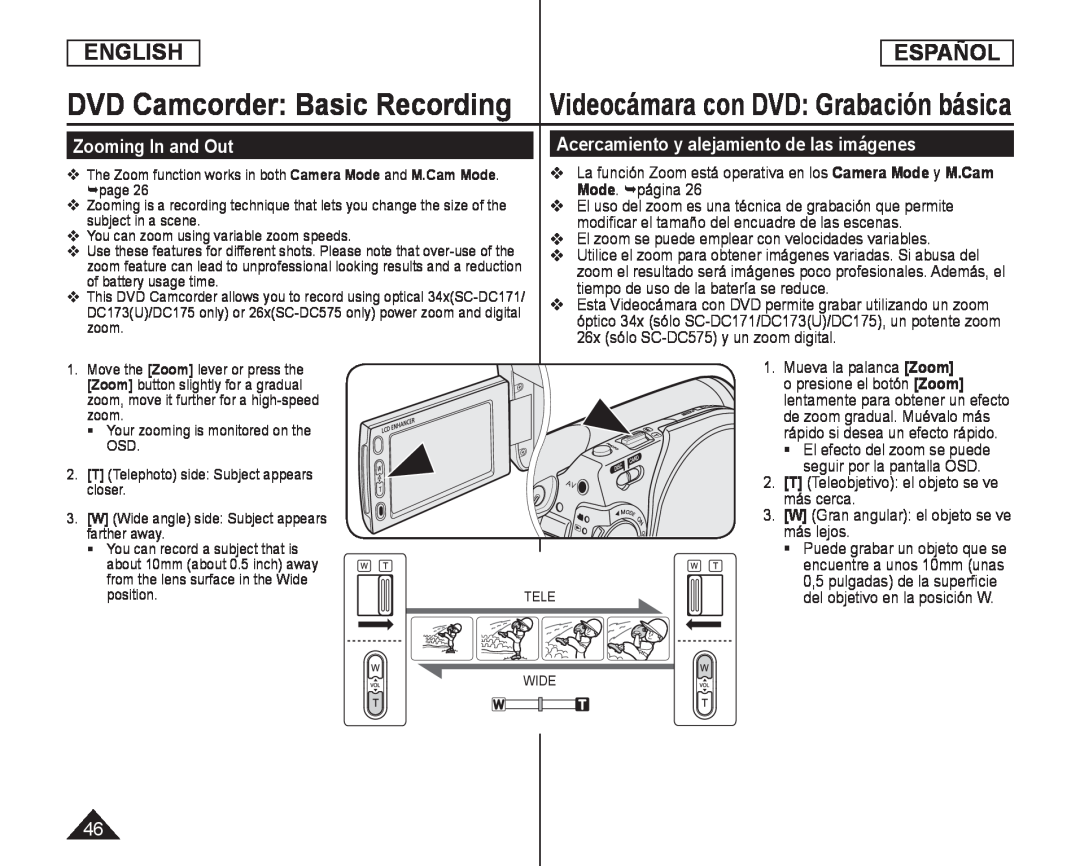
Zooming In and Out
Acercamiento y alejamiento de las imágenes
Mode. página
El uso del zoom es una técnica de grabación que permite
modificar el tamaño del encuadre de las escenas
El zoom se puede emplear con velocidades variables
Utilice el zoom para obtener imágenes variadas. Si abusa del
tiempo de uso de la batería se reduce
26x (sólo SC-DC575)y un zoom digital
1. Mueva la palanca [Zoom]
o presione el botón [Zoom]
de zoom gradual. Muévalo más
El efecto del zoom se puede
seguir por la pantalla OSD
más cerca
más lejos
del objetivo en la posición W
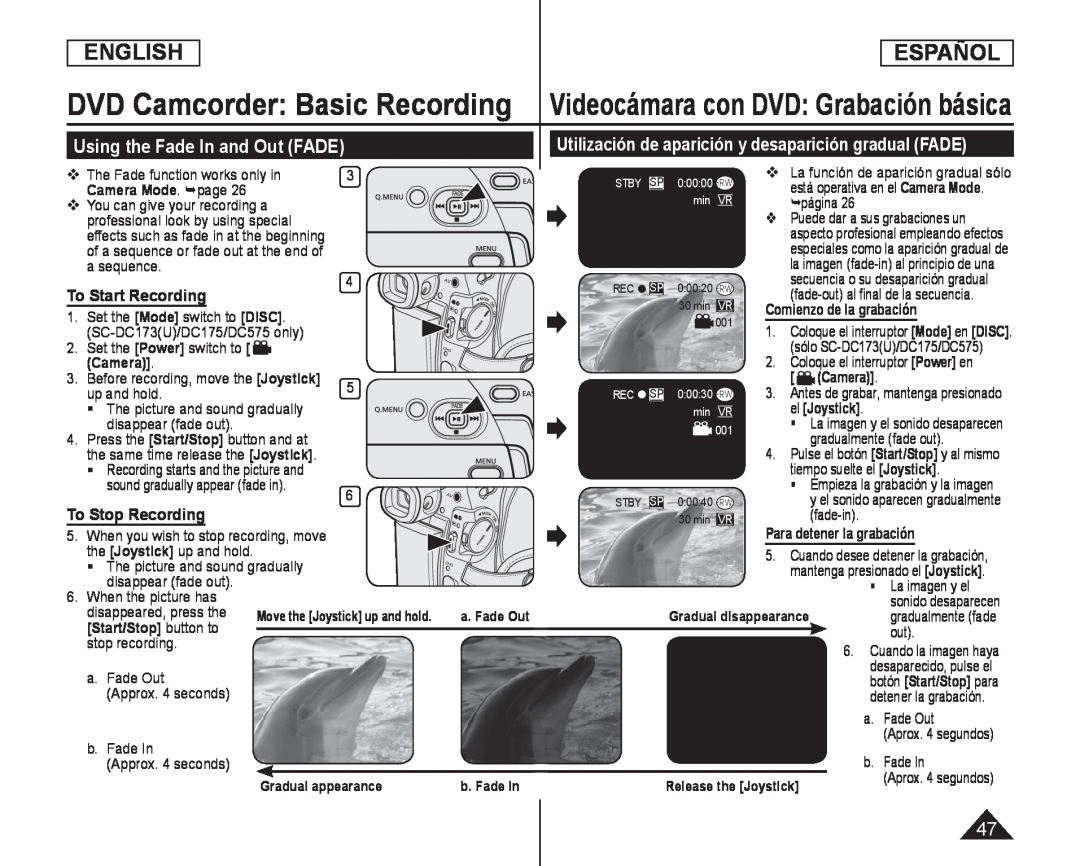 Using the Fade In and Out (FADE)
Utilización de aparición y desaparición gradual (FADE)
To Start Recording
To Stop Recording
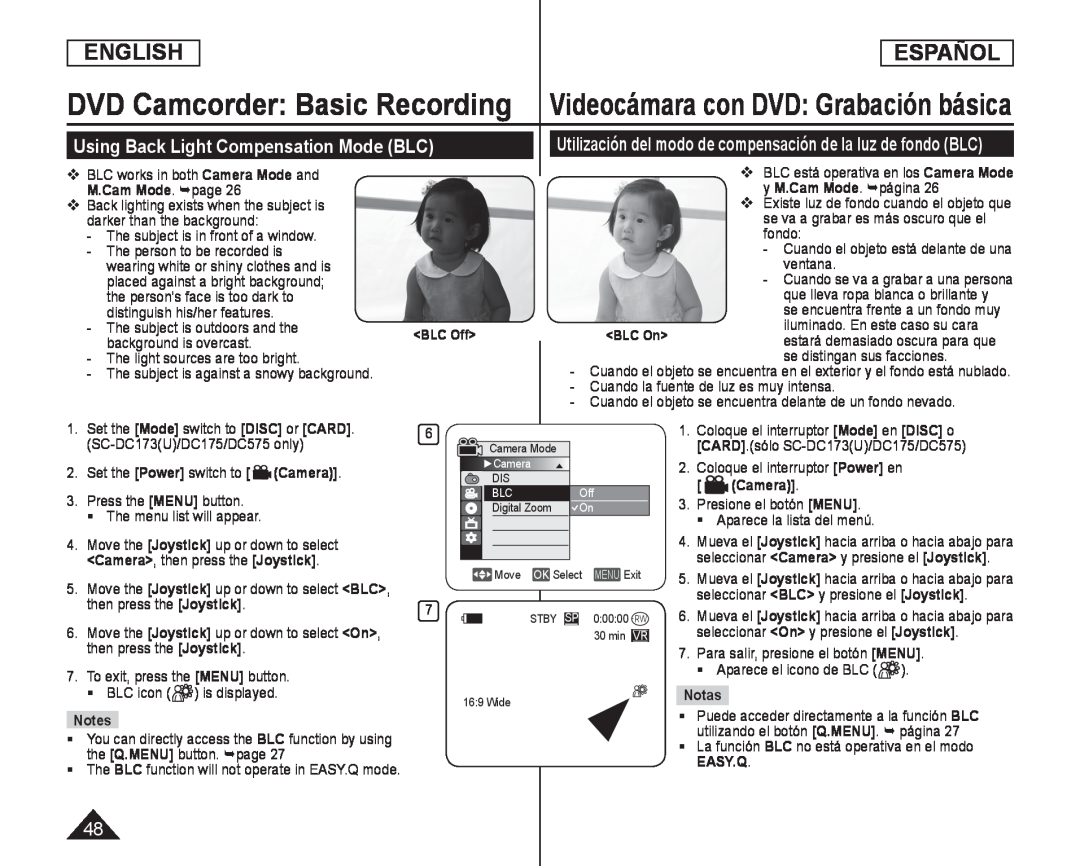 Using Back Light Compensation Mode (BLC)
Utilización del modo de compensación de la luz de fondo (BLC)
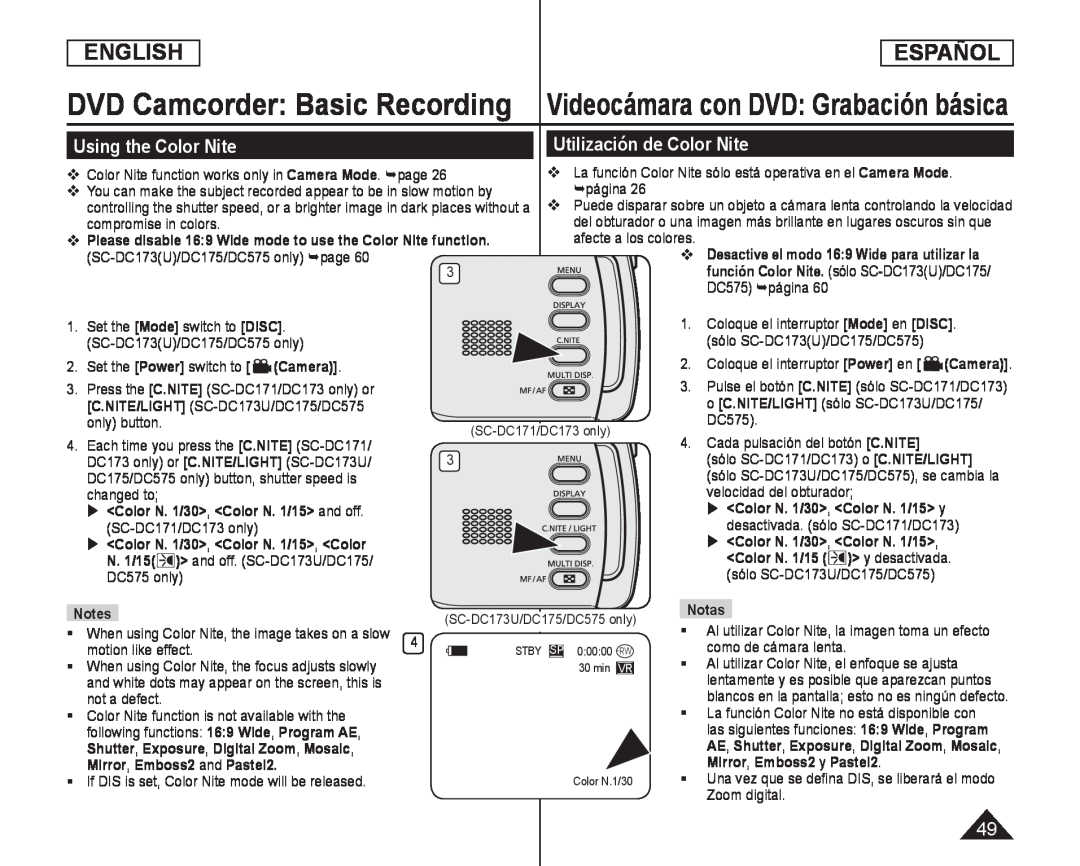 Using the Color Nite
Utilización de Color Nite
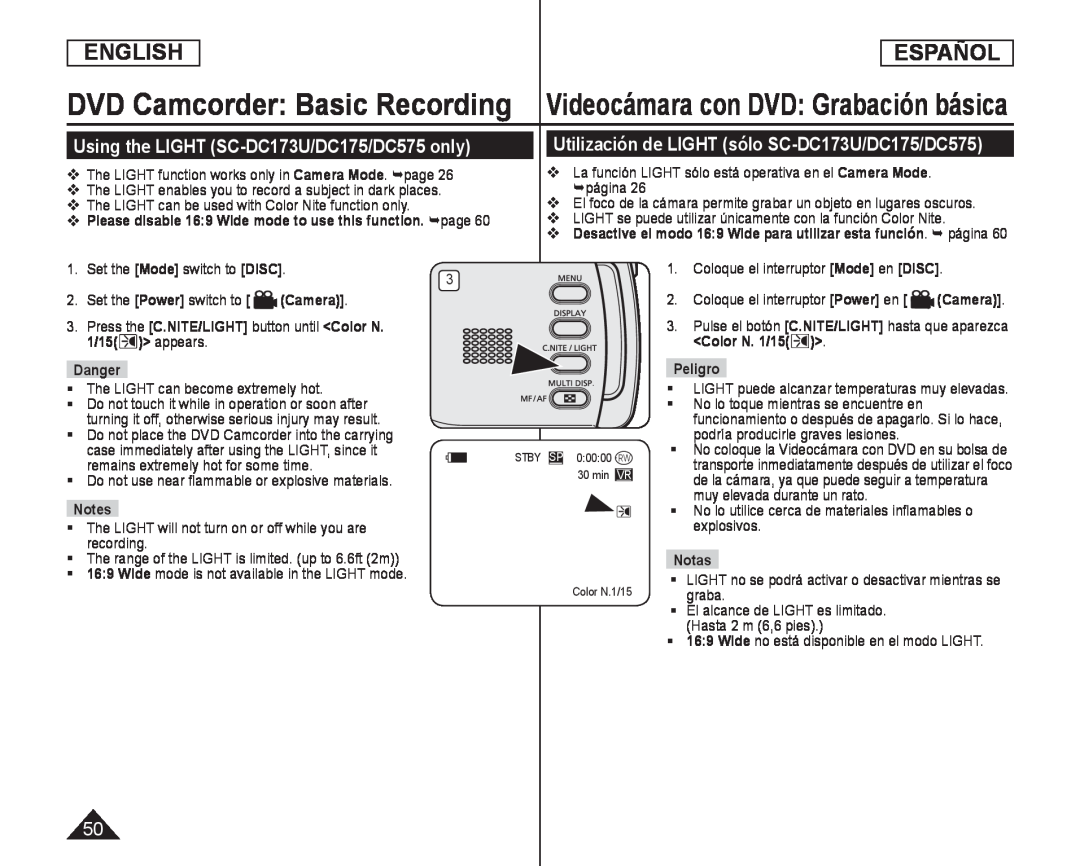 Using the LIGHT (SC-DC173U/DC175/DC575only)
Utilización de LIGHT (sólo SC-DC173U/DC175/DC575)
 DVD Camcorder: Advanced Recording
Videocámara con DVD: Grabación avanzada
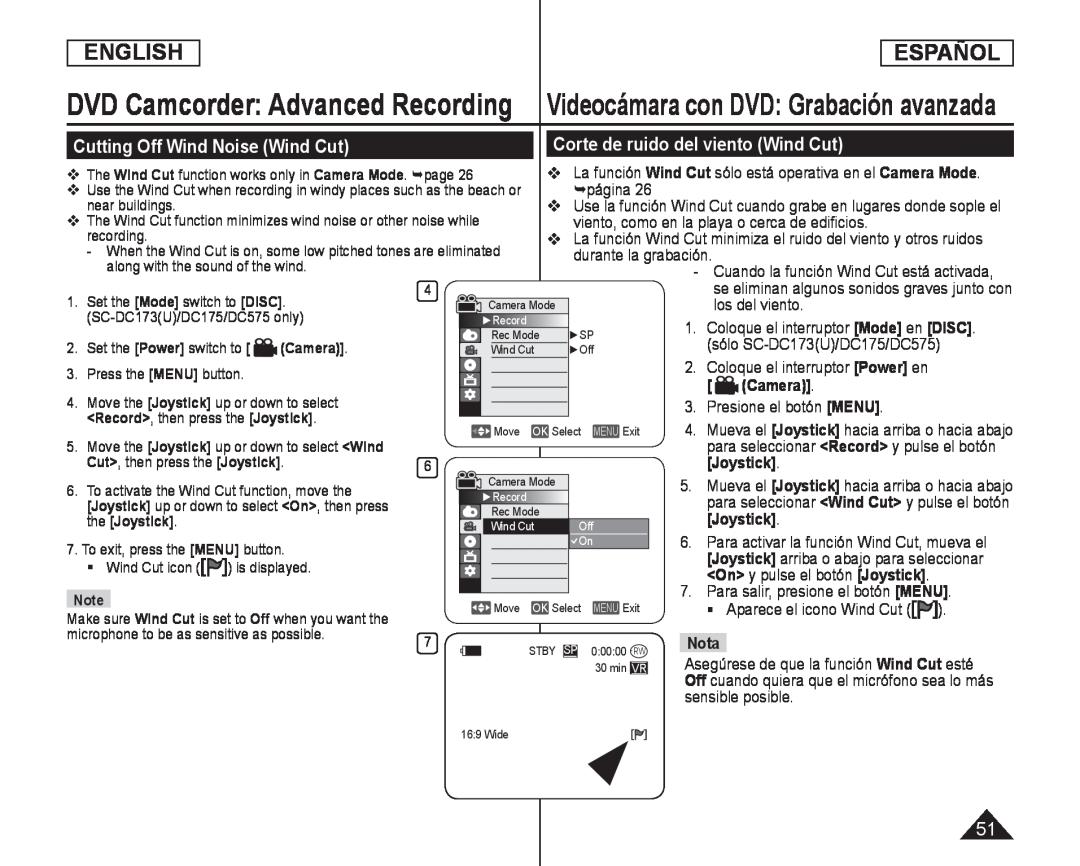
Cutting Off Wind Noise (Wind Cut)
Corte de ruido del viento (Wind Cut)
viento, como en la playa o cerca de edificios
La función Wind Cut minimiza el ruido del viento y otros ruidos
durante la grabación
- Cuando la función Wind Cut está activada
los del viento
Para activar la función Wind Cut, mueva el
[Joystick] arriba o abajo para seleccionar
Aparece el icono Wind Cut
Asegúrese de que la función Wind Cut esté
Wind Cut
sensible posible
![close. The faster the speed is set, the less light enters the lens Set the [Mode] switch to [DISC] or [CARD]](/images/prints/7795/52.1080.webp) ENGLISH
ENGLISHESPAÑOL
DVD Camcorder: Advanced Recording
Videocámara con DVD: Grabación avanzada
Setting the Shutter Speed & Exposure (Shutter/Exposure)
Camera Mode. page
close. The faster the speed is set, the less light enters the lens
Set the [Mode] switch to [DISC] or [CARD]
[Mode]
[DISC]
[CARD]
(SC-DC173(U)/DC175/DC575only)
Set the [Power] switch to
[Power]
(Camera)]
Press the [MENU] button
[MENU]
<Camera>, then
press the [Joystick]
[Joystick]
<Shutter> or
<Manual>, then
press the [Joystick]
[Joystick]
of a second
To exit, press the [MENU] button
[MENU]
Selected settings are displayed
Recommended Shutter Speeds When Recording
Notes
If you manually change the Shutter Speed and the
manual changes are applied first
Speed is set
shining into the lens
La función Shutter Speed sólo está operativa en el Camera Mode. página
Camera Mode
2. Coloque el interruptor [Power] en [ (Camera)]
[Power]
[ (Camera)]
3. Presione el botón [MENU]
[MENU]
Aparece la lista del menú
8. Para salir, pulse el botón [MENU]
[MENU]
Aparecen los ajustes seleccionados
Velocidades del obturador recomendadas al grabar
Deportes al aire libre como golf o tenis: 1/2000 o 1/4000
Deportes en pista cubierta como baloncesto: 1/100
Ajuste de la exposición al grabar
Notas
 DVD Camcorder: Advanced Recording Videocámara con DVD: Grabación avanzada
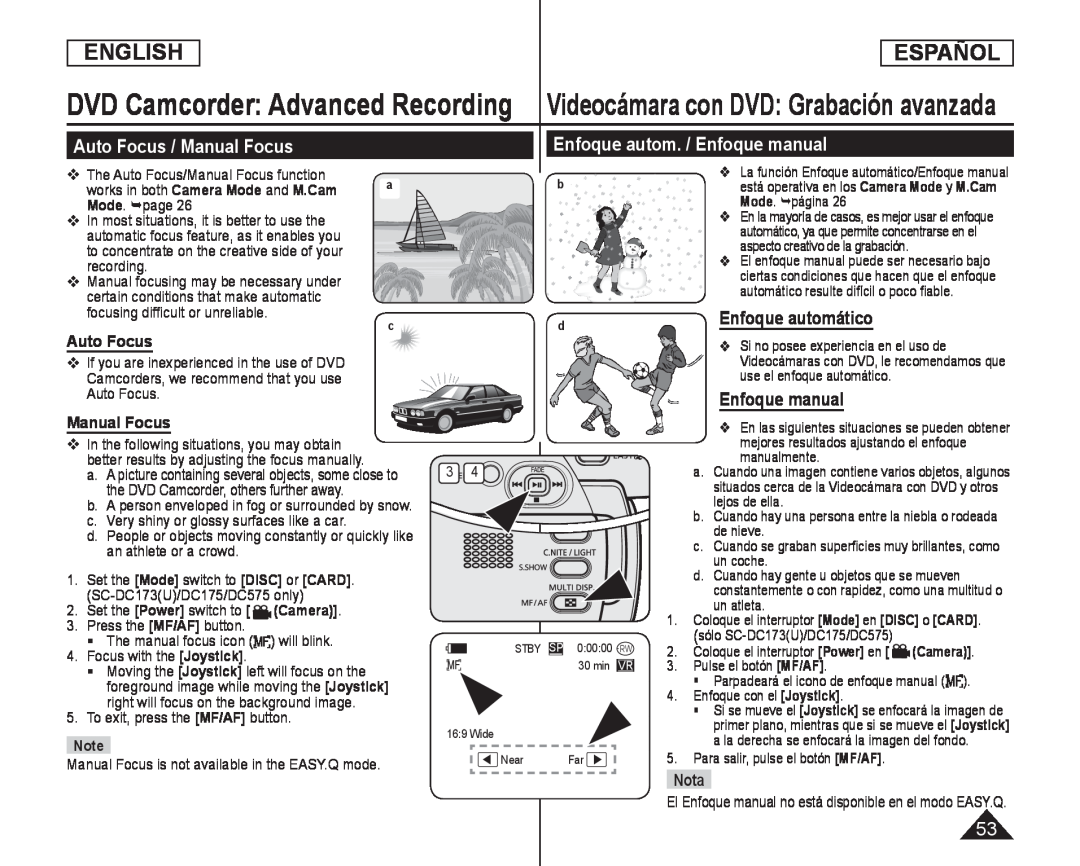
Auto Focus / Manual Focus
Enfoque autom. / Enfoque manual
Auto Focus
Manual Focus
Enfoque automático
Enfoque manual
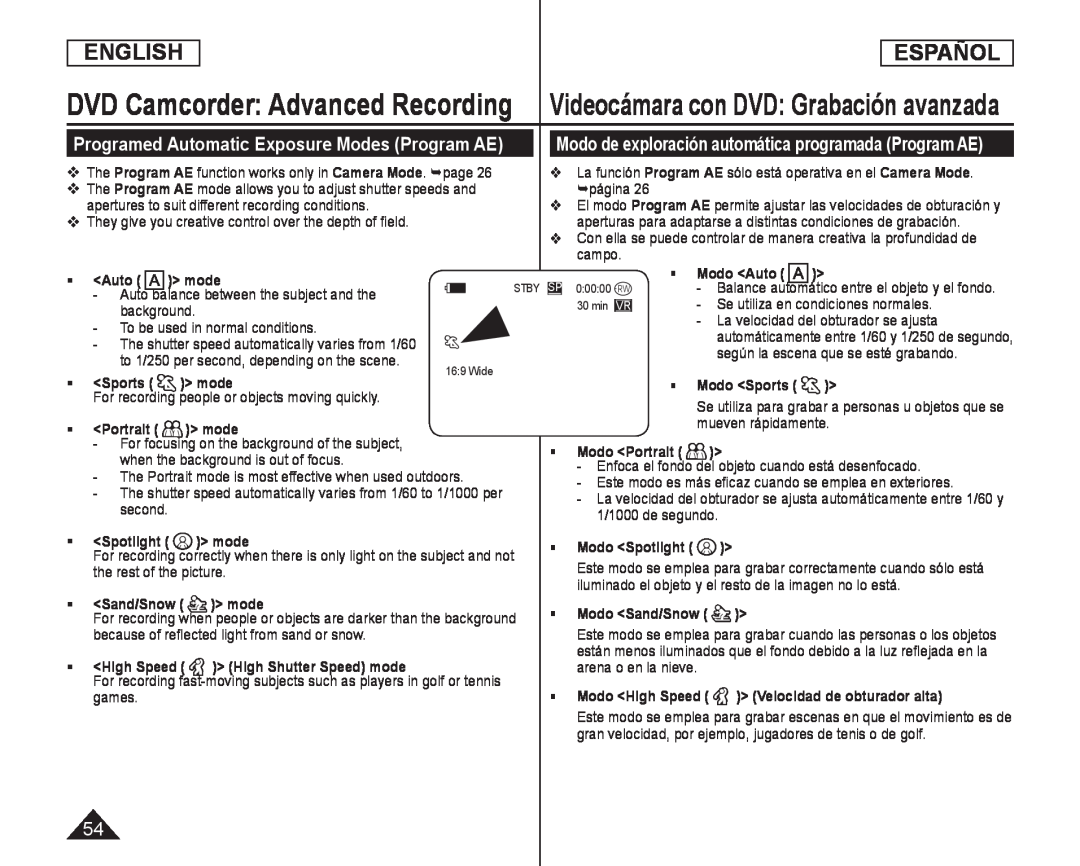 Programed Automatic Exposure Modes (Program AE)
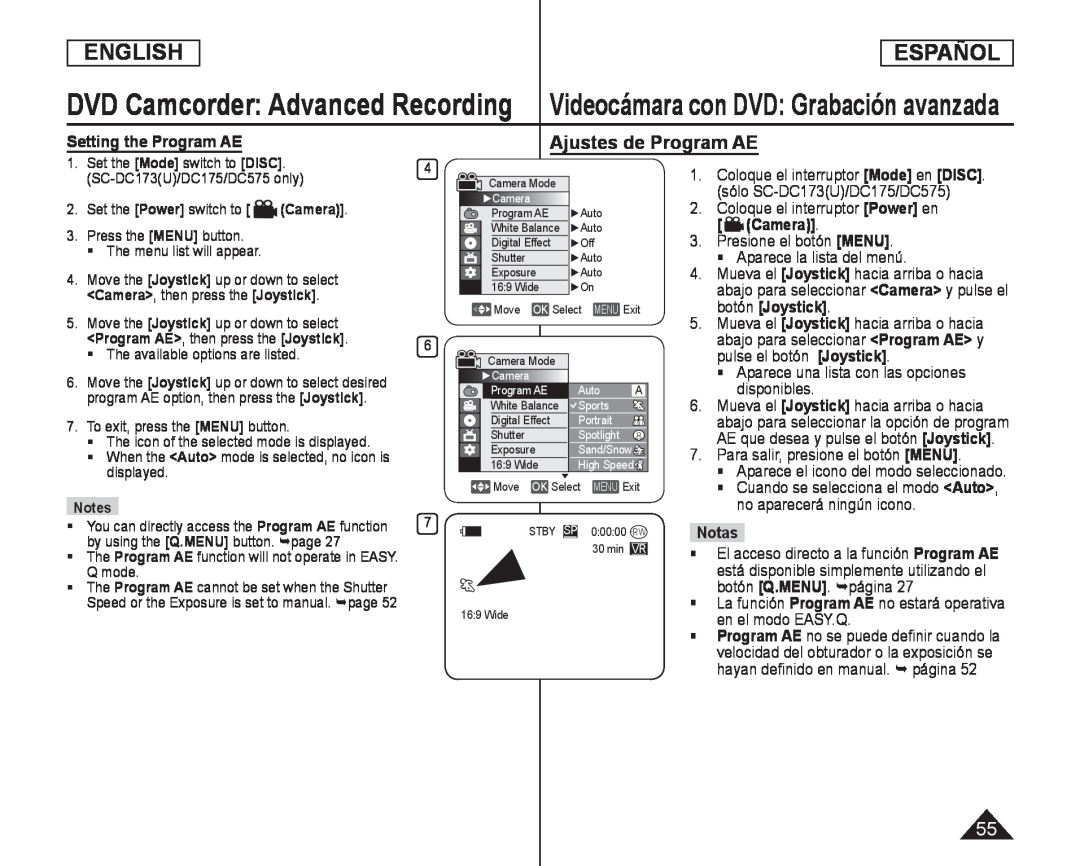 Setting the Program AE
Ajustes de Program AE
<Camera
Aparece una lista con las opciones disponibles
Aparece el icono del modo seleccionado
Cuando se selecciona el modo <Auto>, no aparecerá ningún icono
<Auto
La función Program AE no estará operativa en el modo EASY.Q
Program AE
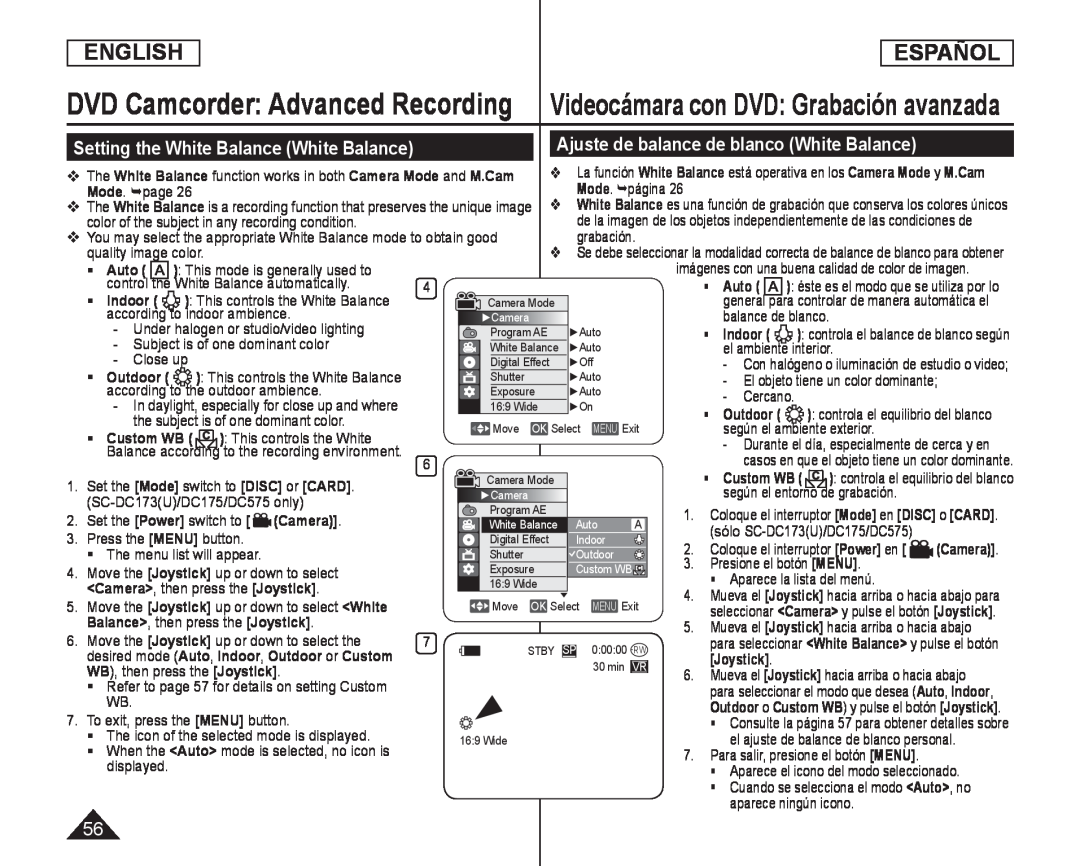 Setting the White Balance (White Balance)
Videocámara con DVD: Grabación avanzada
Ajuste de balance de blanco (White Balance)
grabación
Auto
balance de blanco
Indoor
el ambiente interior
- El objeto tiene un color dominante;
según el ambiente exterior
según el entorno de grabación
aparece ningún icono
![Coloque el objeto blanco bajo una luz apropiada y presione el botón [Joystick]](/images/prints/7795/57.1080.webp) Setting the Custom White Balance
Setting the Custom White BalanceAjuste del balance de blanco personal
Coloque el objeto blanco bajo una luz
apropiada y presione el botón [Joystick]
<Set White Balance> desaparecerá y
Para salir, pulse el botón [MENU]
Aparece el icono de Custom WB
en el modo EASY.Q
preciso
Reinicie el balance de blanco si las
condiciones de iluminación cambian
 Applying Digital Effects (Digital Effect)
Aplicación de efectos digitales (Digital Effect)
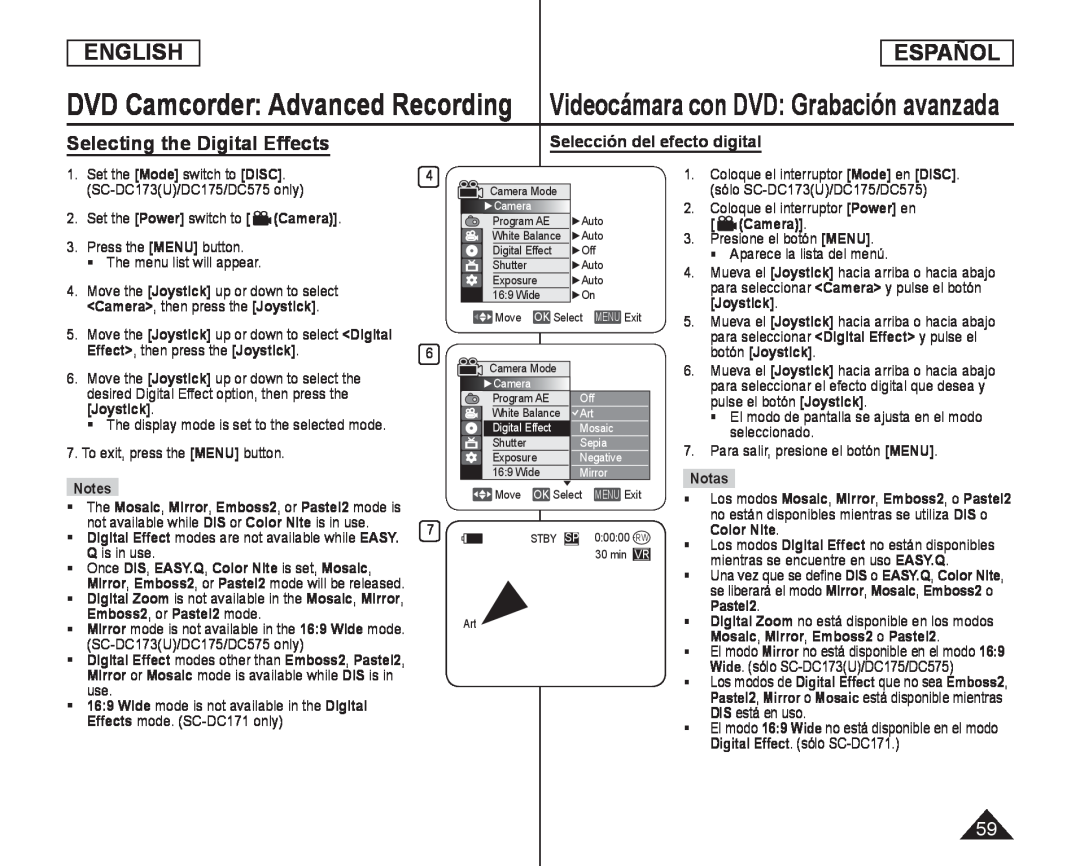 Selecting the Digital Effects
Selección del efecto digital
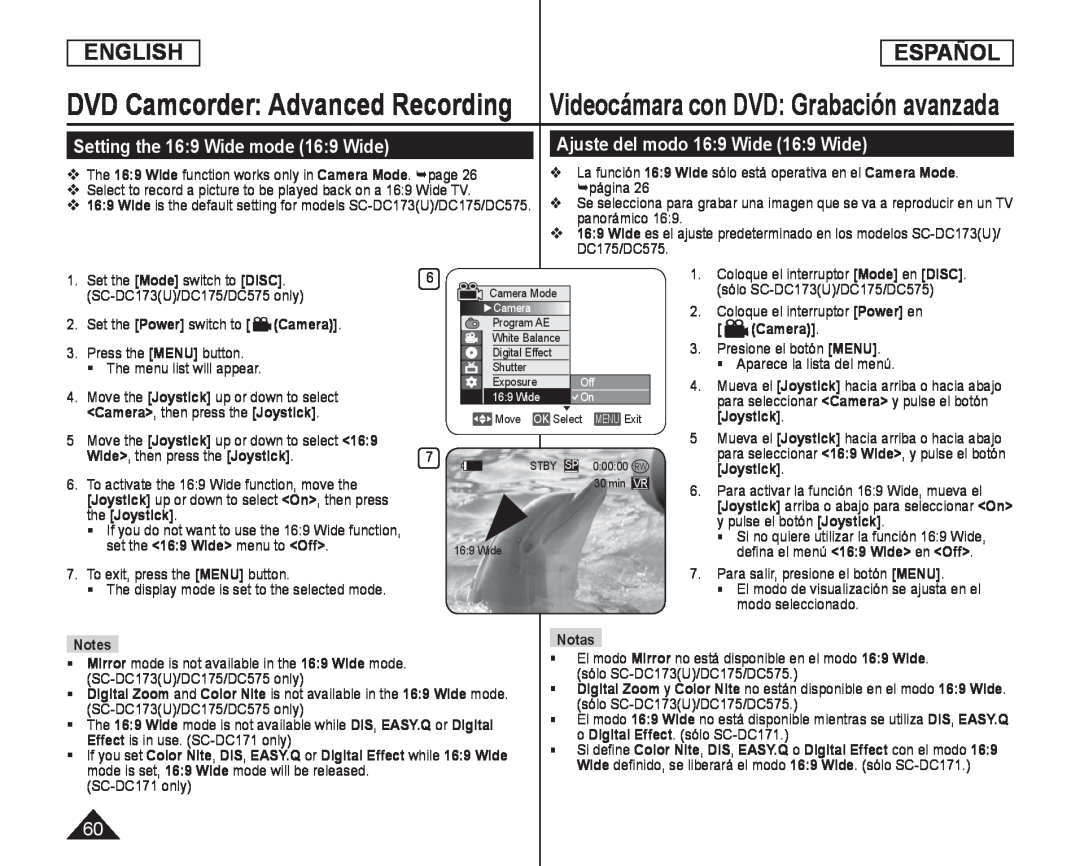 Setting the 16:9 Wide mode (16:9 Wide)
Ajuste del modo 16:9 Wide (16:9 Wide)
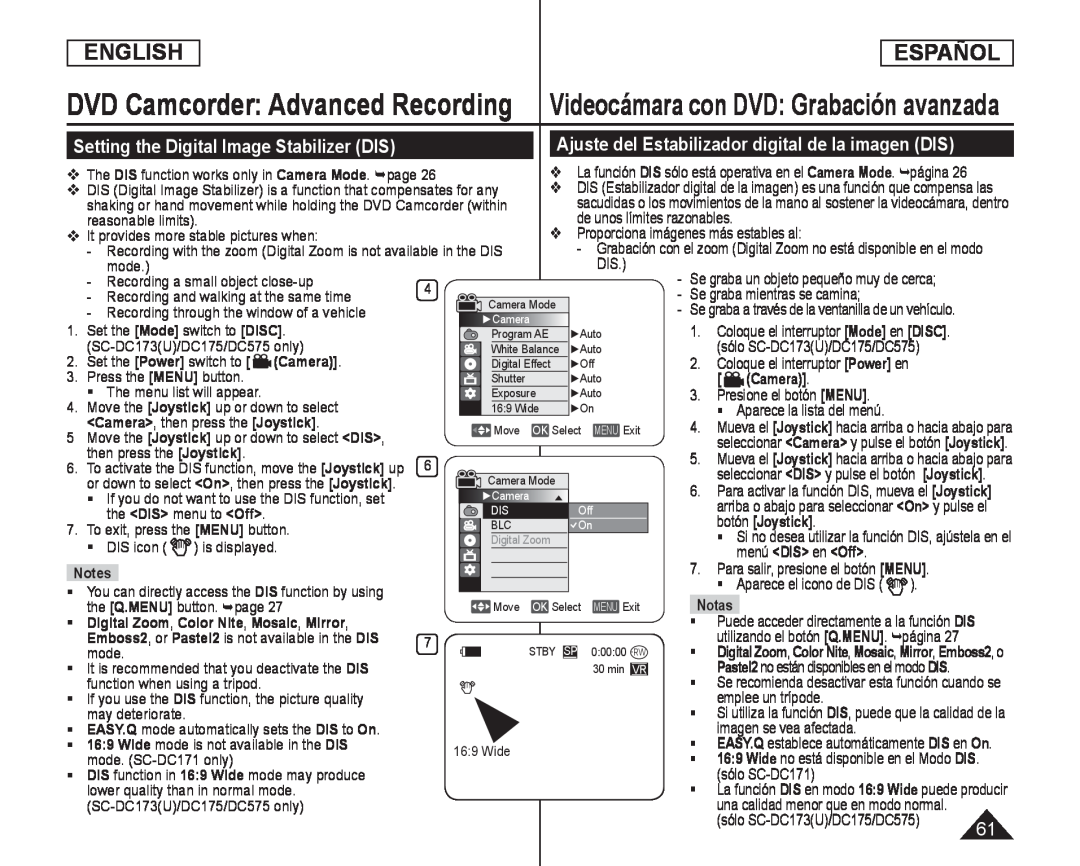 Setting the Digital Image Stabilizer (DIS)
Ajuste del Estabilizador digital de la imagen (DIS)
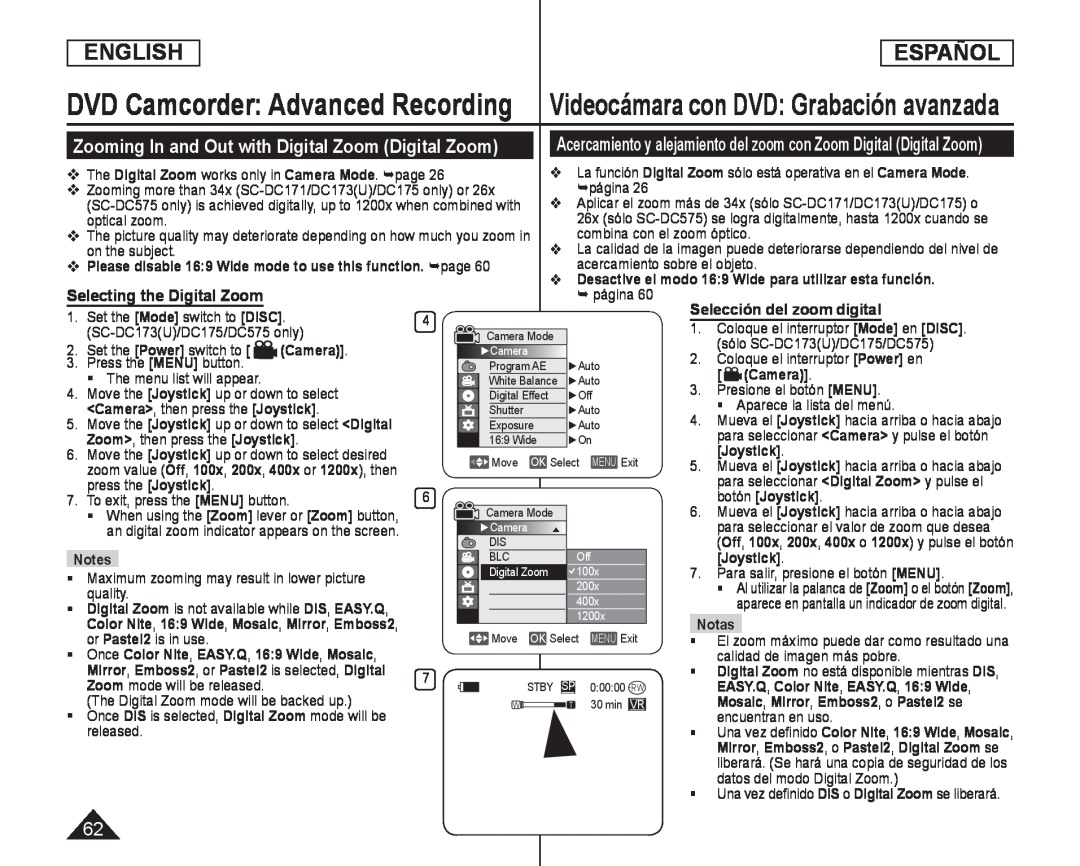 Zooming In and Out with Digital Zoom (Digital Zoom)
 What is the Thumbnail Index
¿Qué es el índice de miniaturas
What’s a Playlist? DVD-RW(VRmode)
Descripción de lista de reproducción DVD-RW(modo VR)
 Videocámara con DVD
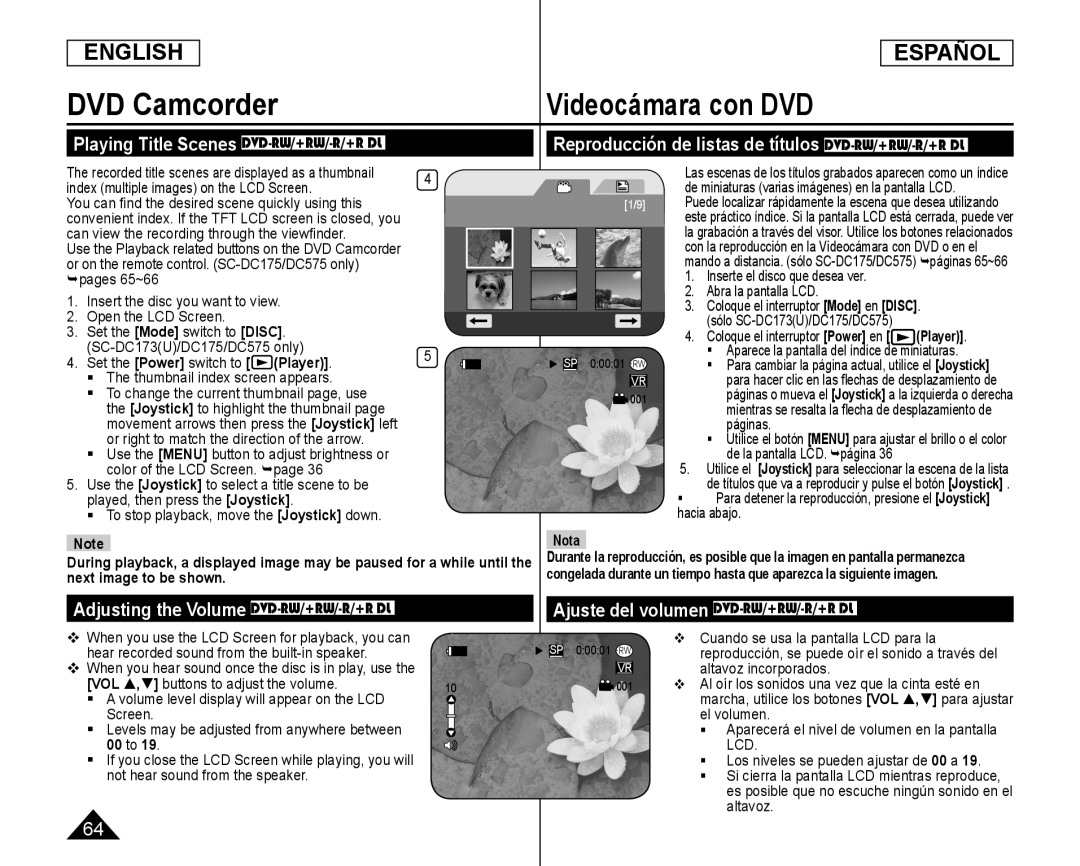
Playing Title Scenes DVD-RW/+RW/-R/+RDL
Reproducción de listas de títulos DVD-RW/+RW/-R/+RDL
Adjusting the Volume DVD-RW/+RW/-R/+RDL
Ajuste del volumen DVD-RW/+RW/-R/+RDL
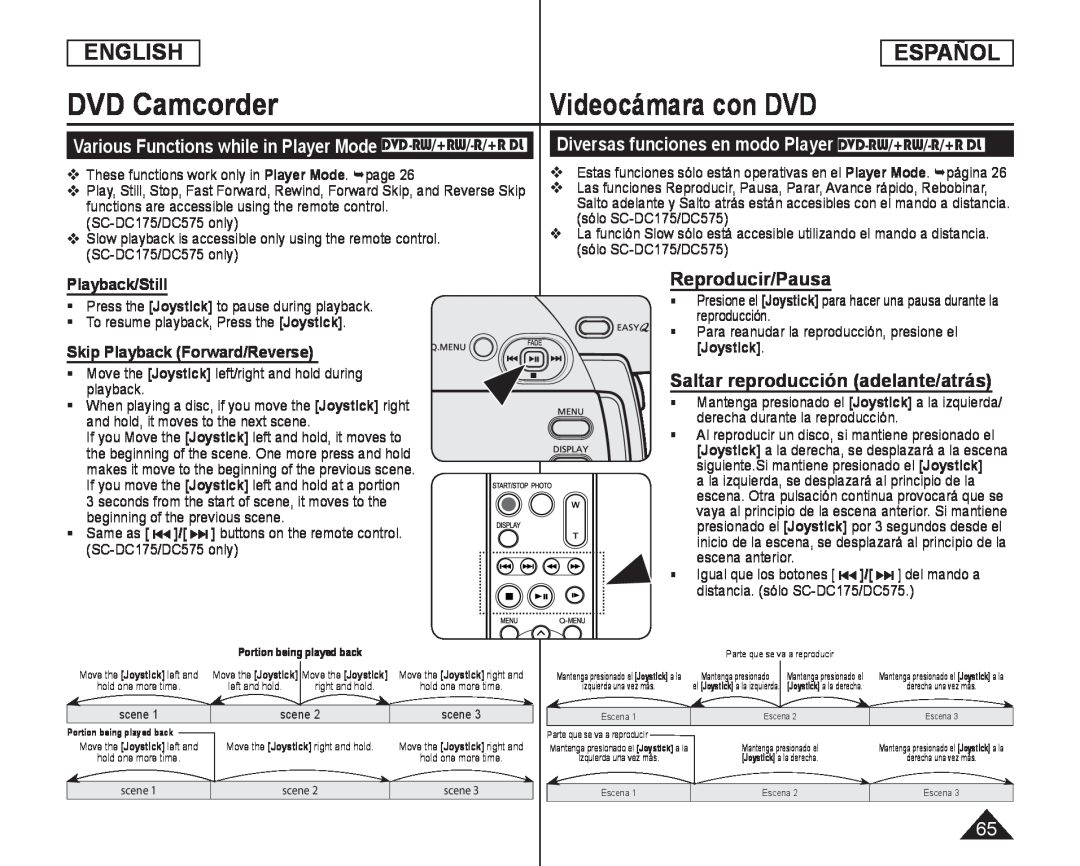 Various Functions while in Player Mode DVD-RW/+RW/-R/+RDL
Diversas funciones en modo Player DVD-RW/+RW/-R/+RDL
Playback/Still
Skip Playback (Forward/Reverse)
Reproducir/Pausa
Saltar reproducción (adelante/atrás)
![Pulse el botón [|] del mando a distancia durante la reproducción -Para reanudar la reproducción normal, pulse el botón []](/images/prints/7795/66.1080.webp) Videocámara con DVD
Videocámara con DVDPicture Search (Forward/Reverse)
Búsqueda de imágenes (Adelante/Atrás)
Reproducción lenta (Adelante/Atrás) (sólo SC-DC175/DC575)
Reproducción en cámara lenta hacia delante
Pulse el botón [|] del mando a distancia durante la reproducción
-Para reanudar la reproducción normal, pulse el botón []
 Videocámara con DVD: Lista de títulos
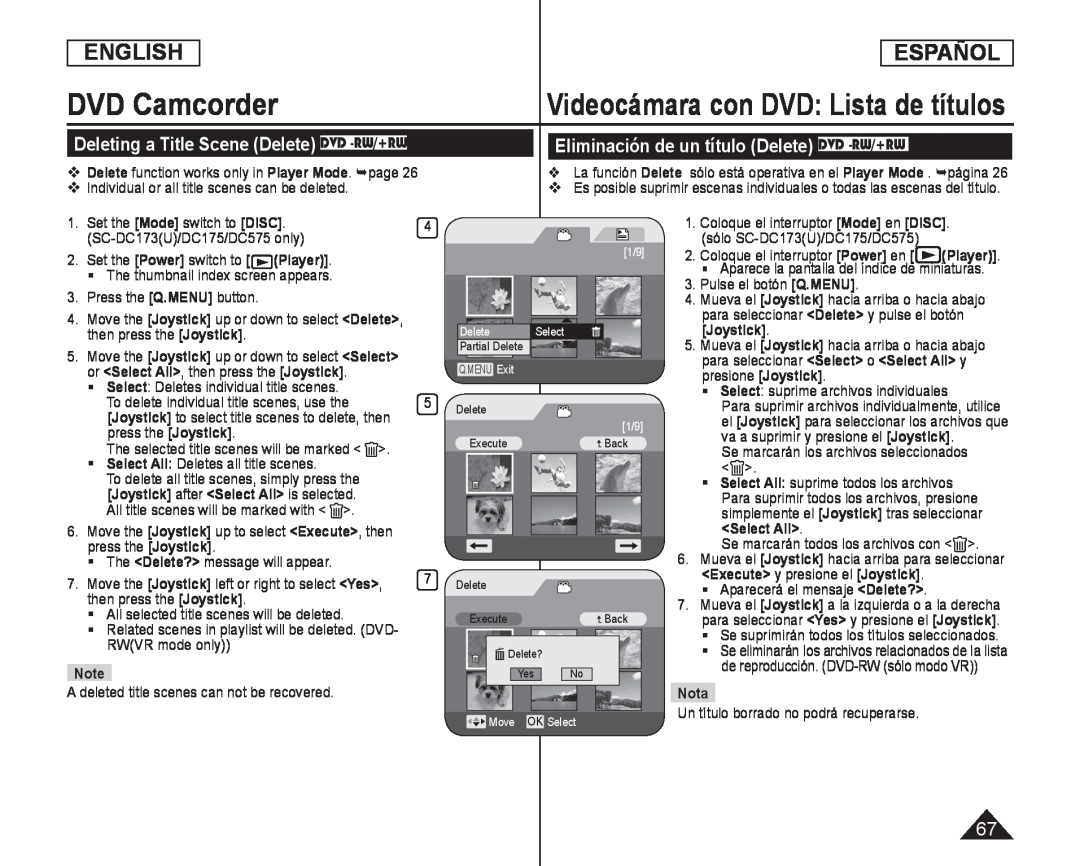
Deleting a Title Scene (Delete) DVD -RW/+RW
Eliminación de un título (Delete) DVD -RW/+RW
 ENGLISH
ESPAÑOL
DVD Camcorder
Videocámara con DVD
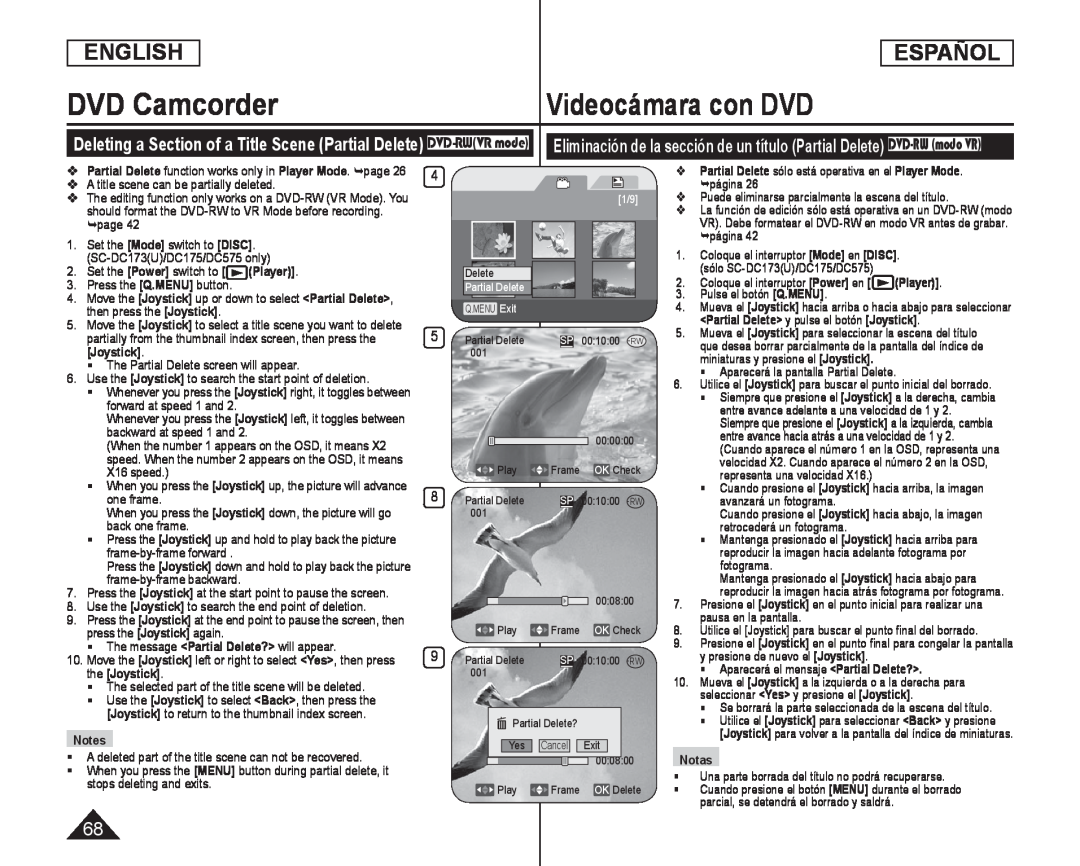
Deleting a Section of a Title Scene (Partial Delete) DVD-RW(VRmode)
Eliminación de la sección de un título (Partial Delete) DVD-RW(modo VR)
A title scene can be partially deleted
página
Puede eliminarse parcialmente la escena del título
page
Set the [Mode] switch to [DISC]
[Mode]
[DISC]
página
Coloque el interruptor [Mode] en [DISC]
[Mode]
[DISC]
(SC-DC173(U)/DC175/DC575only)
(Player)]
(Player)]
Pulse el botón [Q.MENU]
[Q.MENU]
then press the [Joystick]
[Joystick]
<Partial Delete> y pulse el botón [Joystick]
[Joystick]
The Partial Delete screen will appear
Aparecerá la pantalla Partial Delete
X16 speed.)
one frame
avanzará un fotograma
back one frame
retrocederá un fotograma
fotograma
pausa en la pantalla
The message <Partial Delete?> will appear
<Partial Delete
the [Joystick]
Aparecerá el mensaje <Partial Delete
<Partial Delete
The selected part of the title scene will be deleted
seleccionar <Yes> y presione el [Joystick]
<Yes
[Joystick]
[Joystick] to return to the thumbnail index screen
[Joystick]
Notes
A deleted part of the title scene can not be recovered
Notas
Una parte borrada del título no podrá recuperarse
stops deleting and exits
![Esta función sólo está operativa en el Player Mode. página 2.Coloque el interruptor [Power] en](/images/prints/7795/69.1080.webp) Creating a New Playlist (New Playlist) DVD-RW(VRmode)
Creating a New Playlist (New Playlist) DVD-RW(VRmode)Esta función sólo está operativa en el Player Mode. página
2.Coloque el interruptor [Power] en
3. Mueva el [Joystick] arriba para resaltar el
Aparecerán las escenas de la lista de
reproducción en forma de índice de
miniaturas
No se proporciona ningún índice de
miniaturas antes de crear una lista de
reproducción
4. Presione el botón [Q.MENU]
<New Playlist
Aparece la pantalla del índice de miniaturas
7. Mueva el [Joystick] hasta <Add> y pulse el botón [Joystick]
<Add
Se creará una nueva lista de reproducción
Pueden crearse hasta 99 listas de reproducción
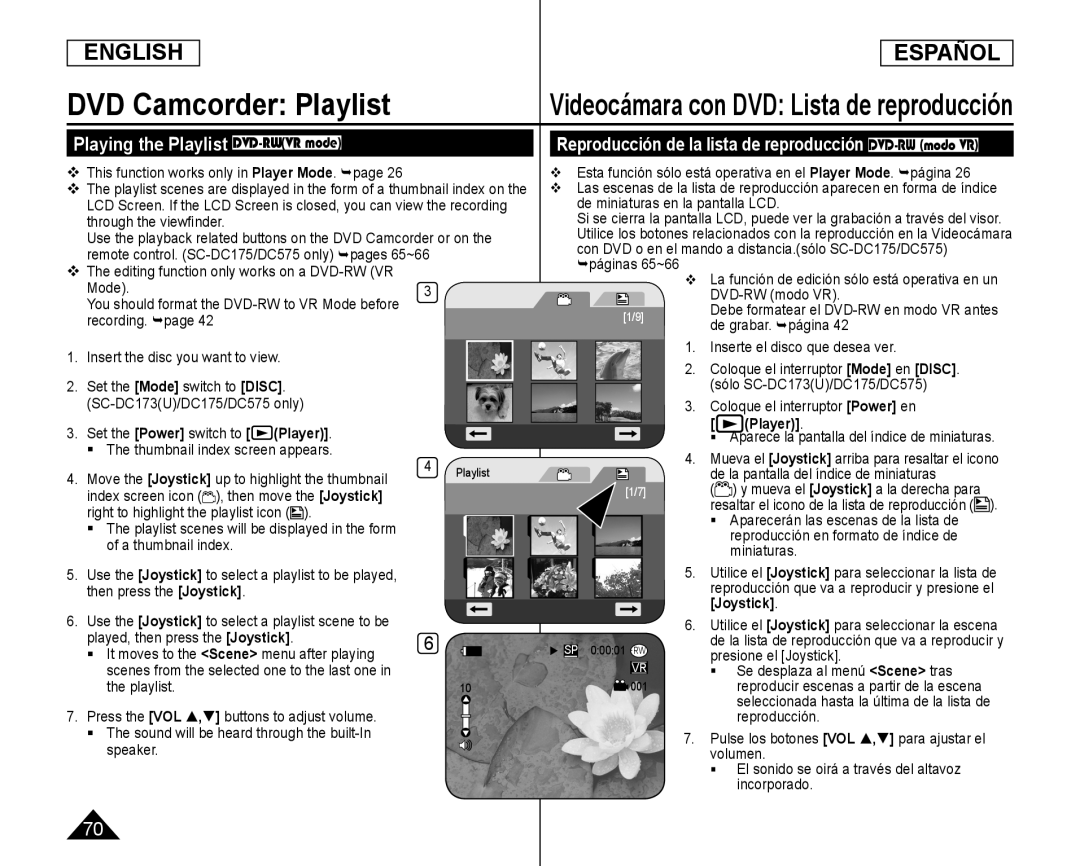 Playing the Playlist DVD-RW(VRmode)
Reproducción de la lista de reproducción DVD-RW(modo VR)
 Videocámara con DVD: Lista de reproducción
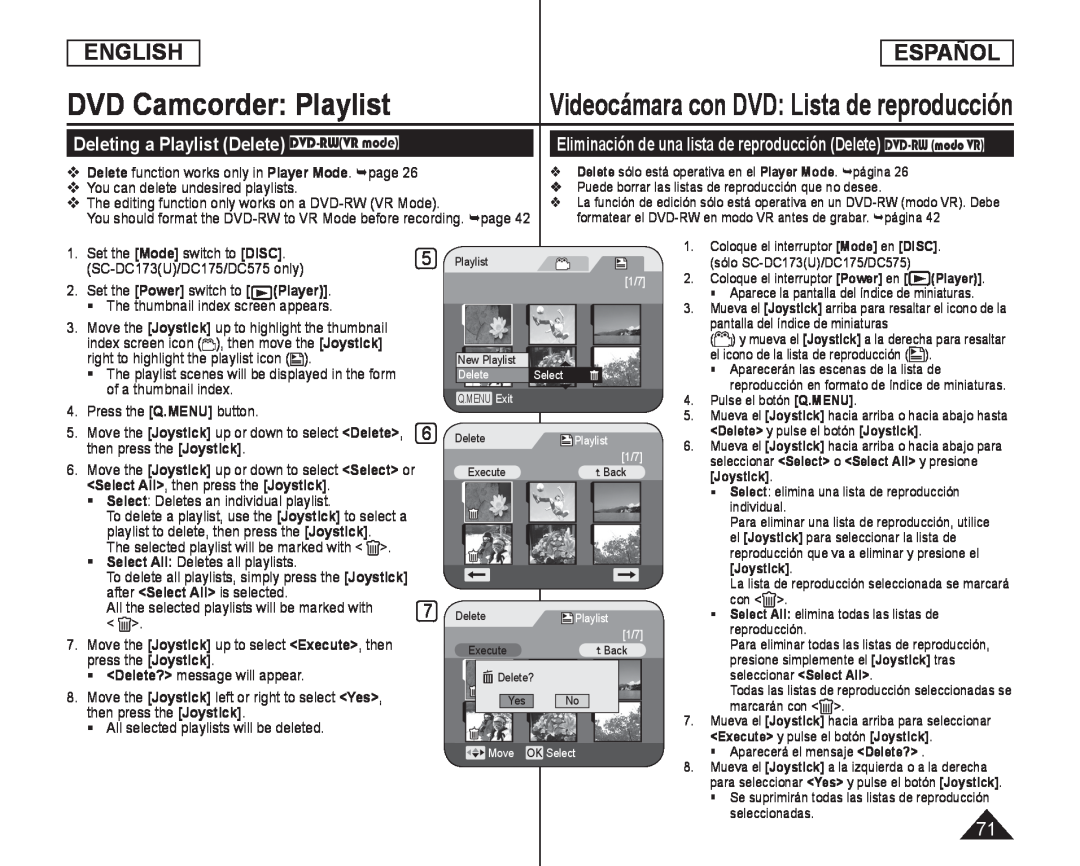
Deleting a Playlist (Delete) DVD-RW(VRmode)
Eliminación de una lista de reproducción (Delete) DVD-RW(modo VR)
 Videocámara con DVD: Lista de reproducción
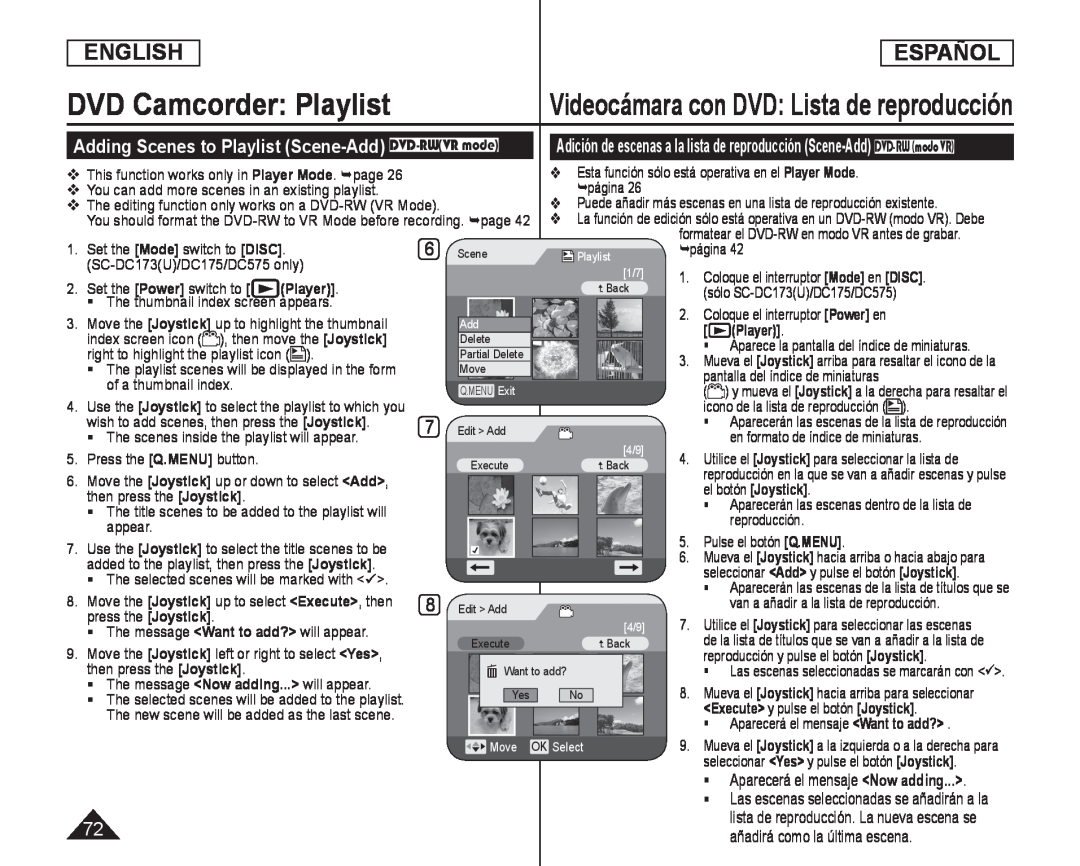
Adding Scenes to Playlist (Scene-Add) DVD-RW(VRmode)
Aparecerá el mensaje <Now adding
<Now adding
Las escenas seleccionadas se añadirán a la
72lista de reproducción. La nueva escena se añadirá como la última escena
 ENGLISH
ESPAÑOL
Videocámara con DVD: Lista de reproducción
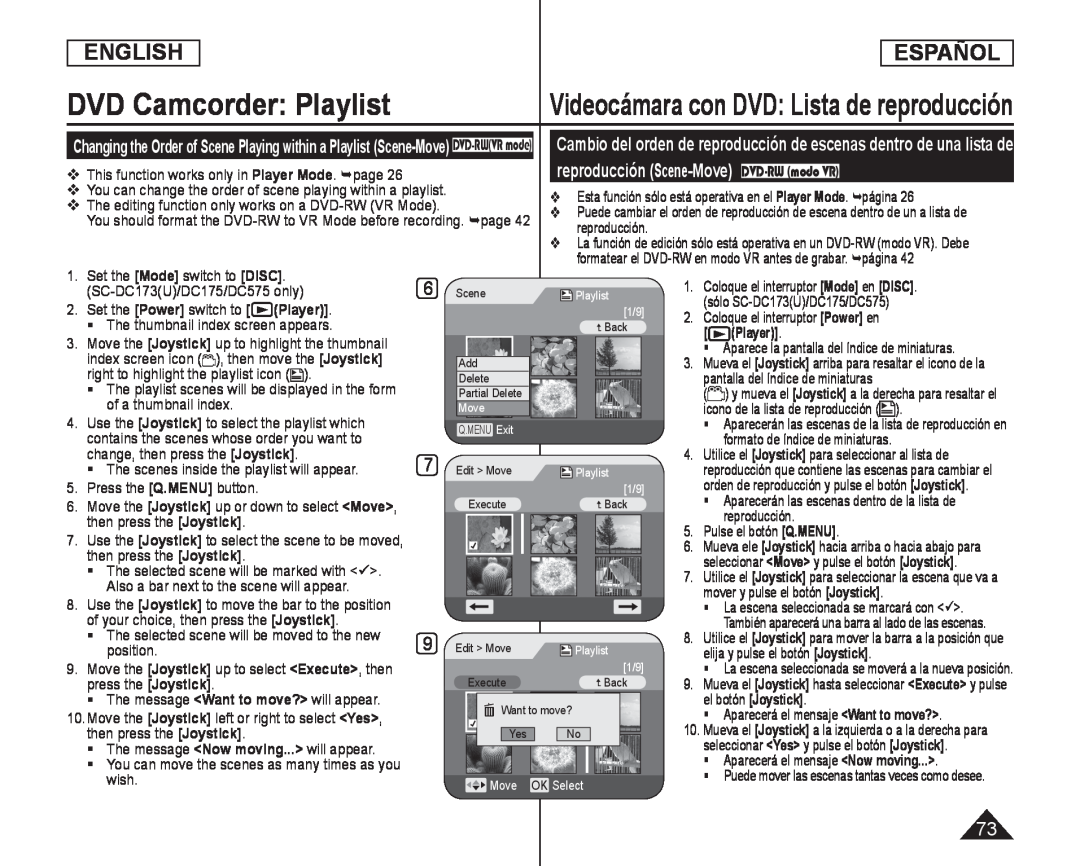
This function works only in Player Mode. page
Player Mode
reproducción (Scene-Move) DVD-RW(modo VR)
Esta función sólo está operativa en el Player Mode. página
Player Mode
The editing function only works on a DVD-RW(VR Mode)
You should format the DVD-RWto VR Mode before recording. page
reproducción
1. Set the [Mode] switch to [DISC]
[Mode]
[DISC]
formatear el DVD-RWen modo VR antes de grabar. página
Coloque el interruptor [Mode] en [DISC]
[Mode]
[DISC]
(SC-DC173(U)/DC175/DC575only)
2. Set the [Power] switch to
[Power]
(Player)]
The thumbnail index screen appears
(Player)]
3. Move the [Joystick] up to highlight the thumbnail
[Joystick]
Aparece la pantalla del índice de miniaturas
index screen icon ( ), then move the [Joystick]
[Joystick]
The playlist scenes will be displayed in the form
of a thumbnail index
4. Use the [Joystick] to select the playlist which
[Joystick]
contains the scenes whose order you want to
formato de índice de miniaturas
change, then press the [Joystick]
[Joystick]
Utilice el [Joystick] para seleccionar al lista de
[Joystick]
The scenes inside the playlist will appear
5. Press the [Q.MENU] button
[Q.MENU]
6. Move the [Joystick] up or down to select <Move
[Joystick]
<Move
Aparecerán las escenas dentro de la lista de
then press the [Joystick]
[Joystick]
reproducción
Pulse el botón [Q.MENU]
[Q.MENU]
7. Use the [Joystick] to select the scene to be moved
[Joystick]
then press the [Joystick]
[Joystick]
seleccionar <Move> y pulse el botón [Joystick]
<Move
[Joystick]
The selected scene will be marked with <
Also a bar next to the scene will appear
8. Use the [Joystick] to move the bar to the position
[Joystick]
La escena seleccionada se marcará con <
[Joystick]
The selected scene will be moved to the new
position
9. Move the [Joystick] up to select <Execute>, then
[Joystick]
<Execute
press the [Joystick]
[Joystick]
The message <Want to move?> will appear
<Want to move
el botón [Joystick]
[Joystick]
10.Move the [Joystick] left or right to select <Yes
[Joystick]
<Yes
Aparecerá el mensaje <Want to move
<Want to move
then press the [Joystick]
[Joystick]
The message <Now moving...> will appear
<Now moving
[Joystick]
You can move the scenes as many times as you
Aparecerá el mensaje <Now moving
<Now moving
wish
 ENGLISH
ESPAÑOL
DVD Camcorder: Playlist
Videocámara con DVD: Lista de reproducción
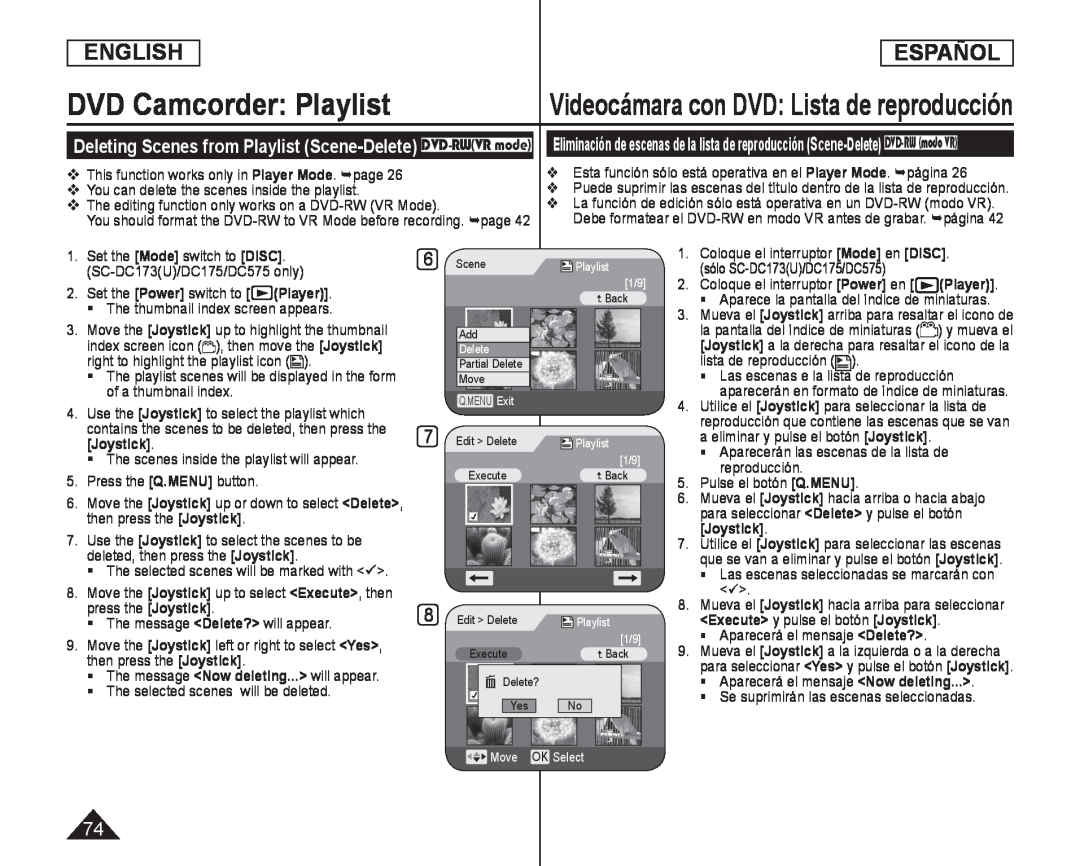
Deleting Scenes from Playlist (Scene-Delete) DVD-RW(VRmode)
This function works only in Player Mode. page
Player Mode
You can delete the scenes inside the playlist
The editing function only works on a DVD-RW(VR Mode)
You should format the DVD-RWto VR Mode before recording. page
Esta función sólo está operativa en el Player Mode. página
Player Mode
Puede suprimir las escenas del título dentro de la lista de reproducción
La función de edición sólo está operativa en un
1.Set the [Mode] switch to [DISC]. (SC-DC173(U)/DC175/DC575only)
[Mode]
[DISC]
2.Set the [Power] switch to [ (Player)]
The thumbnail index screen appears
Move the
[Joystick]
[Joystick]
The playlist scenes will be displayed in the form of a thumbnail index
Use the
[Joystick]
[Joystick]
The scenes inside the playlist will appear
5.Press the [Q.MENU] button
[Q.MENU]
6.Move the [Joystick] up or down to select <Delete>, then press the [Joystick]
Use the
[Joystick]
[Joystick]
The selected scenes will be marked with <
8.Move the [Joystick] up to select <Execute>, then press the [Joystick]
[Joystick]
<Execute
[Joystick]
The message <Delete?> will appear
<Delete
9.Move the [Joystick] left or right to select <Yes>, then press the [Joystick]
[Joystick]
<Yes
[Joystick]
The message <Now deleting...> will appear
<Now deleting
The selected scenes will be deleted
1.Coloque el interruptor [Mode] en [DISC]. (sólo SC-DC173(U)/DC175/DC575)
[Mode]
[DISC]
Coloque el interruptor
[Power]
[ (Player)]
Mueva el
[Joystick]
[Joystick]
Utilice el
[Joystick]
[Joystick]
Aparecerán las escenas de la lista de reproducción
5.Pulse el botón [Q.MENU]
[Q.MENU]
Mueva el
[Joystick]
<Delete
[Joystick]
Utilice el
[Joystick]
[Joystick]
Las escenas seleccionadas se marcarán con <
Mueva el
[Joystick]
<Execute
[Joystick]
Aparecerá el mensaje <Delete
<Delete
Mueva el
[Joystick]
<Yes
[Joystick]
Aparecerá el mensaje <Now deleting
<Now deleting
Se suprimirán las escenas seleccionadas. .deella
Move OK Select
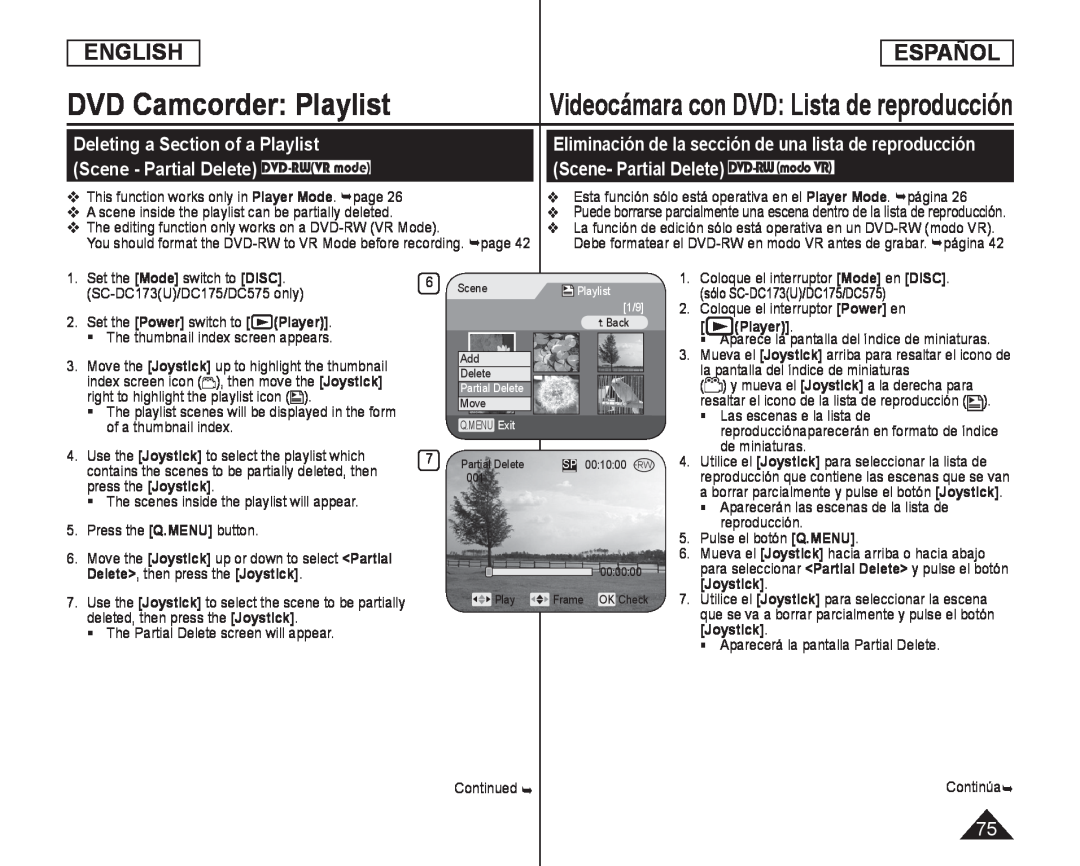 Deleting a Section of a Playlist
Eliminación de la sección de una lista de reproducción
(Scene - Partial Delete) DVD-RW(VRmode)
(Scene- Partial Delete) DVD-RW(modo VR)
![8. Use the [Joystick] to search the start point of deletion](/images/prints/7795/76.1080.webp) ENGLISH
ENGLISHESPAÑOL
DVD Camcorder: Playlist
Videocámara con DVD: Lista de reproducción
8. Use the [Joystick] to search the start point of
[Joystick]
deletion
Whenever you press the [Joystick] right, it
[Joystick]
toggles between forward at speed 1 and
between backward at speed 1 and
(When the number 1 appears on the OSD, it
means X2 speed. When the number 2 appears
on the OSD, it means X16 speed.)
When you press the [Joystick] up, the picture
will advance one frame
will go back one frame
picture frame-by-frameforward
the picture frame-by-framebackward
9. Press the [Joystick] at the start point to pause the
screen
8.Utilice el [Joystick] para buscar el punto inicial del borrado
[Joystick]
Cuando presione el [Joystick] hacia arriba, la imagen avanzará un fotograma
Cuando presione el [Joystick] hacia abajo, la imagen retrocederá un fotograma
Mantenga presionado el
[Joystick]
[Joystick]
10. Utilice el [Joystick] para buscar el punto final del borrado
[Joystick]
Press the
[Joystick]
[Joystick]
The message <Partial Delete?> will appear
<Partial Delete
The selected part of the scene will be deleted
Use the
[Joystick]
<Back
[Joystick]
Note
[MENU]
Presione el
[Joystick]
[Joystick]
Aparecerá el mensaje <Partial Delete
<Partial Delete
Mueva el
[Joystick]
<Yes
[Joystick]
Se borrará la parte seleccionada de la escena
Utilice el
[Joystick]
<Back
[Joystick]
Nota
[MENU]
 Videocámara con DVD: Administrador de discos
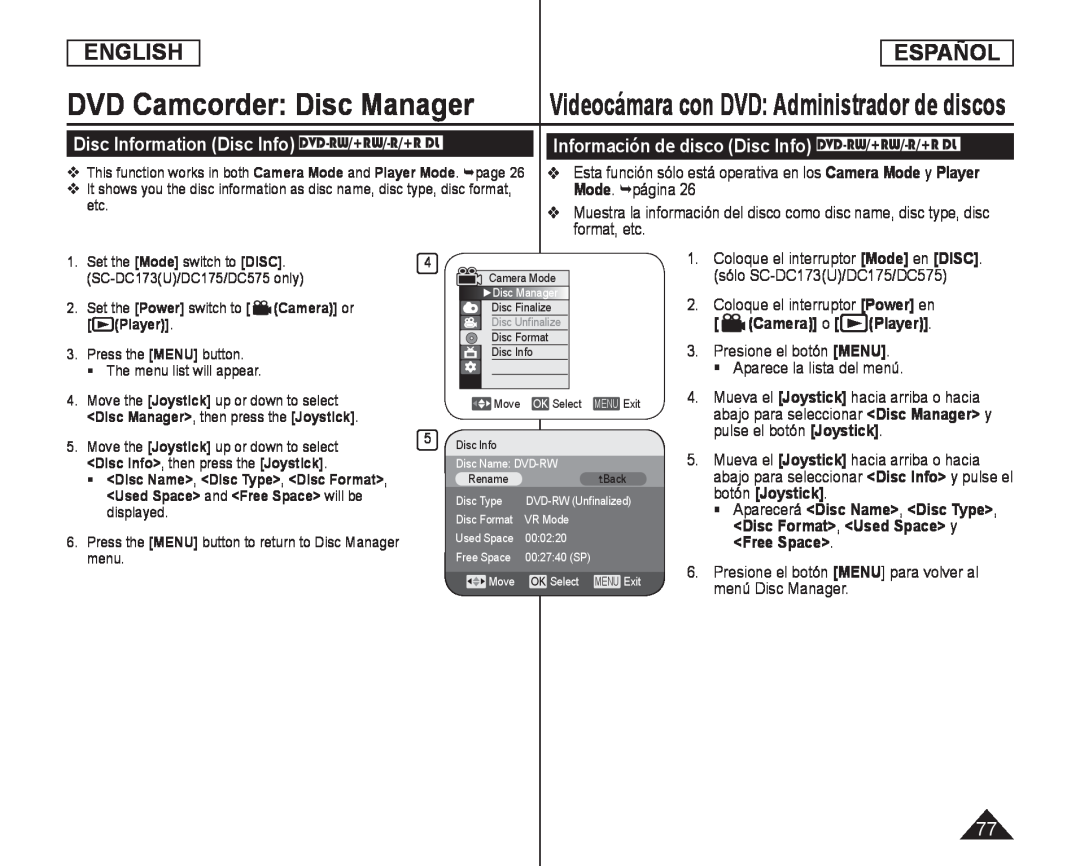
Disc Information (Disc Info) DVD-RW/+RW/-R/+RDL
Información de disco (Disc Info) DVD-RW/+RW/-R/+RDL
Esta función sólo está operativa en los Camera Mode y Player Mode. página
Muestra la información del disco como disc name, disc type, disc format, etc
<Disc Info
6.Presione el botón [MENU] para volver al menú Disc Manager
[MENU
![ Puede especificar un nombre de disco 4. Mueva el [Joystick] hacia arriba o hacia](/images/prints/7795/78.1080.webp) DVD Camcorder: Disc Manager
DVD Camcorder: Disc Manager Puede especificar un nombre de disco
4. Mueva el [Joystick] hacia arriba o hacia
pulse el botón [Joystick]
5. Mueva el [Joystick] hacia arriba o hacia
6. Mueva el [Joystick] a la izquierda o a la
Aparece la pantalla Disc Name
7. Utilice el [Joystick] para mover el cursor a
eliminar el título de disco existente
8. Utilice el [Joystick] para seleccionar los
y pulse el botón [Joystick]
Se cambiará el nombre del disco
menú Disc Manager
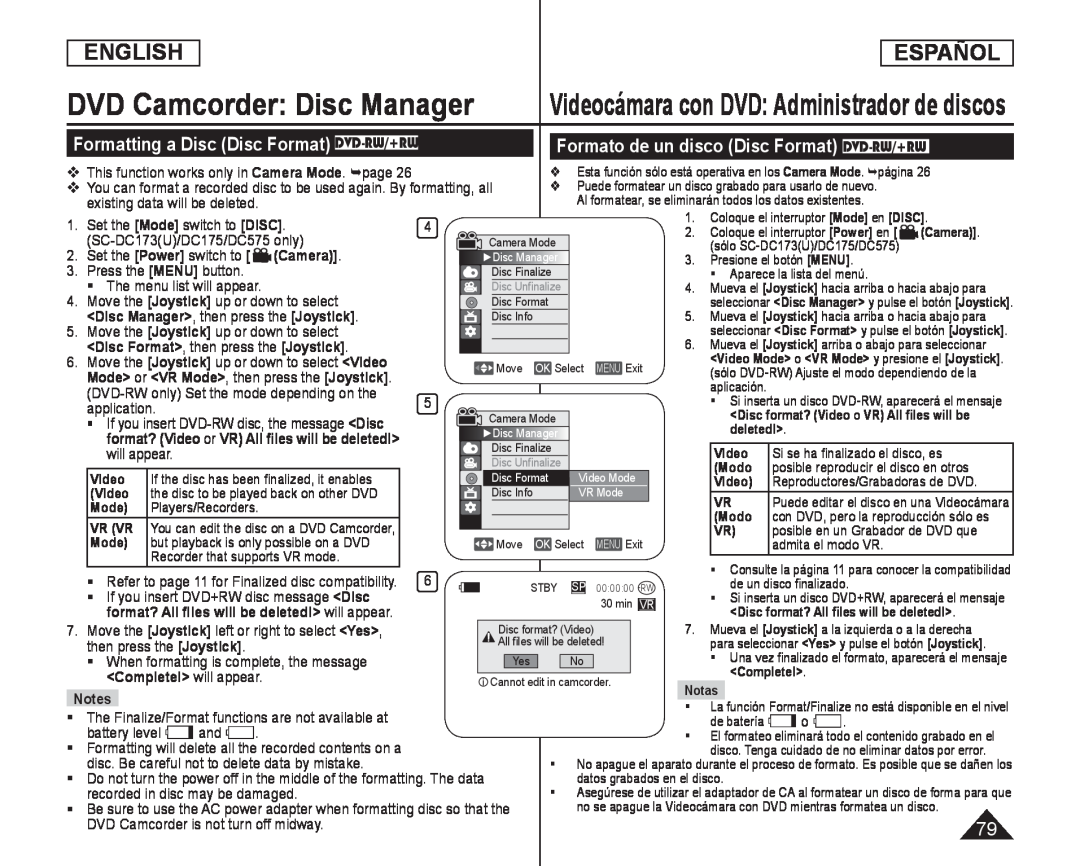 Formatting a Disc (Disc Format) DVD-RW/+RW
Formato de un disco (Disc Format) DVD-RW/+RW
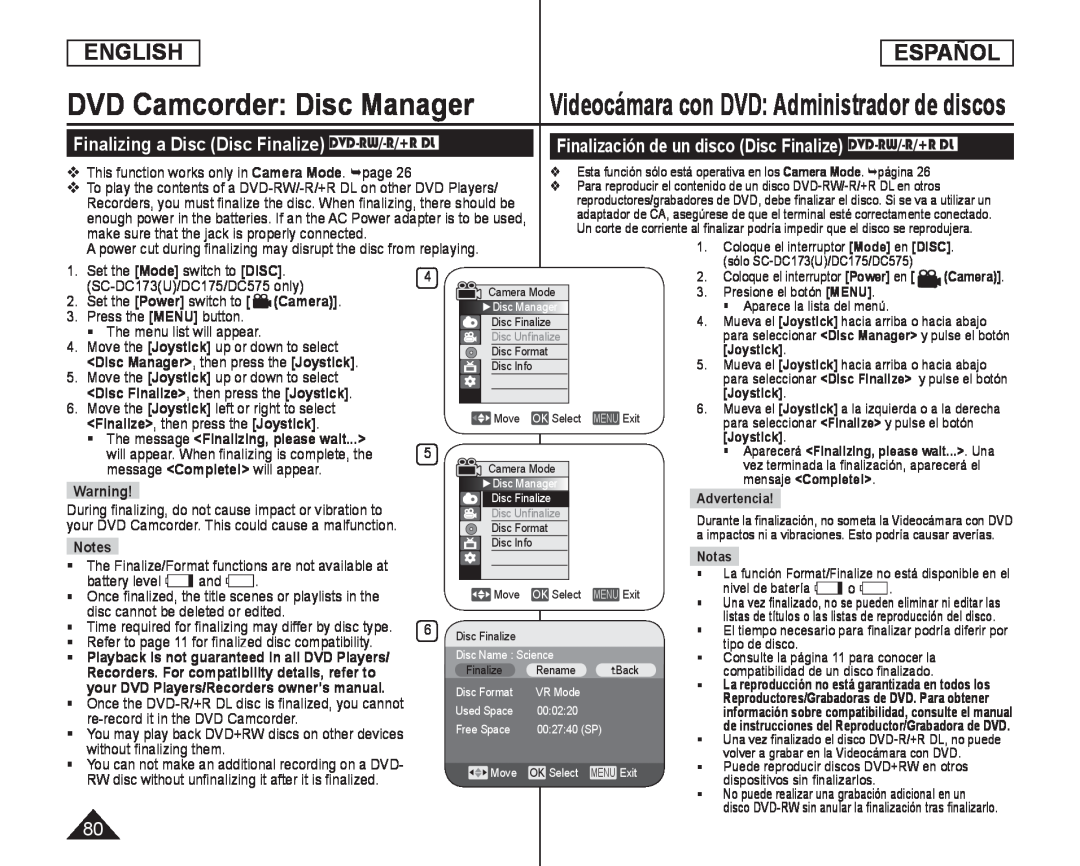 Finalizing a Disc (Disc Finalize) DVD-RW/-R/+RDL
Finalización de un disco (Disc Finalize) DVD-RW/-R/+RDL
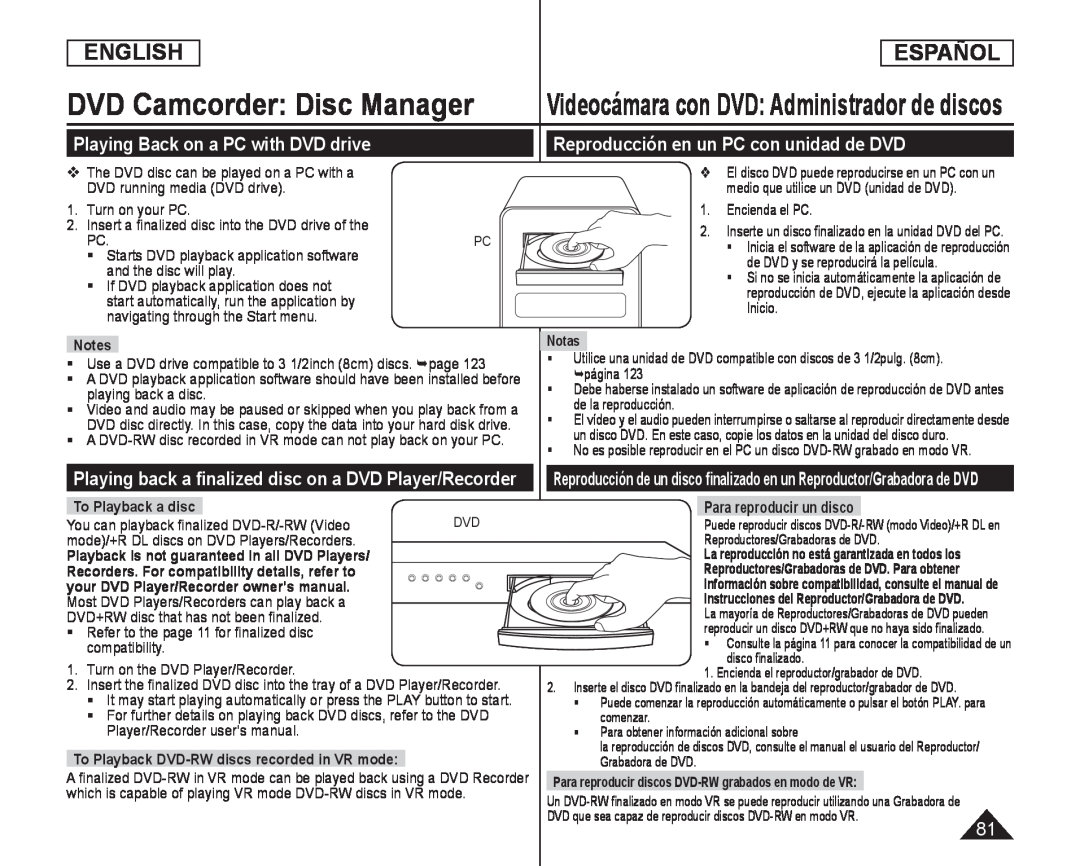 Playing Back on a PC with DVD drive
Reproducción en un PC con unidad de DVD
Playing back a finalized disc on a DVD Player/Recorder
Para reproducir un disco
![Mueva el [Joystick] hacia arriba o hacia abajo para seleccionar <Disc Manager> y](/images/prints/7795/82.1080.webp) Unfinalizing a Disc (Disc Unfinalize) DVD-RW
Unfinalizing a Disc (Disc Unfinalize) DVD-RWMueva el [Joystick] hacia arriba o hacia
abajo para seleccionar <Disc Manager> y
Mueva el [Joystick] a la izquierda o a la
derecha para seleccionar <Unfinalize> y
<Unfinalize
Aparezca el mensaje <Unfinalizing
<Unfinalizing
please wait...>. Una vez cancelada
please wait
la finalización, aparecerá el mensaje
<Complete
en el nivel de batería
Durante la anulación de finalización, no
![AV In/Out sólo está operativa en el Player Mode. página 1.Coloque el interruptor [Mode] en [DISC]](/images/prints/7795/83.1080.webp) DVD Camcorder: Connection
DVD Camcorder: ConnectionSetting the AV In/Out (SC-DC175/DC575only)
Ajuste de AV In/Out (sólo SC-DC175/DC575)
AV In/Out sólo está operativa en el Player Mode. página
1.Coloque el interruptor [Mode] en [DISC]
2.Coloque el interruptor [Power] en [(Player)]
3.Pulse el botón [MENU]
<Record
<AV In/Out
<AV In
<AV In
Para salir, pulse el botón [MENU]
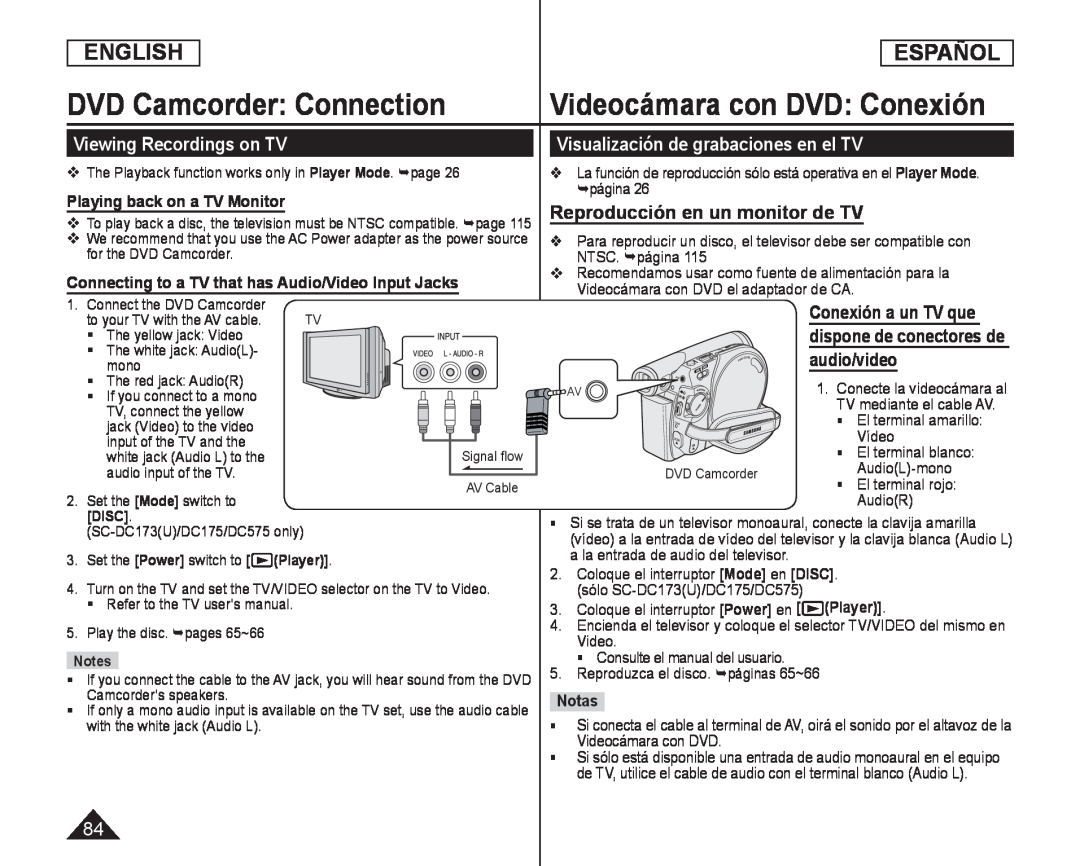 Viewing Recordings on TV
Playing back on a TV Monitor
Connecting to a TV that has Audio/Video Input Jacks
Visualización de grabaciones en el TV
La función de reproducción sólo está operativa en el Player Mode. página
Reproducción en un monitor de TV
Para reproducir un disco, el televisor debe ser compatible con NTSC. página
Conexión a un TV que dispone de conectores de audio/video
El terminal amarillo:
Vídeo
El terminal blanco:
Audio(L)-mono
El terminal rojo:
Audio(R)
3.Coloque el interruptor [Power] en [ (Player)]
4.Encienda el televisor y coloque el selector TV/VIDEO del mismo en Video
Consulte el manual del usuario
5.Reproduzca el disco. páginas 65~66
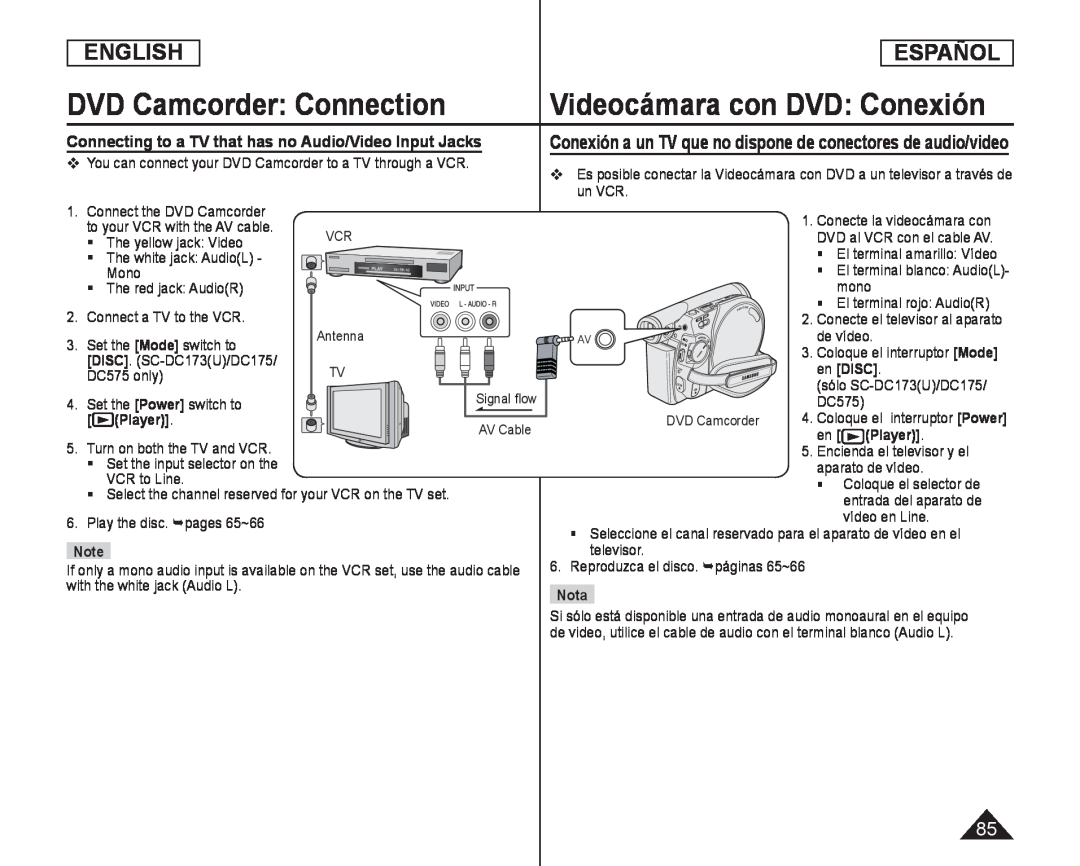 Videocámara con DVD: Conexión
Connecting to a TV that has no Audio/Video Input Jacks
Conexión a un TV que no dispone de conectores de audio/video
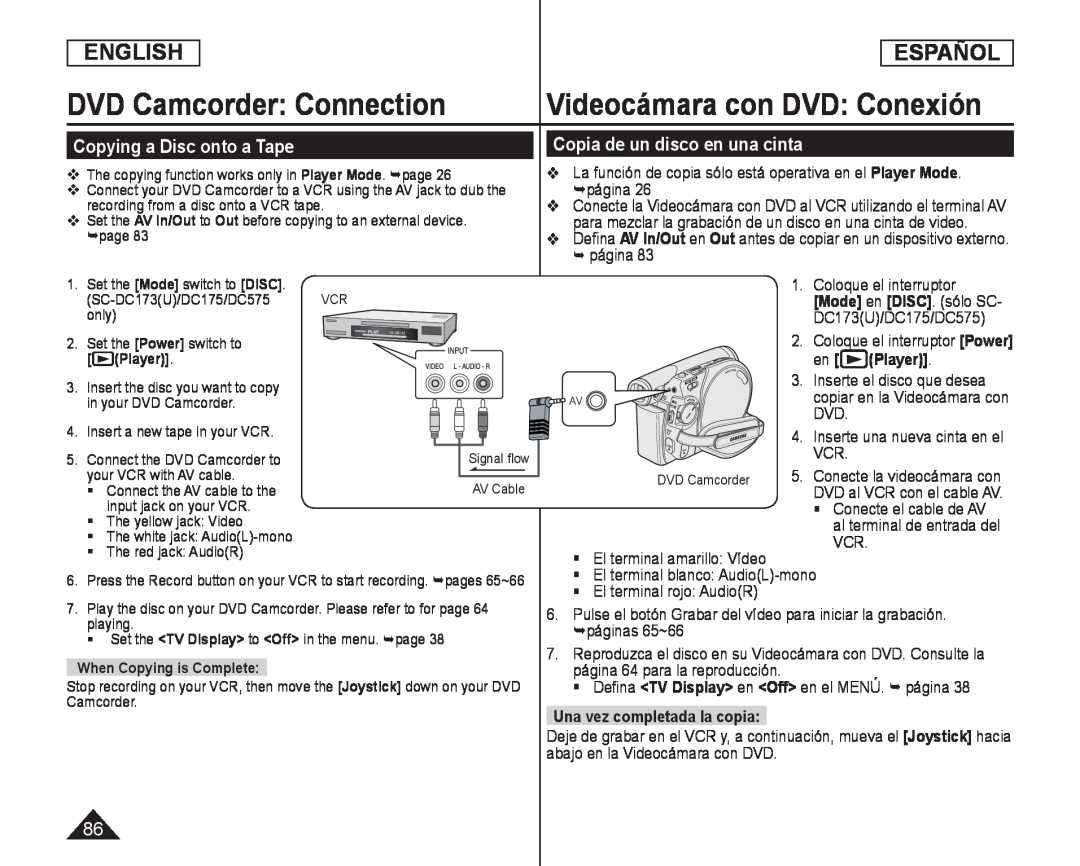 Copying a Disc onto a Tape
Copia de un disco en una cinta
La función de copia sólo está operativa en el Player Mode. página
Defina AV In/Out en Out antes de copiar en un dispositivo externo
Out
2.Coloque el interruptor [Power]
en
3. Inserte el disco que desea
DVD
VCR
Conecte el cable de AV
El terminal amarillo: Vídeo
El terminal blanco: Audio(L)-mono
6. Pulse el botón Grabar del vídeo para iniciar la grabación
páginas 65~66
7. Reproduzca el disco en su Videocámara con DVD. Consulte la
página 64 para la reproducción
<Off> en el MENÚ. página
Una vez completada la copia:
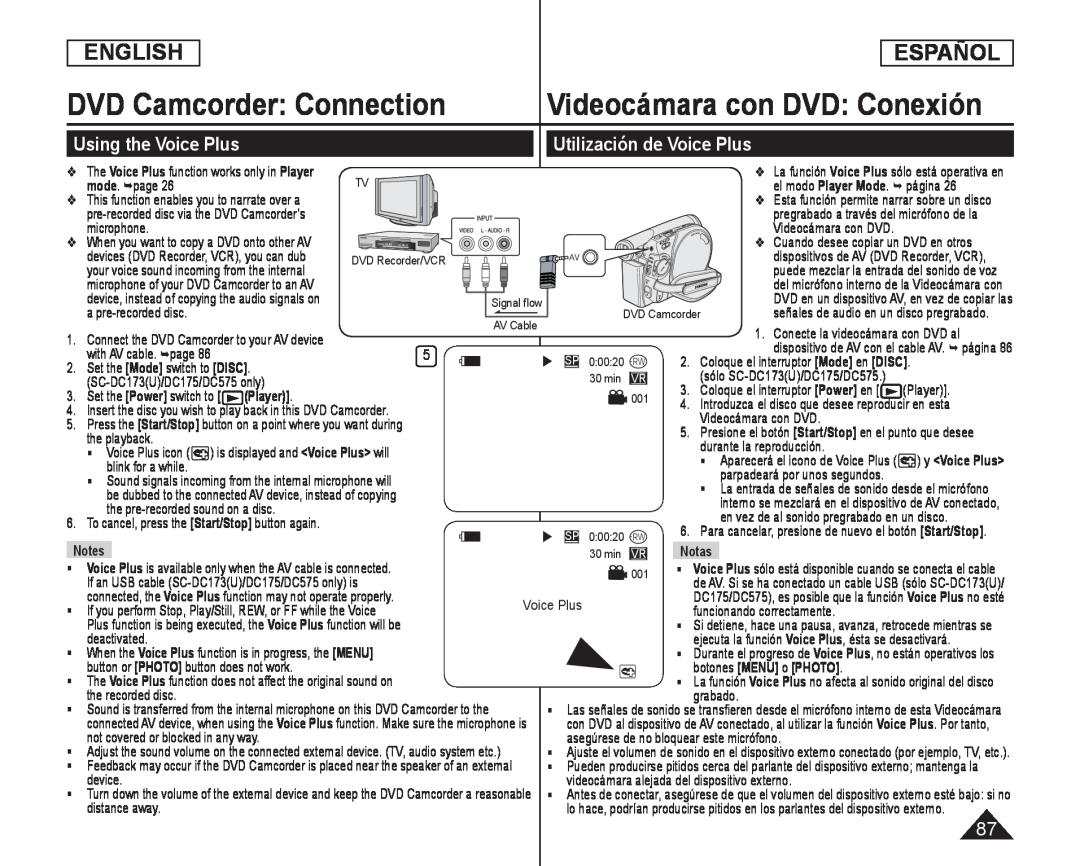 Utilización de Voice Plus
Using the Voice Plus
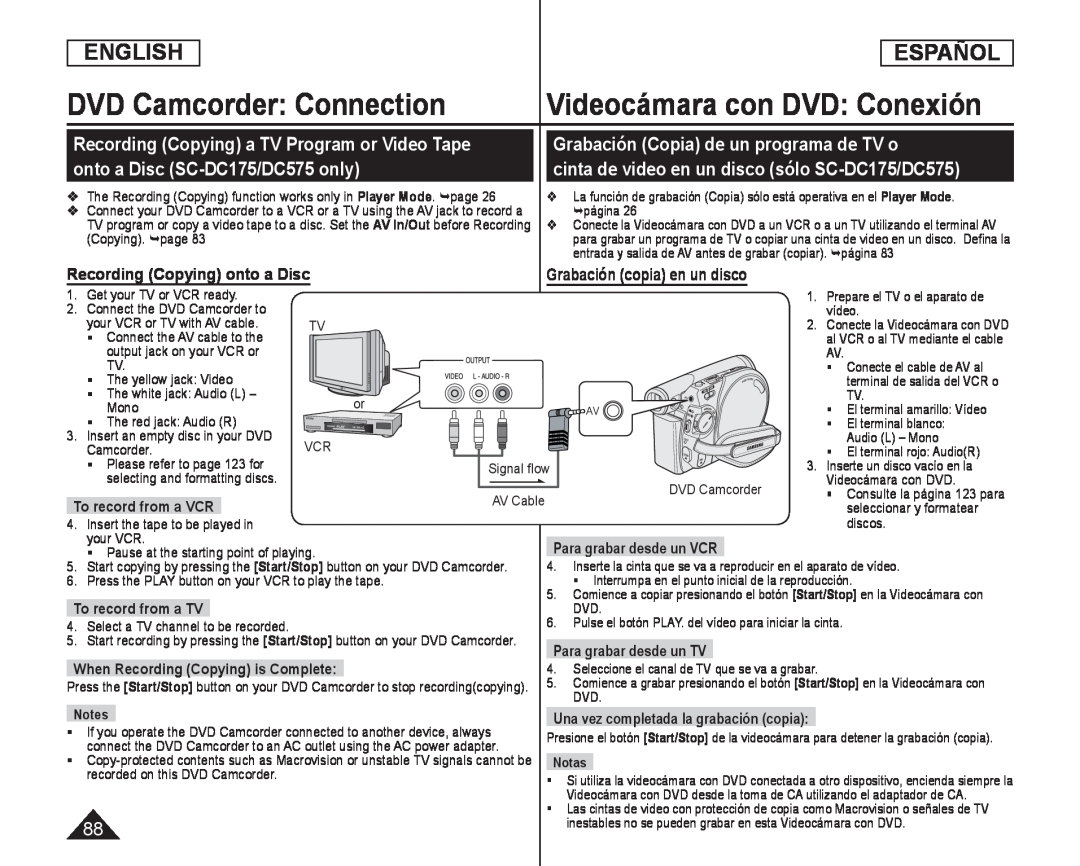 Recording (Copying) a TV Program or Video Tape
onto a Disc (SC-DC175/DC575only)
Grabación (Copia) de un programa de TV o
cinta de video en un disco (sólo SC-DC175/DC575)
Recording (Copying) onto a Disc
Grabación (copia) en un disco
 Digital Still Camera Mode (SC-DC173(U)/DC175/DC575only)
Memory Card Functions
Inserting a Memory Card
Ejecting a Memory Card
Funciones de la tarjeta de memoria
Inserción de una tarjeta de memoria
Expulsión de una tarjeta de memoria
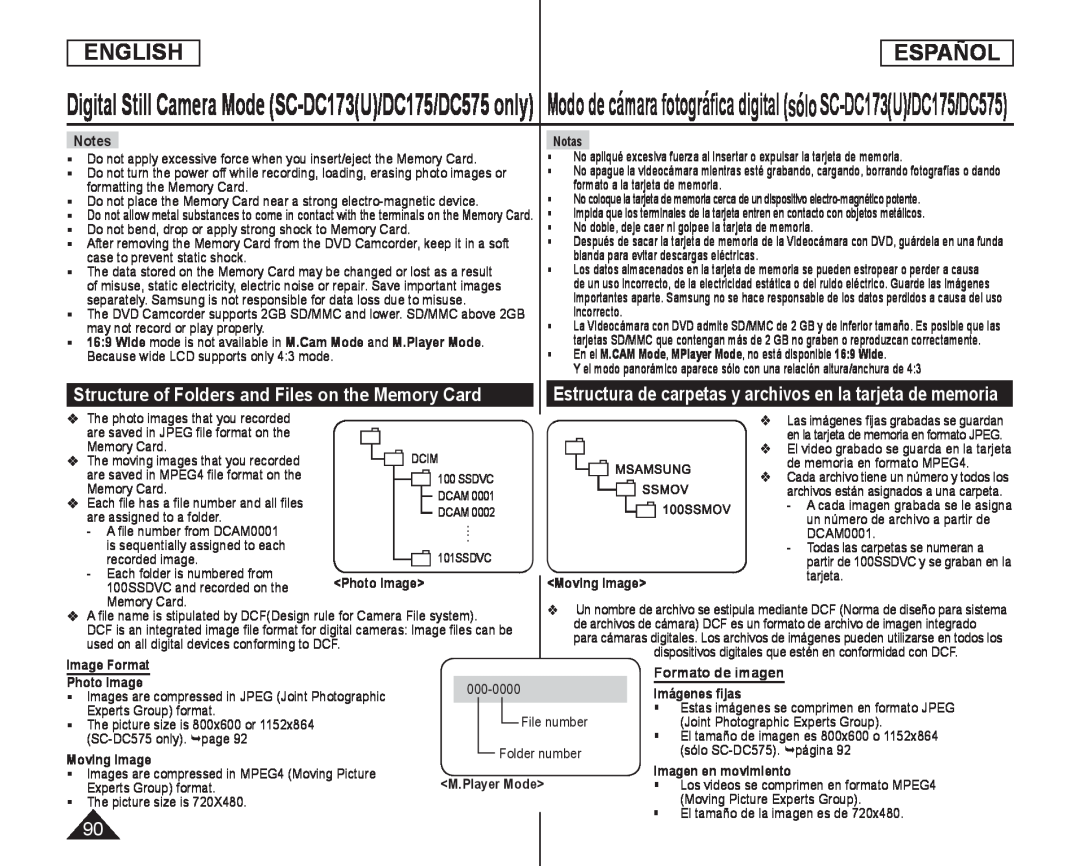 Structure of Folders and Files on the Memory Card
Estructura de carpetas y archivos en la tarjeta de memoria
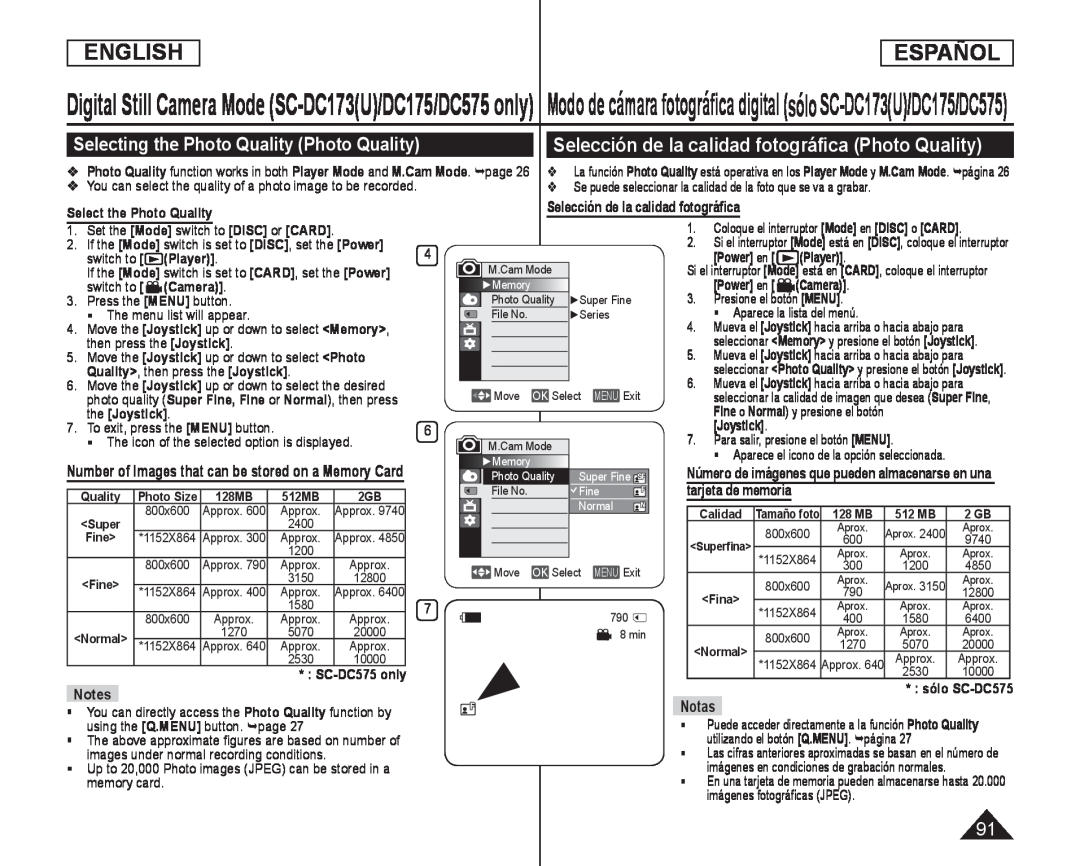 Selecting the Photo Quality (Photo Quality)
Selección de la calidad fotográfica (Photo Quality)
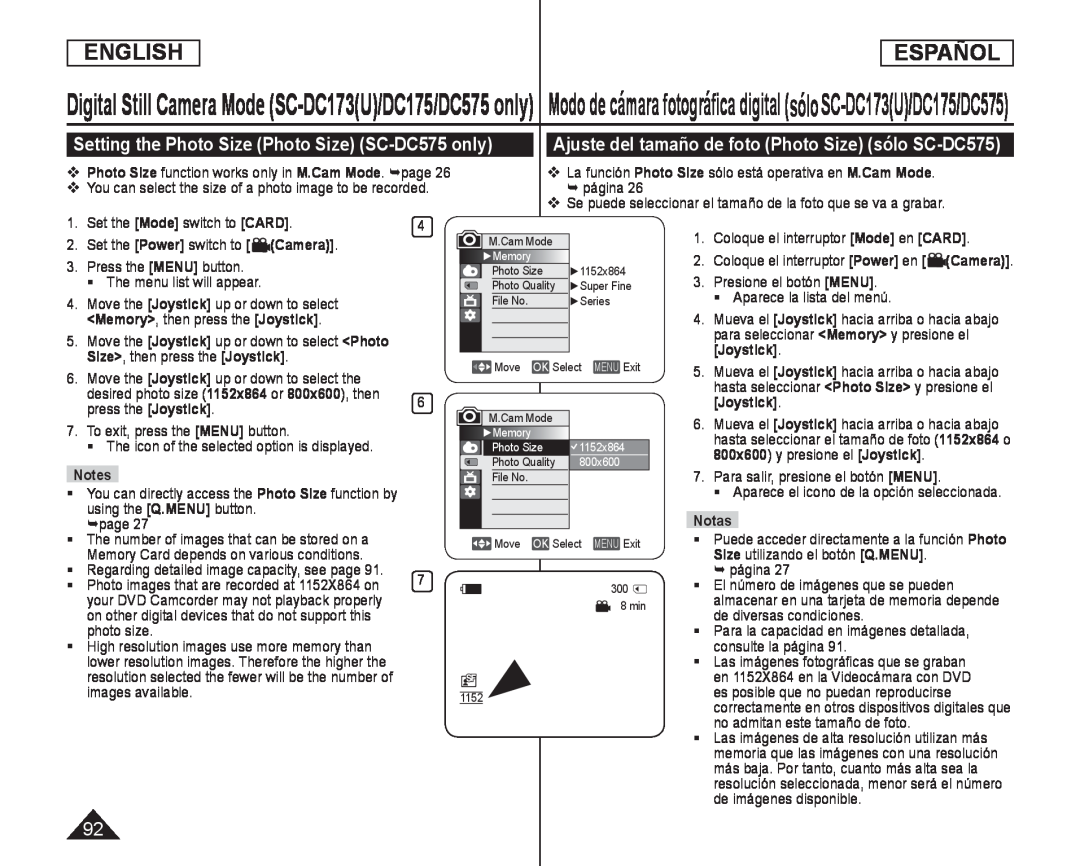 Setting the Photo Size (Photo Size) (SC-DC575only)
Ajuste del tamaño de foto (Photo Size) (sólo SC-DC575)
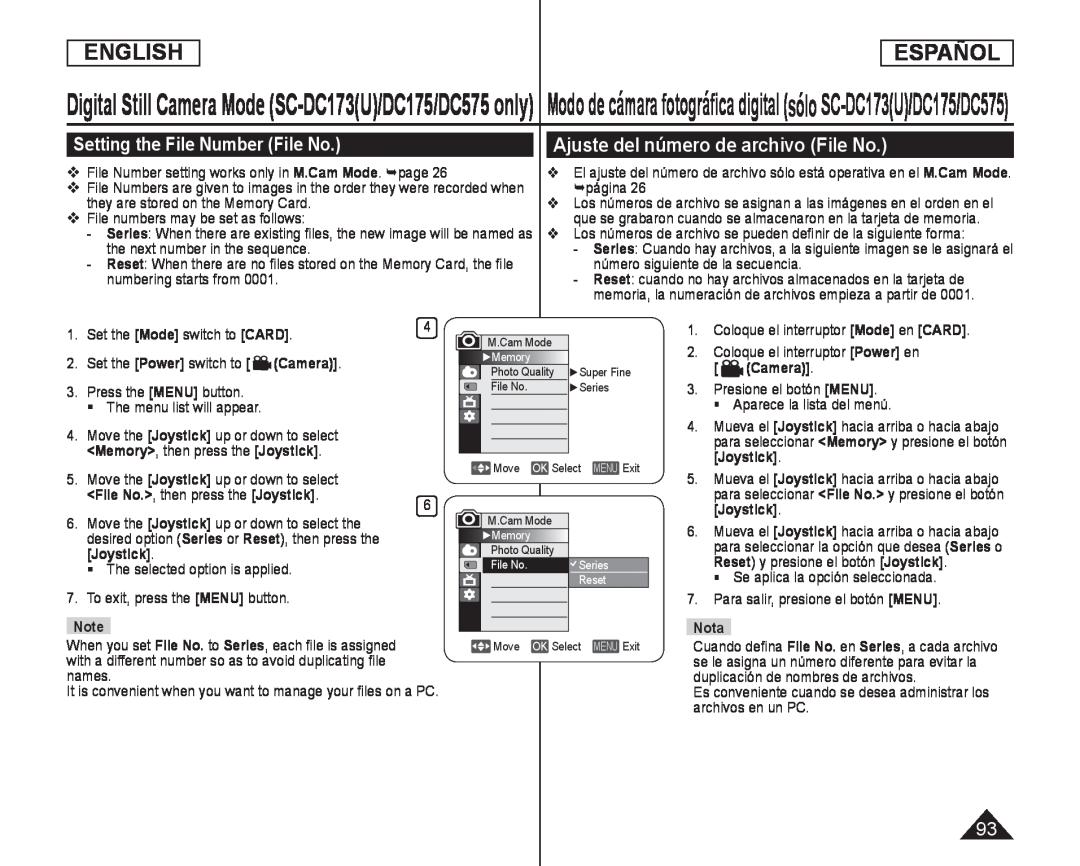 Setting the File Number (File No.)
Ajuste del número de archivo (File No.)
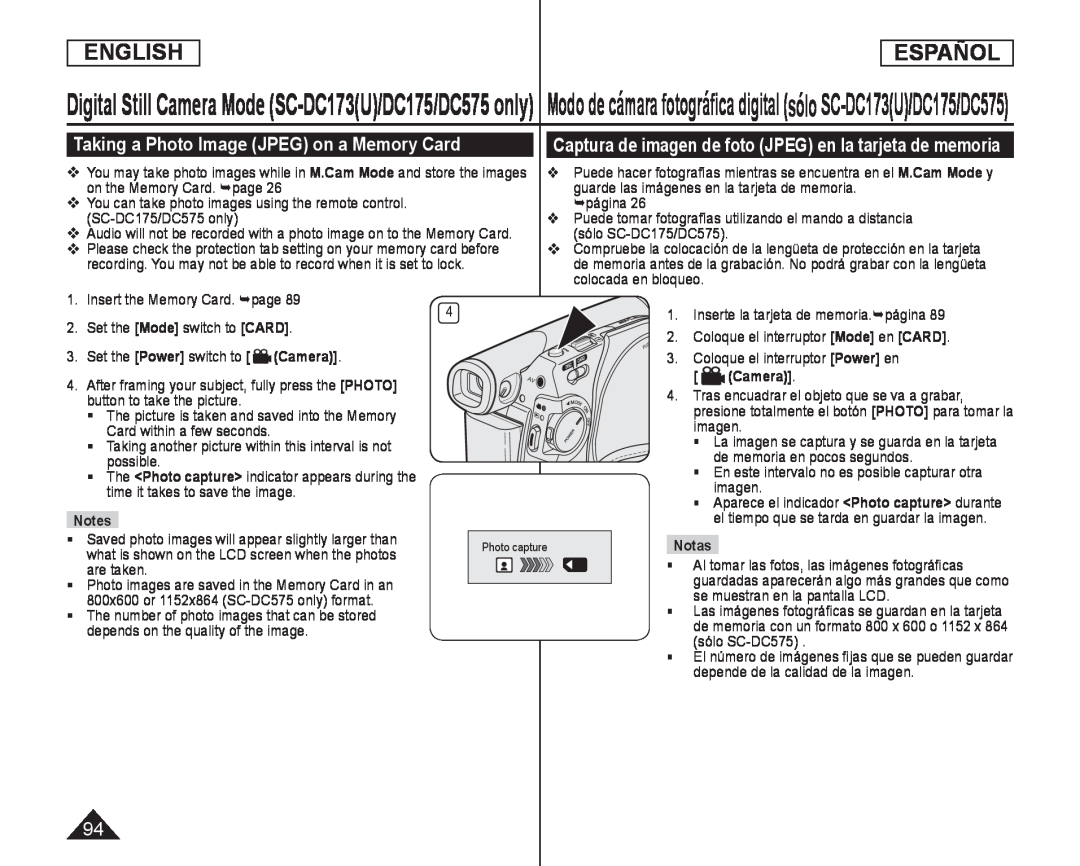 Taking a Photo Image (JPEG) on a Memory Card
Captura de imagen de foto (JPEG) en la tarjeta de memoria
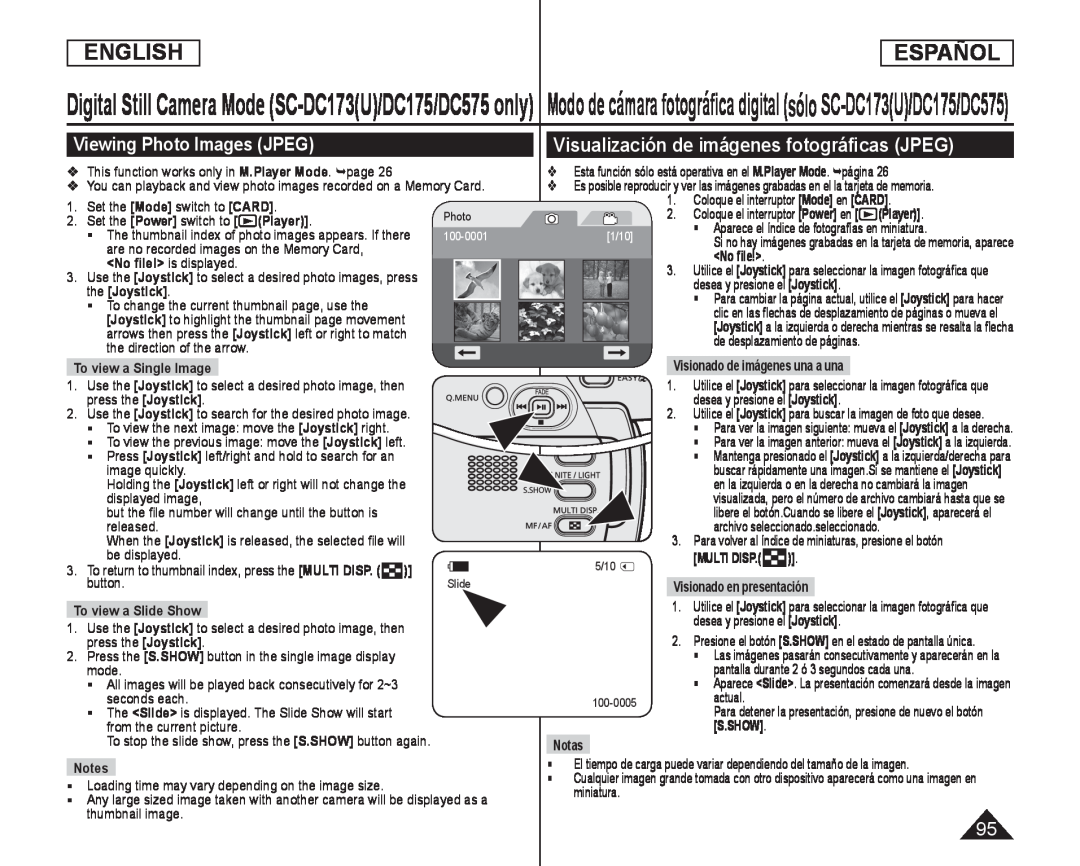 Viewing Photo Images (JPEG)
Visualización de imágenes fotográficas (JPEG)
![La función Protect sólo está operativa en el M.Player Mode. página Coloque el interruptor [Mode] en [CARD]](/images/prints/7795/96.1080.webp) Protection from accidental Erasure (Protect)
Protection from accidental Erasure (Protect)Protección frente a borrado accidental (Protect)
La función Protect sólo está operativa en el M.Player Mode. página
Protect
Coloque el interruptor [Mode] en [CARD]
Aparece el índice de fotografías en
en la tarjeta de memoria, aparece
<No file
Utilice el [Joystick] para seleccionar las
imágenes que se van a proteger
Puede acceder directamente a la función Proteger utilizando el botón
Las imágenes protegidas mostrarán la marca ( ) cuando aparecen
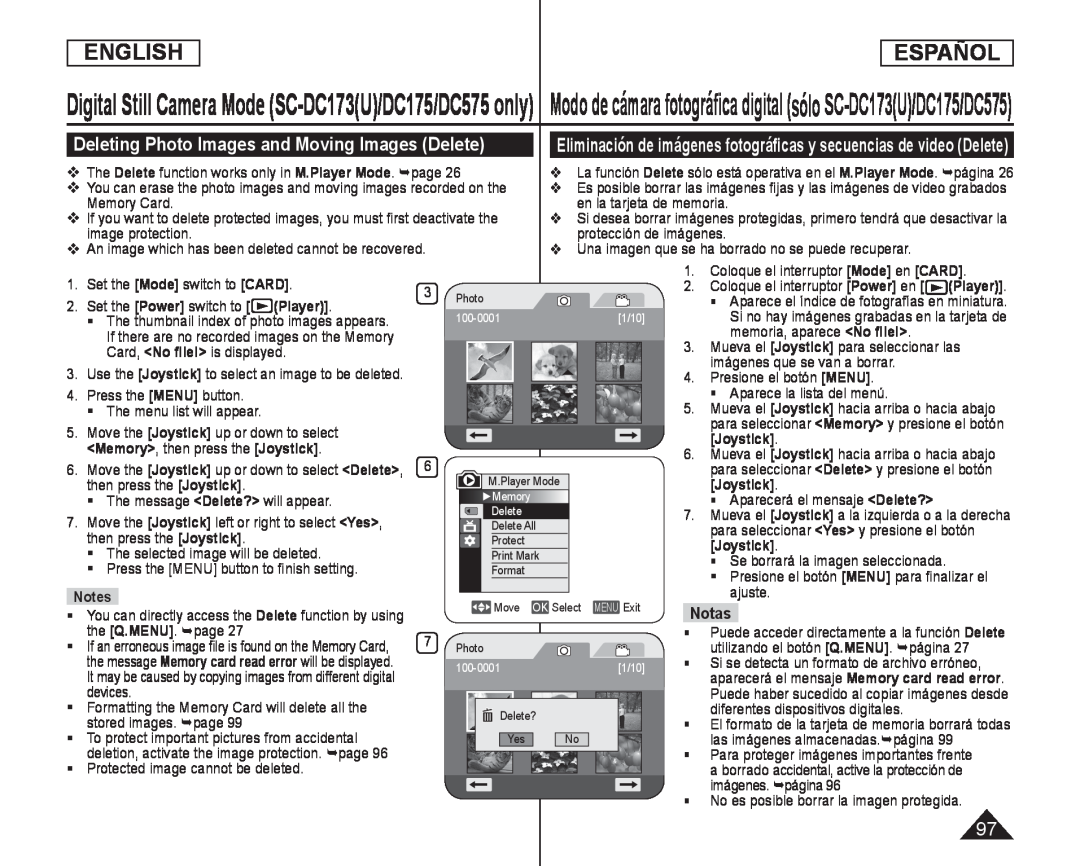 Deleting Photo Images and Moving Images (Delete)
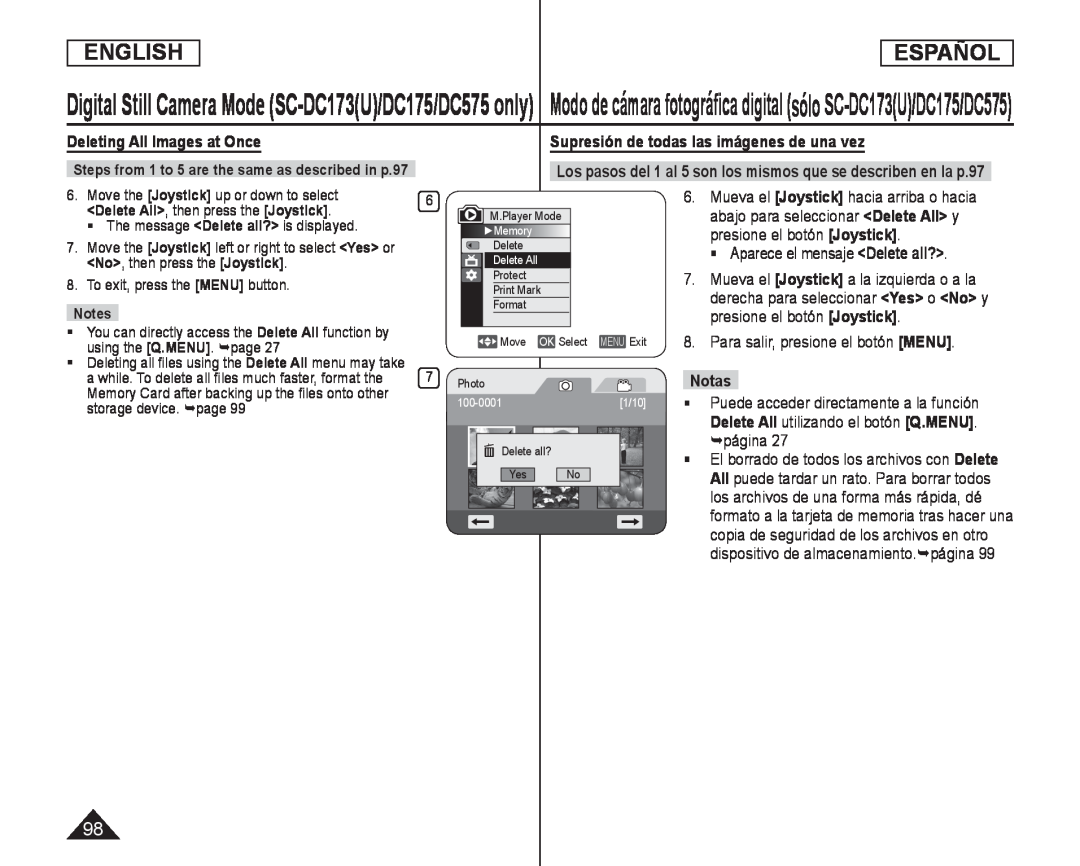 Deleting All Images at Once
Supresión de todas las imágenes de una vez
abajo para seleccionar <Delete All> y
<Delete All
Aparece el mensaje <Delete all
<Delete all
Puede acceder directamente a la función
Delete All utilizando el botón [Q.MENU]
Delete All
los archivos de una forma más rápida, dé
copia de seguridad de los archivos en otro
dispositivo de almacenamiento.página
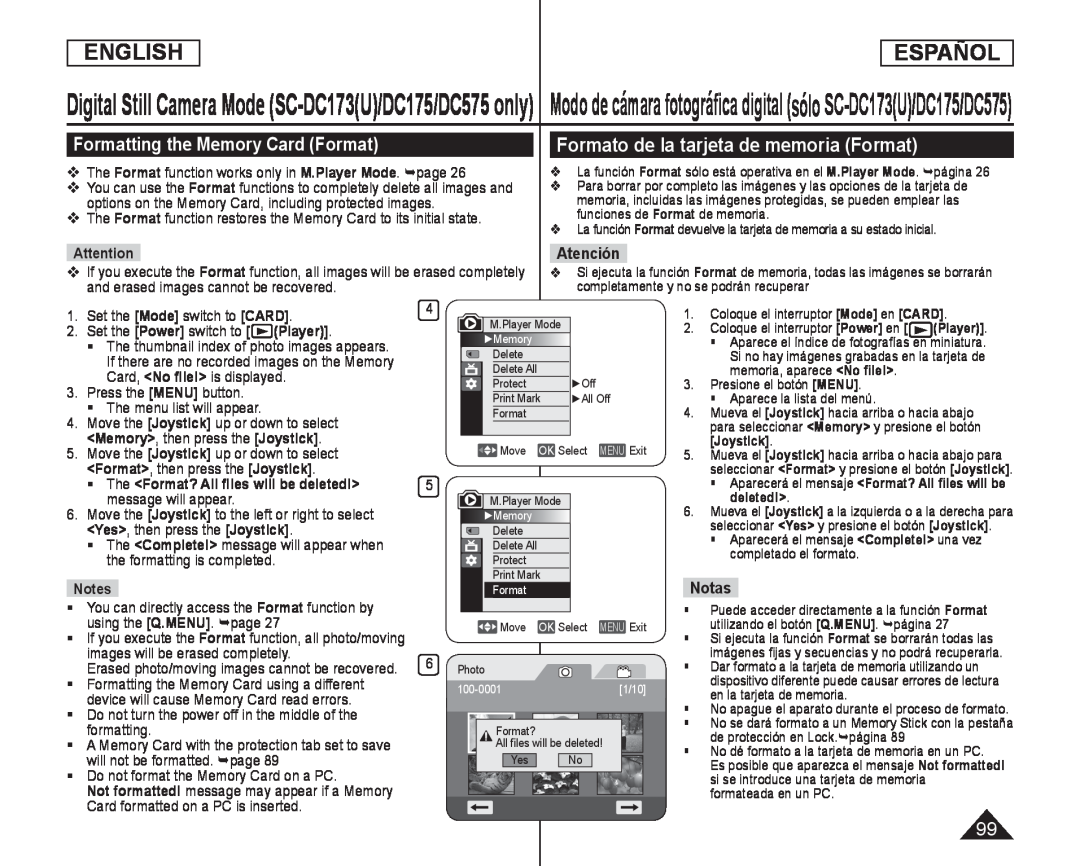 Formatting the Memory Card (Format)
Formato de la tarjeta de memoria (Format)
Atención
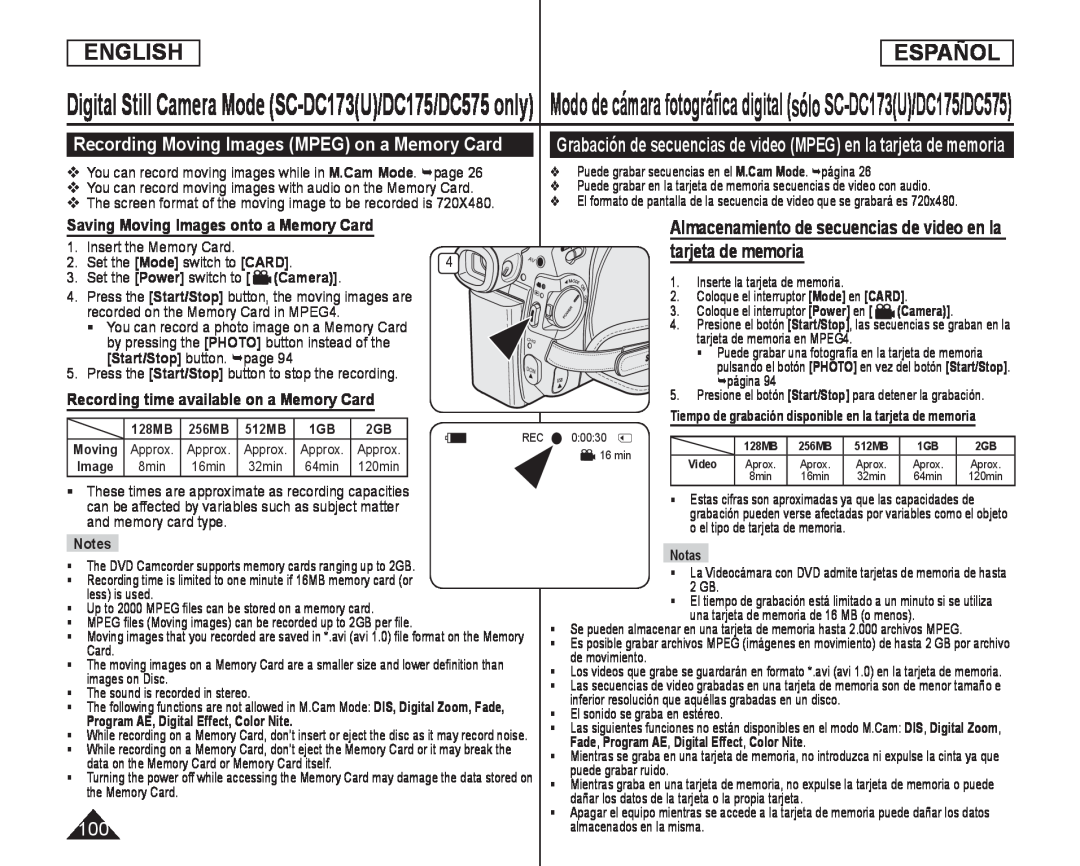 Recording Moving Images (MPEG) on a Memory Card
Saving Moving Images onto a Memory Card
Recording time available on a Memory Card
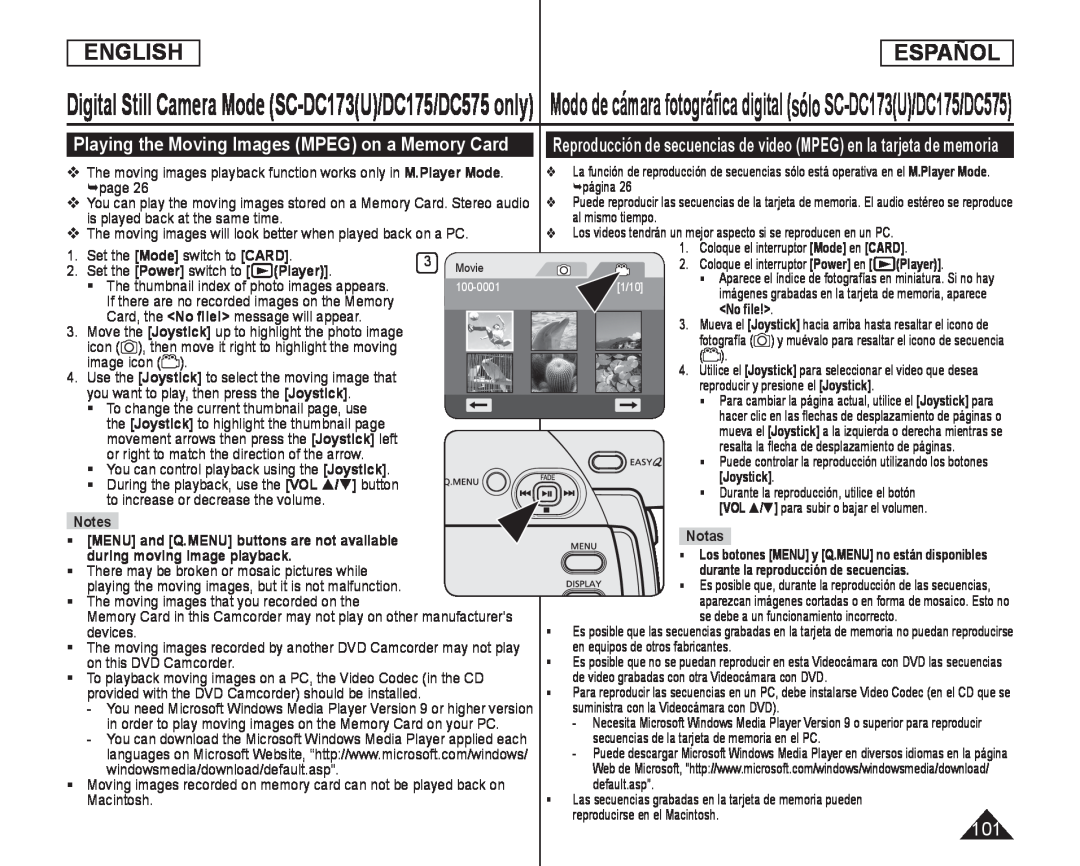 Playing the Moving Images (MPEG) on a Memory Card
 ENGLISH
ESPAÑOL
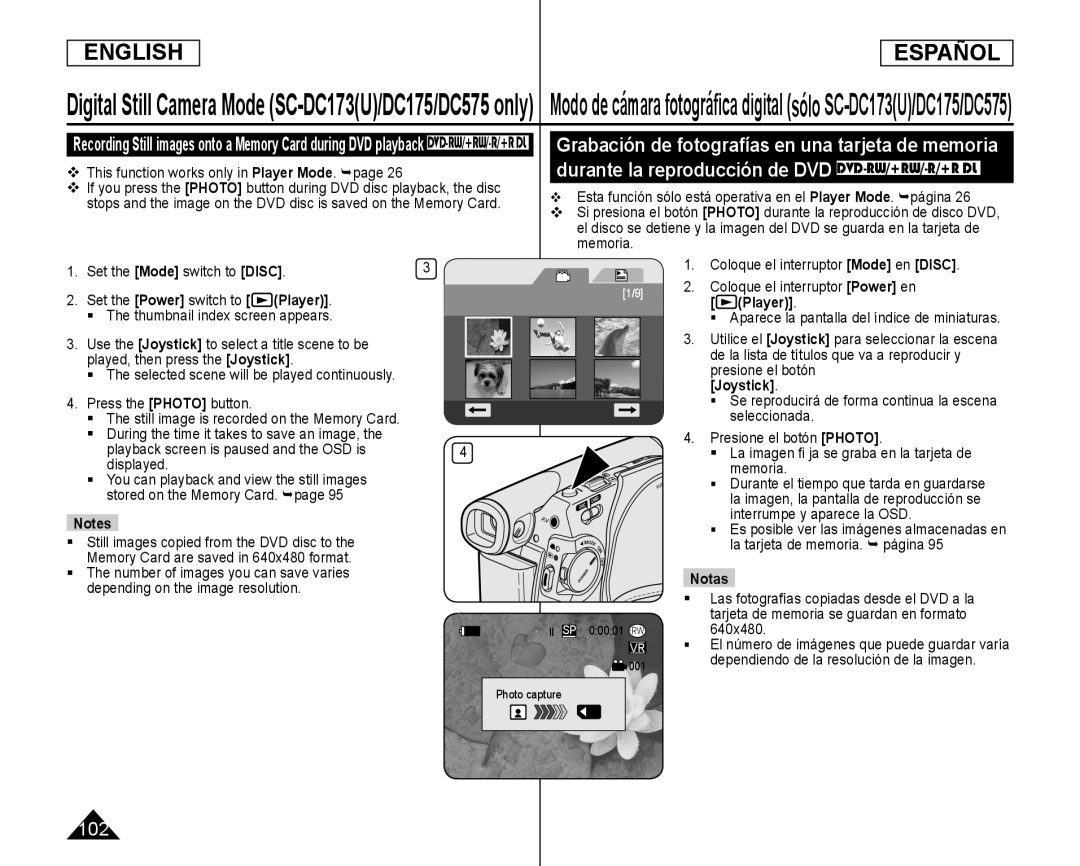
This function works only in Player Mode. page
Esta función sólo está operativa en el Player Mode. página
Si presiona el botón
Set the [Mode] switch to [DISC]
Set the [Power] switch to
The thumbnail index screen appears
Use the [Joystick] to select a title scene to be
played, then press the [Joystick]
The selected scene will be played continuously
Press the [PHOTO] button
The still image is recorded on the Memory Card
During the time it takes to save an image, the
playback screen is paused and the OSD is
displayed
You can playback and view the still images
stored on the Memory Card. page
Still images copied from the DVD disc to the
Memory Card are saved in 640x480 format
The number of images you can save varies
depending on the image resolution
1.Coloque el interruptor [Mode] en [DISC]
2.Coloque el interruptor [Power] en [ (Player)]
Aparece la pantalla del índice de miniaturas
Utilice el
Se reproducirá de forma continua la escena seleccionada
4.Presione el botón [PHOTO]
La imagen fi ja se graba en la tarjeta de memoria
Es posible ver las imágenes almacenadas en la tarjeta de memoria. página
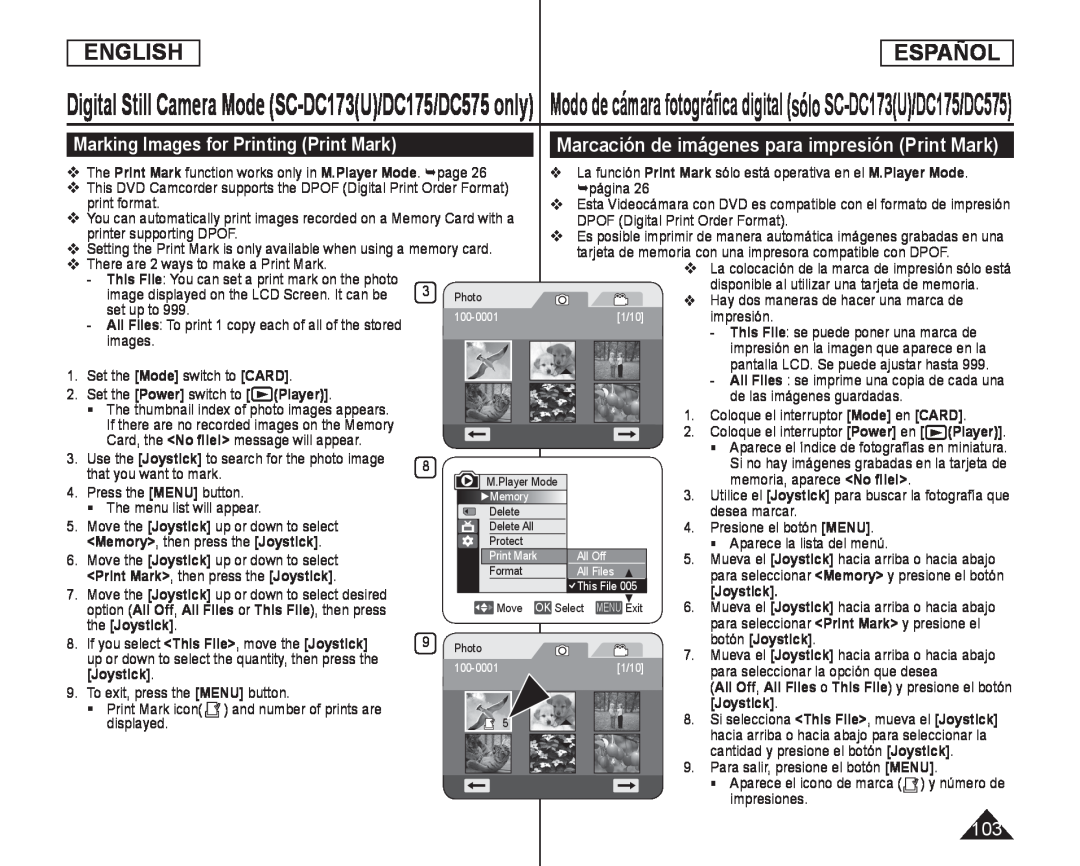 Marcación de imágenes para impresión (Print Mark)
Marking Images for Printing (Print Mark)
 Removing the Print Mark
Eliminación de la marca de impresión
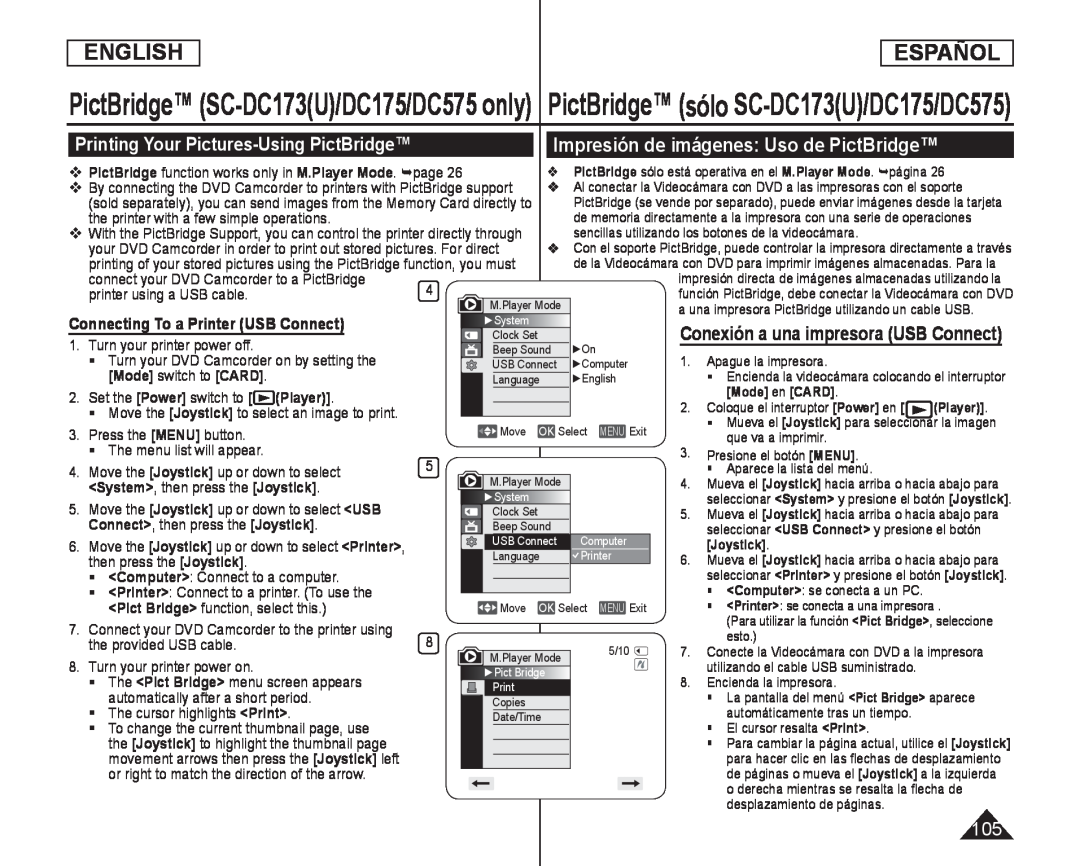 Printing Your Pictures-UsingPictBridge™
Impresión de imágenes: Uso de PictBridge™
Connecting To a Printer (USB Connect)
Conexión a una impresora (USB Connect)
 Setting the Number of Prints
Setting the Date/Time Imprint Option
Printing Images
Canceling the Printing
Ajuste del número de copias
Ajuste de la opción Date/Time Imprint
Impresión de imágenes
Cancelación de la impresión
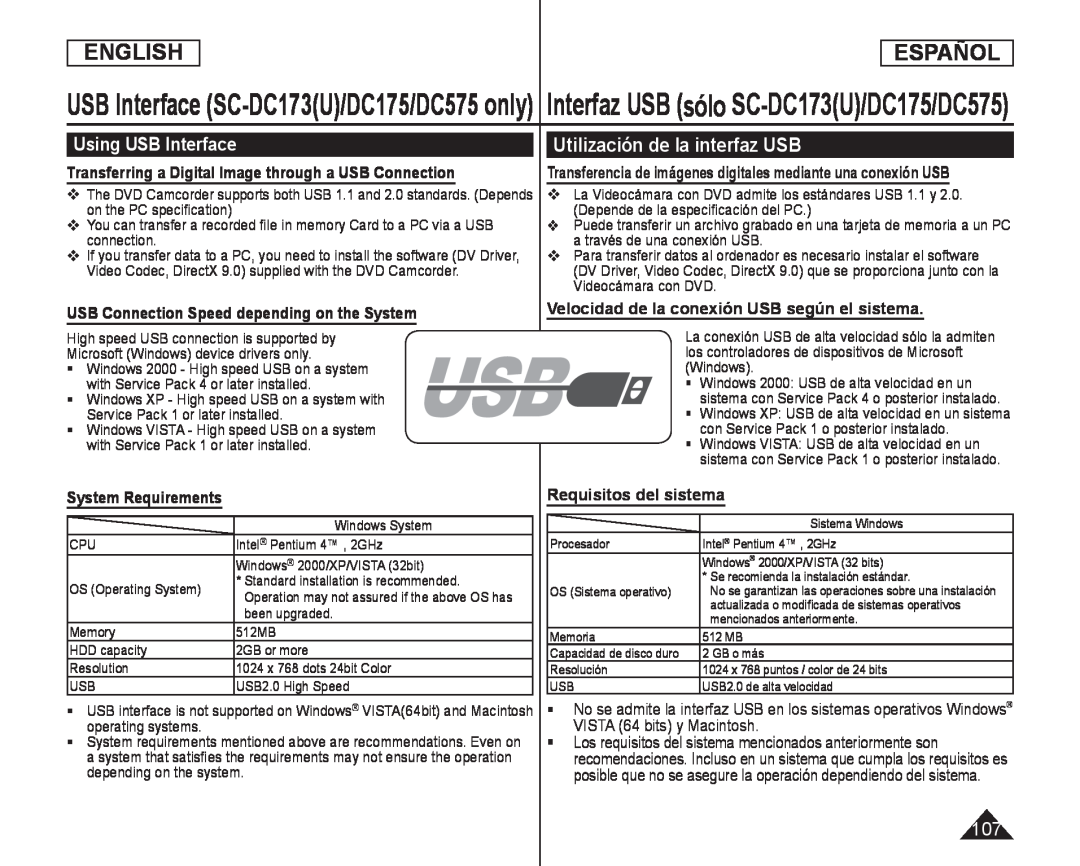 Using USB Interface
Transferring a Digital Image through a USB Connection
Utilización de la interfaz USB
Transferencia de imágenes digitales mediante una conexión USB
USB Connection Speed depending on the System
Velocidad de la conexión USB según el sistema
System Requirements
Requisitos del sistema
No se admite la interfaz USB en los sistemas operativos Windows
 Intel
IntelWindows® es una marca registrada de Microsoft® Corporation
El resto de marcas y nombres pertenecen a sus respectivos propietarios
USB Streaming requiere Video Codec, DV Driver y DirectX
![La función USB Connect sólo está operativa en el M.Player Mode. página 1.Coloque el interruptor [Modo] en [CARD]](/images/prints/7795/109.1080.webp) Selecting the USB Device (USB Connect)
Selecting the USB Device (USB Connect)Selección del dispositivo USB (USB Connect)
La función USB Connect sólo está operativa en el M.Player Mode. página
1.Coloque el interruptor [Modo] en [CARD]
[Modo]
Puede seleccionar
<Computer
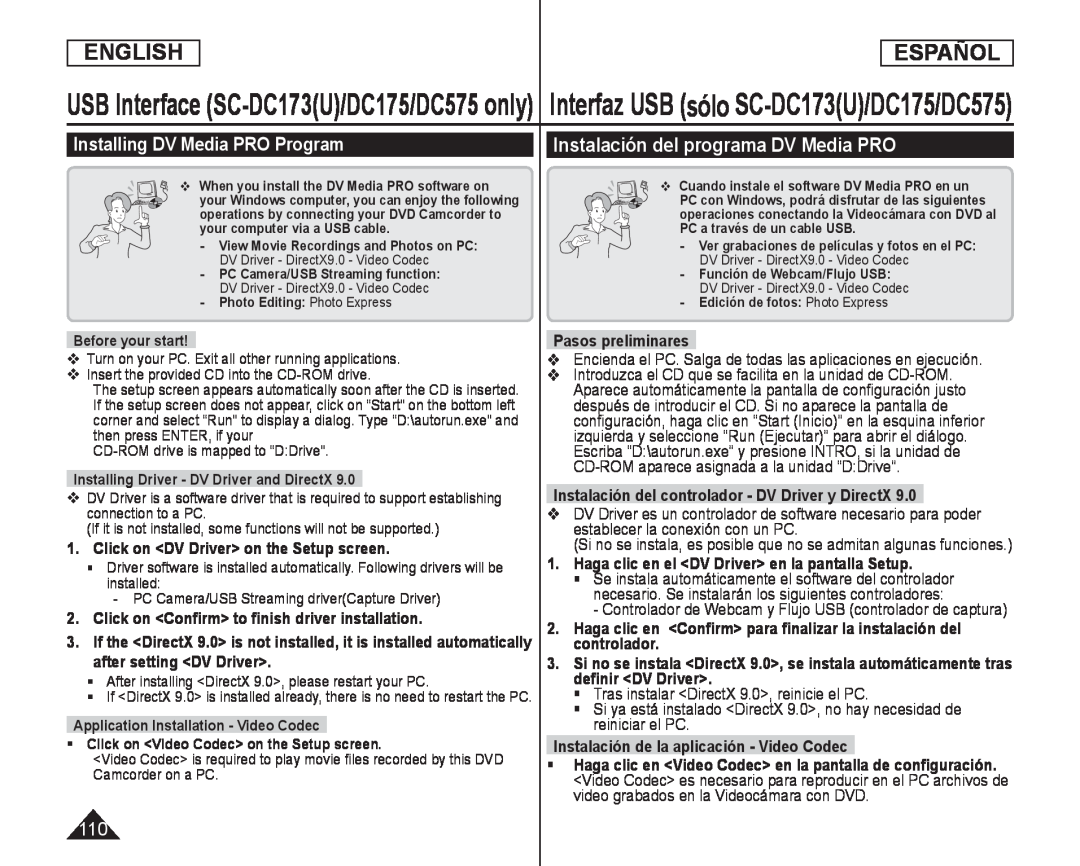 Installing DV Media PRO Program
Instalación del programa DV Media PRO
1.Click on <DV Driver> on the Setup screen
2.Click on <Confirm> to finish driver installation
Pasos preliminares
Encienda el PC. Salga de todas las aplicaciones en ejecución
Instalación del controlador - DV Driver y DirectX
(Si no se instala, es posible que no se admitan algunas funciones.)
1.Haga clic en el <DV Driver> en la pantalla Setup
- Controlador de Webcam y Flujo USB (controlador de captura)
2.Haga clic en <Confirm> para finalizar la instalación del controlador
Tras instalar <DirectX 9.0>, reinicie el PC
Si ya está instalado <DirectX 9.0>, no hay necesidad de reiniciar el PC
Instalación de la aplicación - Video Codec
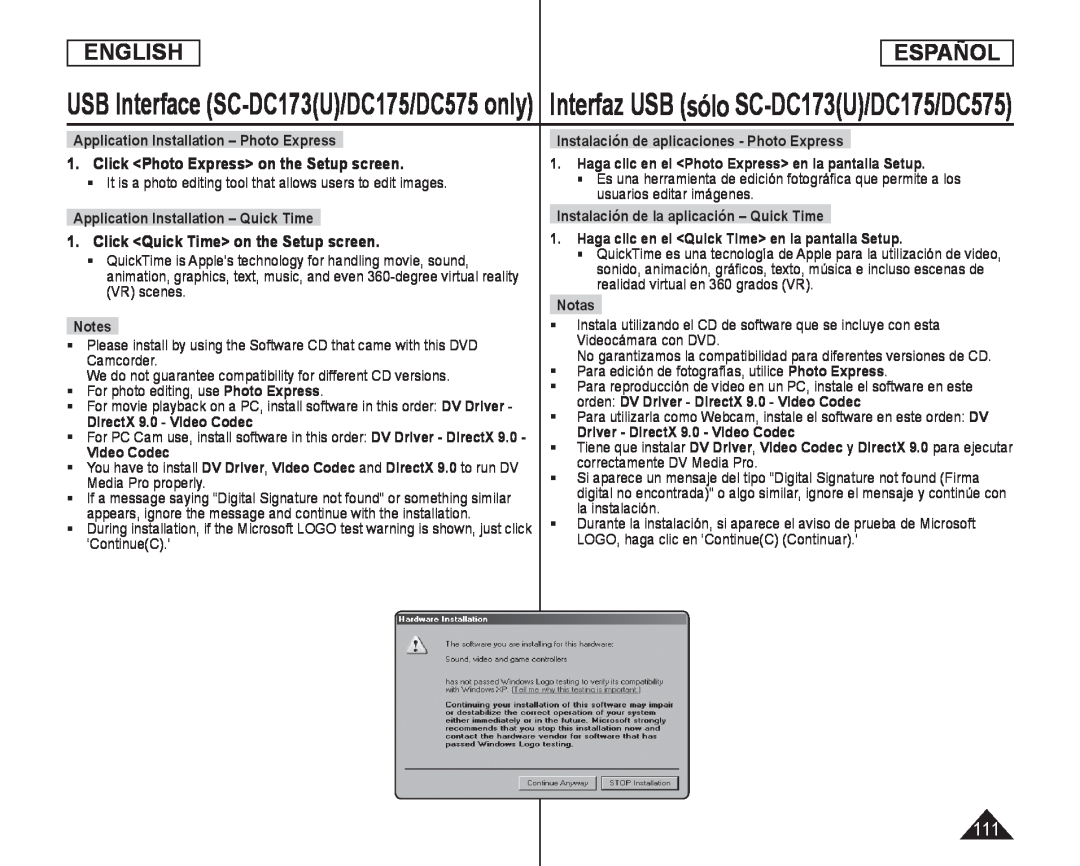 1.Click <Photo Express> on the Setup screen
1.Click <Quick Time> on the Setup screen
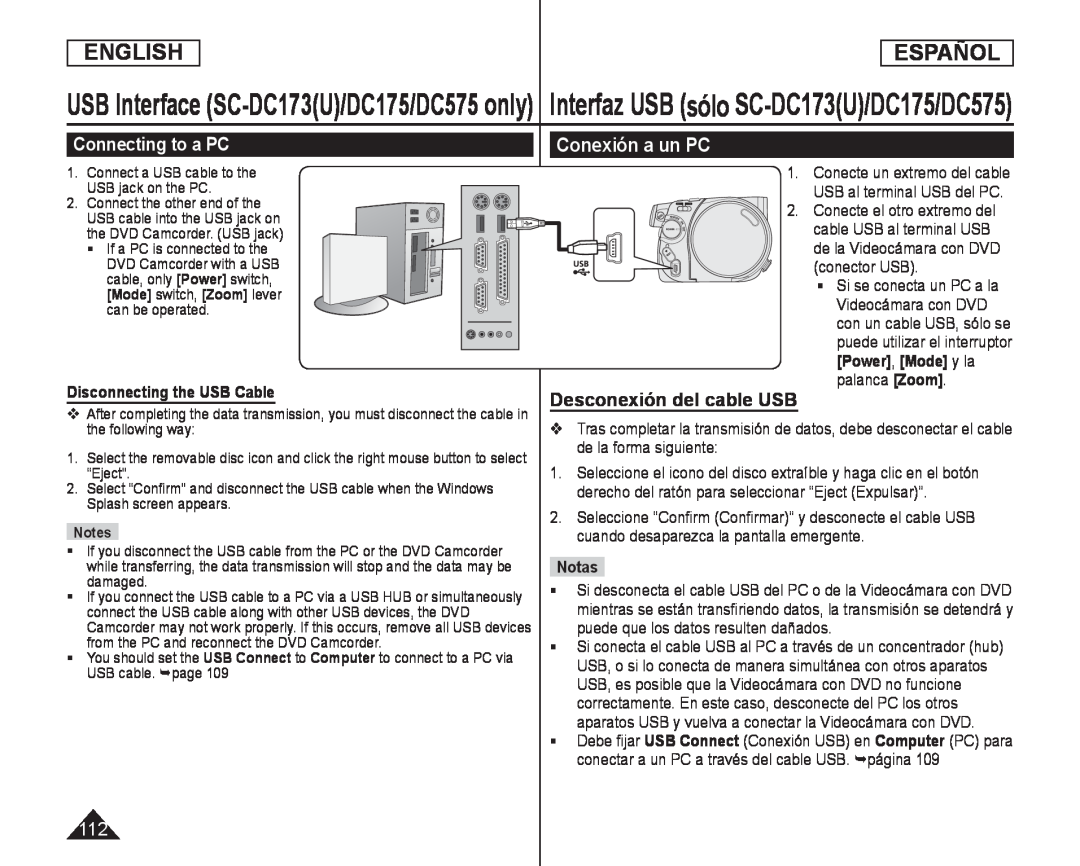 Connecting to a PC
Disconnecting the USB Cable
Conexión a un PC
1. Conecte un extremo del cable USB al terminal USB del PC
Desconexión del cable USB
Debe fijar
Computer
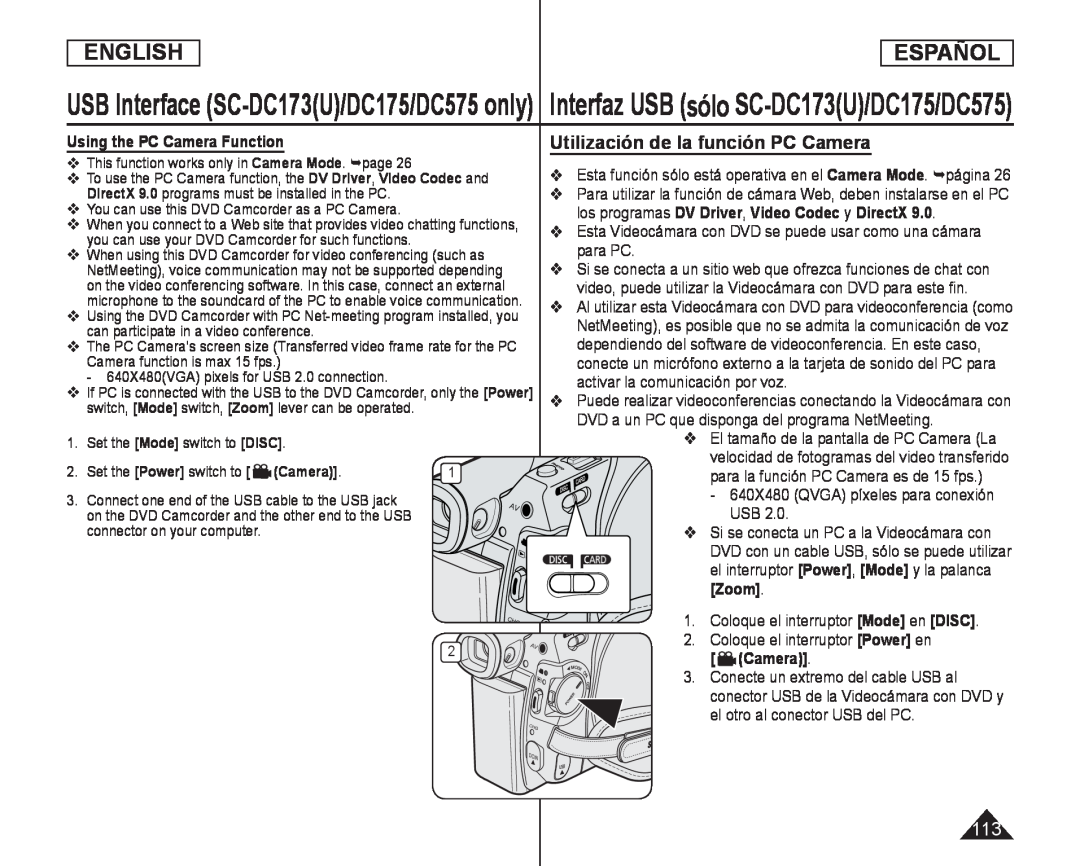 Using the PC Camera Function
Utilización de la función PC Camera
Esta función sólo está operativa en el Camera Mode. página
Para utilizar la función de cámara Web, deben instalarse en el PC los programas
DV Driver
Video Codec
DirectX
Esta Videocámara con DVD se puede usar como una cámara para PC
El tamaño de la pantalla de PC Camera (La
- 640X480 (QVGA) píxeles para conexión USB
2. Coloque el interruptor [Power] en [ (Camera)]
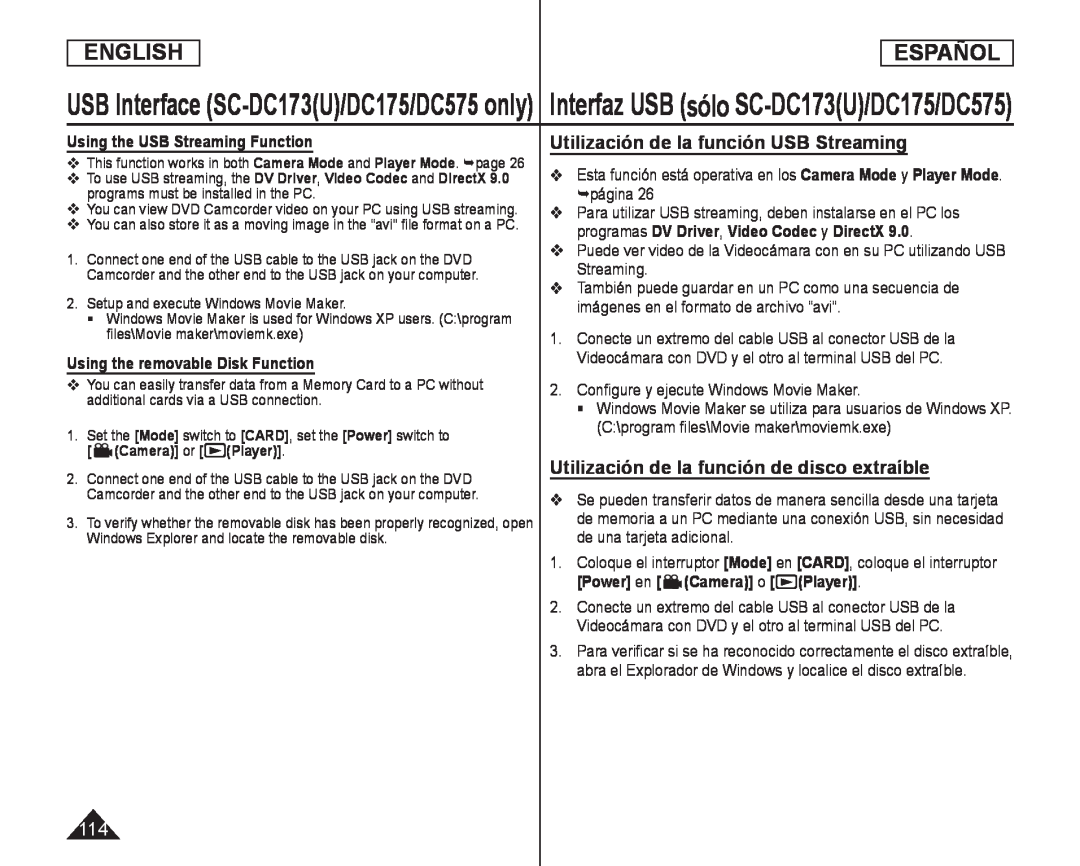 Using the USB Streaming Function
Using the removable Disk Function
Utilización de la función USB Streaming
Esta función está operativa en los Camera Mode y Player Mode. página
Puede ver video de la Videocámara con en su PC utilizando USB Streaming
2.Configure y ejecute Windows Movie Maker
Utilización de la función de disco extraíble
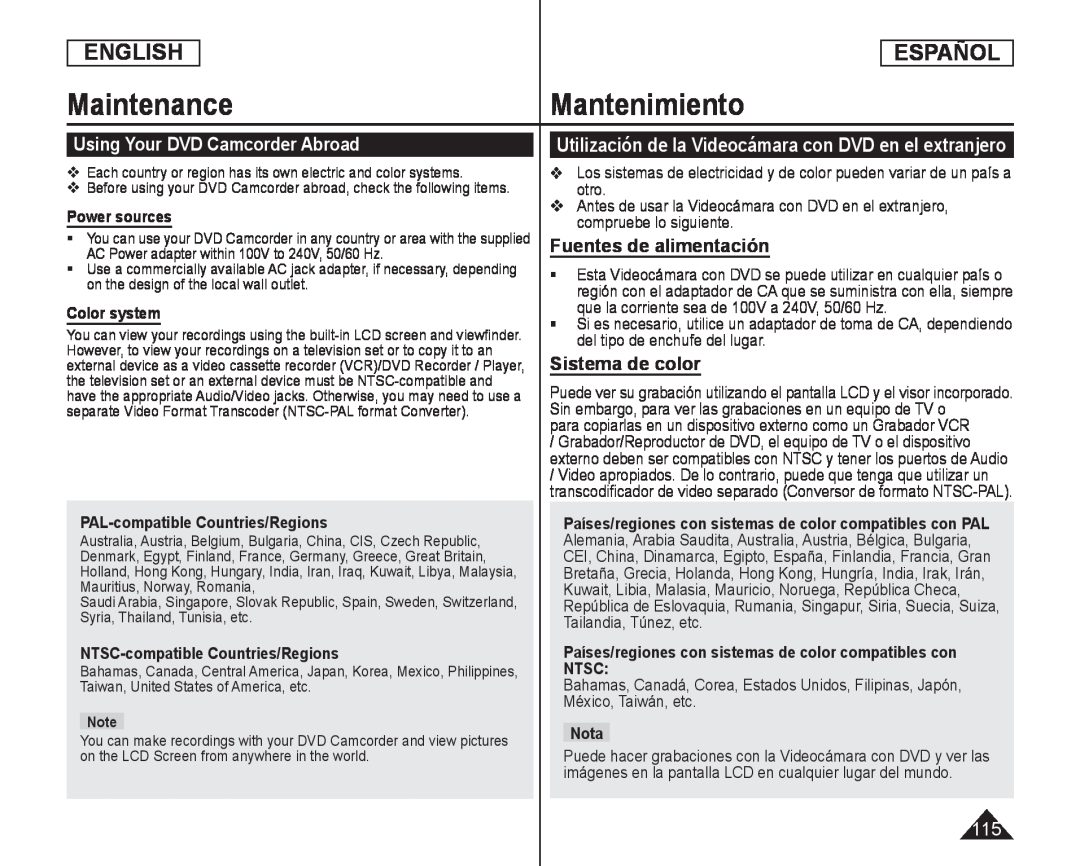 MaintenanceMantenimiento
Using Your DVD Camcorder Abroad
Power sources
Color system
Utilización de la Videocámara con DVD en el extranjero
Los sistemas de electricidad y de color pueden variar de un país a otro
Antes de usar la Videocámara con DVD en el extranjero, compruebe lo siguiente
Fuentes de alimentación
Sistema de color
PAL-compatibleCountries/Regions
NTSC-compatibleCountries/Regions
Países/regiones con sistemas de color compatibles con NTSC:
Bahamas, Canadá, Corea, Estados Unidos, Filipinas, Japón, México, Taiwán, etc
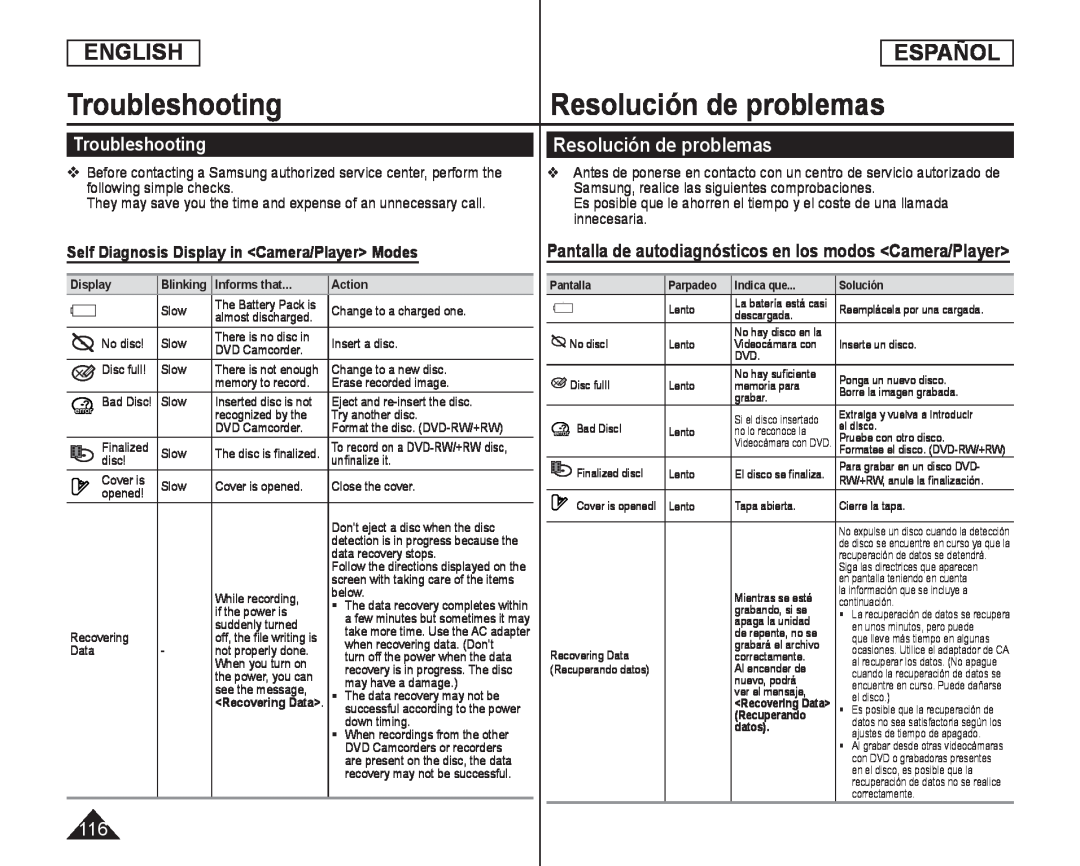 Troubleshooting
Resolución de problemas
Troubleshooting
Self Diagnosis Display in <Camera/Player> Modes
Pantalla de autodiagnósticos en los modos <Camera/Player
 Resolución de problemas
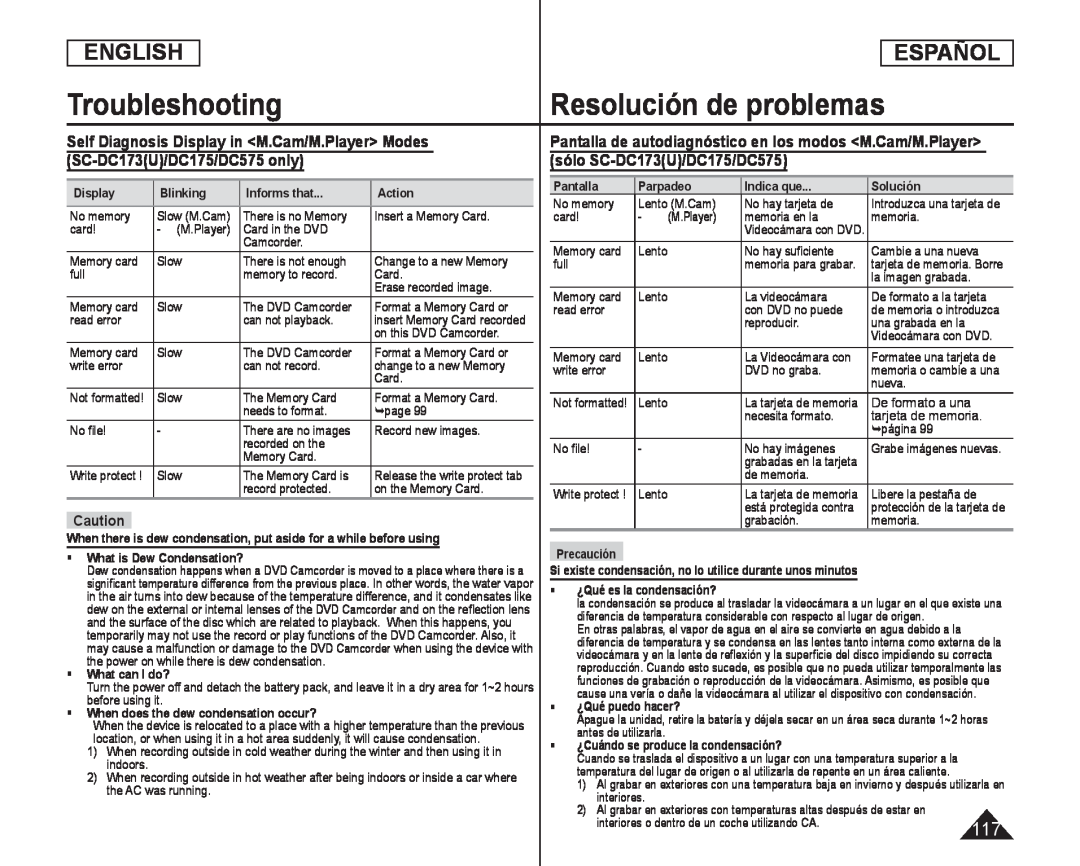
Self Diagnosis Display in <M.Cam/M.Player> Modes (SC-DC173(U)/DC175/DC575only)
 ENGLISH
ESPAÑOL
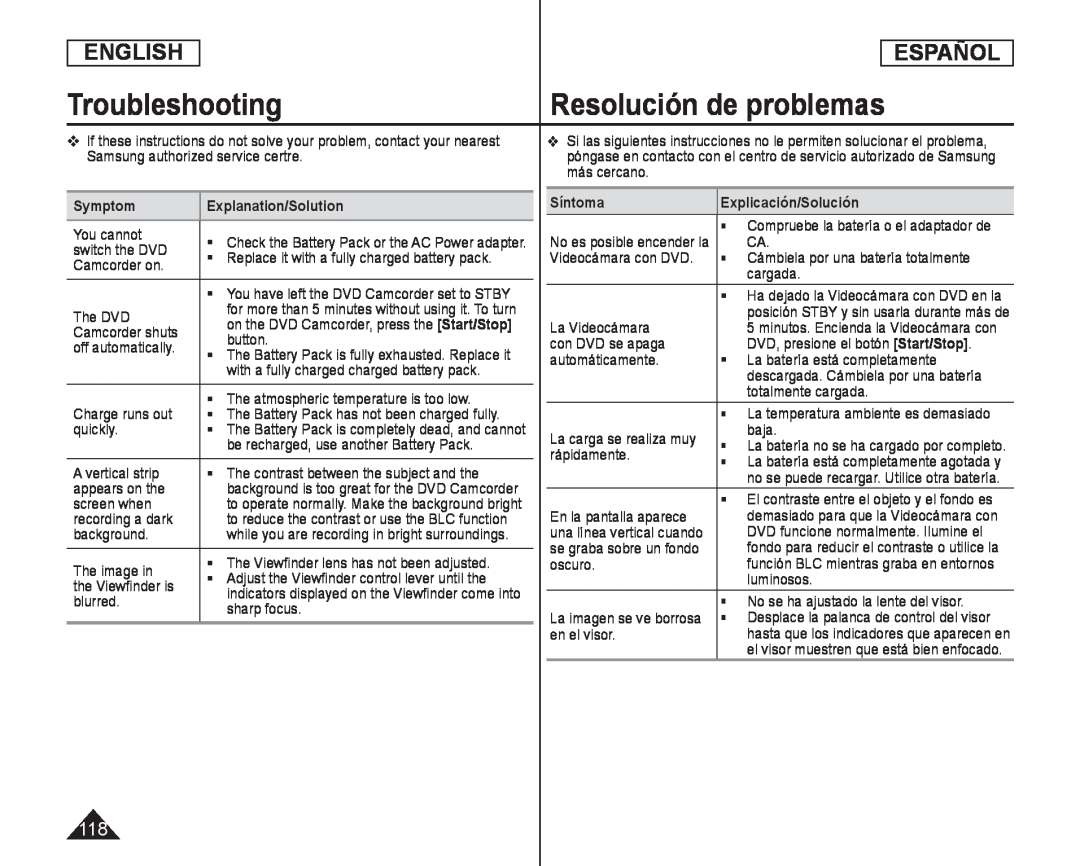
Troubleshooting
Resolución de problemas
Symptom
Explanation/Solution
You cannot
switch the DVD
Replace it with a fully charged battery pack
Camcorder on
The DVD
Camcorder shuts
button
off automatically
with a fully charged charged battery pack
Charge runs out
The atmospheric temperature is too low
quickly
be recharged, use another Battery Pack
A vertical strip
The contrast between the subject and the
appears on the
screen when
recording a dark
background
The image in
The Viewfinder lens has not been adjusted
Adjust the Viewfinder control lever until the
the Viewfinder is
blurred
sharp focus
Síntoma
Explicación/Solución
CA
Videocámara con DVD
Cámbiela por una batería totalmente
cargada
La Videocámara
con DVD se apaga
DVD, presione el botón [Start/Stop]
[Start/Stop]
automáticamente
La batería está completamente
descargada. Cámbiela por una batería
totalmente cargada
La carga se realiza muy
baja
rápidamente
En la pantalla aparece
se graba sobre un fondo
oscuro
luminosos
No se ha ajustado la lente del visor
en el visor
 ENGLISH
ESPAÑOL
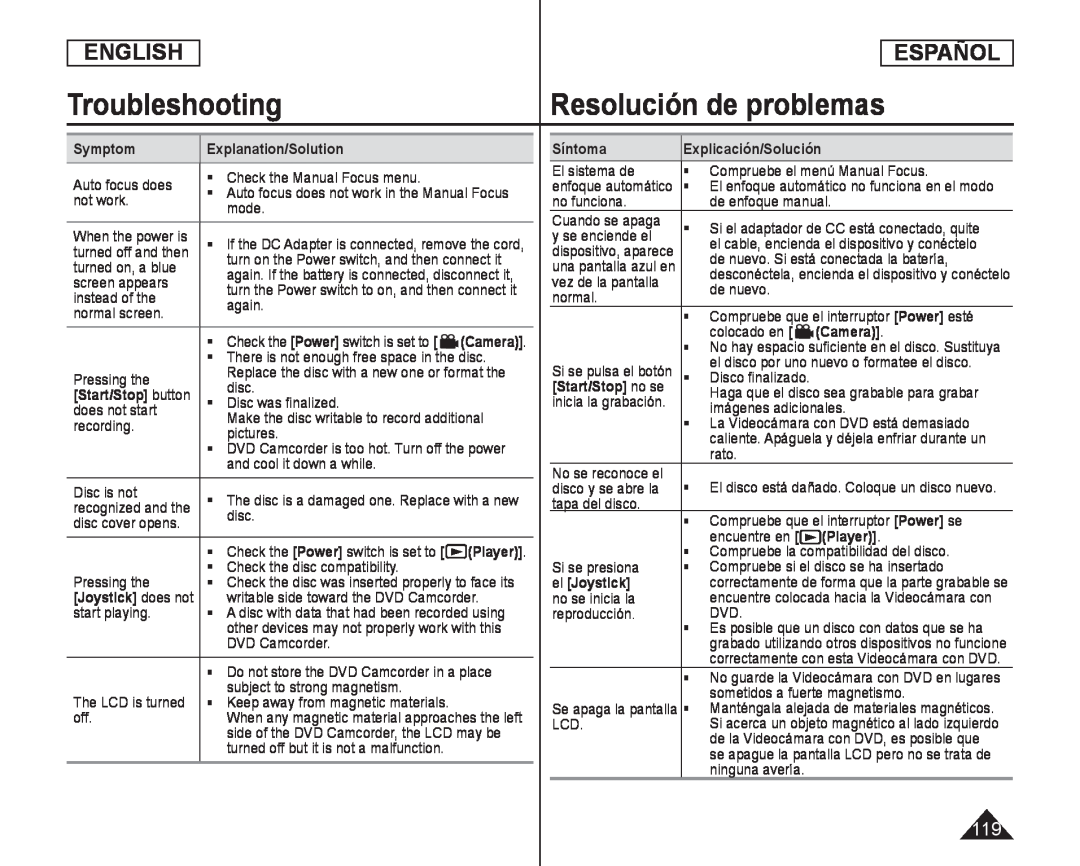
Troubleshooting
Resolución de problemas
Symptom
Explanation/Solution
Auto focus does
Check the Manual Focus menu
not work
mode
When the power is
turned on, a blue
screen appears
instead of the
again
normal screen
[Power]
(Camera)]
There is not enough free space in the disc
Pressing the
disc
[Start/Stop] button
Disc was finalized
does not start
Make the disc writable to record additional
recording
pictures
and cool it down a while
Disc is not
disc cover opens
disc
[Power]
(Player)]
Pressing the
Check the disc compatibility
[Joystick] does not
writable side toward the DVD Camcorder
start playing
other devices may not properly work with this
DVD Camcorder
Do not store the DVD Camcorder in a place
The LCD is turned
subject to strong magnetism
off
Síntoma
Explicación/Solución
El sistema de
Compruebe el menú Manual Focus
no funciona
de enfoque manual
Cuando se apaga
y se enciende el
de nuevo. Si está conectada la batería
vez de la pantalla
de nuevo
normal
Compruebe que el interruptor [Power] esté
[Power]
colocado en
(Camera)]
el disco por uno nuevo o formatee el disco
[Start/Stop] no se
imágenes adicionales
La Videocámara con DVD está demasiado
rato
No se reconoce el
disco y se abre la
tapa del disco
Compruebe que el interruptor [Power] se
[Power]
encuentre en
(Player)]
Compruebe la compatibilidad del disco
Si se presiona
Compruebe si el disco se ha insertado
el [Joystick]
no se inicia la
reproducción
DVD
sometidos a fuerte magnetismo
LCD
 ENGLISH
ESPAÑOL
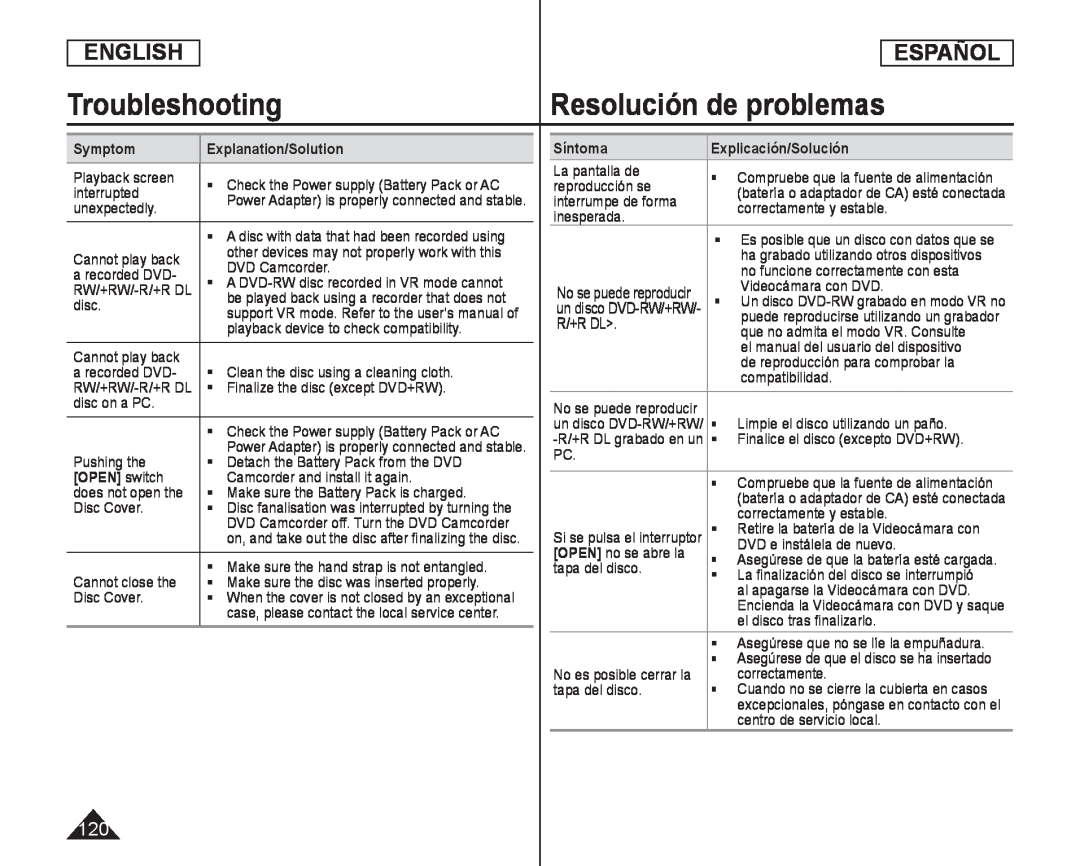
Troubleshooting
Resolución de problemas
Symptom
Explanation/Solution
Playback screen
Check the Power supply (Battery Pack or AC
interrupted
unexpectedly
Cannot play back
other devices may not properly work with this
DVD Camcorder
a recorded DVD
RW/+RW/-R/+RDL
disc
playback device to check compatibility
Cannot play back
Clean the disc using a cleaning cloth
a recorded DVD
RW/+RW/-R/+RDL
Finalize the disc (except DVD+RW)
disc on a PC
Check the Power supply (Battery Pack or AC
Pushing the
Detach the Battery Pack from the DVD
[OPEN] switch
Camcorder and install it again
does not open the
Make sure the Battery Pack is charged
Disc Cover
Cannot close the
Make sure the hand strap is not entangled
Make sure the disc was inserted properly
Disc Cover
Síntoma
Explicación/Solución
La pantalla de
reproducción se
interrumpe de forma
correctamente y estable
inesperada
no funcione correctamente con esta
Videocámara con DVD
R/+R DL
que no admita el modo VR. Consulte
el manual del usuario del dispositivo
de reproducción para comprobar la
compatibilidad
Limpie el disco utilizando un paño
Finalice el disco (excepto DVD+RW)
PC
correctamente y estable
[OPEN] no se abre la
[OPEN]
DVD e instálela de nuevo
tapa del disco
La finalización del disco se interrumpió
al apagarse la Videocámara con DVD
el disco tras finalizarlo
No es posible cerrar la
correctamente
tapa del disco
centro de servicio local
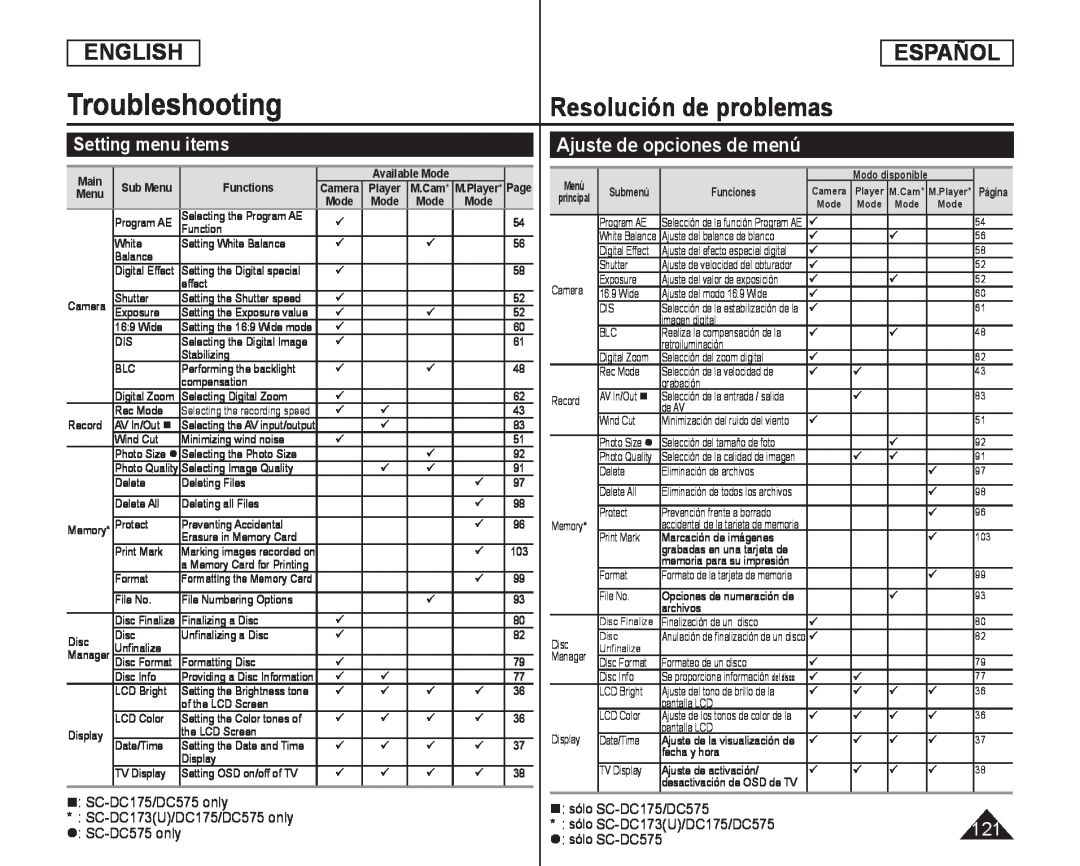 Setting menu items
Ajuste de opciones de menú
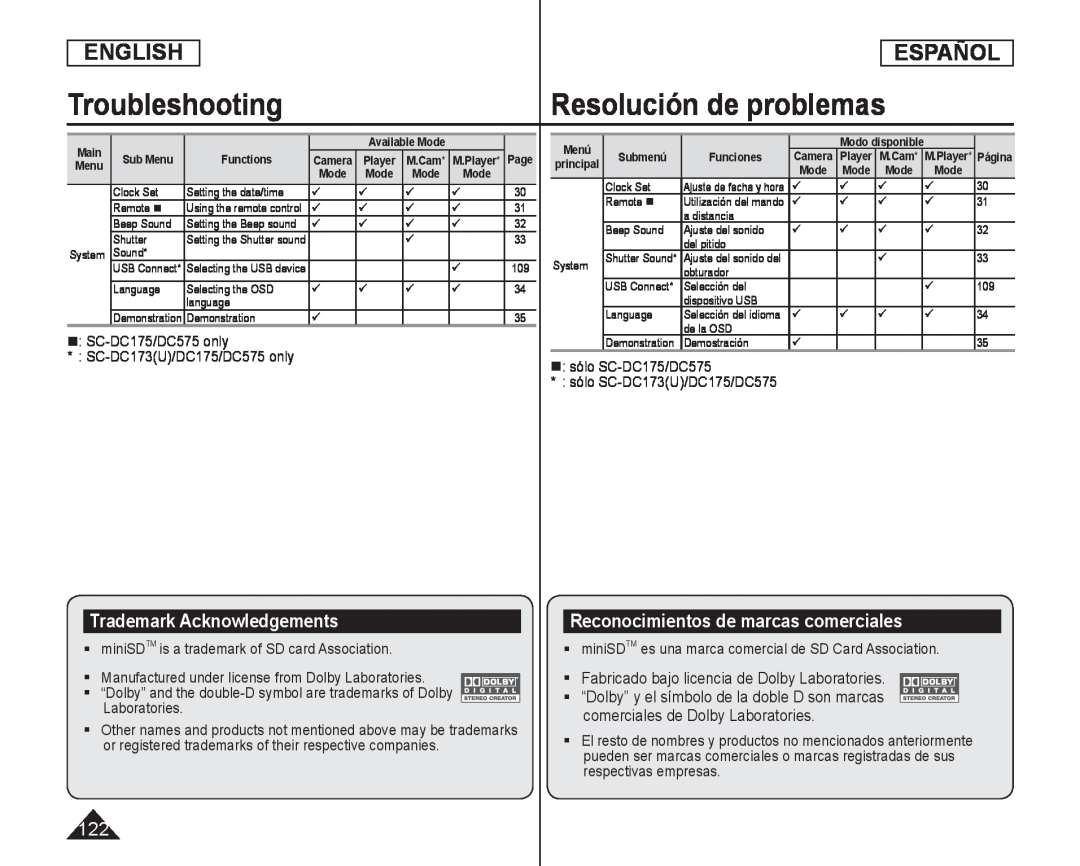 Trademark Acknowledgements
Reconocimientos de marcas comerciales
comerciales de Dolby Laboratories
 Miscellaneous Information
Información diversa
Disc Type Description
Descripción del tipo de disco
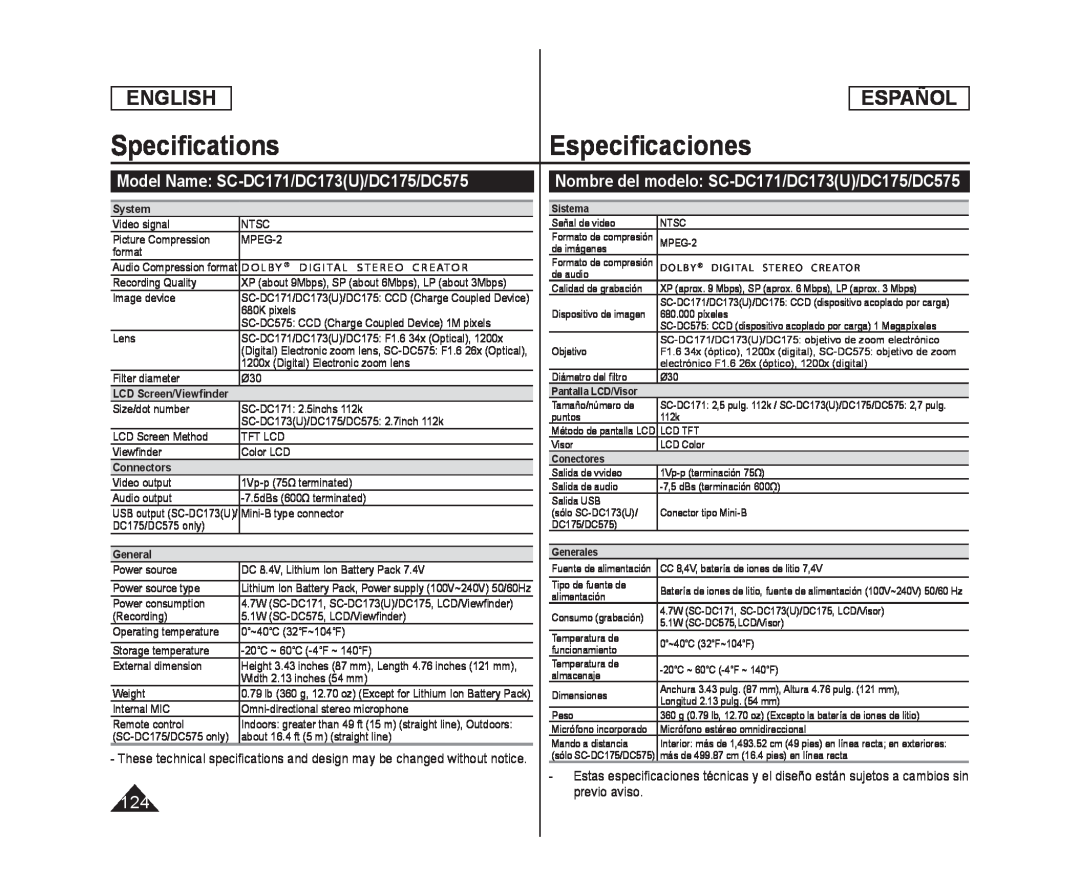 SpecificationsEspecificaciones
Model Name: SC-DC171/DC173(U)/DC175/DC575
Nombre del modelo: SC-DC171/DC173(U)/DC175/DC575
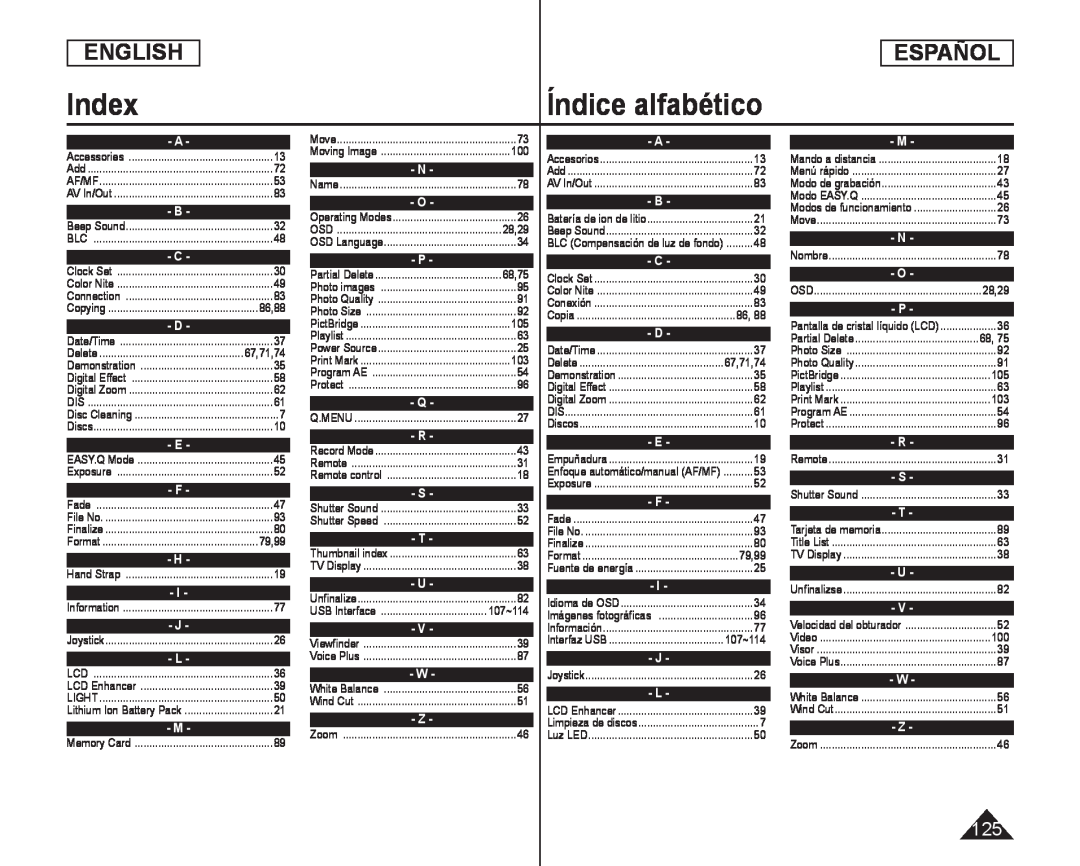 Index
IndexÍndice alfabético

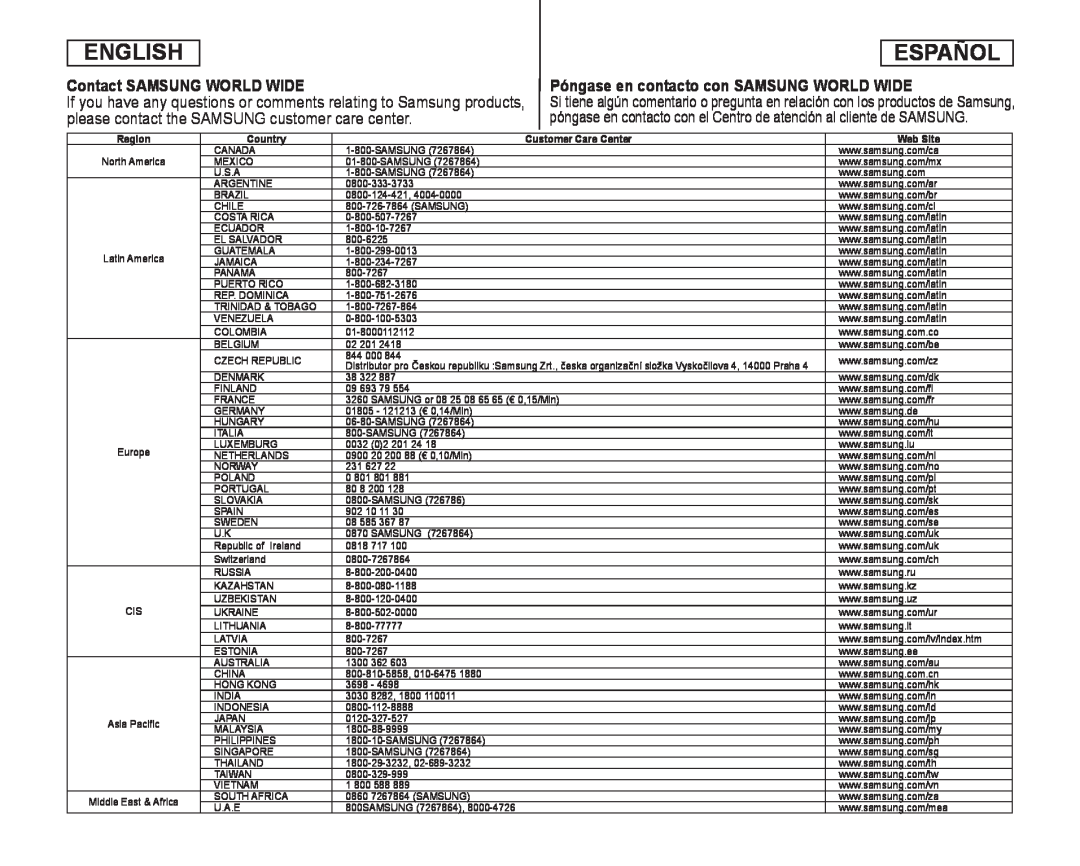 Contact SAMSUNG WORLD WIDE
Póngase en contacto con SAMSUNG WORLD WIDE
 THIS DVD CAMCORDER IS MANUFACTURED BY: CE DVD CAMÉSCOPE EST FABRIQUÉ PAR:
SAMSUNG ELECTRONICS MÉXICO, S.A de C.V
Vía López Portillo No
Col. San Francisco Chilpan Tultitlán, Estado
de México, C.P
RoHS compliant
Normes RoHS